
Best Garage Door Seals & Weatherstripping 2026: The “Daylight Gap Test” (And Why Your Energy Bills Are Suffering)
This post contains affiliate links. We may earn a commission if you purchase through these links.
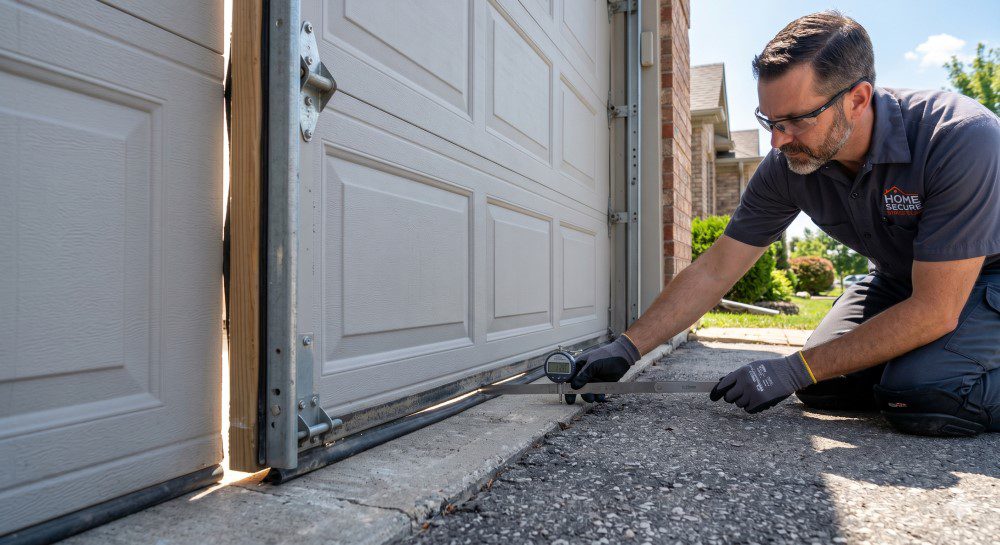
The “Daylight Gap Test”: Stand inside your closed garage on a bright day. Let your eyes adjust for 30 seconds. Now look at all four edges of your garage door. Do you see light? Can you see the driveway through any gap? If yes, you’re heating or cooling the outside world — and paying for it every single month.
The average American household spends $2,200/year on energy. For homes with attached garages, the HVAC system responsible for maintaining the home’s temperature often works against the garage’s thermal leakage. The U.S. Department of Energy estimates that air leaks through doors, windows, and gaps account for 25–40% of heating and cooling energy waste in residential homes.
Your garage door is the largest movable object on your home. And it almost certainly has gaps you’re not sealing.
💡 Garage Door Energy Savings Calculator
See exactly how much money a proper seal and insulation upgrade saves on your energy bill — and how fast it pays for itself.
| Upgrade Selected | Cost | Est. Annual Saving | Payback |
|---|
* Savings estimates based on US Department of Energy research showing 10–30% heating/cooling loss reduction from air sealing improvements. Individual results vary based on climate, home size, HVAC efficiency, and usage patterns. Use as a planning guide, not a guaranteed figure.
The 4 Types of Garage Door Seals (And Where Each One Lives)
Most homeowners know about the bottom seal — the rubber strip at the base of the door. But a complete garage door seal system has four components, each addressing a different gap:
1. Bottom Seal (Door-to-Floor Seal)
Location: The rubber or vinyl strip that attaches to the bottom edge of the garage door panel. Purpose: Seals the gap between the bottom of the door and the garage floor. Signs it needs replacement: You can see daylight under the closed door; leaves, dirt, and insects enter under the door; cold air drafts at floor level.
Types:
- T-style bottom seal: The most common. The T-shaped rubber insert slides into a channel on the door’s bottom rail. Easiest to replace.
- Beaded (bead-style) seal: A round bead on each edge of the rubber strip locks into a U-shaped retainer. More difficult to replace but more durable.
- Bulb-style seal: A round tube of rubber that compresses against the floor. Best for uneven floors.
Installation note: Most bottom seals are designed for flat, level garage floors. If your floor has a significant slope or crown, you need a threshold seal (see below) to compensate.
2. Threshold Seal (Floor-Mounted)
Location: A rubber or vinyl strip that mounts to the garage floor rather than the door. Purpose: Creates an elevated seal surface that the bottom of the door closes against — allows for compensation of uneven floors and creates a positive seal even when the door is slightly out of alignment. Bonus: Also seals against water infiltration (rain runoff, melting snow), which a bottom-seal-only setup cannot do as effectively.
The Garadry threshold seal is the most widely reviewed residential option and consistently outperforms the alternatives in water infiltration testing.
3. Vertical Side Seals (Stop Molding Seals)
Location: Along the vertical edges of the door frame on both sides, where the door meets the wooden door stop molding. Purpose: Seals the gap between the door panels and the door frame sides. Signs it needs replacement: Wind whistling sound when the door is closed; visible light at the door’s side edges; insects entering from the sides.
Types:
- Brush seals: Rows of polypropylene fibers that flex against the door panel. Excellent for irregular gaps and door panels that don’t sit perfectly flush.
- Compression foam tape: Adhesive-backed foam that compresses against the door. Less durable than brush seals (foam compresses permanently over time) but easier to install.
- J-style vinyl seals: Snap-on or nail-on vinyl seals that clip to the existing stop molding and press against the door surface.
4. Top Seal (Header Seal)
Location: Across the top of the door opening, where the door meets the horizontal header frame. Purpose: Seals the gap at the top of the door. Often neglected: Most DIYers replace bottom and side seals but never think about the top. Warm air rises — a gap at the top of the door loses significant conditioned air through convection.
Types:
- Weatherstrip with foam insert: A vinyl holder with a foam or rubber insert that mounts to the header board.
- Brush seal header: For doors that have large or irregular top gaps.
The Daylight Gap Test: A Systematic Inspection
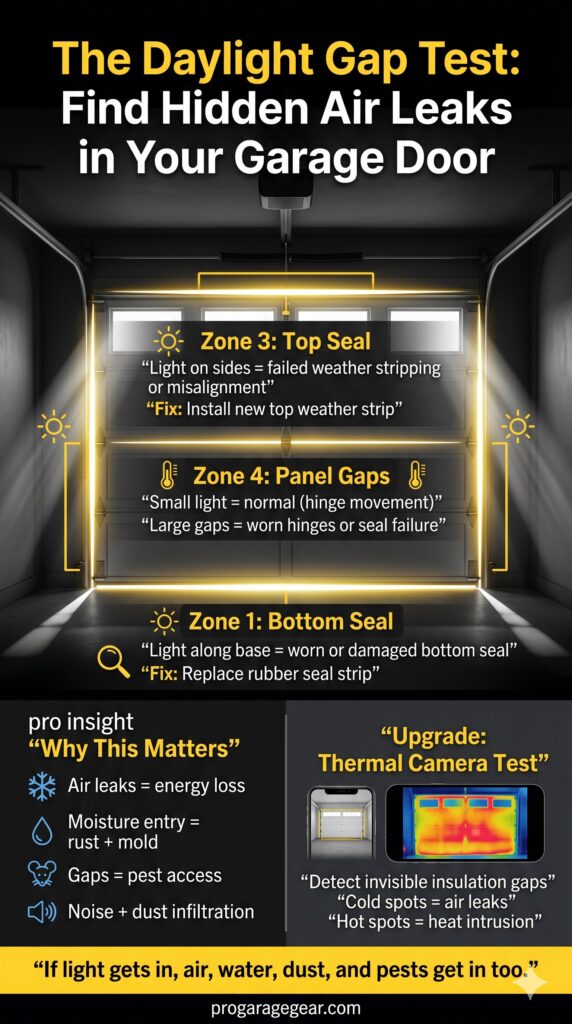
Walk through this inspection on a sunny day with the garage interior as dark as possible:
Bottom: Look along the full width of the door base. Any light = bottom seal replacement needed.
Sides: Look at both vertical edges where the door meets the frame. Light = side seal replacement or door alignment issue.
Top: Look at the full width of the header. Light = top seal replacement.
Between panels: For multi-panel doors, look at the horizontal gaps between panels. Some light is normal (panels hinge), but significant daylight means the panel seals or hinges may need attention.
The thermal camera upgrade: If you want to go beyond the visual test, a thermal camera attachment for your smartphone ($200–$400, compatible with most iPhone and Android models) shows temperature gradients across your door in real time. Gaps and areas of poor insulation show as dramatic color differences. It’s an invaluable tool for garage energy auditing.
Beyond Seals: Door Insulation
A complete door seal system stops air infiltration. But if your door panels themselves have no insulation value, you’re still losing heat through the panels themselves via conduction.
Door R-Value Reality Check:
- Uninsulated steel door: R-0 to R-2
- Single-layer foam-insulated door: R-6 to R-9
- Premium polyurethane-core door: R-16 to R-18
For non-insulated doors: A garage door insulation kit ($40–$80) adds R-6 to R-8 of insulation to the door panels in 2–3 hours. Combined with a complete seal replacement, this can reduce heating energy loss through the door by 70% or more.
For a deep dive on door insulation kits including the best brands and installation tips, see our Best Garage Door Insulation Kits guide.
2026 Rankings: Best Garage Door Seals
🥇 Best Bottom Seal — Pemko 18060 Garage Door Bottom Seal
Type: T-style replacement seal (fits standard bottom retainer) Width: Fits up to 18 ft. wide doors Material: EPDM rubber (superior UV and temperature resistance vs. vinyl) Why it wins: EPDM maintains flexibility in temperatures down to -40°F. Vinyl seals become brittle and crack in cold climates. For garages in any climate that sees freezing temperatures, EPDM is the correct material. The Pemko seal is the specification-grade choice used by commercial door installers.
🛒 Check Price on Amazon →🥇 Best Threshold Seal — Garadry 3/4″ Height Garage Door Threshold
Type: Floor-mounted threshold Seal Height: 3/4″ (available in 1″ for larger gaps) Material: EPDM rubber with aluminum retainer Width: Available up to 18 ft. Why it wins: The Garadry threshold is the definitive solution for water infiltration. It mounts to the floor with adhesive (supplied) and sits against the bottom of the closed door. Rain runoff and snowmelt literally cannot get past it. For garages in areas with frequent rain or snow, this is the single best improvement you can make to your door sealing system.
Installation note: The floor must be clean and completely dry before applying the adhesive. Allow 24 hours before driving over the threshold. Clean the floor with isopropyl alcohol before adhesive application for maximum bond.

🥇 Best Side Seal — M-D Building Products Nail-On Vinyl Door Stop
Type: J-style vinyl with foam insert, nail-on Why it wins: The simplest, most foolproof side seal installation. The vinyl profile nails to the existing stop molding and its J-lip presses firmly against the door panel. Works even if the door isn’t perfectly flush with the frame, which is common on older doors that have shifted over time.
🛒 Check Price on Amazon →🥇 Best Top Seal — Pemko 18068 Garage Door Top Weatherstrip
Type: Header-mount, aluminum retainer with rubber wiper Why it wins: The aluminum retainer holds the rubber wiper firmly against the door panel without sagging over time — a problem with adhesive-mounted foam top seals. The rubber wiper flexes to accommodate the slight outward panel bow that most doors develop after years of use.
🛒 Check Price on Amazon →DIY Installation: What You Need
Tools required:
- Utility knife and straight edge (for cutting seals to length)
- Cordless drill with appropriate bits
- Staple gun (for bottom seal replacement, if using staple-attach style)
- Caulk gun and silicone caulk (for sealing around the door frame exterior)
- Tape measure
The complete seal replacement: Plan for 2–4 hours for a full four-side seal replacement on a standard double garage door. Work top-to-bottom: header seal first, side seals next, bottom seal last. This ensures clean material overlaps at the corners.
The “paint the door frame” bonus: While you have the side seal hardware removed, this is the best time to repaint or caulk the exterior door frame. Cracked paint and dried caulk on the exterior frame are secondary air infiltration points beyond the door seals themselves.
⚙️ The Opener Calibration Guide: What to Do After Installing a Heavy EPDM Seal
Here’s the post-installation problem nobody warns you about: you install a quality EPDM bottom seal (significantly heavier and stiffer than the original vinyl seal), you press the close button, and your door goes 90% of the way down — then reverses back up. Your garage door opener’s safety system thinks it hit an obstacle.
This happens because modern garage door openers use a “Down Force” sensor — a resistance threshold built into the opener’s logic. When the door encounters more resistance than expected during closing (like compressing a thicker, stiffer seal against the floor), the opener interprets it as hitting a person or object and automatically reverses. This is a safety feature. But it means after every seal change, your opener needs recalibration.
This affects: All major opener brands including LiftMaster, Chamberlain, Genie, Craftsman, and Ryobi smart openers.
The Calibration Process:
Step 1 — Identify Your Opener Type
Force adjustment style varies by opener age:
- Older openers (pre-2010): Physical adjustment screws on the motor head, usually labeled “Down Force” and “Up Force” with a flat screwdriver slot
- Newer openers (2010+): Electronic force adjustment via button sequence on the motor unit
- Smart/Wi-Fi openers: Force adjustment via the mobile app (Chamberlain MyQ, LiftMaster Secure View, Genie Aladdin Connect)
Step 2 — The “Resistance Test” (Before You Adjust)
Close the door and observe: Does it reverse at the floor? If yes, proceed. If the door closes fully but strains the motor — still proceed, as motor strain indicates the force is at maximum and the opener is doing more work than designed.
Step 3 — Adjust the Down Force
For screw-adjustment openers: Locate the “Down Force” (sometimes labeled “Close Force”) adjustment screw on the motor unit — usually a white or red plastic screw on the side or back of the motor head.
- Turn clockwise in 1/4-turn increments (increases force)
- After each 1/4-turn, run the door through a complete close cycle
- Stop when the door closes fully without reversing
- Do not exceed 3 full turns total from the original setting. If you’ve turned more than 3 full turns without resolving the issue, the problem is not opener calibration — it’s the seal being too thick for your opener’s design load, or a track/spring issue.
For electronic-adjustment openers (LiftMaster/Chamberlain example):
- Press and hold the LEARN button on the motor unit until the LED blinks (usually 6 seconds)
- Press and hold the CLOSE button on the wall control until the door closes and the light blinks
- The opener runs an auto-force calibration cycle
- Test by running the door 3 complete cycles
For smart opener apps: Open the app → Settings → Force Adjustment → Increase “Close Force” in 5% increments → Test cycle → Repeat until successful
Step 4 — The Safety Verification Test (Non-Optional)
After any force adjustment, you MUST verify the safety reversal still works:
- Place a 2×4 flat on the floor in the door’s path
- Close the door
- When the door contacts the 2×4, it must reverse within 2 seconds
If the door does not reverse on contact with the 2×4 — stop using the opener immediately and reduce the down force until it does. An opener that doesn’t reverse on obstacle contact is a safety hazard, not just an inconvenience. A garage door can exert 300–800 lbs. of downward force. The reversal system exists to prevent crushing injuries.
The Seal-to-Opener Compatibility Note: If your opener is more than 15 years old and already at maximum force setting, a 3/4″ EPDM seal may be beyond what it can compress reliably. In this case, the threshold seal (floor-mounted, door presses against it rather than compressing the door-mounted seal) is the better solution — it requires less compressive force from the opener.
If your opener is aging, a new smart opener resolves force calibration issues and adds remote monitoring. See our Best Smart Garage Door Openers 2026 guide.
The Energy Math: Is It Worth It?
Cost of a complete seal replacement:
- Bottom seal (EPDM): $25–$50
- Threshold seal: $50–$80
- Side seals: $15–$30
- Top seal: $15–$30
- Total: $105–$190 in materials
Energy savings potential: According to the Insulation Institute, sealing air leaks in a garage-connected home can reduce heating and cooling costs by 10–20%. For the average $2,200/year energy bill, that’s $220–$440 in annual savings — making a full seal replacement one of the fastest-payback home improvement projects available.
Payback period: 3–6 months for the seal material cost.
For complete garage energy efficiency, combine door sealing with a quality heater matched to your space. See our Best Garage Heaters 2026 guide for the right heating solution once your door is properly sealed.
How often should I replace garage door weather seals?
Bottom and threshold seals typically last 5–8 years under normal use. Side and top seals last longer — often 10–15 years if undamaged. Inspect annually. Replace when you see cracking, visible gaps, or compressed-flat foam that no longer bounces back.
My garage door doesn’t close all the way to the floor in one corner — is that a seal problem or a door problem?
Likely a door problem (spring tension or track alignment) rather than a seal problem. A misaligned door creates a gap that no bottom seal can fully compensate for. Have the door tension adjusted first; then install a new bottom seal.
Can I use regular foam weatherstripping tape instead of dedicated garage door seals?
Only for temporary or light-duty use. Standard foam tape compresses permanently within 1–2 seasons of door operation. Purpose-built garage door seals use compression-molded EPDM or vinyl that maintains its shape through thousands of open/close cycles.
Will sealing my garage door make it too airtight for a gas heater?
This is a legitimate safety concern. Combustion gas heaters (propane, natural gas) require makeup air for combustion. A sealed garage without an air source can become oxygen-depleted and produce carbon monoxide. Always follow the heater manufacturer’s ventilation requirements and install a CO detector.
The Bottom Line
The daylight gap test takes 60 seconds to perform. If you see light — do something about it. A complete garage door seal system costs under $200 and pays for itself in under 6 months for most homeowners.
Your energy bill is a direct reflection of how airtight your home’s envelope is. The garage door is the single largest gap in that envelope. Close it.