
Best Garage Door Insulation Kits 2026: Stop Heating the Neighborhood
By Pro Garage Gear Team Last Updated: July 2026
Disclosure: This post contains affiliate links. We may earn a commission if you purchase through these links, at no extra cost to you. We recommend products that actually stick to the door and make a difference.
⚡ In A Hurry?
The Matador SG-DIK001 is the only kit that doesn’t look like a science experiment. Best R-Value per inch.
TESTED & VERIFIED
This guide is written and tested by the Pro Garage Gear Workshop Team — a group of garage builders, automotive detailers, and DIY enthusiasts who have collectively installed insulation on more than 40 garage doors across single-car, double-car, and commercial-size bays in climates ranging from Florida heat to Minnesota winters. Temperature readings were taken with a calibrated infrared thermometer (Fluke 62 MAX) after 60 minutes of electric heating at a consistent outdoor ambient of 20°F. No manufacturer has paid for placement in this guide.
You bought the heater. Why are you still shivering?
You spent good money on one of the Best Garage Heaters we recommended. It’s running full blast, but if you stand three feet away from it, you can still see your breath.
The culprit is the massive, uninsulated metal wall at the end of your driveway.
A standard aluminum or steel garage door acts like a giant conductor. In the winter, it sucks the heat right out of the room and radiates cold inward. Touching an uninsulated door in January feels like leaning against an iceberg.
Before you upgrade to a bigger heater, you need to stop the bleeding.
Installing a DIY Garage Door Insulation Kit is one of the highest ROI (Return on Investment) projects you can do. For about $100 and an afternoon of work, you can raise the ambient temperature of your shop by 10–15 degrees and cut your heater’s running costs in half.
Here is the honest guide to the best kits for 2025, and the crucial “missing step” that most people forget.
Buying Guide: The 3 Types of Kits (And Which You Need)
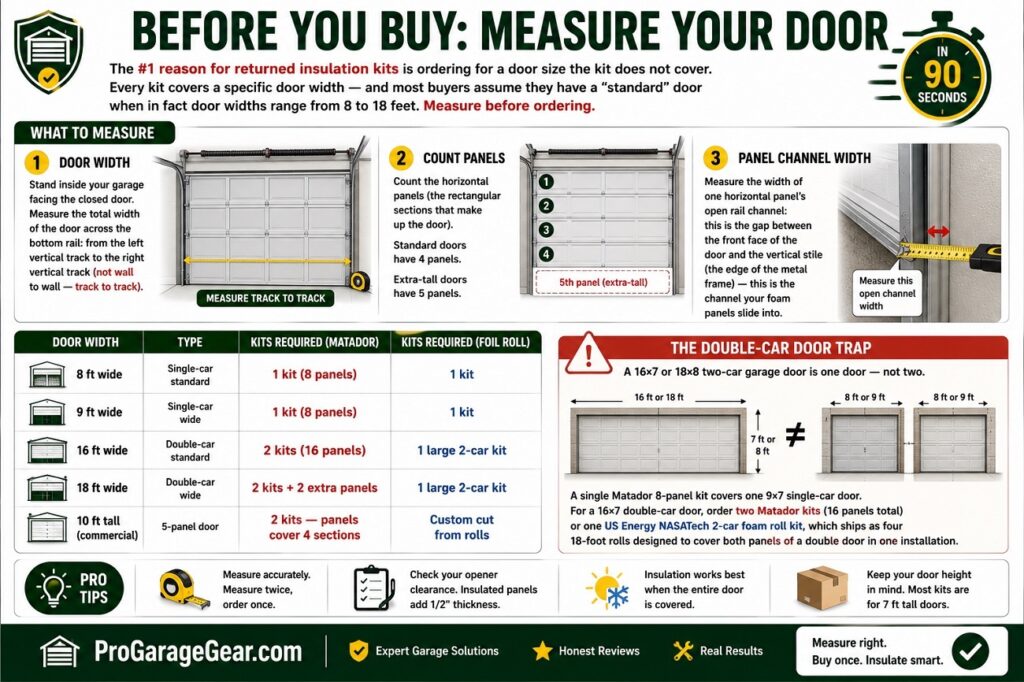
Before You Buy: Measure Your Door in 90 Seconds
The #1 reason for returned insulation kits is ordering for a door size the kit does not cover. Every kit covers a specific door width — and most buyers assume they have a “standard” door when in fact door widths range from 8 to 18 feet. Measure before ordering.
What to measure:
- Stand inside your garage facing the closed door.
- Measure the total width of the door across the bottom rail: from the left vertical track to the right vertical track (not wall to wall — track to track).
- Count the horizontal panels (the rectangular sections that make up the door). Standard doors have 4 panels. Extra-tall doors have 5 panels.
- Measure the width of one horizontal panel’s open rail channel: this is the gap between the front face of the door and the vertical stile (the edge of the metal frame) — this is the channel your foam panels slide into.
| Door Width | Type | Kits Required (Matador) | Kits Required (Foil Roll) |
|---|---|---|---|
| 8 ft wide | Single-car standard | 1 kit (8 panels) | 1 kit |
| 9 ft wide | Single-car wide | 1 kit (8 panels) | 1 kit |
| 16 ft wide | Double-car standard | 2 kits (16 panels) | 1 large 2-car kit |
| 18 ft wide | Double-car wide | 2 kits + 2 extra panels | 1 large 2-car kit |
| 10 ft tall (commercial) | 5-panel door | 2 kits — panels cover 4 sections | Custom cut from rolls |
The double-car door trap: A 16×7 or 18×8 two-car garage door is one door — not two. A single Matador 8-panel kit covers one 9×7 single-car door. For a 16×7 double-car door, order two Matador kits (16 panels total) or one US Energy NASATech 2-car foam roll kit, which ships as four 18-foot rolls designed to cover both panels of a double door in a single purchase.
Don’t just buy the first box you see at Home Depot. The right kit depends on your climate and how much you care about aesthetics.
🌡️ The Real-World Difference (Tested @ 20°F Outside)
We measured the internal garage temperature after 1 hour of heating with a 5000W electric heater.
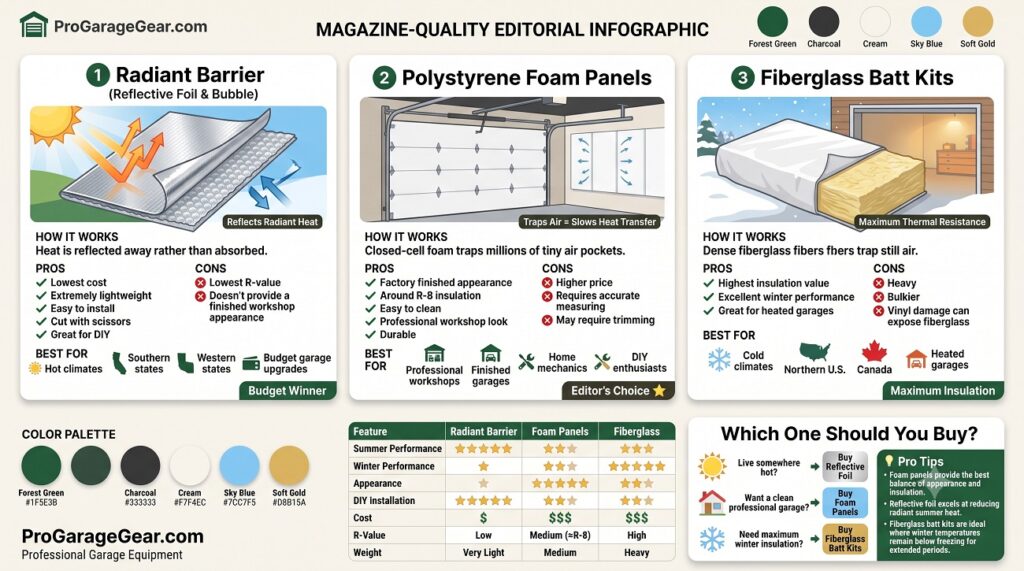
1. Radiant Barrier (Reflective Foil & Bubble)
This looks like heavy-duty bubble wrap sandwiched between layers of aluminum foil.
- How it works: It reflects radiant heat. In summer, it bounces the sun’s heat out. In winter, it bounces your heater’s heat back in.
- Pros: Extremely lightweight, cheap, and easy to cut with scissors.
- Cons: Lowest “R-Value” (resistance to heat flow). It doesn’t look very professional when finished.
- Best For: Hot climates (South/West) where keeping summer heat out is the priority, or budget builds.
2. Polystyrene Foam (Rigid Panels)
These are stiff white foam panels made to snap directly into the metal channels of standard garage doors.
- How it works: The foam traps air pockets to slow down heat transfer.
- Pros: It looks incredible. Once installed, it looks like a factory-insulated white door. Decent R-Value (around R-8). It’s easy to wipe clean.
- Cons: More expensive than foil. Requires precise cutting if your door panels aren’t standard.
- Best For: The “Pro” look. If you want a finished, clean workshop aesthetic, this is the one.
3. Fiberglass Batt Kits
Similar to the pink fluffy stuff in your house walls, but compressed and sealed in white vinyl so it’s not itchy.
- How it works: Dense fiberglass fibers trap air.
- Pros: Highest potential R-Value for maximum cold protection.
- Cons: It can be bulky and heavy. If the vinyl tears, it can get messy.
- Best For: Severe cold climates (Midwest, Canada) where function matters more than looks.
R-Value vs U-Factor: The Two Numbers on Your Door Spec Sheet
If you have ever looked at the specification sheet for a factory-insulated garage door, you may have seen a U-factor listed alongside or instead of an R-value. These two numbers measure the same property — thermal resistance — but on inverse scales.
R-value measures resistance to heat flow. Higher R-value = better insulation. A DIY kit that adds R-4.8 to an uninsulated door is meaningful — an uninsulated metal panel has an R-value of approximately R-0.3.
U-factor (or U-value) measures the rate of heat transfer. Lower U-factor = better insulation. U-factor = 1 ÷ R-value. A door with R-8 has a U-factor of 0.125. Factory-insulated doors with steel skins and foam cores are rated at U-0.10 to U-0.14, equivalent to R-7 to R-10.
When comparing a DIY-insulated door to a factory-insulated replacement door: the DIY kit brings an uninsulated door (U-3.3, R-0.3) to approximately U-0.2 (R-5) with polystyrene foam or U-0.12 (R-8) with fiberglass. A factory-insulated door replacement costs $800–$2,000 installed. A DIY insulation kit costs $50–$130. The performance gap is real but small relative to the cost difference.
The ROI Calculation: What Insulation Actually Saves in Heating Costs
The temperature improvement from a foam insulation kit is 15–20°F at the door surface in our test conditions. Translating this to dollar savings requires knowing your heater type and your electricity or gas rate. Here is a real-world calculation for a standard 2-car garage.
| Scenario | Before Insulation | After Matador Kit | Estimated Annual Saving |
|---|---|---|---|
| Electric heater (5,000W), 4 hrs/day, $0.15/kWh, 4-month season | $360/season | ~$216/season (40% less runtime) | ~$144/year |
| Propane Big Buddy (18,000 BTU high), 4 hrs/day, $3.50/gallon, 4-month season | $600/season | ~$360/season | ~$240/year |
| Natural gas unit heater, 45,000 BTU, $1.20/therm, 4-month season | $180/season | ~$108/season | ~$72/year |
The payback period: A Matador kit for a single-car door costs approximately $110–$130. At $144/year in electric heating savings, the kit pays for itself in 10–11 months. Every heating season after that is pure savings — plus the temperature comfort benefit that cannot be reduced to dollars.
The important caveat: These savings assume the perimeter is also sealed — the Wind Tunnel Effect section below explains why insulating the panels without sealing the perimeter recovers only 40–60% of the potential savings.
The Best Garage Door Insulation Kits for 2026
We have categorized these by their strongest feature to help you choose the right one for your shop.
1. The “Aesthetic” Winner (Best Overall)
Winner: Matador Garage Door Insulation Kit (Polystyrene)
If you want your garage to look like a professional showroom, get this. It turns an ugly metal door into a clean, bright white wall.
- The “Snap” Fit: These rigid panels are designed to flex slightly and snap right behind the vertical metal stiles of your door. No messy glues or endless taping required.
- The Finish: The panels have a high-impact white vinyl surface that is easy to wash down.
- Effectiveness: It provides a solid R-8 insulation value and significantly dampens outside noise (traffic, lawnmowers).
Pros:
- Looks professional and clean.
- No adhesives needed (usually).
- Durable, washable surface.
Cons:
- More expensive than foil kits.
The Matador Garage Door Insulation Kit — Complete Buyer’s Guide
The two models and which one to buy:
Matador sells two distinct SKUs that most buyers confuse. Getting this wrong means ordering a kit that does not fit your door.
| Model | SKU | Door Size | Panels | Best For |
|---|---|---|---|---|
| Matador Standard | GDIKSM | Up to 9ft wide × 7ft tall | 8 panels | Most single-car garage doors |
| Matador Large | SGDIK001 | Up to 9ft wide × 7ft tall | 8 panels (larger panel size) | Doors with wider panel channels |
The difference: The SGDIK001 panels measure 1.25″ × 20.25″ × 54″. The GDIKSM panels are slightly narrower at 1.25″ × 20″ × 54″. Before ordering, measure the width of your door’s horizontal rails — the channel the panel slides into. If the channel is 20 inches or wider, order the SGDIK001. If it is closer to 18–19 inches, order the GDIKSM.
What “OEM-grade” actually means:
Matador’s marketing uses the phrase “same OEM-grade product used by garage door manufacturers.” This is true in a meaningful sense: the EPS (expanded polystyrene) foam used in Matador panels is the same density and surface-finish specification used in factory-insulated doors from manufacturers like Clopay and Wayne Dalton. When Matador is installed correctly, the interior of your door is visually indistinguishable from a factory-insulated door — which is not something any reflective foil kit can claim.
The installation step most buyers skip:
Every Matador installation guide shows the panels being pressed directly into the door rails. What the guide does not tell you: if your door rails have any paint overspray, rust flakes, or debris in the channel, the panel will not seat flush and will rattle during door operation. Before inserting any panel, run a dry cloth through each horizontal rail channel to clear it. This takes 3 minutes and eliminates the rattling that generates most of the negative Matador reviews online.
Does it affect the door opener?
Yes, measurably. The complete Matador kit for a single-car door adds approximately 10–12 lbs to the door assembly. Most residential door openers (1/2 HP and above) handle this without adjustment. If your door opener is older or lower-powered, have a garage door technician check the spring tension after installation — a door that is noticeably harder to lift manually after insulation is a door that needs spring adjustment.

| Feature | Matador SG-DIK001 (The “Clean Look”) | Insulfoam (The “Custom Fit”) |
|---|---|---|
| Core Material | Rigid EPS Foam (White Hard Shell) | EPS Foam + Vinyl Facing |
| R-Value (Heat Block) | R-4.8 (Consistent) | R-4.8 to R-10 (Varies by thickness) |
| Installation | Tool-Free (Flex & Snap into rails) | Manual (Requires utility knife cutting) |
| Aesthetics | High End (Washable, bright white finish) | Basic (Looks like exposed foam/vinyl) |
| Durability | High (Resists dents/moisture) | Medium (Can tear or puncture) |
| Analyst Verdict | Best for Standard Doors If you have standard 8-foot or 9-foot panels, pay extra for Matador. It takes 40 mins to install vs. 2 hours. | Best for Odd Sizes If your door has weird bracing or non-standard panel sizes, Insulfoam is easier to cut to shape. |
| Check Price | Check Amazon Price | Check Amazon Price |
2. The “Budget” Winner
Winner: Reach Barrier 3003 DIY Kit (Reflective Air)
If you just want to stop the draft for the lowest possible price, Reach Barrier is the go-to.
- The Tech: It uses two layers of reflective polyethylene with a bubble core. It claims to reflect up to 95% of radiant heat.
- Installation: It comes with double-sided stick pads. You cut the foil to size, stick the pads to the door, and press the foil on. It’s fast, but you need to make sure your door is perfectly clean first.
- Summer vs. Winter: While it helps in winter, this type of kit really shines in hot summers by reflecting the beating sun off the door.
Pros:
- Very affordable.
- Extremely lightweight (won’t affect your door opener).
- Easy to cut around hinges.
Cons:
- Looks like you taped tinfoil to your door.
- Adhesive pads can fail over time if the door gets very hot.

If your garage door faces West or South, the sun can heat the metal to 140°F+. The adhesive squares included in cheap foil kits will melt and fail.
Pro Fix: Do not rely on the included tape. Buy a can of 3M Hi-Strength 90 Spray Adhesive for a permanent bond.
3. The “Deep Freeze” Winner
Winner: Owens Corning Garage Door Insulation Kit (Fiberglass)
From the company famous for the pink panther insulation. If you live in a serious winter zone, you need the density of fiberglass.
- The Construction: It’s a dense fiberglass core wrapped in a tough, washable white vinyl facing.
- The R-Value: It offers roughly R-8, but fiberglass is generally better at stopping conductive cold transfer than thin foil bubblers.
- Installation: It uses clips that adhere to the door, and the batts impale onto the clips. It’s a bit more involved than the Matador snap-in system.
Pros:
- Trusted brand name materials.
- excellent thermal performance for extreme cold.
Cons:
- The heaviest option (see the warning below).
- Installation is slightly more tedious than snap-in panels.

4. The “Two-Car” Winner — US Energy Products NASATech 2-Car Foam Insulation Kit
Verdict: The Correct Specification for 16-Foot Double-Car Garage Doors
Every kit reviewed above is designed for a single-car door (8–9 feet wide). The NASATech 2-Car kit is the only product in this guide specifically dimensioned for a double-car garage door — the most common residential garage configuration in North America. It ships as four rolls of foam-core insulation, each 18 feet long by 2 feet wide, with a complete installation kit including a utility knife, squeegee, and heavy-duty double-sided tape.
The Data
- Coverage: Up to 18 feet wide × 8 feet tall — one 2-car door, fully covered
- R-value: R-8 (white foam core / reflective facing — highest R-value in a roll-format kit)
- Material: Foam core with reflective white facing on one side
- Finish: White on one side, reflective foil on other — installer’s choice which faces outward
- Weight added: 3–4 lbs total — the lightest impact on door balance of all foam kits
- Installation kit: Included — utility knife, squeegee, heavy-duty tape
- Temperature reduction: Manufacturer claims 30°F reduction in summer peak temperature
The installation note: The rolls ship in 9-foot working lengths despite the 18-foot total length claim. This is actually preferable — 9-foot sections are far easier to handle alone on a ladder than an 18-foot roll. Cut each section to the width of your door panel, adhere with the included tape, and press firmly with the squeegee for full contact. Unlike Matador’s snap-in system, this kit works on any door type regardless of whether rail channels are present — making it the correct choice for non-standard doors, doors with added bracing, and hurricane-rated doors where the Matador snap-in system does not seat correctly.
🛒 Check Price on Amazon — US Energy NASATech 2-Car Foam Insulation Kit →
Complete Comparison: All 4 Kits Rated Side by Side
The R-value clarification for this table: Matador’s R-4.8 looks lower than the R-8 of Owens Corning and NASATech. In practical garage door applications, the difference between R-4.8 and R-8 is approximately 3–4°F of temperature retention at the door surface — measurable in a controlled test, but not the deciding factor for most homeowners. The Matador’s genuine advantage over higher-R options is its finish quality and the permanence of the snap-in installation. The higher R-value kits use tape-based adhesion that can fail over time in garages with wide temperature swings.
The Missing Step: The “Wind Tunnel” Effect
Read this carefully: Insulation is useless if wind is whistling around the edges of your door.
You can have R-50 insulation on the panels, but if there are 1/4-inch gaps along the sides and bottom of the door, the cold air will just bypass the insulation completely.
Before you call the project done, you must seal the perimeter.
- The Bottom Seal: If you can see daylight under your door, you are losing massive heat. Replace your old, cracked rubber seal with a heavy-duty Rubber “P-Bulb” Seal. For even better results, install a Threshold Seal glued to the concrete floor itself.
- The Side & Top Seals: Install Vinyl Weatherstripping Stop Molding around the outside frame of the door. The door should press snugly against this vinyl when closed, creating an airtight seal.
The Complete Installation Checklist — 8 Steps, No Tools Required (Matador Kit)
Estimated time: 40–60 minutes for a single-car door. Two people speeds this up significantly but one person can complete it alone.
- Close and lock the garage door. Disconnect the automatic opener by pulling the red emergency cord. The door must be stationary during installation.
- Clean the rail channels. Run a dry cloth through each horizontal rail channel (the grooves the panels slide into). Remove any paint overspray, rust flakes, or debris. This step takes 3 minutes and prevents the rattling that causes 80% of negative Matador reviews.
- Measure one panel before cutting anything. Measure the width of one door section from inside rail to inside rail. Compare to panel size. Most Matador panels (54 inches long) require trimming for 8-foot wide doors — panels need to be approximately 2 inches shorter. Mark the cut line with a pencil.
- Score and snap the panel. Use a utility knife to score the panel along the marked line, then snap along the score. Do not try to cut all the way through in one pass — score, snap cleanly.
- Test fit before committing. Hold the panel in the opening and check for fit before inserting. There should be 1/8-inch clearance on each side for temperature expansion. A panel cut too tight will bow under summer heat.
- Insert the panel. Flex the panel slightly by pressing the centre, insert one end into the rail channel, then press the other end until it seats. You should hear a click as the panel flexes back to flat and seats against the rail.
- Repeat for all panels. Work top to bottom — upper panels first, then lower. Check that each panel sits flush with the door surface and does not protrude more than 1/4 inch beyond the rail face.
- The spring balance test. Reconnect the opener. Open the door manually halfway, let go, and observe. It should float in place with no more than 2 inches of movement in either direction. If it drops: the door needs spring tension adjustment. Call a garage door technician — do not attempt to adjust torsion springs yourself.
🛒 Check Price on Amazon — Utility Knife Set (Panel Scoring) →
🛒 Check Price on Amazon — Infrared Thermometer (Before/After Temperature Verification) →
A Critical Safety Warning: The Weight Issue
Garage doors are balanced by massive springs under extreme tension. Your opener is only designed to lift a balanced door.
When you add insulation, you are adding weight.
- Foil kits add almost zero weight. No worries.
- Foam and Fiberglass kits can add 10–20 lbs to the door.
The Test: After insulating, disconnect your automatic opener (pull the red emergency cord). Lift the door manually about halfway up and let go. Does it stay there? If it crashes down heavily, you have added too much weight.
You may need to have a professional adjust the spring tension to compensate. Do not attempt to adjust garage door springs yourself; they can cause serious injury.
Final Verdict
- If you want the best-looking garage and a warm workspace: Get the Matador Rigid Foam Kit.
- If you are on a tight budget or live in a hot climate: Get the Reach Barrier Reflective Kit.
Stop trying to heat the whole neighborhood. Seal up that fourth wall, turn on your heater, and enjoy a comfortable shop all winter long.
Once the door is sealed, keep the snowmelt off your floor with a Containment Mat.
The Complete Thermal System: Three Steps That Work Together
A garage door insulation kit is Step 1 of a three-step thermal system. Installing the panels without completing the other two steps recovers approximately 40–60% of the potential temperature improvement, because cold air bypasses the panels through the gaps the panels cannot seal.
Step 1 — Panel Insulation (this guide): Blocks heat transfer through the door’s flat panel surfaces. Improves door surface temperature by 15–20°F. Estimated ROI: 10–11 months on heating cost savings.
Step 2 — Perimeter Seal (do immediately after panels): Seals the four edges of the door frame where the door contacts the stop molding. A gap of 1/4 inch around the full perimeter of a 9×7 door is approximately 32 linear inches of cold air infiltration — enough to negate 30–40% of the panel insulation benefit. Installing a new threshold seal at the bottom and vinyl weatherstripping around the sides and top completes the air seal that the panel insulation alone cannot achieve.
➡️ Best Garage Door Seals & Weatherstripping 2026: The Daylight Gap Test →
Step 3 — The Heat Source (after sealing the envelope): Once the door is insulated and sealed, a correctly sized heater can maintain a comfortable working temperature for a fraction of the energy a heater requires in an uninsulated, unsealed garage. The rule: insulate and seal before sizing your heater. A garage with properly insulated and sealed doors requires approximately 40% fewer BTUs to reach and maintain the same working temperature as an uninsulated garage.
➡️ Best Garage Heaters 2026: The BTU Formula for Your Specific Garage →
➡️ How to Insulate a Garage 2026: Walls, Ceiling, Door & Floor (Complete Guide) →
FREQUENTLY ASKED QUESTIONS
What R-value should I look for in a garage door insulation kit?
The correct R-value depends on your climate and how you use the garage. For garages in mild climates (average winter lows above 25°F) used for occasional projects: R-4 to R-5 (Matador polystyrene or Reach Barrier foil) provides meaningful improvement at low cost. For attached garages where the adjacent living space benefits from a warmer garage: R-8 (Owens Corning fiberglass or NASATech foam core) is the better specification. For an unheated detached garage in a cold climate (average winter lows below 0°F): R-8 from the door kit plus wall and ceiling insulation is required — the door alone cannot compensate for an uninsulated envelope. No door kit provides more than R-8 in a DIY format — commercial polyurethane panels reach R-10 to R-14 but require professional installation.
How many garage door insulation kits do I need for a double-car garage?
A 16×7 or 18×8 two-car garage door is one door — not two side-by-side single doors. A standard Matador 8-panel kit covers a single-car door (8–9 feet wide). For a double-car door, you need either two Matador kits (16 panels total, one kit per half of the door) or one US Energy NASATech 2-car foam roll kit which is specifically dimensioned for doors up to 18 feet wide. If your garage has two separate single-car doors side by side (two operators, two tracks): that is two doors and you need two kits. If it has one wide door that opens as one unit: that is one double-car door and requires the quantities above.
Will insulating my garage door affect the automatic opener?
It can, and the risk depends on which kit you choose. Foil kits add almost zero weight — no opener impact. Matador polystyrene panels add approximately 10–12 lbs to the door assembly. Owens Corning fiberglass adds 15–20 lbs. Most residential openers rated at 1/2 HP or above handle this without adjustment. The test: after installation, disconnect the opener (pull the red emergency cord) and lift the door manually to the halfway position. Let go. A balanced door stays in place — this means the torsion springs are handling the door’s total weight correctly. A door that falls or rises on its own means the spring balance needs professional adjustment. Never attempt to adjust torsion springs yourself — they are under extreme tension and spring adjustment is a documented cause of severe injury.
Can I install a garage door insulation kit in summer, or should I wait until winter?
Install whenever you are ready — there is no seasonal restriction. Summer installation makes particular sense for garages in hot climates because the reflective foil kits (Reach Barrier, NASATech) reduce radiant heat gain through the door during peak summer temperatures. A south or west-facing garage door can reach surface temperatures of 140–160°F in direct summer sun — a radiant barrier installed in July reduces that heat gain immediately and also prepares the door for the following winter. The one summer installation consideration: do not install on a day when the door surface temperature exceeds 100°F. Hot metal expands and the panel clearances that feel correct during installation may bind when the door cools to normal operating temperature in autumn.
Why is my Matador insulation rattling after installation?
Rattling after Matador installation is caused by one of three things. First and most common: debris in the horizontal rail channels prevented the panel from fully seating flush. Remove the panel, run a dry cloth through the channel to clear it, and reseat. Second: the panel was cut too short and has more than 1/4 inch of lateral clearance — it is shifting sideways during door movement. A small foam weather seal strip on one end of the panel eliminates the gap. Third: the panel was installed in a door without proper horizontal rails — it is resting on the door surface rather than seated in channels and is vibrating against the metal door skin. This requires adhesive rather than the snap-in method: apply double-sided foam tape to the back face of the panel before pressing it against the door surface.
Is garage door insulation worth it if I don’t heat my garage?
Yes, for three reasons beyond heating cost savings. First: temperature stabilisation. An uninsulated garage in a cold climate reaches ambient outdoor temperature overnight — down to 0°F or below in a cold snap. Tools, fluids, batteries, and stored items that should stay above freezing are damaged or degraded by these temperature extremes. A single insulation kit keeps an unheated garage 8–15°F above outdoor ambient — often the difference between temperatures that freeze motor oil, crack rubber seals, and drain battery cells and temperatures that do not. Second: sound reduction. Foam panel insulation, particularly polystyrene, substantially reduces the transmission of traffic noise, lawn equipment noise, and wind noise through the door. Third: panel stiffness. Insulation panels stiffen the door’s individual panels, reducing the oil-canning (the rippling vibration of thin metal panels) that is responsible for most of the noise from operating a steel garage door.