
Weatherproof Your Garage for Summer 2026: The Heat, Humidity, and UV Damage Guide That Protects Your Tools, Your Floor, and Your Car
Affiliate Disclosure: Pro Garage Gear participates in the Amazon Services LLC Associates Program. We earn from qualifying purchases at no extra cost to you. No manufacturer has paid for placement in this guide.
Weatherproof Your Garage For Summer – The Damage Nobody Expects: The first project of the summer often reveals the winter’s hidden damage — a floor coating with new micro-cracks where the concrete expanded and contracted. The second project reveals something worse: the cordless tool batteries left in the garage all winter are now holding 60% of their original charge. By July, the garage itself is the problem. You walk in, the air is 118°F, your safety glasses fog immediately, and the epoxy floor you spent a weekend coating last spring is developing the slightly tacky surface feel that means the topcoat is beginning to soften.
An unprotected garage in summer is not a neutral storage environment — it is an active degradation system. Steel tools develop surface oxidation faster in hot humid air than in cool dry air. Lithium-ion battery capacity degrades by 20% per year when stored above 95°F. Floor coatings soften under sustained heat and become permanently marked by point loads. Rubber seals on door weatherstripping harden and lose their compression capacity. UV radiation through garage door windows bleaches rubber, plastic, and painted surfaces within a single season.
This guide introduces the 5-Layer Summer Weatherproofing System — a sequential approach that addresses each heat and humidity source in priority order, producing a garage that runs 20–30°F cooler than an unprotected equivalent without air conditioning. It also covers the specific summer damage risks most guides ignore: battery degradation, floor coating softening, and UV exposure through garage-facing windows.
Understanding Why a Garage Gets So Much Hotter Than Your Home
A house stays reasonably cool in summer because it has insulation, attic ventilation, shade from overhangs, and thermal mass in its walls and floors. A standard residential garage has none of these advantages — and several features that actively amplify heat.
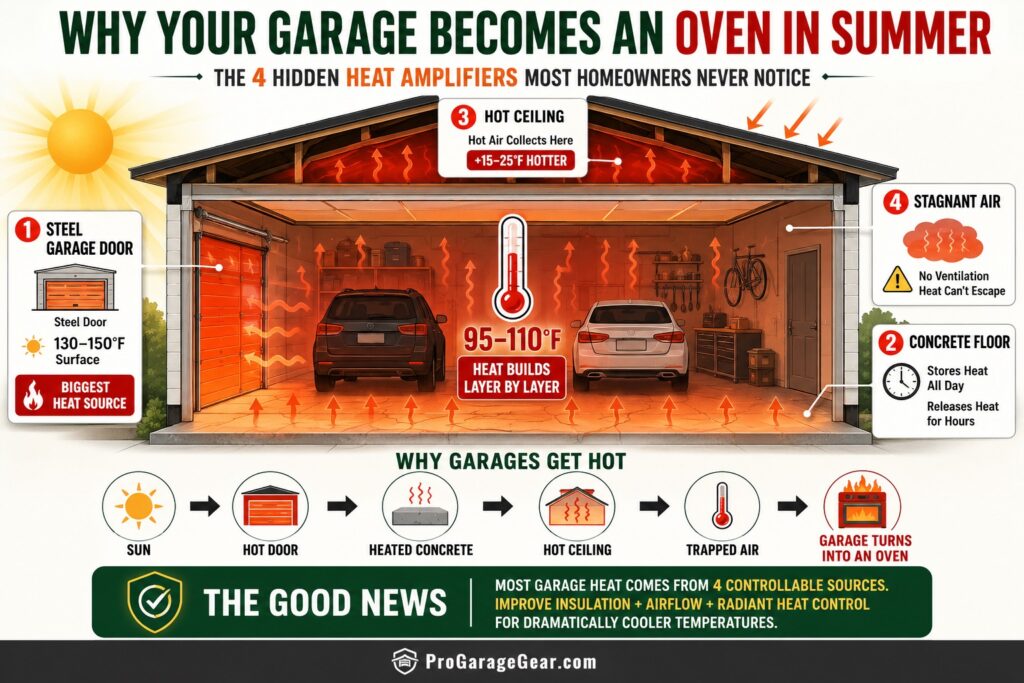
The Four Summer Heat Amplifiers in a Standard Garage
Amplifier 1 — The steel garage door: A standard uninsulated steel sectional garage door has an R-value of approximately 2. In direct sunlight, its surface temperature reaches 130–150°F. The door radiates that heat into the garage interior as long-wave infrared radiation that the interior air absorbs efficiently. A south- or west-facing garage door in direct afternoon sun is the single largest heat source in any residential garage — contributing 15–25°F of interior temperature rise compared to a shaded or insulated door.
Amplifier 2 — The concrete slab: Concrete has high thermal mass — it absorbs heat slowly and releases it slowly. A garage slab that heats up during the day continues radiating heat into the garage air for 4–6 hours after the outdoor temperature drops in the evening. This is why a garage that feels tolerable at noon can peak at its highest temperature at 6 PM — the slab has been accumulating heat all day and reaches its peak emission around mid-afternoon to early evening.
Amplifier 3 — The ceiling: Hot air rises. In an uninsulated garage with a standard 8-foot ceiling, the air temperature at ceiling height is typically 15–25°F higher than at floor level. The ceiling surface — uninsulated drywall or bare OSB — absorbs heat from the hot attic or roof above and radiates it downward. If the garage shares a roof with the home and the attic is hot, the ceiling becomes a radiant heat source operating throughout the day.
Amplifier 4 — No air circulation: A house in summer has HVAC moving air continuously, preventing hot spots from stratifying. A garage with a closed door and no ventilation has completely static air — hot air stratifies at the ceiling and cool air sinks to the floor, but without any mechanism to remove the accumulated heat, the entire air column gradually heats to ambient or above.
The 5-Layer Summer Weatherproofing System
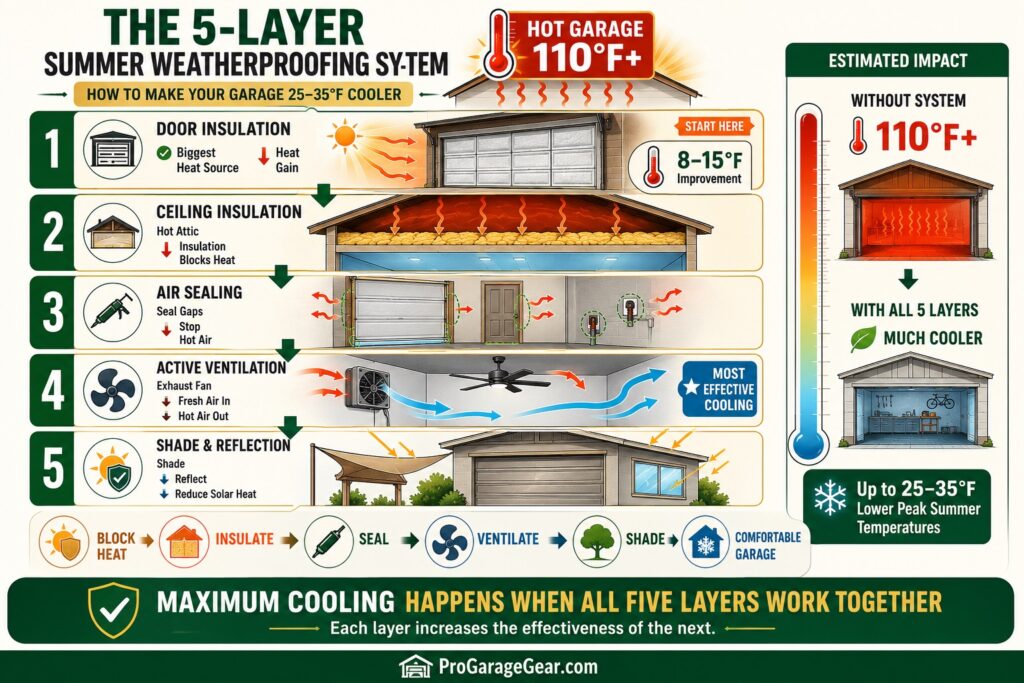
The five layers address heat sources in the order of their impact — largest contribution first. Each layer builds on the previous and the cumulative effect is significantly greater than any single intervention. A homeowner who installs all five layers in the correct sequence typically sees a 25–35°F reduction in peak summer garage temperature compared to a completely unprotected equivalent.
Layer 1 — Door Insulation: The Highest-Impact First Step
The garage door is responsible for more summer heat gain than any other single element. Addressing it first produces the largest single temperature reduction — 8–15°F depending on orientation and climate — and enables every subsequent layer to perform closer to its rated effectiveness.
A south- or west-facing garage door in direct summer sun is a 130°F radiator facing your garage interior for 4–6 hours per day. Insulating it reduces this surface temperature by 20–30°F and cuts the radiated heat entering the garage by 50–70%.
Option A — DIY Foam Board Kit ($60–$120)
A purpose-built garage door insulation kit — foam board panels cut to fit each door section — is the most cost-effective approach. Kits include pre-cut panels, adhesive, and retainer pins. Installation takes 2–3 hours on a standard 16×7 foot door and adds R-6 to R-8 of thermal resistance.
The kit installation step most buyers miss: The foam panels must be installed so they do not contact the door’s horizontal hinge brackets. Panels that press against hinges during door travel bind the mechanism and can damage the opener over time. Leave a 1/4-inch gap at each horizontal hinge line when sizing panels.
🛒 Check Price on Amazon — Garage Door Insulation Kit (R-8 Foam Board) →
Option B — Reflective Foil Radiant Barrier ($30–$60)
A reflective foil barrier installed on the interior face of the door reflects solar radiation before it can be absorbed and re-radiated as heat. Foil barriers are less effective than foam board for overall R-value improvement but are lighter, easier to install, and do not add meaningful weight to the door — an important consideration for older spring-balanced doors where added weight requires spring tension adjustment.
The weight consideration: A full foam board insulation kit adds 6–12 lbs to a standard double garage door. If your door opener hesitates during operation after installing insulation, a garage door technician should check and adjust the spring tension. Spring imbalance from added door weight is a documented cause of opener mechanism wear and premature failure.
The spring tension check after adding insulation: If your garage door hesitates, feels heavier than normal during manual operation, or the opener reverses direction mid-travel after installing insulation panels — the spring tension needs professional adjustment. Between annual professional checks, monthly lubrication of the door’s moving components prevents wear from the increased load. White lithium grease on the rollers, hinges, and track prevents the metal fatigue that develops from operating a newly heavier door without lubrication.
🛒 Check Price on Amazon — WD-40 White Lithium Grease (Door Hardware After Insulation) →
🛒 Check Price on Amazon — Reflective Foil Radiant Barrier (Garage Door) →
➡️ For a full guide to garage door insulation kits including R-value testing: Best Garage Door Insulation Kits 2026: Matador vs. Owens Corning Tested →
Layer 2 — Ceiling Insulation: Block the Attic Heat Source
The ceiling of an attached garage is typically the floor of an attic space. Attic air in summer reaches 140–160°F. An uninsulated garage ceiling transfers heat from that attic space into the garage continuously through the ceiling drywall — the same way a cold drink sweats through an uninsulated cup. Adding ceiling insulation between the attic and the garage ceiling does not eliminate this heat transfer, but it dramatically slows the rate — which is what allows the ventilation system in Layer 4 to actually keep pace with heat input.
The Correct Insulation Approach for Garage Ceilings
If the garage ceiling is finished drywall with accessible attic space above: install batt insulation between the ceiling joists from the attic side. R-19 (6-inch fibreglass batts) is the minimum effective specification for summer heat reduction. R-30 or higher is recommended for garages in USDA Zones 6–9 where summer heat is the dominant seasonal concern.
If the garage ceiling has no accessible attic — a flat-roof detached garage or a garage with HVAC mechanical systems directly above — blown-in insulation or rigid foam board applied to the interior ceiling face are the alternatives. Rigid foam board on the interior ceiling requires careful installation to avoid blocking lighting fixtures and maintaining the minimum ceiling height for opener clearance.
🛒 Check Price on Amazon — R-19 Fibreglass Batt Insulation (Ceiling Joists) →
➡️ For the complete garage insulation guide covering walls, ceiling, and door: How to Insulate a Garage: The Phase-by-Phase DIY Guide →
Layer 3 — Seal the Envelope: Stop Hot Air Infiltration
Every gap around the garage door perimeter, service door frame, and wall penetrations is a pathway for hot outdoor air to continuously enter and displace the relatively cooler air your ventilation system is trying to maintain. Sealing these gaps before installing ventilation is essential — an exhaust fan removing hot air from a garage with significant infiltration gaps is essentially pumping outdoor hot air through the space rather than removing internally generated heat.
The Four-Point Summer Sealing Checklist
Garage door bottom seal: The rubber or vinyl strip at the bottom of the door seals against the floor when closed. In summer, this seal also prevents hot air from entering under the door when the door is closed during peak afternoon heat. EPDM bottom seals maintain flexibility at temperatures up to 248°F — critical for a surface that contacts a 130°F door in direct sun.
Garage door perimeter seal (top and sides): The vinyl or rubber j-seal around the top and sides of the door opening compresses against the door face when closed. These seals harden and lose compression over time — particularly on sun-exposed south and west-facing doors where UV exposure accelerates rubber degradation. If daylight is visible around the closed door perimeter, the seal needs replacement.
Service door weatherstripping: The door between the garage and the home or the exterior pedestrian door. A solid-core service door with full compression weatherstripping on all four sides and a sweep on the bottom prevents bidirectional heat transfer — hot garage air entering the home and conditioned home air entering the garage.
Wall penetrations: Electrical conduit, gas line penetrations, HVAC duct entries, and hose bibb connections all represent potential infiltration paths. A tube of paintable exterior caulk and 30 minutes of visual inspection seals all of these permanently.
⚠️ The Shared Wall Exception: Fire-Rated Sealing Is Required by Code — Not Optional
The “paintable exterior caulk for all penetrations” instruction in Layer 3 has one critical exception that protects your home and your family.
Standard exterior caulk — silicone, latex, or polyurethane — seals against air, water, insects, and sound. It does not seal against fire. At temperatures above approximately 500°F, standard caulk softens, melts, and allows fire to pass through the opening it was sealing. For penetrations in exterior-facing walls, this is acceptable — a fire in the garage has other paths before reaching a caulked exterior wall penetration.
For penetrations in the wall shared between an attached garage and the home’s living space, this is a code violation that can cost lives.
Under International Residential Code (IRC) Section R302.5 and all model codes based on it: The separation between an attached garage and the interior of a dwelling must maintain its fire resistance rating at every penetration. Electrical conduit, gas line entry points, plumbing penetrations, HVAC duct connections, and any other opening in this shared wall must be sealed with fire-rated materials — materials that maintain their sealing function at temperatures above 1,000°F for a specified period.
The correct materials for shared-wall penetrations:
| Penetration Type | Correct Sealing Material | Do NOT Use |
|---|---|---|
| Small gaps around conduit or pipe (under 2″) | Fire-rated intumescent caulk (e.g., 3M Fire Barrier 1000NS) | Standard silicone or latex caulk |
| Larger voids around framing (2″–6″) | Fire-blocking polyurethane foam (e.g., Great Stuff Fire Block) | Standard expanding foam (brown can) |
| HVAC duct penetrations | Sheet metal collar + fire-rated caulk at all edges | Tape alone or standard foam |
| Electrical box penetrations | Fire-rated putty pads inside the electrical box | Caulk inside energised electrical boxes |
How to identify the shared wall: In an attached garage, the shared wall is the wall that connects directly to the home’s living space — typically the back wall or one side wall of the garage, depending on the house plan. Walk inside the home and identify which room shares a wall with the garage. The drywall on the garage side of that wall is the fire-separation assembly. Every penetration through it requires fire-rated treatment.
Standard expanding foam (the brown-capped Great Stuff can) is not fire-rated. It is the most commonly used product for DIY gap sealing and the most commonly used incorrectly on shared walls. The red-capped Great Stuff Fire Block or the equivalent 3M product is the correct choice — it looks similar, costs the same, and provides the required fire resistance rating. The colour of the cap is the only visible difference at the point of purchase.
🛒 Check Price on Amazon — Great Stuff Fire Block Foam (Red Can — Shared Walls) →
🛒 Check Price on Amazon — 3M Fire Barrier 1000NS Intumescent Caulk →
🛒 Check Price on Amazon — EPDM Garage Door Bottom Seal (T-Style) →
🛒 Check Price on Amazon — Garage Door Perimeter J-Seal (Top + Sides) →
➡️ For a complete door sealing guide with the daylight gap test: Best Garage Door Seals & Weatherstripping 2026 →
Layer 4 — Active Ventilation: Remove the Heat You Cannot Block
Layers 1–3 reduce the rate at which heat enters the garage. Layer 4 removes the heat that enters despite those reductions. Active ventilation — moving air through the garage rather than simply circulating it — is the mechanism that converts an insulated, sealed garage into a liveable working environment in summer.
The distinction between circulation and ventilation matters enormously here. A ceiling fan circulates air — it moves the same air repeatedly through the same space. This creates evaporative cooling on human skin but does not reduce the air temperature. A wall exhaust fan vents air — it removes hot air from the garage and allows cooler replacement air to enter. In a garage where the ceiling air is 110°F and the outdoor air is 90°F, exhausting the stratified ceiling air and replacing it with outdoor air cools the garage measurably. In a garage that is 118°F because of a south-facing door and no insulation: no amount of ceiling fan speed reduces that temperature. Ventilation does.
The Two-Device Active Ventilation System
Device 1 — Wall exhaust fan (the primary cooling device): A wall-mounted exhaust fan positioned high on the wall opposite the prevailing wind draws hot stratified ceiling air out of the garage and creates a pressure differential that pulls replacement air in through the partially opened garage door or service door. The exhaust fan position matters — high on the wall where the hottest air stratifies, on the wall that allows the incoming air path to cross the full garage length.
Size the exhaust fan to achieve 15–20 Air Changes per Hour (ACH) in the summer season. For a standard 2-car garage (20×20×9 = 3,600 cubic feet): 15 ACH requires 3,600 × 15 / 60 = 900 CFM minimum exhaust fan capacity.
⚠️ The Make-Up Air Requirement: Why Your Exhaust Fan Needs a Dedicated Intake Path
This is the most important safety consideration in Layer 4 — and the one most guides omit entirely.
A 900+ CFM exhaust fan removes that volume of air from the garage every minute it operates. That air has to come from somewhere. If it does not have a clear, dedicated intake path, three things happen in sequence: the fan motor strains against the negative pressure it is creating, the garage envelope develops lower-than-atmospheric pressure, and any gas appliance sharing the space — a water heater, a furnace, a propane heater — experiences a condition called backdrafting, where the pressure differential reverses the normal upward draft in the appliance’s exhaust flue.
A backdrafting gas appliance vents its combustion gases — including carbon monoxide — into the room rather than up the flue. In a sealed garage with a high-powered exhaust fan and a gas water heater, this is a documented cause of CO poisoning incidents. It is not theoretical. It is the predictable physical consequence of running a high-volume exhaust fan in a sealed space with a combustion appliance present.
The correct solution is a permanent passive intake louver — not a partially opened door.
A passive intake louver is a screened, dampered opening installed in the lower section of the wall opposite the exhaust fan. When the fan runs, the louver’s damper opens with the airflow and outdoor air enters through the screen continuously. When the fan stops, the damper closes automatically under its own weight or spring tension, sealing the opening against bugs, rain, and cold air infiltration.
Why opposite and low: Positioning the intake louver on the wall opposite the exhaust fan maximises the cross-ventilation path length — air travels across the full garage length, picking up heat as it moves. Positioning it low on the wall takes advantage of the temperature gradient: cool inlet air at floor level replaces hot stratified air being exhausted at ceiling level, maximising the temperature differential and effectiveness of every CFM the fan moves.
Sizing the intake louver: The free area of the intake louver (the actual open area after accounting for the screen and damper blades) should be at least 1 square inch per CFM of exhaust fan capacity. A 900 CFM exhaust fan requires a minimum 900 square inches of free intake area — approximately a 12×12 inch louver with 60–65% free area, or two 8×8 inch louvers. Undersizing the intake creates the same negative pressure problem as having no intake at all.
🛒 Check Price on Amazon — 12″ Aluminum Intake Louver with Bug Screen →
🛒 Check Price on Amazon — CO Detector with Digital PPM Display (Any Gas Appliance Garage) →
The gas appliance rule: If your garage contains any gas-fired appliance — water heater, furnace, unit heater, or propane device — install a CO detector with a digital PPM readout before operating any exhaust fan. The detector tells you immediately if backdrafting is occurring during fan operation. A reading above 35 PPM during exhaust fan use indicates inadequate makeup air and the fan must be stopped until the intake is correctly sized.
🔧 The Complete Ventilation System: Fan + Controller + Intake — Buy All Three
The exhaust fan alone is the least effective version of this system. Here is why all three components are required:
| Component | What Happens Without It | Amazon |
|---|---|---|
| iLIVING Variable Speed Exhaust Fan | N/A — the primary cooling device | Shop → |
| Thermostat Controller (plug-in) | Fan must be manually activated — will stop being used within 2 weeks | Shop → |
| Passive Intake Louver (12″, aluminum) | Negative pressure + backdraft risk from gas appliances | Shop → |
The thermostat controller is the most overlooked component in any ventilation system. Set it to 85°F and it activates the exhaust fan automatically whenever the garage exceeds that temperature — day or night, whether you remember or not. The garage cools during the early morning hours before peak heat builds. By the time you arrive in the afternoon, the temperature has been managed continuously rather than reacting to conditions that are already extreme.
🛒 Check Price on Amazon — Plug-In Thermostat Controller (Auto-Activates Fan at Set Temp) →🛒 Check Price on Amazon — Aluminum Passive Intake Louver with Bug Screen →
Device 2 — Garage ceiling fan (the comfort layer): Once the exhaust fan has reduced the garage to within 5–10°F of outdoor ambient temperature, a ceiling fan provides the perceived cooling effect — the wind-chill factor that makes a 90°F garage feel like 80°F on exposed skin. For a working garage, a ceiling fan alone is insufficient for true heat reduction but is an excellent complement to a correctly sized exhaust fan.
The ceiling fan selection for garage use differs from residential ceiling fan selection in one critical dimension: the motor must be damp or wet rated. Garage environments — particularly after vehicle entry or pressure washing — expose the motor and blade assembly to moisture that destroys residential-rated fans within one or two seasons.
🛒 Check Price on Amazon — Minka-Aire Contractor 60″ Ceiling Fan (Damp Rated) →
➡️ For ceiling fan CFM specifications and garage sizing: Best Garage Ceiling Fans 2026: HVLS Airflow and Damp Rating Guide →
➡️ For exhaust fan CFM calculations and fume management: Best Garage Fans & Ventilation 2026: The ACH Calculation →
Calculate Your Garage’s Heat Load and Required Exhaust Fan Size
Enter your garage dimensions, door orientation, current insulation, and whether gas appliances are present. The calculator determines the correct exhaust fan CFM, sizes your intake louver, and tells you the priority action order based on your specific heat amplifiers.
☀️ Summer Garage Heat & CFM Calculator
Enter your garage specs. Get your required exhaust fan CFM, intake louver size, heat amplifier breakdown, and priority action order.
* CFM calculation uses 15 ACH target at rated garage volume. Actual cooling depends on insulation quality, outdoor temperature differential, and intake louver sizing. Gas appliance backdraft risk increases with fan CFM and envelope tightness — always install intake louver and CO detection before operating high-CFM exhaust fans with combustion appliances present.
Layer 5 — Reflective and Shading Solutions: The Low-Cost Finish
After Layers 1–4 are in place, Layer 5 addresses the remaining solar gain paths — window glass in the garage door or side walls, and any remaining exterior surfaces with high solar absorptance. These are lower-impact interventions than the previous four layers but add meaningful temperature reduction at minimal cost.
Garage Door Window Film
Garage door windows — the decorative windows in the upper panels of many residential doors — transmit solar radiation directly into the garage interior. A window tint or reflective film applied to the interior face of each window reduces solar transmission by 60–85% while maintaining the exterior appearance. Installation is a DIY process requiring a spray bottle of soapy water and a squeegee — identical to residential window tinting.
🛒 Check Price on Amazon — Reflective Solar Window Film (Garage Door Windows) →
Exterior Shade Options
For garages with a south- or west-facing door that receives direct afternoon sun — the orientation that contributes the most door heat gain — an exterior shade solution reduces the door surface temperature before insulation even engages. Options in priority order of effectiveness:
- Pergola or shade structure over the driveway: Permanent, effective, adds property value. Reduces door surface temperature by 30–50°F compared to direct sun. Requires permit in most jurisdictions.
- Motorised exterior shade/screen: Rolls down to cover the door opening during peak sun hours. Reduces solar gain significantly. Requires electrical connection.
- Exterior sun shade sail: Tensioned fabric stretched across the driveway area on poles. Temporary, adjustable, no permit required. Effective at 40–60% solar reduction at the door surface.
🛒 Check Price on Amazon — Exterior Sun Shade Sail (Driveway / Garage) →
The Summer Damage Guide: What Heat and UV Do to Garage Equipment
Temperature reduction is the primary goal of summer weatherproofing. But even in a well-managed garage at 85–90°F, specific equipment categories have summer-specific vulnerabilities that require targeted protection.
Lithium-Ion Battery Degradation
This is the most costly and least-discussed summer garage damage. Lithium-ion battery cells — in cordless tools, EV chargers, portable power stations, and battery backup devices — experience accelerated calendar aging (capacity loss over time independent of charge cycles) at elevated temperatures.
The relationship is not linear. At 77°F storage, a lithium-ion cell loses approximately 4% capacity per year from calendar aging. At 104°F storage, the same cell loses approximately 35% per year. A set of four DeWalt batteries stored in a 110°F garage for one summer loses an estimated 30–40% of its capacity — the equivalent of 3–4 years of normal calendar aging in a single season.
The summer battery protocol:
- Store batteries at 40–60% charge during extended summer storage — not at full charge. Full charge accelerates degradation at high temperatures.
- Move batteries to climate-controlled indoor space during the months your garage regularly exceeds 95°F. A kitchen drawer, a basement shelf, or any conditioned space maintains battery health through summer more effectively than any garage cooling intervention.
- Never charge batteries in a garage that is above 95°F. Charging generates internal heat in addition to ambient heat — cells charging in 100°F ambient air reach internal temperatures that trigger irreversible degradation pathways.
The 2-Bar Rule — How to measure 40–60% charge without any equipment: Most cordless tool batteries have a 4-bar LED fuel gauge on the side that lights up when you press the check button. Two lit bars out of four corresponds to approximately 40–60% charge — the optimal storage range. This works across Milwaukee M18, DeWalt 20V MAX, Ryobi ONE+, and most EGO batteries. Check before storing: if you see 3 or 4 bars, use the battery briefly to bring it down to 2 bars, then store it. If you see 1 bar or no bars, give it a short charge to reach 2 bars before long-term storage. Two bars. That is the entire protocol.
The 3-bar exception for Milwaukee M12: Milwaukee M12 batteries use a 3-bar indicator rather than 4-bar. On M12 batteries, 1–2 lit bars corresponds to the 40–60% storage range. Do not confuse the indicator count with the M18 standard.
Why full charge is the wrong storage state: A lithium-ion cell at 100% charge has its cathode material in a maximally lithiated (high-energy) state that is chemically unstable over time. The instability produces continuous side reactions at the anode that permanently consume electrolyte and reduce capacity. At 50% charge, the cathode material is in a more thermodynamically stable intermediate state — the side reactions are dramatically slower. The difference between storing at 100% and 50% at 95°F is the difference between 35% annual capacity loss and approximately 12% annual loss. For a $150 battery pack, this is $35–$40 per year of capacity loss prevented by a 30-second charge level check before summer storage.
🛒 Check Price on Amazon — Battery Storage Organiser Case (Move Batteries Inside) →
Epoxy and Polyaspartic Floor Coating Softening
Fully cured garage floor coatings — epoxy, polyaspartic, and polyurea — have a continuous service temperature rating. For most consumer-grade epoxy products, this rating is 140–160°F. A garage floor in direct sun through an open door reaches surface temperatures of 120–140°F in summer. Parked vehicles concentrate weight on four small tire contact points — a 4,000 lb vehicle has approximately 24 square inches of total tire contact, meaning each tire applies approximately 83 lbs per square inch of pressure to the floor surface.
At temperatures approaching the coating’s service limit and with concentrated tire load: the floor coating can permanently deform at tire contact points. This is the “hot tire pickup” failure mode — not the tire peeling the coating off, but the coating softening just enough to take the permanent impression of the tire tread pattern.
The summer floor protection protocol:
- Park on interlocking floor tiles or rubber tire mats during summer months — the tiles distribute the load and provide thermal insulation between the tire and the coating.
- Do not park a vehicle immediately after driving in peak summer heat. Let the vehicle cool and the tires cool for 15–20 minutes before rolling to final parking position.
- If floor coating softening is already occurring: apply a commercial-grade polyurethane sealer (not another epoxy layer) as a sacrificial topcoat that can be renewed without full floor prep.
🛒 Check Price on Amazon — Interlocking Garage Floor Tiles (Tire Protection) →
UV Damage to Rubber, Plastic, and Painted Surfaces
UV radiation degrades polymer materials — rubber, vinyl, polypropylene, and painted surfaces — through a process called photodegradation. In a garage with windows or a door that opens to direct sun, UV exposure is significant. Common victims in a summer garage include: rubber door seals (cracking within 2–3 seasons without protection), vinyl-wrapped tool handles (surface cracking and adhesive failure), plastic storage bins (brittleness and UV yellowing), and rubber floor mats (surface hardening and cracking).
303 Aerospace Protectant — the same UV protectant used on marine and automotive surfaces — provides a renewable UV barrier on any rubber or vinyl surface. Applied once at the start of each summer season, it extends the service life of every polymer surface in the garage by preventing the photodegradation cycle from initiating.
🛒 Check Price on Amazon — 303 Aerospace UV Protectant (Rubber and Vinyl) →
The application method matters as much as the product. 303 Aerospace Protectant applied with a low-lint microfiber applicator pad produces a more even, longer-lasting UV barrier than spraying directly onto a surface and wiping with a cloth. The applicator pad prevents pooling in textured surfaces — rubber weatherstripping, textured vinyl handles — where excess product collects and leaves white residue.
🛒 Check Price on Amazon — Microfiber Applicator Pads (For 303 Protectant) →
The Summer Weatherproofing Budget: All Five Layers at Three Investment Levels
| Layer | Essential | Recommended | Premium |
|---|---|---|---|
| Layer 1 — Door insulation | $60 (foam kit) | $120 (foam + radiant barrier) | $800+ (new insulated door) |
| Layer 2 — Ceiling insulation | $120 (R-19 batts) | $280 (R-30 full coverage) | $800 (spray foam professional) |
| Layer 3 — Envelope sealing | $40 (bottom seal + caulk) | $120 (full 4-point seal) | $300 (professional air sealing) |
| Layer 4 — Active ventilation | $90 (box fan + mount) | $320 (exhaust fan + ceiling fan) | $700+ (mini-split cooling) |
| Layer 5 — Reflective/shading | $25 (window film) | $100 (film + shade sail) | $2,000+ (pergola structure) |
| Total | $335 | $940 | $4,600+ |
The ROI reality: The recommended tier at $940 produces a garage that peaks 25–30°F cooler than unprotected on the hottest summer days. The avoided damage over a single summer — battery capacity preservation ($200–$400), floor coating protection ($300–$2,000 to recoat), UV seal replacement ($80–$200) — typically exceeds the investment in the first season alone.
The Summer Maintenance Calendar
Weatherproofing a garage for summer is not a one-time installation — it is an annual maintenance rhythm. Here is the seasonal checklist:
April — Before Peak Heat
- Test the daylight gap on all door seals — replace any that fail
- Inspect foam board insulation panels for compression or pest damage
- Clean the exhaust fan blade and intake screen (garage dust accumulates over winter)
- Apply 303 Aerospace Protectant to all rubber seals, vinyl surfaces, and rubber mats
- Move battery packs to 40–60% charge for summer storage protocol
June — Peak Season Check
- Measure garage temperature at 3 PM on the hottest forecast day — this is your baseline
- If temperature exceeds 95°F: identify which layer is underperforming and address it
- Check floor coating for any new soft spots or tire impressions — address early
- Verify exhaust fan is operating correctly — feel for airflow at the exterior louver
September — Post-Summer
- Inspect window film for bubbling or delamination — replace if compromised
- Check garage door spring tension if insulation added this year — technician if needed
- Transition batteries back to normal charge protocol now that temperatures are dropping
- Condition rubber seals before cold weather begins to prevent winter cracking
Frequently Asked Questions
Will a portable air conditioner cool a garage effectively?
A portable air conditioner in an uninsulated, unsealed garage is largely ineffective — the heat infiltration rate through an unprotected door and ceiling exceeds any portable AC’s cooling capacity. A 14,000 BTU portable AC adds approximately 14,000 BTU of cooling per hour. A 20×20 foot unprotected garage in direct summer sun absorbs 40,000–60,000 BTU per hour of heat from the door, ceiling, and ambient air alone. The AC is overwhelmed before the room temperature drops. Apply Layers 1–3 first — after insulation and sealing reduce heat infiltration to 15,000–20,000 BTU per hour, a 14,000 BTU portable AC can meaningfully maintain a target temperature.
How much does a mini-split cost to run in a garage?
A 12,000 BTU mini-split with an inverter compressor draws approximately 900–1,200 watts at full cooling capacity. Running 8 hours per day during summer months (June–August) at $0.14/kWh: approximately 1,200W × 8 hours × 90 days ÷ 1,000 = 864 kWh × $0.14 = $121 for the summer cooling season. This compares favourably with the damage costs a mini-split prevents — particularly battery degradation and floor coating softening in high-use garages. A mini-split installation requires an electrician for the dedicated circuit and a licensed HVAC technician for refrigerant handling.
Should I leave the garage door cracked open in summer to vent heat?
Leaving the garage door cracked 6–12 inches is effective between approximately 6–10 AM — when outdoor air is cooler than garage air accumulated from the previous day. After 10 AM in most US climates, outdoor air temperature exceeds the garage interior temperature and a cracked door admits hot outside air rather than venting cool air. The correct ventilation strategy is time-of-day dependent: ventilate actively in the morning, seal the envelope during peak afternoon heat, and exhaust accumulated heat in the early evening when outdoor temperatures drop below interior temperatures again.
Will a whole-house fan help with a garage that is attached to the home?
Whole-house fans exhaust conditioned home air to the attic — they are not designed to address garage heat directly. An attached garage that is transferring heat into the home is better addressed by insulating the shared wall between the garage and home (which reduces heat transfer regardless of any fan) and addressing the garage temperature directly using the 5-layer system described in this guide. Running a whole-house fan draws air from every opening in the home — including the garage — which can pull hot garage air into the living space if the shared door seal is not perfect.
What is the most cost-effective single upgrade for a hot garage?
If budget allows only one upgrade: door insulation, specifically for a south- or west-facing door. At $60–$120, a foam board insulation kit applied to an uninsulated steel door reduces the door’s surface temperature by 20–30°F and cuts its heat radiation into the garage by 50–70%. No other single intervention at any price point produces a larger temperature reduction in a hot garage than removing the largest heat source — the door — from the equation. Every other layer becomes more effective after this one is in place.
The Bottom Line: Summer Is a System Problem, Not a Thermostat Problem
The most common summer garage mistake is buying a solution before understanding the problem. A ceiling fan in a 118°F garage does not cool the garage — it makes 118°F more bearable on exposed skin. A portable AC in an uninsulated, unsealed garage runs continuously at full capacity while the temperature hovers 20°F above target. These are answers to the wrong question.
The correct question is: where is the heat coming from, in what volume, and in what sequence can I most cost-effectively reduce it? The 5-Layer System answers that question in priority order. Layer 1 removes the largest heat source. Layer 2 removes the second-largest. Layer 3 stops replacement heat from entering. Layer 4 removes what remains. Layer 5 finishes what the first four started.
Applied in sequence, these five layers transform a June garage that was unusable by noon into a July workshop that is productive all day. The tools stay cool. The floor stays stable. The batteries retain their capacity. The garage earns its square footage through the hottest months of the year instead of surrendering it to the sun.
Affiliate Disclosure: Pro Garage Gear earns from qualifying Amazon purchases at no extra cost to you. Temperature reduction figures are estimates based on typical residential garage configurations. Actual results vary with climate, orientation, and existing insulation levels.