
Best Garage Ceiling Fans 2026: The HVLS Guide to Cooling a Hot Summer Workshop
Affiliate Disclosure: Pro Garage Gear is a participant in the Amazon Services LLC Associates Program. We earn from qualifying purchases at no extra cost to you. We only recommend products we would install in our own garages.
The “Summer Shutdown” Problem: It is July. Your garage thermometer reads 104°F. You have a project to finish — new shelving to build, a car to work on, a welder to run. You last 20 minutes before the heat forces you inside. Your garage — your workshop, your sanctuary — becomes unusable for four months every year. Not because you lack the tools. Because you never solved the airflow problem.
The solution most people reach for is a portable AC unit. But a portable AC in a garage is fighting a losing battle — it cools a sealed room, and garages are not sealed rooms. Every time the door opens, every time you run a combustion engine, every gap around the door seals your expensive cooled air out. You are air conditioning the outdoors.
The solution professional shops, agricultural facilities, and warehouses have used for decades is fundamentally different: high-volume, low-speed airflow. Move enough air across your body and you feel 8–10°F cooler — without refrigeration, without sealing the garage, without a $1,500 mini-split installation. A single quality ceiling fan does what no portable AC unit can: it makes heat tolerable everywhere in the garage simultaneously.
This guide explains the physics, ranks the six best garage ceiling fans for 2026, and tells you exactly how to size one for your space.
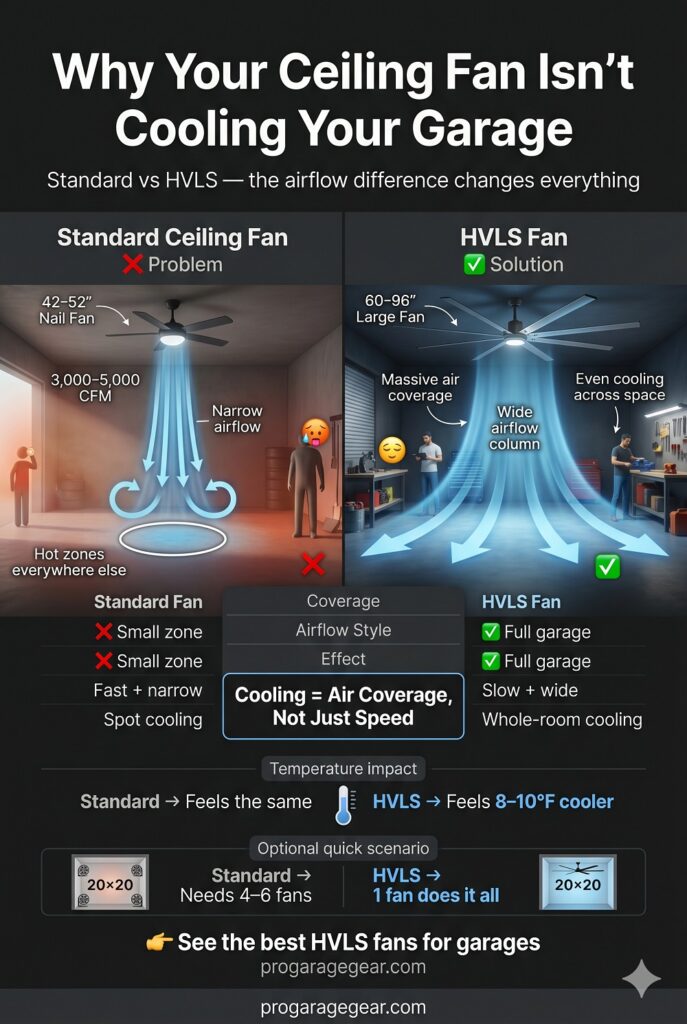
Why Standard Ceiling Fans Fail in Garages (And What HVLS Changes)
Before we recommend a single product, you need to understand why most ceiling fans sold at home improvement stores are wrong for a garage — and why one specification changes everything.
The Problem With Standard Residential Ceiling Fans
A standard residential ceiling fan (42–52 inch, 3–5 blades, 3,000–5,000 CFM) is designed for a room with an 8-foot ceiling, closed walls, and still air. It moves air in a tight column directly below the fan and relies on the room’s walls to return that air back to the blade plane.
A garage has none of those conditions. With a 9–12 foot ceiling, open door gaps, and a large floor area, the same fan simply recirculates stagnant hot air in a small zone beneath it — creating one cool spot directly below and leaving the rest of the garage unchanged. You would need 4–6 standard fans to cover a standard 20×20 garage adequately.
What HVLS (High Volume Low Speed) Actually Means
HVLS fans operate on a fundamentally different principle. They use large-diameter blades (56–96 inches) spinning at low RPM (30–150 RPM vs. the 200–350 RPM of standard fans) to move enormous volumes of air in a wide, gentle column rather than a fast, narrow one.
The physics: air velocity across skin is what creates cooling through evaporative effect — the faster air moves across your body, the faster sweat evaporates, and the cooler you feel. But the width of that airflow column determines how many people and surfaces benefit simultaneously. A wide, slow column of air covers an entire garage floor; a narrow, fast column covers a spot the size of a table.
The result: a single 60-inch HVLS fan in a 20×20 garage creates consistent 2–3 mph airflow across the entire floor — which reduces perceived temperature by 8–10°F (the “wind chill” effect applied to indoor spaces). At 90°F ambient, that is the difference between tolerable and genuinely comfortable.
The CFM Number That Actually Matters for Garages
CFM (Cubic Feet per Minute) is the standard measurement of how much air a fan moves. For garage use, target this formula:
Required CFM = Garage Square Footage × 2
A 20×20 ft. garage (400 sq. ft.) needs a fan delivering a minimum of 800 CFM at the floor level — not at the blade, which is how most manufacturers rate their fans. A ceiling-level CFM rating of 5,000+ typically delivers 800–1,200 CFM at floor level, which is the range where the 8–10°F cooling effect is achieved.
The practical shortcut: any fan with 5,000+ CFM at the blade and a 56-inch or larger blade diameter will deliver meaningful whole-garage cooling in a standard 20×20 space. Below 5,000 CFM in a 20×20 garage, you are essentially buying a standard residential fan with a garage-mounting kit.
Key Buying Specifications: What to Check Before You Purchase
1. Blade Diameter — The Most Important Spec
Blade diameter determines the width of the airflow column and directly sets the maximum coverage area. Match blade diameter to your garage size:
| Garage Size | Recommended Blade Diameter | Minimum CFM |
|---|---|---|
| 1-car (10×20 ft.) | 52–56 inches | 4,500+ CFM |
| 2-car (20×20 ft.) | 56–60 inches | 5,000+ CFM |
| 2.5–3 car (24×24 ft.) | 60–72 inches | 7,000+ CFM |
| Large workshop (30×30+ ft.) | 72–96 inches, or 2 fans | 10,000+ total CFM |
2. Ceiling Height and Downrod Length
Ceiling fan blades must be at least 7 feet from the floor for safe clearance. In a standard 9-foot garage ceiling, a fan with a 12-inch downrod positions the blades at approximately 7.5–8 feet — correct. In a 10-foot ceiling: 18-inch downrod. In a 12-foot ceiling: 24-inch downrod.
For garages with sloped roofs: look for “angled ceiling” fans or fans that include an adjustable ball mount rather than a straight canopy. Straight-canopy fans installed on sloped ceilings vibrate, wobble, and have significantly shorter bearing lives.
3. Motor Type: AC vs. DC
| Motor Type | Energy Use | Speed Control | Lifespan | Cost |
|---|---|---|---|---|
| AC Motor | 60–80W (standard) | 3–5 fixed speeds | 10–15 years | Lower |
| DC Motor | 15–35W (significantly less) | 6–12 speed settings | 15–25 years | Higher upfront |
DC Motor: Why Garages Make the Case Stronger Than Any Other Room
The energy savings case for DC motors is well-documented. But in a garage specifically, two additional advantages make DC motors more valuable than the numbers alone suggest:
Advantage 1 — DC Motors Run Cooler in High-Ambient Temperatures
An AC motor operates at a fixed winding resistance. As ambient temperature increases, motor efficiency drops and heat generation increases — a compounding problem on the hottest garage days when you need the fan most. A motor running hot in a hot garage is stressing its bearing lubricant, its winding insulation, and its capacitors simultaneously.
DC motors regulate their operating current precisely to match the load requirement. In high-ambient conditions (95–110°F garage interiors), a quality DC motor runs 15–25°F cooler than its AC equivalent at the same output. This is not an abstract engineering benefit — it is a direct service life advantage in the environment where you are using the fan.
Advantage 2 — Variable Speed for Precision Ventilation Control
AC motors typically offer 3 fixed speeds. DC motors offer 6–12 variable speed settings. In a garage context, this matters for two specific scenarios:
Fume dilution at low concentrations: When running a vehicle briefly, or when residual solvent odour lingers after a painting session, you want enough airflow to dilute the concentration without full high-speed operation (which stirs up settled sawdust and creates its own problems). A DC fan at 35% speed — a setting AC fans cannot offer — is often the correct tool for low-level fume dilution.
Winter circulation without draft: The ideal winter heat destratification speed is very slow — slow enough to move ceiling-pooled warm air downward without creating a noticeable breeze. DC fans at their lowest 1–2 speed settings achieve this; AC fans at their lowest setting are typically still too fast for true draft-free circulation.
The practical conclusion: If you primarily use your garage in summer only, an AC motor at lower cost is a reasonable choice. If you use your garage year-round — for winter projects, vehicle work, or storage management — the DC motor’s advantages compound across every season and justify the premium investment.
For a garage fan running 6–8 hours/day during summer, a DC motor’s energy savings are real and cumulative. At $0.13/kWh, an AC motor fan costs approximately $14–$18/month to run all day during summer. A DC motor equivalent costs $4–$8/month. Over a five-year summer season, that is $50–$70 in real savings — often covering the DC premium entirely.
4. Damp-Rating vs. Dry-Rating
All garage ceiling fans should be rated damp-rated at minimum. A dry-rated fan is designed for climate-controlled indoor spaces — the humidity cycles, temperature swings, and occasional moisture intrusion of a garage environment will corrode dry-rated motors and bearings within 2–3 seasons.
Damp-rated fans are sealed against moisture contact. Wet-rated fans can be directly exposed to rain. For an enclosed garage: damp-rated is sufficient. For a carport or open shelter: wet-rated is required.
5. Mounting Type
- Standard mount (close-to-ceiling): For ceilings at or below 8 feet. Hugs the ceiling. Limits downrod options.
- Downrod mount: Most common. Allows blade positioning at the optimal height regardless of ceiling height.
- Flush/hugger mount: Blades mounted directly to the motor housing. Only appropriate for very low ceilings (below 8 ft.) and moves significantly less air than downrod equivalents.
- Dual-mount (convertible): Ships with hardware for both options. Best for uncertain ceiling situations.
2026 Rankings: The 6 Best Garage Ceiling Fans
🥇 #1 — Minka-Aire F896-60-BNW Contractor 60-Inch (Best All-Around for 2-Car Garages)
The one-sentence reason it wins: The highest CFM-per-dollar of any damp-rated 60-inch fan in the residential market, from a manufacturer that has been making heavy-duty commercial fans since 1990.
The Data
- Blade diameter: 60 inches
- CFM: 7,477 (high speed)
- Motor: AC, 153×15mm (commercial-grade winding)
- Speeds: 3 (pull chain) / 6 (with optional remote)
- Damp-rated: Yes
- Ideal ceiling height: 9–14 ft.
- Downrod included: 3.5-inch standard; optional extension rods sold separately
- Blade pitch: 14° (higher pitch = more air moved per revolution)
At 7,477 CFM, the Minka-Aire Contractor delivers airflow that covers a standard 20×20 garage completely. The 14° blade pitch is the specification that separates Minka-Aire from competitors — most residential fans use 12° pitch. The additional 2° moves significantly more air at the same RPM without increasing motor stress, because blade aerodynamics are nonlinear.
The honest downside: The included downrod is 3.5 inches — unusable for most garages with 9-foot or higher ceilings. Budget $15–$25 for a 12-inch or 18-inch downrod extension. This is a known omission with the base kit.
Who it is for: Anyone with a standard 2-car garage who wants the single best combination of airflow, durability, and value.
🛒 Check Price on Amazon — Minka-Aire 60″ Contractor Fan →
🛒 Check Price on Amazon — Downrod Extension (12″ or 18″) →
🥈 #2 — Hunter Industrial 60-Inch Ceiling Fan (Best for Daily Heavy-Use Shops)
The one-sentence reason it earns #2: Hunter’s Industrial series uses a permanently lubricated lifetime bearing system — the single most durable consumer fan available, specifically designed for the temperature cycling and particulate-heavy environment of workshops.
The Data
- Blade diameter: 60 inches
- CFM: 6,247 (high speed)
- Motor: AC, WhisperWind motor system
- Speeds: 3 (compatible with wall control)
- Damp-rated: Yes
- Warranty: Lifetime motor, 1-year parts — best warranty in the category
- Blade pitch: 12°
The Hunter Industrial’s defining feature is its WhisperWind motor, which uses balanced counter-rotating magnets rather than brushed windings. In dusty workshop environments where other fan motors accumulate particulate in their windings over years, the sealed WhisperWind design maintains efficiency indefinitely.
The honest downside: At 6,247 CFM, it moves 1,200 CFM less than the Minka-Aire. In a 20×20 garage, this is a real difference at the far corners. If your shop frequently operates with the garage door fully closed, the Hunter’s lower airflow will leave slightly warmer zones near the walls. For garages with at least partial door opening during operation, the difference is minimal.
Who it is for: Serious DIYers who run power tools daily, woodworkers generating significant sawdust, or anyone whose workshop use is heavy enough that longevity matters more than maximum CFM.
🛒 Check Price on Amazon — Hunter Industrial 60″ Ceiling Fan →
🥉 #3 — Harbor Breeze Mazon 44-Inch (Best for 1-Car Garages / Budget Pick)
The one-sentence reason it earns #3: For single-car garages (10×20 feet) where the Minka-Aire’s 60-inch span is physically oversized, the Harbor Breeze Mazon delivers the best CFM-per-dollar in the 44-inch category at a price that genuinely accessible.
The Data
- Blade diameter: 44 inches
- CFM: 4,212 (high speed)
- Motor: AC
- Speeds: 3
- Damp-rated: Yes
- Ideal for: Spaces under 200 sq. ft.
The honest downside: This is a starter fan, not a professional fan. The motor housing uses standard residential-grade bearings that will accumulate workshop grime faster than the Minka-Aire or Hunter. Expect a 5–7 year service life in a working garage versus 10–15 years for the premium options. For a one-car garage used occasionally: fully acceptable. For a daily-use shop: invest in the Minka-Aire.
🛒 Check Price on Amazon — Harbor Breeze 44″ Damp-Rated Fan →
⭐ #4 — Westinghouse Wengue 52-Inch (Best DC Motor Pick — Lowest Running Cost)
The Westinghouse Wengue is the most energy-efficient fan in this comparison. Its DC motor draws only 26 watts at high speed versus the 65–80 watts of AC competitors. For a garage fan running 8 hours/day from May through September (150 days), the Westinghouse saves approximately $9–$14 per summer season over AC alternatives. Over 10 years: $90–$140 in real electricity savings from one fan.
The Data
- Blade diameter: 52 inches
- CFM: 5,100 (high speed)
- Motor: DC (26W max draw)
- Speeds: 6 variable
- Remote control: Included
- Damp-rated: Yes
- Reversible: Yes (winter circulation mode)
The winter bonus: In reverse rotation (clockwise at low speed), a ceiling fan pushes warm air that pools at ceiling level back down along the walls — reducing heating costs by 10–15% in an insulated garage. The Westinghouse’s 6-speed remote makes switching modes effortless. It is the only fan in this comparison that pays dividends in both summer and winter.
🛒 Check Price on Amazon — Westinghouse DC 52″ Fan with Remote →
⭐ #5 — Canarm Industrial 56-Inch (Best for Detached Workshops with High Ceilings)
Canarm manufactures fans for commercial applications — warehouses, barns, manufacturing floors. Their 56-inch residential/commercial hybrid is the only fan in this comparison that is genuinely rated for industrial use cycles (24/7 operation) while remaining within residential price ranges.
The Data
- Blade diameter: 56 inches
- CFM: 6,791 (high speed)
- Motor: AC, commercial-grade sealed
- Duty cycle: 24/7 rated (no other fan in this list matches this)
- Damp-rated: Yes
- Mounting: Compatible with ceiling heights 9–20 ft. via available downrod lengths
Who it is for: Serious detached workshops with 12+ foot ceilings, garages used as professional trades spaces, or any garage where the fan will run continuously rather than intermittently.
🛒 Check Price on Amazon — Canarm 56″ Industrial Fan →
⭐ #6 — Matthews Fan Company Collins 52-Inch (Best for Show-Quality Garages)
If your garage doubles as a showroom — for a classic car, a finished workspace, or an entertainment space — the Matthews Collins delivers HVLS-class performance in a premium brushed nickel or matte black finish that looks intentional rather than industrial.
- Blade diameter: 52 inches
- CFM: 5,540 (high speed)
- Motor: DC (quiet, 6-speed)
- Finish: Multiple premium options
- Damp-rated: Yes
🛒 Check Price on Amazon — Matthews Fan 52″ Premium →
The Complete Garage Ceiling Fan Comparison Table
| Fan | Blade Size | CFM | Motor | Damp Rated | Best For | Amazon |
|---|---|---|---|---|---|---|
| Minka-Aire Contractor | 60″ | 7,477 | AC | ✅ | 2-car garages | Shop → |
| Hunter Industrial | 60″ | 6,247 | AC | ✅ | Daily-use shops | Shop → |
| Harbor Breeze Mazon | 44″ | 4,212 | AC | ✅ | 1-car / budget | Shop → |
| Westinghouse Wengue | 52″ | 5,100 | DC (26W) | ✅ | Energy-conscious | Shop → |
| Canarm Industrial | 56″ | 6,791 | AC (commercial) | ✅ | Detached workshops | Shop → |
| Matthews Collins | 52″ | 5,540 | DC | ✅ | Premium / show garages | Shop → |
Ceiling Fan vs. Garage Exhaust Fan: Which Do You Actually Need?
This is the question most buyers don’t ask before purchasing — and getting it wrong costs real money.
When You Need a Ceiling Fan
A ceiling fan recirculates air within the garage. It moves air across your body to create cooling through evaporation. It does NOT remove air from the garage or reduce the concentration of airborne contaminants.
Use a ceiling fan when:
- Your primary problem is heat discomfort during physical work
- You need year-round air circulation (winter circulation mode)
- You want continuous, silent background cooling without ongoing ventilation needs
When You Need an Exhaust Fan
An exhaust fan removes air from the garage and replaces it with fresh outdoor air. It reduces fume concentration, lowers humidity, and purges contaminants. It does NOT effectively cool you through air movement alone.
Use an exhaust fan when:
- You run vehicles inside (carbon monoxide removal is mandatory)
- You use spray paint, solvents, or chemical finishes
- You do welding (fume removal is a health requirement)
- Garage humidity exceeds 60% regularly
The Professional Answer: Use Both
The best-equipped garages use a ceiling fan for constant airflow comfort and a wall exhaust fan for active fume and humidity removal during chemical work. These two systems are complementary, not competing.
For the exhaust side of this system, see our dedicated guide:
➡️ Best Garage Fans & Ventilation 2026: How to Calculate Your Required CFM — this companion article covers wall exhaust fans, ACH calculations, and the ventilation setup for spray painting and welding environments.
Installation Guide: What Most How-To Articles Skip
Step 1 — Check Your Electrical Box
The electrical box your ceiling light was connected to may not be rated for a fan’s dynamic load. Standard light fixture boxes are rated for static loads only (the weight of a fixture hanging still). A ceiling fan creates both static load (weight) and dynamic load (rotational vibration). Installing a heavy fan on a light-fixture-rated box can cause the box to pull out of the joist over time — a genuine safety risk.
Look at your existing electrical box. If it is an old metal box screwed directly to a joist — it is almost certainly fine for a fan. If it is a thin plastic box wedged between joists with adjustable arms — replace it with a fan-rated metal box before proceeding.
🛒 Check Price on Amazon — Fan-Rated Ceiling Box →
The Strobe-Free Layout Check (A Safety Step Most Installers Skip)
Here is the installation problem nobody mentions until after you have already mounted the fan, wired it, and turned it on for the first time: if your garage has linear LED shop lights running parallel to the fan blades, the rotating blades will interrupt the light at regular intervals as they pass between the fixture and your work surface. At certain fan speeds, this creates a strobing effect — a rapid, rhythmic flicker that is imperceptible at a glance but causes severe eye strain and disorientation during sustained power tool use.
This is not a minor comfort issue. The Occupational Safety and Health Administration (OSHA) identifies stroboscopic effects from rotating machinery near artificial light sources as a genuine safety hazard — rotating equipment can appear stationary or slow under strobe conditions, masking its actual speed. Running a table saw or angle grinder under a strobing light is a real risk.
The cause: A 60-inch fan spinning at 200 RPM has blades passing a fixed point approximately 3.3 times per second per blade (on a 3-blade fan). If your LED shop lights flicker at 120 Hz (the standard US frequency) and the blade interruption frequency harmonic aligns with it, the visual effect can be pronounced.
The fix is simple — measure before you mount:
| Scenario | Safe? | Solution |
|---|---|---|
| Fan centre is 3+ feet from nearest LED strip | ✅ Safe | No action needed |
| Fan centre is 1–3 feet from LED strip | ⚠️ Borderline | Reposition one or the other before mounting |
| Fan centre directly above a linear LED strip | ❌ Unsafe | Relocate fan position or reroute the light strip |
The professional layout rule: Place your ceiling fan so its centre point is at least 36 inches horizontally from the nearest linear light source. If your garage ceiling has a single central junction box with no flexibility, install the fan on a longer downrod to position the blade plane above the light fixture plane — blades above the lights cannot interrupt light reaching the work surface below.
For garages with multiple LED shop light strips running across the ceiling: install the fan perpendicular to the light strips rather than parallel. Perpendicular orientation minimises the time any single blade spends occluding a light source and significantly reduces the strobe frequency.
Pro tip: After installation, stand at your workbench with a power tool running (not cutting — just spinning) and watch it under the fan at medium speed. If the tool’s motion appears to slow, stutter, or show irregular rotation — you have a stroboscopic interference problem. Adjust fan speed up or down one setting; changing the blade interruption frequency by even 10% often eliminates the effect entirely.
➡️ For complete garage lighting layout guidance including CRI ratings and shadow elimination at the bench: >Best Garage Workbench Lighting 2026: Fix the Shadow Triangle
The Garage Door Path Test (Do This Before You Buy, Not After)
This is the step that generates the most one-star reviews for otherwise excellent garage ceiling fans. A buyer selects a 60-inch fan, mounts it from the central ceiling junction box, powers it on — and discovers that when the garage door opens, the horizontal door sections travel directly through the blade sweep radius. The fan blades strike the door. Best case: the fan stops. Worst case: a blade shatters and becomes a projectile.
The problem is almost entirely avoidable with a 90-second measurement taken before purchasing.
The Garage Door Path Test — 3 Measurements:
Measurement 1 — Door Track Clearance Height: With your garage door in the fully open (overhead) position, measure the vertical distance from your ceiling to the top of the door panel that is now horizontal above you. This is your track occupation height — the vertical space taken up by the open door and its hardware.
Standard residential garage doors in the open position occupy the top 10–14 inches of ceiling height (door thickness + track hardware + opener rail). In a 9-foot garage, this means the door assembly can reach up to 7.5–8 feet from the floor.
Measurement 2 — Available Fan Blade Height: Your fan blades must clear the door assembly by at least 4 inches of vertical clearance with the door fully open. Calculate:
Blade Height = Ceiling Height − Downrod Length − Canopy Height (approx. 8″) − Motor Housing Height (approx. 6″)
For a 9-foot ceiling with an 18-inch downrod:
108″ − 18″ − 8″ − 6″ = 76 inches (6 ft. 4 in.) blade height
If your open door assembly reaches 7.5 feet (90 inches) and your blades sit at 76 inches — you have a 14-inch blade-to-door clearance. Safe.
If your open door assembly reaches 8.5 feet (102 inches) and your blades sit at 76 inches — you have a negative clearance. The door will hit the blades. Do not proceed with that mounting position.
Measurement 3 — Horizontal Radius Check: The fan blades extend outward from the motor housing. A 60-inch fan has a 30-inch radius. Measure horizontally from your planned fan centre point to the nearest point where the open garage door panel or its tracks exist. This must be greater than 30 inches — ideally 36 inches — to provide safe blade clearance on all sides.
Quick Reference Table:
| Garage Door Type | Typical Open Height from Ceiling | Safe for 60″ Fan? |
|---|---|---|
| Standard sectional, 7-ft. door, 9-ft. ceiling | 10–12″ from ceiling | ✅ Usually yes — measure to confirm |
| Standard sectional, 8-ft. door, 9-ft. ceiling | 14–18″ from ceiling | ⚠️ Tight — calculate carefully |
| High-lift conversion, 8-ft. door, 10-ft. ceiling | 6–8″ from ceiling | ✅ Usually fine with correct downrod |
| Tilt-up (older style), 7-ft. door, 9-ft. ceiling | Entire upper 24″ | ❌ Very tight — 44″ fan only, or reposition |
If Your Measurements Show Insufficient Clearance:
You have three options, in order of cost:
- Reposition the fan — mount it toward the rear of the garage (away from the door) where the door assembly does not overhead. Most garage doors only occupy the front third of the ceiling in the open position. A fan mounted over the middle or rear third is typically safe regardless of door type.
- Use a shorter downrod — reduces downrod length to raise the blades closer to the ceiling. This maintains clearance but reduces airflow efficiency (blades closer to the ceiling push less air). Acceptable trade-off if relocation is not possible.
- Select a smaller fan diameter — a 44-inch fan has a 22-inch radius rather than 30 inches, providing 8 additional inches of horizontal clearance. Appropriate for 1-car garages where the airflow reduction is acceptable.
The rule before you buy: Measure first, purchase second. A 5-minute measurement with a tape measure eliminates the most common and most frustrating garage ceiling fan installation failure.
Step 2 — Confirm Your Wiring Configuration
Ceiling fans require both a hot wire (for the motor) and, if your fan has an integrated light kit, a second switched hot wire. Most garages have a single-switch circuit at the ceiling — which means you will need either:
- A fan with a pull chain for speed control (no second wire needed), or
- A remote-control fan receiver (intercepts the single hot wire and separates control signals wirelessly)
For a garage with a single ceiling wire and no second switch: buy a fan with an included RF or Bluetooth remote. The receiver module mounts inside the fan’s canopy and requires no additional wiring. This is the most common residential garage wiring situation.
For wiring upgrades — adding a dedicated 15-amp circuit to the ceiling fan location — see our complete guide: ➡️ Garage Electrical Load Guide 2026: Why Your Breaker Trips & The 20-Amp Upgrade
Step 3 — Downrod Length Selection
Calculate your downrod length using this formula:
Downrod Length = Ceiling Height − 8 ft. + 8 inches (canopy height)
9-foot ceiling: 9 − 8 + 0.67 = 1.67 ft. → use 18-inch downrod
10-foot ceiling: 10 − 8 + 0.67 = 2.67 ft. → use 24-inch downrod
12-foot ceiling: 12 − 8 + 0.67 = 4.67 ft. → use 48-inch downrod
🛒 Check Price on Amazon — Ceiling Fan Downrod Extensions →
Step 4 — Blade Balancing After Installation
A wobbling garage ceiling fan is not a defective fan — it is an unbalanced one. Garage fans accumulate sawdust, grease mist, and debris unevenly across their blades, causing weight imbalance. A blade balancing kit (a set of small weighted clips that attach to blades) eliminates wobble completely and takes 10 minutes.
🛒 Check Price on Amazon — Blade Balancing Kit →
The Complete Ceiling Fan System: Accessories That Complete the Setup
[INFOGRAPHIC B: The Complete Garage Fan System Diagram — see infographic brief above for designer]
| Accessory | What It Does | Priority | Amazon |
|---|---|---|---|
| Fan-rated ceiling box | Safe dynamic load mounting — non-optional | 🔴 Essential | Shop → |
| Downrod extension (correct length) | Positions blades at 7–8 ft. for maximum airflow | 🔴 Essential | Shop → |
| Universal remote receiver | Wireless control from a single-wire ceiling circuit | 🟡 Recommended | Shop → |
| Blade balancing kit | Eliminates wobble from uneven dust accumulation | 🟡 Recommended | Shop → |
| Smart wall switch (fan-rated) | App/voice control — ensure “fan-rated” not dimmer type | 🟢 Optional | Shop → |
| Humidity sensor (for automation) | Auto-start fan when humidity exceeds threshold | 🟢 Optional | Shop → |
The “smart switch” warning: Never install a standard dimmer switch on a ceiling fan. Dimmer switches regulate voltage, which damages fan motors and can cause overheating and fire. Always use a fan-rated speed controller switch (Lutron Caseta Fan Speed Control or equivalent) if you want wall-based speed adjustment.
Ceiling Fan Maintenance: Keeping Performance Peak in a Working Garage
A garage ceiling fan operates in conditions that accelerate bearing wear and blade degradation significantly faster than a residential indoor fan. Sawdust, oil mist, grease vapor, and temperature cycling stress every component. A 15-minute maintenance routine performed twice per year extends fan life from 5–7 years to 12–18 years.
The Twice-Yearly Garage Fan Maintenance Protocol
Spring Startup (April/May)
- Turn off the circuit breaker before any maintenance
- Wipe each blade with a damp microfiber cloth — both top and bottom surfaces. A single blade accumulating 2 oz. more dust than the others causes measurable vibration
- Check all blade bracket screws — hand-tighten any that have loosened from vibration over winter
- Check the canopy mounting screws at the ceiling box
- Switch motor direction to counterclockwise (summer cooling mode)
- Run at each speed setting for 2 minutes — listen for grinding, clicking, or wobble sounds that indicate bearing issues
Fall Shutdown (September/October)
- Full blade wipe-down (summer accumulates more debris than winter)
- Apply 2–3 drops of sewing machine oil or 3-in-1 oil to the motor oil port if your model has one (older fans; most modern fans are permanently lubricated)
- Switch motor direction to clockwise (winter heat recirculation mode at low speed)
- Check for any blade bracket cracks that developed over the high-use season
The annual blade wipe-down is the single most impactful maintenance task. An evenly clean fan runs quieter, moves more air per watt, and places no vibration stress on its bearings. A fan with dirty blades does all three things worse.
Winter Destratification: Making Your Fan Work in the Cold Months
(Insert at the end of the Fall Shutdown checklist in the Maintenance section, as a new sub-section before the FAQ)
The Winter Reverse Mode: Heat Recirculation Science Explained
Most garage owners install a ceiling fan in May, use it through September, and forget it exists from October through April. This is leaving significant energy savings and comfort improvements unused for half the year.
When you heat your garage in winter — with an electric heater, propane unit, or mini-split — warm air rises immediately by convection. Hot air is less dense than cool air; it floats to the ceiling and forms a warm layer that can be 10–15°F warmer than the floor where you are standing and working.
Your floor-level heater is fighting this stratification constantly: it heats air at floor level, that air rises, and the ceiling layer grows warmer while the floor layer cycles through cool-heat-cool-heat repeatedly. Your heater runs more often and consumes more energy than it would if the air were evenly distributed.
Reversing the fan direction breaks this cycle:
In clockwise rotation (when viewed from below) at low speed, a ceiling fan creates an upward draft at the centre of the room and a gentle downward draft along the walls. This draws the cool floor air up through the centre column and pushes the warm ceiling air down along the perimeter walls — without creating the direct downward draft that would make the room feel colder.
The result: a more uniformly heated garage, a heater that cycles less frequently, and heating cost reductions of 10–15% in a well-insulated garage.
The Garage-Specific Winter Protocol:
| Setting | Direction | Speed | Effect |
|---|---|---|---|
| Summer cooling | Counterclockwise | Medium to high | Direct downward airflow — wind chill effect |
| Winter destratification | Clockwise | Lowest available (speed 1) | Gentle circulation — no perceptible draft |
| Winter destratification (DC fan) | Clockwise | 15–20% of max | Ideal — slow enough for truly draft-free circulation |
The critical detail: Winter reverse mode only works correctly at low speed. Running the fan clockwise at medium or high speed in winter creates a downward draft that makes occupants feel colder — the opposite of the intended effect. If your fan’s lowest speed still creates a noticeable breeze: DC motors, with their finer speed gradations, achieve the correct ultra-low circulation speed that AC motors cannot reach.
Measuring whether it is working: Stand in the centre of your heated garage with the fan in winter reverse mode at low speed. Hold your hand palm-up about 6 inches from the ceiling. You should feel gentle, barely perceptible warmth moving downward toward the walls. No downward breeze should be felt at standing height in the centre of the room. If you feel a draft at head height — reduce the fan speed.
For garages heated by radiant infrared heaters (propane or electric): note that radiant heat warms surfaces and objects, not air directly. Destratification through fan circulation is less critical in radiant-heated spaces because the comfort mechanism is different. Destratification still reduces heat loss through the ceiling, but the perceived comfort benefit is smaller than in convective (forced-air) heated garages.
➡️ For heater type selection and BTU sizing for your garage: Best Garage Heaters 2026: Electric, Propane & Mini-Split (Sized by BTU)
Garage Ceiling Fan + Summer Cooling: The Complete System
A ceiling fan is the foundation of summer garage comfort — but it works best as part of a coordinated approach. These are the companion upgrades that amplify what the ceiling fan does:
Pair With: Garage Door Insulation
An uninsulated steel garage door absorbs solar radiation all day and releases it as radiant heat into your garage for hours after sunset. A door insulation kit (R-6 to R-8 added) reduces the peak radiant heat load that your ceiling fan has to work against — making the same fan feel more effective without any other changes.
➡️ Best Garage Door Insulation Kits 2026: Stop Heating the Neighborhood →
Pair With: Garage Ventilation (Exhaust Fan)
When the garage door is open during the hottest part of the day, an exhaust fan on the opposite wall pulls hot air out and creates directional flow through the garage. A ceiling fan circulating the already-moving air extends the cooling effect to every corner. The combination is significantly more effective than either system alone.
➡️ Best Garage Fans & Ventilation 2026: Wall Exhaust Fans, CFM, and Fume Management →
Pair With: Garage Air Filtration
A ceiling fan in a woodworking or grinding shop redistributes airborne sawdust and metal particles rather than removing them. An ambient air filtration unit captures particles before they settle or enter your lungs. Run both simultaneously: the fan for comfort, the filter for air quality.
➡️ Best Garage Air Filtration Systems 2026: Save Your Lungs →
Pair With: Dehumidification
High humidity in summer makes 85°F feel like 95°F. A ceiling fan moving humid air creates less effective evaporative cooling than a ceiling fan moving dry air. Controlling garage humidity (target: 40–50% RH) amplifies the ceiling fan’s effectiveness significantly — each percentage point of humidity reduction makes the same airflow feel noticeably more comfortable.
➡️ Best Garage Dehumidifiers 2026: The Humidity Number That Protects Your Tools →
What size ceiling fan do I need for a 2-car garage?
For a standard 20×20 foot (400 sq. ft.) 2-car garage with a 9-foot ceiling, a 60-inch fan delivering 5,500+ CFM is the correct specification. The Minka-Aire Contractor 60″ (7,477 CFM) is the single best option at this size. A 52-inch fan at 5,000+ CFM works adequately for 2-car garages but will leave slightly warmer zones at the far corners. Avoid 44-inch fans for this space — they are genuinely undersized.
Can I use a regular indoor ceiling fan in my garage?
Only if it is explicitly damp-rated. A dry-rated indoor fan installed in a garage will experience bearing corrosion and motor winding degradation from humidity cycles within 2–3 seasons. The damp-rating designation means the manufacturer has sealed the motor against moisture contact. All fans recommended in this guide are damp-rated.
Does a garage ceiling fan actually help in extreme heat (100°F+)?
Yes, with an important caveat. A ceiling fan does not reduce the air temperature — it reduces the perceived temperature through wind chill (evaporative cooling). The actual air temperature remains the same. At 100°F ambient: a ceiling fan makes it feel like approximately 90–92°F. This is meaningful for comfort and safety during physical work, but it does not replace air conditioning for truly extreme heat conditions. If you regularly work in 100°F+ garages: pair a ceiling fan with a portable evaporative cooler or window AC unit.
Does the direction of a ceiling fan matter in a garage?
Yes. In summer (May–October): set the fan to run counterclockwise (when viewed from below). This pushes air straight down, creating the wind-chill cooling effect. In winter (November–April): set the fan to run clockwise at low speed. This pulls cool air up and pushes warm ceiling air down along the walls without creating a cold draft — reducing heating energy use by 10–15% in an insulated garage. Most fans have a small direction switch on the motor housing; some remote-controlled models switch direction via the remote.
Is a 48-inch garage ceiling fan enough for a 2-car garage?
Technically possible, but not ideal. A 48-inch fan in a 20×20 garage will create a clearly cooler zone directly under the fan with noticeably less airflow at the garage walls and corners. You would need to position your primary work area directly below the fan rather than anywhere in the garage. For 2-car garages: 56–60 inches is the correct size. A 48-inch fan is well-suited to a 1-car garage (10×20 feet) or a smaller workshop.
What is the difference between HVLS fans and standard ceiling fans?
HVLS (High Volume Low Speed) fans use large-diameter blades spinning at low RPM to move a wide, gentle column of air. Standard residential fans use smaller blades at higher RPM to create a fast, narrow column. In an open or large space like a garage, the wide airflow coverage of HVLS design provides full-room comfort; a standard fan creates one cool spot. True commercial HVLS fans (8–24 feet in diameter, used in warehouses) cost $3,000–$20,000. Residential HVLS-principle fans (56–72 inches, $150–$500) apply the same physics at a fraction of the cost.
Will a ceiling fan affect my garage air filtration system?
A ceiling fan increases the total air movement in the garage, which means your filtration system’s filter media is exposed to a higher particle flux — it captures more particles per unit time when air is being actively circulated. This is a positive outcome for air quality (more particles captured) but means you should check and replace filters more frequently when the fan runs continuously. See our Best Garage Air Filtration guide for filter replacement intervals under active use conditions.
The Bottom Line: Which Fan Should You Buy?
For the majority of homeowners with a standard 2-car garage: buy the Minka-Aire Contractor 60-inch. It moves more air than anything else in its price class, the 14° blade pitch is genuinely superior engineering rather than marketing, and Minka-Aire’s track record in commercial applications translates directly to long service life in a working garage. Budget $20 for a proper downrod — it ships with an undersized one.
If energy efficiency over a decade matters more than upfront CFM numbers: the Westinghouse DC 52-inch saves real money and provides excellent year-round performance including winter heat recirculation.
If you run your workshop daily and longevity is your primary concern: the Hunter Industrial 60-inch with its lifetime motor warranty is the correct lifetime investment.
Install it with the right downrod. Wire it correctly. Run it counterclockwise all summer. And enjoy a garage that is actually usable in July for the first time in years.
Your workshop deserves to be used twelve months a year. A ceiling fan is the most cost-effective step toward making that happen.
Affiliate Disclosure: Pro Garage Gear is a participant in the Amazon Services LLC Associates Program. We earn from qualifying purchases at no extra cost to you. All product recommendations are based on genuine research and represent gear we would install in our own garages. Prices and availability are subject to change.