
How to Insulate a Garage: The Complete DIY Guide (Walls, Ceiling, Door & Floor) for 2026
Affiliate Disclosure: Pro Garage Gear earns from qualifying Amazon purchases at no extra cost to you.
The “Heating the Neighborhood” Calculation: The average uninsulated garage loses 60–70% of its heat through the walls, ceiling, and door in a single hour. That means your garage heater — running at full capacity — is spending most of its energy warming the outdoors. Every dollar you spend on insulation eliminates this waste permanently. A properly insulated garage can cut heating energy consumption by 60–70%, pay itself back in 2–4 heating seasons, and make your garage usable in temperatures that would otherwise shut it down.
This guide covers every surface, every material, and every method — written for the DIYer doing this themselves.
💰 Garage Insulation Payback & ROI Estimator
See exactly how much money your insulation project saves — and how fast it pays for itself. Based on DOE energy-loss data for residential garages.
| Upgrade | Cost | Annual Saving | Payback | Amazon |
|---|
* Savings estimates based on DOE data showing 60–70% heat loss reduction from fully insulated garages. Individual results vary by climate, garage construction, and HVAC system efficiency. Pro Garage Gear earns from qualifying Amazon purchases.
The R-Value Primer: What It Means and What You Actually Need
R-Value measures thermal resistance — how effectively insulation slows heat transfer. Higher R-value = better insulation. But the right R-value depends entirely on your climate zone.
US Climate Zone R-Value Targets for Garages:
| Climate Zone | States (Examples) | Wall R-Value | Ceiling R-Value | Door R-Value |
|---|---|---|---|---|
| Zone 1–2 (Hot) | FL, HI, TX Gulf | R-13 | R-19 | R-6 |
| Zone 3 (Mixed) | GA, TX, AZ, NM | R-13 to R-15 | R-25 | R-8 |
| Zone 4 (Mixed-Cold) | MO, VA, KY, OR | R-15 | R-30 | R-10 |
| Zone 5 (Cold) | OH, PA, CO, WA | R-19 | R-38 | R-12 |
| Zone 6 (Very Cold) | MN, WI, ME, ND | R-21 | R-49 | R-14 |
| Zone 7 (Subarctic) | AK, parts of MN | R-21+ | R-60 | R-16+ |
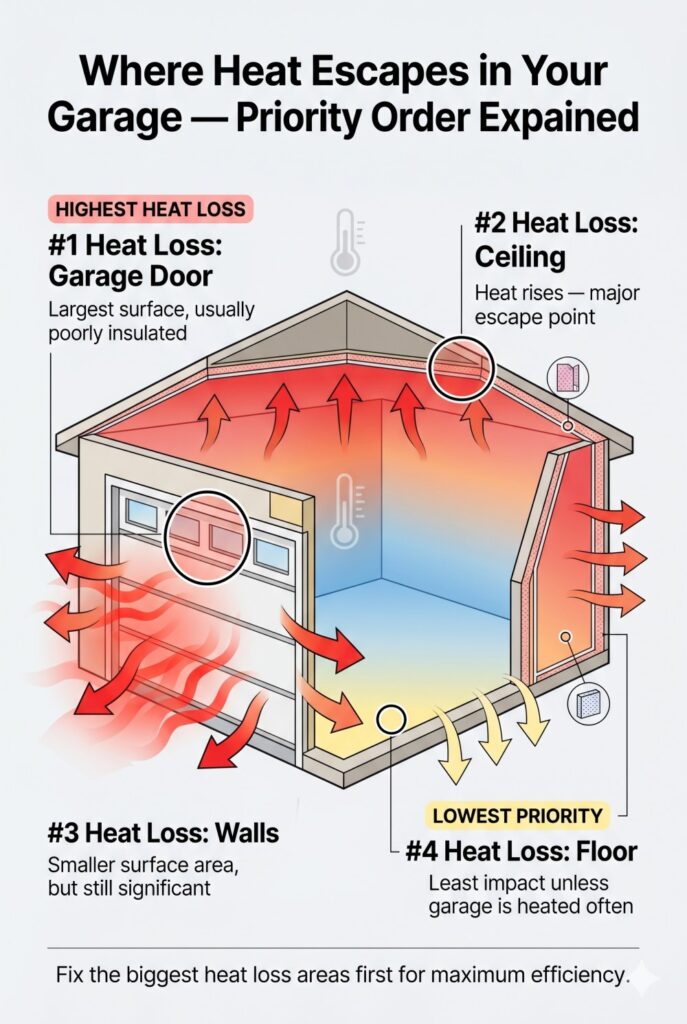
The Priority Order: In a typical garage, heat loss by surface (worst first):
- Garage door (largest single surface, typically zero insulation)
- Ceiling / attic interface (heat rises — biggest loss after door)
- Walls (significant, but smaller surface area than ceiling in most garages)
- Floor (least loss, but worth addressing if you heat the garage regularly)
🔒 Phase 0: Air Sealing First (The Step That Makes Everything Else Work)
Here’s the truth about insulation that most DIY guides skip entirely: insulation without air sealing is approximately 50% as effective as it should be. R-value measures resistance to heat conduction through a material — but it does nothing to stop convective heat loss through gaps, cracks, and penetrations where air physically moves through the envelope.
A 1/4-inch gap around a single electrical outlet box in an insulated wall can transfer as much heat as removing a full square foot of R-19 insulation. Air sealing that gap costs 30 cents worth of caulk. Ignoring it negates hours of insulation work.
Do Phase 0 before cutting a single piece of insulation.
The Phase 0 Air Sealing Checklist
Work from the top down — attic/ceiling first, walls second, floor interface third.
Ceiling/Attic Interface (Highest Priority):
- Top plates — the horizontal lumber at the top of each stud wall where it meets the ceiling. Gap between top plate and drywall/sheathing is the #1 air leakage path in residential garages. Seal with acoustical caulk (paintable, flexible, non-shrink).
- Recessed light housings — if you have recessed can lights, each one is a direct hole to the attic. Seal the gap around the housing with high-temp caulk or an approved cap from below.
- Ductwork penetrations — any HVAC duct or pipe that passes through the ceiling. Seal with foam backer rod + acoustical caulk for gaps under 1/2″; closed-cell spray foam for larger gaps.
Rim Joists (The Most Overlooked Air Leakage Point): The rim joist is the vertical lumber that sits on top of your foundation wall around the perimeter of the floor framing. It’s the single largest source of air infiltration in most garages — a large surface area exposed directly to the outdoors with zero insulation in most existing construction.
The Rim Joist Spray Foam Method:
- Access the rim joist from inside the garage (look for the band of lumber just above the concrete foundation wall)
- Cut 1.5-inch rigid foam board pieces to fit between each joist bay
- Press the foam against the rim joist
- Seal ALL FOUR EDGES with expanding spray foam — the foam is both the secondary insulation and the air barrier
This two-material approach (rigid foam + spray foam seal) achieves R-10 at the rim joist and eliminates what is typically the largest single air infiltration path.
Walls:
- Electrical outlet and switch boxes — every box on an exterior wall is a gap. Use pre-cut foam gaskets ($8 for a 10-pack) that press fit behind the cover plate. No tools required.
- Pipe penetrations — plumbing, gas lines, conduit. Seal around each with spray foam or hydraulic cement depending on gap size.
- Window and door frames — the gap between the frame and the rough opening. Fill with low-expansion foam (not standard expanding foam, which can bow window frames).
➡️ Shop Acoustical Caulk on Amazon ➡️ Shop Outlet Foam Gaskets on Amazon ➡️ Shop Low-Expansion Window and Door Foam on Amazon
The High-Volume Rim Joist Solution: Froth-Pak Spray Foam Kit
For rim joists in a full 2-car garage (typically 80–120 linear feet of rim joist perimeter), single spray cans are slow and expensive. A two-component spray foam kit (like Froth-Pak) applies continuous closed-cell foam at a rate that makes the entire perimeter a 30-minute job rather than a 2-hour one.
Froth-Pak kits yield 12–50 board-feet of closed-cell foam per kit (depending on kit size). A 2-car garage typically needs 1.5–2 kits of the 50 board-foot size for complete rim joist coverage at 1.5-inch depth.
Why closed-cell matters here: Open-cell foam absorbs moisture. At the rim joist (which is exposed to ground-level cold and humidity), moisture-absorbing foam creates exactly the rot and mold problem you’re trying to prevent. Closed-cell foam is waterproof, vapor-resistant, and provides R-6 to R-7 per inch — making it the correct material for below-grade and rim joist applications.
➡️ Check Price — Froth-Pak 50 Two-Component Spray Foam Kit on Amazon
➡️ Check Price — Froth-Pak 12 (Smaller Garages) on Amazon
The Air Sealing ROI: According to the Department of Energy, air sealing alone (without adding any insulation) reduces heating and cooling costs by 10–20% in a typical home. In a garage, where air infiltration is typically higher than in conditioned living space, the savings are proportionally greater. Air sealing is always the highest-return step — before any insulation.
Surface 1: The Garage Door (Start Here — Biggest Bang for Buck)
Why the Door Is First
Most garage doors are single-layer steel or aluminum with an R-value of R-0 to R-2. Replacing them with a fully insulated door (R-16 to R-18) is the highest-return insulation investment per dollar — but costs $1,200–$3,000 installed. The alternative: a DIY insulation kit that adds R-6 to R-8 to your existing door for $40–$80.
DIY Garage Door Insulation Kits
The Matador and Owens Corning kits use foil-faced foam board panels cut to fit each door section. Installation takes 2–3 hours. The result is a door that’s noticeably warmer to the touch in winter — and the reduced thermal mass means less energy spent counteracting the door’s cold-soaking effect.
➡️ Shop Garage Door Insulation Kits on Amazon
DIY insulation kits: Best Garage Door Insulation Kits
Surface 2: Garage Ceiling Insulation
The Method That Depends on What’s Above
If you have a living space above the garage: The ceiling is a finished floor from above. Access is limited to what’s exposed below — typically bare joists with a drywall ceiling on the room above. In this case, blown-in insulation (cellulose or fiberglass) is the best DIY option — rent a blower from Home Depot and fill the joist bays from inside the garage.
If you have an attic space above the garage: Access is from above. Roll batts of fiberglass insulation between the joists. R-38 is achievable with two layers of R-19 batts installed perpendicular to each other (the perpendicular layer eliminates thermal bridging at the joist edges).
If you have a flat roof or no attic: Spray foam is the most effective option — applied directly to the underside of the roof deck. This requires either a professional (for two-part spray foam) or spray foam kits for small areas.
Ceiling Insulation Materials Compared
| Material | R-Value/Inch | DIY Friendly? | Cost per Sq. Ft. | Best Use |
|---|---|---|---|---|
| Fiberglass Batts | R-3.2 | ✅ Yes | $0.30–$0.45 | Open joist bays |
| Mineral Wool Batts | R-3.7 | ✅ Yes | $0.50–$0.70 | Open bays; better moisture resistance |
| Blown-In Cellulose | R-3.5 | ✅ Yes (rented blower) | $0.25–$0.50 | Enclosed or hard-to-reach cavities |
| Spray Foam (closed cell) | R-6.5 | ⚠️ DIY kits available for small areas | $1.50–$3.00 | Rim joists, small gaps |
| Rigid Foam Board | R-3.8–R-6.5 | ✅ Yes | $0.50–$1.20 | Flat ceilings, surface-mount |
Shopping for Ceiling Insulation
➡️ Fiberglass Batt Insulation on Amazon ➡️ Mineral Wool Batts on Amazon ➡️ Spray Foam Insulation Kit on Amazon
Surface 3: Garage Wall Insulation
The 4-Step Wall Insulation Process
Step 1 — Identify Your Wall Construction
- Finished walls (drywall already up): Blown-in is your only option without demolition
- Open stud bays (bare studs visible): Batt insulation is fastest and most cost-effective
Step 2 — Address the Vapor Barrier
In climates with cold winters, a vapor barrier (6-mil polyethylene sheeting) must be installed on the warm side of the insulation (between the insulation and the interior living space — meaning on the interior face of the studs, under the drywall).
In hot climates (Zones 1–3), vapor barriers go on the exterior side. Getting this backwards causes the barrier to trap condensation within the wall assembly, leading to mold. Check your local building code for the correct vapor barrier placement for your zone.
➡️ 6-Mil Poly Vapor Barrier on Amazon
Step 3 — Install Batt Insulation
Measure your stud spacing (16″ or 24″ on center). Buy batts cut to match. Install friction-fit (the batts are slightly wider than the bay — they press-fit without staples, though face-stapling to the stud faces gives a cleaner vapor barrier surface for drywall installation).
Friction-fit tips:
- Don’t compress the batts — a compressed R-19 delivers R-13. Compression destroys R-value.
- Fill all gaps around electrical boxes and pipes. These are thermal shortcuts that bypass the insulation entirely.
- Use acoustical caulk around all penetrations (pipe/conduit entry points) before insulating.
➡️ R-19 Fiberglass Insulation Batts on Amazon
Step 4 — Thermal Bridging Upgrade (Optional but Impactful)
Standard stud-bay insulation creates a thermal bridge at every stud — studs are poor insulators (R-1 per inch) compared to fiberglass (R-3.2/inch). Adding a continuous layer of 1-inch rigid foam board across the interior face of all studs before drywalling eliminates this bridge and adds R-3.8 to the entire wall — raising a standard R-13 wall assembly to approximately R-17.
➡️ 1-Inch Rigid Foam Board Insulation on Amazon
Surface 4: Garage Floor Insulation
The floor is the lowest priority but still contributes to comfort — especially if you’re in a heated garage workshop. Bare concrete in a cold climate acts as a heat sink, cooling the air and making standing uncomfortable.
The easiest floor insulation approach:
- Install 1-inch rigid foam board directly on the clean concrete
- Cover with 3/4-inch plywood subfloor, screwed to the foam (not to the concrete)
- This creates an R-5 floor with a workable surface — dramatically warmer underfoot
Alternative: Rubber anti-fatigue mats at standing work areas provide immediate comfort benefit without the subfloor investment.
➡️ Anti-Fatigue Mat for Garage Floors on Amazon
Best Garage Floor Mats and Tiles: floor insulation alternatives
The Complete Insulation Shopping List
| Item | Purpose | Approx. Cost | Amazon |
|---|---|---|---|
| Garage Door Insulation Kit | Door: add R-6 to R-8 | $40–$80 | Shop → |
| R-19 Fiberglass Batts | Walls: 2×6 stud bays | $60–$120 (per roll) | Shop → |
| R-13 Fiberglass Batts | Walls: 2×4 stud bays | $40–$80 (per roll) | Shop → |
| R-38 Batts (2 layers) | Ceiling: open joists | $120–$200 | Shop → |
| 6-Mil Poly Vapor Barrier | Vapor control (cold climates) | $30–$60 | Shop → |
| 1″ Rigid Foam Board | Thermal bridge reduction | $20–$35/sheet | Shop → |
| Spray Foam Cans (Great Stuff) | Air-sealing gaps/penetrations | $15–$25 | Shop → |
| Acoustical Caulk | Seal around electrical/pipes | $8–$15 | Shop → |
Do I need a permit to insulate my garage?
Insulating open wall and ceiling bays (without altering structure) typically requires no permit. Adding drywall after insulation may require a permit in some jurisdictions. Check locally before drywalling.
Should I insulate an unattached garage?
If you heat it — yes, absolutely. If it’s purely storage with no climate control, the ROI is lower but the condensation control benefit still applies. A detached garage without insulation in a humid climate experiences significant condensation cycles that damage stored equipment
Can I use spray foam for all my insulation?
Spray foam (especially closed-cell) is the best air-sealing insulation available, but it’s significantly more expensive than batts for open bays. Use closed-cell spray foam for rim joists, around windows, and all penetrations. Use batts for the large open bays. This hybrid approach achieves near-spray-foam performance at batt pricing.
How long does DIY garage insulation take?
A standard 2-car garage (walls + ceiling, open bays): 1 weekend with two people. The door kit adds 2–3 hours.
The Bottom Line
Insulate in this order: door first, ceiling second, walls third, floor last. Each surface you insulate improves the performance of your heating and cooling system and reduces the energy bill permanently. A fully insulated 2-car garage in a cold climate cuts heating costs by $200–$400/year — paying back the material investment in 2–3 seasons.
Start this weekend with a $60 door kit and a can of spray foam for the obvious gaps. The improvement will be immediately noticeable, and it’s the cheapest hour of garage improvement you can make.
Best Garage Heaters 2026: heating after insulation
Best Garage Door Seals: sealing before insulation