
How to Soundproof a Garage Workshop Without Destroying the Walls (The Complete Guide)
Affiliate Disclosure: Pro Garage Gear participates in the Amazon Services LLC Associates Program. We earn from qualifying purchases at no extra cost to you. All product recommendations are based on independent research — no brand has paid for placement in this guide.
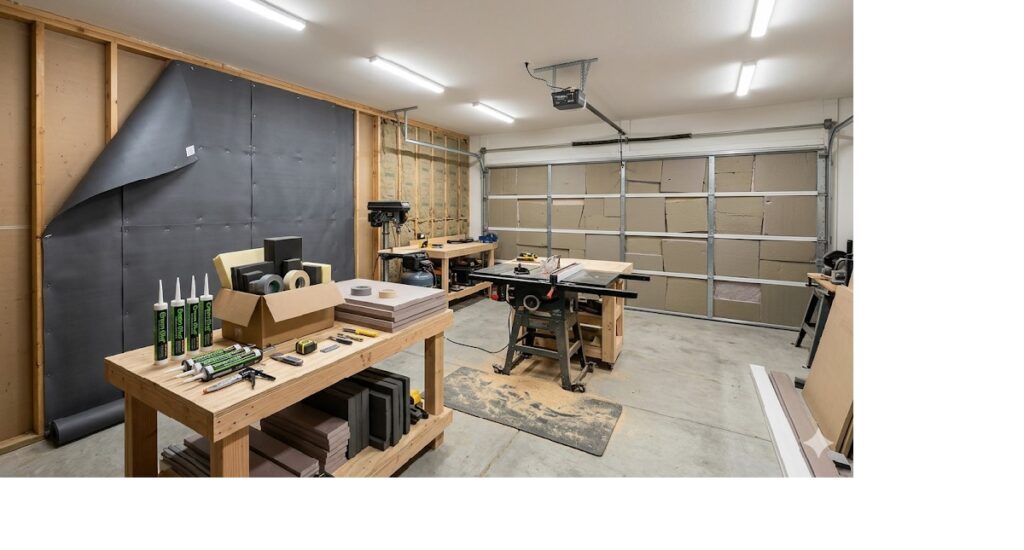
The “7 PM Miter Saw” Problem: You finally have the garage workshop you have been building toward for years. The workbench is solid. The lighting is right. The tools are organized. You start a project at 7 PM on a Tuesday — and by 7:04 PM, you have a text from your neighbor and a look from your spouse that communicates everything without words.
A table saw generates 100–105 decibels at the operator position. A miter saw hits 103 dB. An angle grinder reaches 100 dB. These are not just loud sounds — they are sounds that travel through walls, floors, ceilings, and air gaps with minimal loss, arriving in your neighbor’s living room at 85–90 dB — louder than a running lawnmower. This guide will fuide you on how to soundproof a garage workshop.
Most garage soundproofing advice recommends one of two things: buy some acoustic foam panels (which treat echo inside the room but do virtually nothing for sound transmission outside it), or tear out your walls and rebuild them with specialty construction (which costs $8,000–$15,000 and requires permits). Both are wrong answers for a garage workshop owner who wants practical results without a construction project.
The correct approach uses the same four mechanisms that professional recording studios use — applied intelligently to garage surfaces using products that do not require demolition. This guide explains all four mechanisms, tells you which garage surfaces to treat first for maximum return, and ranks the specific materials that deliver real STC improvement at every budget level.
The Physics First: Why Your Foam Panels Are Not Working
Understanding why acoustic foam fails to stop sound transmission is the foundation of everything that follows. Acoustic foam panels — the wedge or egg-carton profile foam sold everywhere as “soundproofing” — are sound absorbers, not sound barriers. They reduce echo and reverberation inside the room by absorbing reflected sound energy. They make your garage sound less “live” (less reverberant). They do essentially nothing to prevent sound from transmitting through your walls to the outside.
Sound transmission through a solid surface is governed by mass and damping — not absorption. The heavier a surface per square foot, the less it vibrates when sound energy strikes it, and the less sound energy is transmitted through it. A 5/8-inch sheet of drywall has a surface mass of approximately 2.5 lbs per square foot. Sound at 100 dB strikes it. Some energy is reflected, some is absorbed by the gypsum, and the remainder causes the panel to vibrate — transmitting sound to the other side.
Adding acoustic foam to that drywall reduces the echo inside your workshop. It does not change the surface mass. The wall transmits essentially the same amount of sound to your neighbor regardless of whether foam covers the inside surface.
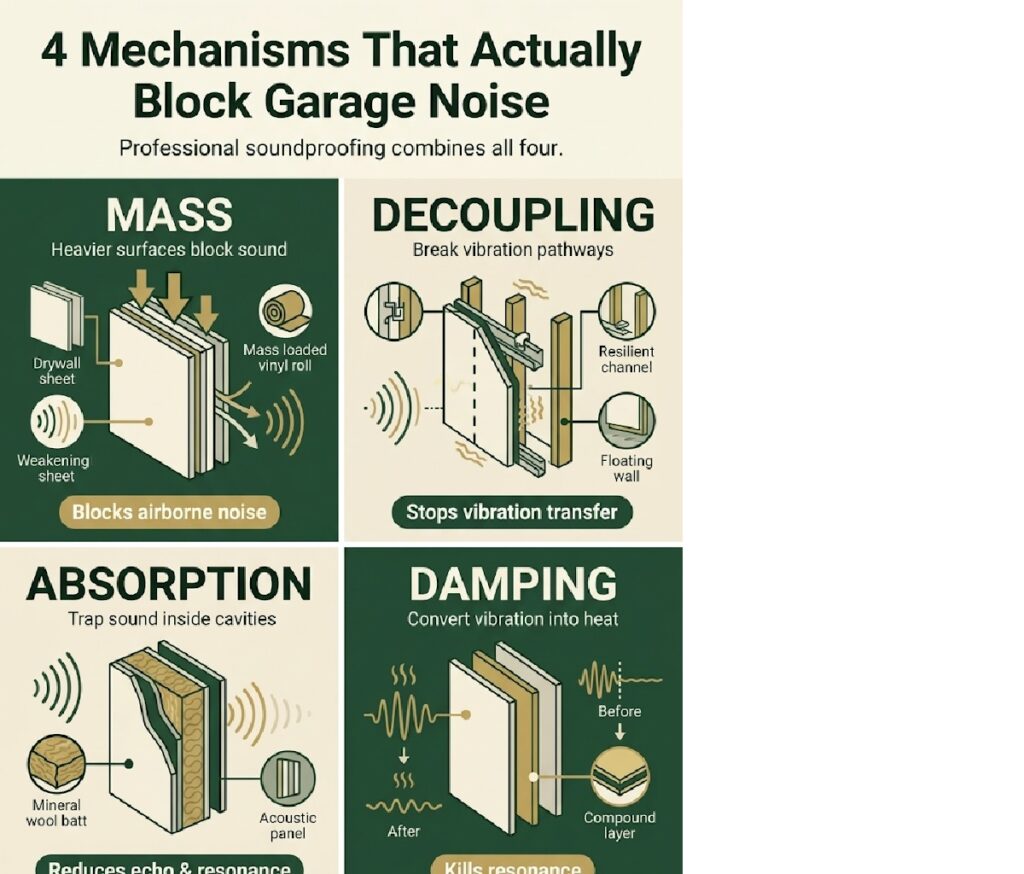
The Four Mechanisms That Actually Work
Professional sound isolation uses four distinct mechanisms simultaneously. The more of these you implement, the greater the STC (Sound Transmission Class) improvement. Implementing only one provides marginal results. Implementing all four on your most critical surfaces delivers professional-level isolation.
Decibels, STC, and NRC: The Three Numbers That Matter
Before comparing materials, you need to understand the three measurement systems used in soundproofing. These appear on product pages and in specifications — knowing what they mean prevents expensive mistakes.
Decibels (dB) — The Source Measurement
Decibels measure sound pressure level at a specific distance. The scale is logarithmic: a 10 dB increase sounds approximately twice as loud to the human ear, but represents 10 times more acoustic energy. Common workshop tools:
| Tool / Source | dB at Operator | dB Through Typical Uninsulated Garage Wall | Human Perception |
|---|---|---|---|
| Table saw | 100–105 dB | 65–75 dB | As loud as a busy restaurant kitchen |
| Miter saw | 100–103 dB | 65–73 dB | Clearly audible through walls; disruptive |
| Angle grinder | 97–101 dB | 62–71 dB | Clearly audible; perceived as intrusive |
| Router | 95–100 dB | 60–70 dB | Noticeable; tolerable for short periods |
| Circular saw (cordless) | 98–102 dB | 63–72 dB | Disrupts conversation in adjacent rooms |
| Drill / Impact driver | 95–98 dB | 60–68 dB | Audible but less disruptive |
| Air compressor (on-cycle) | 87–92 dB | 52–62 dB | Noticeable but less intrusive |
The Frequency Problem: Why the Same Tool Needs Different Materials in Different Parts of the Room
Every soundproofing material has a frequency range where it performs best — and a frequency range where it performs poorly. Treating all workshop noise as a uniform problem leads to mismatched material choices and disappointing results. A miter saw and an air compressor both measure 100 dB at the operator — but they require fundamentally different soundproofing approaches because they transmit at completely different frequencies.
Understanding Frequency in Workshop Context
High-frequency sound (1,000–8,000 Hz): The “whine” and “shriek” of circular saws, miter saws, routers, and grinding. High-frequency sound travels in relatively straight lines, is effectively blocked by mass and damped by Green Glue, and loses energy quickly as it transmits through dense materials.
Low-frequency sound (20–250 Hz): The “thump,” “rumble,” and “drone” of air compressors, bass notes from large table saws, and impact vibration from hammering and drop impacts. Low-frequency sound travels in all directions simultaneously, passes through standard drywall with minimal loss, and requires decoupling (physical separation of surfaces) rather than mass to control effectively.
The Frequency-Material Matching Chart
| Tool | Primary Frequency | Dominant Sound Character | Most Effective Treatment | Least Effective Treatment |
|---|---|---|---|---|
| Miter saw / circular saw | 2,000–8,000 Hz (high) | High-pitched whine, blade noise | Green Glue + double drywall, MLV on shared walls | Rubber mats alone (wrong frequency range) |
| Router / trim router | 3,000–10,000 Hz (very high) | High-pitched screech | Green Glue + double drywall (excellent at this range) | Decoupling (not primary transmission path) |
| Air compressor (on-cycle) | 60–250 Hz (low) | Deep rhythmic thump, motor drone | Anti-vibration isolation feet, rubber decoupling mats | Green Glue + drywall (minimal effect at low Hz) |
| Table saw (motor) | 120–400 Hz (low-mid) | Constant motor rumble | Anti-vibration mat under saw base + MLV on walls | Acoustic foam panels (NRC only, no transmission benefit) |
| Table saw (blade contact) | 1,000–5,000 Hz (mid-high) | Cutting whine, pitch varies | Green Glue + double drywall | Floor treatment alone |
| Angle grinder / cut-off saw | 500–4,000 Hz (mid-high) | Harsh metallic screech | MLV + double drywall on shared walls | Absorption foam |
| Hammer / impact work | 20–500 Hz (very low) | Impact thud, structural vibration | Rubber mat + decoupled floor system | Wall mass treatment (wrong transmission path) |
| Drill / impact driver | 200–1,500 Hz (low-mid) | Motor whine, impact clicks | Any combined treatment (moderate source) | Single-layer improvement typically sufficient |
The Practical Takeaway: Treat by Dominant Tool
Identify the loudest tool you use most frequently and match the primary treatment to its frequency profile:
- If your primary tool is a miter saw, router, or circular saw: Prioritise Green Glue + second drywall layer on shared walls. These tools are high-frequency dominant and respond dramatically to damping-based treatments.
- If your primary equipment is an air compressor or heavy machinery: Prioritise anti-vibration isolation under the equipment and rubber floor decoupling first. Wall treatments alone will not address the structural low-frequency transmission path of a compressor on a concrete slab.
- If you use both regularly: The full four-layer system (Rockwool cavity fill + MLV + Green Glue + second drywall) addresses both frequency ranges simultaneously — this is the only treatment approach that handles the full spectrum from compressor thump to saw whine in a single wall assembly.
The frequency insight that changes everything: Adding a second layer of drywall with Green Glue to a wall shared with your air compressor will improve the high-frequency noise coming through that wall. But the low-frequency compressor thump will continue to transmit through the concrete floor, up the wall stud bases, and through the wall framing regardless of what you apply to the wall face. For compressors, the correct first step is always isolation feet — not drywall treatment.
🛒 Check Price on Amazon — Anti-Vibration Isolation Feet (Compressors) →
🛒 Check Price on Amazon — Green Glue Compound (12-Tube Case — Enough for One Full Wall) →
STC (Sound Transmission Class) — The Wall/Door Rating
STC rates how well a structure (wall, door, window, floor assembly) reduces airborne sound transmission. Higher STC = more sound blocked. The scale is logarithmic: each 10-point STC improvement reduces perceived loudness by approximately half.
| STC Rating | What You Hear Through It | Equivalent Structure |
|---|---|---|
| STC 25 | Normal speech clearly audible | Single-layer 1/2″ drywall, no insulation |
| STC 33 | Loud speech audible; words distinguishable | Standard 2×4 wall, single drywall, insulated |
| STC 40 | Loud speech heard but not understood | 2×4 wall, double drywall, insulated |
| STC 45 | Loud speech faintly heard | Double drywall + Green Glue + insulation |
| STC 50 | Very loud sounds faintly heard | Decoupled wall assembly, double drywall, MLV |
| STC 60+ | Almost no sound transmission | Professional recording studio construction |
Your practical target for a garage workshop: STC 45–50 on the walls shared with neighbors or living spaces. At STC 45, your table saw (100 dB at source) arrives at your neighbor’s wall as approximately 55 dB — quieter than normal conversation. At STC 50: approximately 50 dB — the sound level of a quiet office.
NRC (Noise Reduction Coefficient) — The Absorption Rating
NRC rates how much sound energy a material absorbs rather than reflects. It ranges from 0 (perfect reflector) to 1.0 (perfect absorber). Acoustic foam panels have NRC ratings of 0.60–0.95 — excellent at reducing echo within your garage, contributing nothing to preventing transmission through surfaces.
NRC matters for your interior workshop comfort (reducing fatigue from reverberation) but not for your neighbor’s experience. Both matter — but they require different materials.
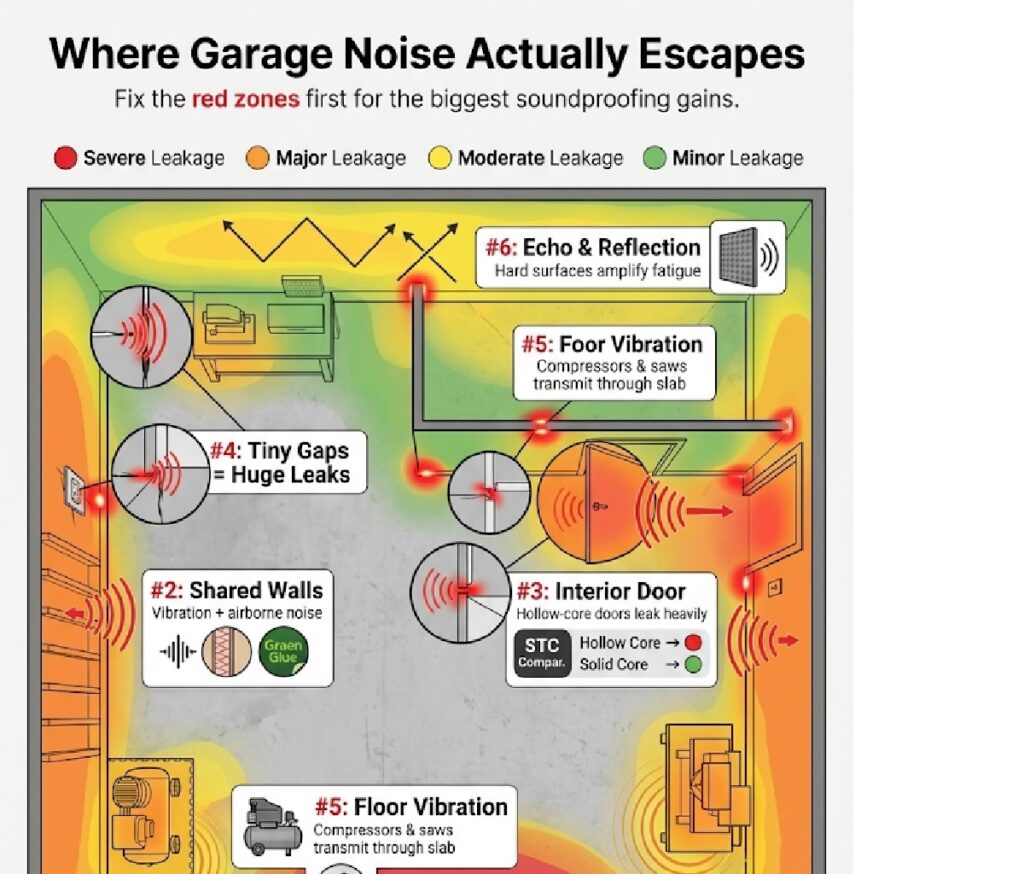
The Garage Sound Leakage Map: Where to Treat First
Sound escapes your garage through every surface — but not equally. Treating the lowest-STC surfaces first delivers the most improvement per dollar. Here is the ranked leakage map for a typical residential garage:
Calculate Your STC Improvement Before You Buy a Single Product
Select your current wall setup, choose the upgrades you are planning, and see exactly what your table saw sounds like to your neighbor — before and after. The calculator also tells you which treatment to prioritise for your specific wall condition.
🔊 Workshop STC Improvement Calculator
Select your current wall state and planned upgrades. See your before/after STC rating and what your table saw actually sounds like to your neighbor.
* STC improvements are typical values for residential assemblies with good workmanship. Actual results vary with installation quality, flanking paths, and specific product combinations. Values shown are additive estimates — real acoustic systems show diminishing returns at higher STC levels.
Surface-by-Surface Soundproofing Guide
Surface 1: The Garage Door (Treat This First — Always)
The garage door is the single largest sound leak in any garage and the most overlooked in soundproofing guides. A single-layer steel sectional door has an STC rating of approximately 18–22 — essentially a large, barely-there barrier. At STC 20, your 100 dB table saw transmits 80 dB through the door into your driveway and street — louder than a garbage truck at close range.
The good news: significant improvement is achievable without replacing the door.
Method 1 — Mass-Loaded Vinyl (MLV) on the Interior Door Face
Mass-loaded vinyl is a dense, flexible sheeting material — typically 1 lb per square foot — that adds mass to a surface without structural modification. Applied to the interior face of each garage door panel with adhesive and mechanical fasteners, MLV adds approximately 1 lb/sq.ft. of surface mass to the door assembly. The STC improvement: approximately 8–12 points when combined with the door’s existing insulation layer.
Installation on a sectional door requires cutting MLV panels to fit each door section precisely (the panels must flex at the hinges) and securing with construction adhesive plus aluminum tape at seams. A standard 2-car garage door (16×7 ft = 112 sq. ft.) requires one 4-foot wide × 30-foot roll of MLV.
🛒 Check Price on Amazon — Mass Loaded Vinyl (1 lb/sq.ft., 4ft wide) →
Important weight check: MLV adds 1 lb per square foot to each door panel. A 16-foot wide × 7-foot tall garage door has 112 sq. ft. of surface area — MLV adds 112 lbs to the door assembly. Check your garage door spring tension rating before adding MLV. Most torsion spring systems can accommodate this additional load, but a door balance check (available from any garage door technician for $50–$75) is worthwhile before proceeding.
⚠️ The Summer Adhesive Failure Warning: Why Mechanical Fasteners Are Non-Negotiable
An uninsulated steel garage door in direct sunlight reaches surface temperatures of 120–140°F on a hot summer day in most US climates. At these temperatures, even “heavy-duty” construction adhesives — including many products marketed specifically for MLV installation — lose between 40–70% of their bond strength. The MLV sheet, now carrying its full 1 lb per square foot weight, begins to peel away from the door panel. In worst-case scenarios, a full MLV panel separates during door operation and wraps around the door mechanism — causing opener damage and potentially trapping the door open or closed.
This is not a theoretical risk. It is the documented failure mode that experienced acoustic installers encounter when they return to evaluate adhesive-only MLV jobs after their first summer. The fix is simple, adds minimal cost, and makes the installation permanent.
The correct MLV installation on a garage door uses mechanical fasteners exclusively — not adhesive alone:
- Cut MLV panels to fit each door section precisely — panels must stop 1 inch short of each horizontal hinge line so the door sections can flex freely.
- Position the panel and mark fastener locations — space fasteners 8 inches apart around the perimeter and 12 inches apart across the field of each panel.
- Install plastic cap roofing nails (also called cap staples or simplex cap nails) using a hammer or a pneumatic cap nailer. The wide plastic cap distributes the load over a larger area of the MLV, preventing the fastener from pulling through the dense material. These are the same fasteners used on house wrap installation — available at every home improvement store.
- Alternative for steel garage doors: Use 1/2-inch stainless steel self-tapping screws with large-diameter finishing washers. The washer must be at least 1-inch diameter to prevent pull-through.
- Finish seams between panels with aluminum foil HVAC tape — not standard duct tape (which also fails at high temperatures). HVAC foil tape maintains adhesion at temperatures up to 248°F.
| Fastener Type | Best For | Spacing | High-Temp Safe? |
|---|---|---|---|
| Plastic cap roofing nails | Wood-framed doors | 8″ perimeter, 12″ field | ✅ Yes — mechanical, no adhesive |
| Self-tapping screws + 1″ washers | Steel sectional doors | 8″ perimeter, 12″ field | ✅ Yes — mechanical |
| Construction adhesive alone | Not recommended for door use | N/A | ❌ Fails above 90°F sustained |
| Double-sided foam tape alone | Not recommended for door use | N/A | ❌ Fails above 85°F sustained |
| Mechanical + HVAC foil tape seams | All door types — the correct method | As above | ✅ Yes — rated to 248°F |
🛒 Check Price on Amazon — Plastic Cap Roofing Nails (MLV Fasteners) →
🛒 Check Price on Amazon — HVAC Aluminum Foil Tape (High-Temp Seams) →
Method 2 — Acoustic Door Insulation Kit (Lower Mass, Easier Installation)
If your door is not yet insulated, a garage door insulation kit adds R-8 of thermal insulation while contributing meaningfully to the door’s acoustic mass. The STC improvement from an insulation kit alone is approximately 4–6 points — less than MLV, but sufficient for homeowners whose noise concern is moderate.
➡️ For complete garage door insulation options including specific kit comparisons: Best Garage Door Insulation Kits 2026: Stop Heating the Neighborhood →
Method 3 — Sealing Every Gap Around the Door Frame
This step costs under $50 and delivers a disproportionate acoustic improvement. Sound travels through air with zero resistance — a 1/4-inch gap around a door frame that covers 1% of the total door area will transmit enough sound to overwhelm the insulation value of the other 99%. Every gap must be sealed.
For the door bottom: a quality EPDM threshold seal or bottom door seal. For the sides and top: compression weatherstripping that creates a positive seal when the door closes. For the frame-to-wall interface: acoustical caulk in every crack between the door frame and the surrounding wall framing.
➡️ See our detailed guide: Best Garage Door Seals & Weatherstripping 2026: The Daylight Gap Test →
🛒 Check Price on Amazon — Acoustical Caulk (Non-Hardening Sealant) →
🔧 The Garage Door Silence Kit: The Complete System
These three components work as a system — not as individual products. The MLV adds mass; the mechanical fasteners ensure it survives summer temperatures; the HVAC tape seals the seams between panels against sound transmission at the panel joints. Missing any one element compromises the other two.
| Component | Role in System | Amazon |
|---|---|---|
| Mass Loaded Vinyl (1 lb/sq.ft. roll) | Mass — primary sound barrier | Shop → |
| Plastic Cap Roofing Nails | Mechanical attachment — heat-proof fastening | Shop → |
| HVAC Aluminum Foil Tape | Seam sealing — rated to 248°F, no adhesive failure | Shop → |
| Acoustical Caulk | Air gap sealing — door frame and perimeter | Shop → |
🛒 Search Amazon — Complete Garage Door Soundproofing Kits →
Surface 2: Shared Walls — The Four-Layer System
The walls shared with your neighbors or with your home’s living space are the second priority. A standard 2×4 stud wall with a single layer of 1/2-inch drywall and no insulation has an STC of approximately 33. Here is how to improve it at three budget levels — without demolition.
Budget Level 1: Insulation + Acoustic Caulk ($80–$200 for a 20-foot wall)
If your shared wall has open stud bays (visible studs, no drywall on the garage side), adding fiberglass or mineral wool insulation in the stud cavities before any other treatment is the foundation of every other method. An empty stud bay acts as a resonant chamber that amplifies certain frequencies. Filling it with unfaced R-13 or R-15 batts eliminates this resonance and adds approximately 5–8 STC points.
🛒 Check Price on Amazon — Rockwool Safe’n’Sound R-15 Acoustic Batts →
Why Rockwool over fiberglass here: Rockwool (mineral wool) batts have a denser, less fibrous structure than fiberglass at equivalent R-value — which makes them better acoustic absorbers, not just thermal insulators. Rockwool Safe’n’Sound is specifically designed for interior partition acoustic control. The STC contribution of Rockwool in a wall cavity is approximately 2–4 points higher than fiberglass at the same thickness.
Budget Level 2: Second Drywall Layer + Green Glue ($300–$600 for a 20-foot wall)
Adding a second layer of 5/8-inch drywall to an existing wall increases surface mass and — critically — when installed with Green Glue damping compound between the layers, converts mechanical vibration energy into heat before it can transmit through the wall assembly. The combined STC improvement over a basic single-layer drywall wall: approximately 8–14 points.
Green Glue application process: Apply two tubes of Green Glue compound per 4×8 sheet of drywall in a random S-pattern across the sheet face. Hang the new drywall layer with screws through both layers into the studs. The Green Glue must remain wet (not dried) to remain effective — it never fully cures and continues damping vibration for the life of the installation.
🛒 Check Price on Amazon — Green Glue Compound (Tubes) →
🛒 Check Price on Amazon — 5/8″ Type X Drywall (for second layer) →
Budget Level 3: Mass-Loaded Vinyl + Second Drywall + Green Glue ($500–$900 for a 20-foot wall)
The highest non-demolition STC improvement adds a layer of MLV between the existing wall surface and the new drywall layer. The wall assembly becomes: existing wall → MLV layer (mass) → Green Glue (damping) → 5/8″ drywall (mass). This three-layer combination consistently achieves STC improvements of 12–18 points over the base wall — pushing a basic STC 33 wall to STC 45–51.
Installation sequence: staple or glue MLV to existing wall surface, apply Green Glue to back of new 5/8″ drywall sheets, hang drywall over MLV, finish and paint as normal. The wall gains approximately 2.5–3 inches of depth in the treated area — adjust outlet boxes and trim accordingly.
🛒 Check Price on Amazon — Mass Loaded Vinyl Wall Roll →
Surface 3: Air Gaps and Penetrations — The Most Overlooked Step
This is where most DIY soundproofing projects fail. You can achieve an excellent STC wall assembly — and then lose 60% of that improvement through an unsealed electrical outlet, an uninsulated pipe penetration, or a gap between the drywall and the ceiling.
Sound transmission through a gap is essentially unimpeded. A gap representing just 1% of a wall’s total area will transmit enough sound to limit the effective STC of the entire assembly to approximately STC 28 — regardless of how well the other 99% of the wall is treated. This is called the “weak link” principle of acoustics.
The Air Gap Audit Checklist
- ☐ Electrical outlets and switches on shared walls: Every outlet box on an exterior or shared wall is a direct hole through the wall assembly. Install pre-cut foam gaskets behind outlet cover plates — they cost $8 for a 10-pack and take 5 minutes per outlet.
- ☐ The drywall-to-ceiling joint: The joint where wall drywall meets ceiling drywall is rarely sealed. Apply a bead of acoustical caulk in this joint before painting.
- ☐ The drywall-to-floor joint: Same joint at the bottom of walls. Often hidden by baseboard but unsealed behind it.
- ☐ Pipe and conduit penetrations: Any pipe, conduit, or cable that passes through a shared wall creates a direct sound path. Fill the gap around each penetration with acoustic putty or acoustic sealant.
- ☐ Recessed lighting: Recessed light cans in a shared ceiling are essentially holes. They require acoustically-rated covers or replacement with surface-mount fixtures.
🛒 Check Price on Amazon — Foam Outlet Gaskets (10-Pack) →
🛒 Check Price on Amazon — Acoustic Putty Pads for Outlet Boxes →
Surface 4: The Interior Service Door (Garage to Home)
The door between your garage and your home’s interior is, in most houses, a hollow-core interior door — STC 20–28 depending on age and construction. This door transmits sound directly from your workshop into your living spaces, bedrooms, and kitchen. Upgrading this door addresses both the soundproofing problem and the carbon monoxide safety concern simultaneously.
Option 1 — Solid-Core Door Replacement (Best Result)
A solid-core door has an STC of 28–34 — approximately 6–10 points higher than a hollow-core door. Combined with a quality door sweep and compression weatherstripping on all four sides, a solid-core service door between garage and living space is the most impactful single structural upgrade available without touching the walls.
🛒 Check Price on Amazon — Solid Core Interior Door →
Option 2 — Soundproofing Blanket on Existing Door (Budget Fix)
A moving blanket or dedicated soundproofing blanket hung on the interior face of the service door adds mass and damping without replacement. STC improvement: approximately 4–8 points. Not a permanent solution — the blanket must be removed and rehung — but effective for temporary or budget-constrained situations.
🛒 Check Price on Amazon — Soundproofing Blanket (Door or Wall Mount) →
Carbon monoxide note: Any improved sealing of the service door between garage and home increases the importance of a CO detector in the garage. Better sound sealing means less incidental air exchange — and any combustion activity in the garage (vehicles, propane heaters, generators) concentrates CO more rapidly in a well-sealed space.
➡️ Attached Garage Health Risks: The CO and Benzene Danger Most Homeowners Miss →
Surface 5: The Floor — Decoupling Impact and Vibration
Floor soundproofing addresses a different type of sound than wall treatment: impact noise — the vibration transmitted through the concrete slab when heavy machinery runs, when tools are dropped, or when compressors cycle on and off. This low-frequency structural vibration travels through the concrete and into attached structures (in attached garages) where it re-radiates as airborne sound in adjacent rooms.
The correct material for floor decoupling is rubber — specifically, anti-vibration rubber mat material rated for the equipment you are running.
| Equipment | Recommended Floor Treatment | Notes |
|---|---|---|
| Table saw / miter saw | 3/4″ rubber anti-vibration mat under machine base | Decouples saw vibration from floor; reduces transmitted frequency |
| Air compressor | Anti-vibration pad + isolation feet | Compressor motor vibration is continuous — decoupling is essential |
| Bench grinder / sander | 3/8″ rubber mat under workbench area | Moderate vibration; rubber mat sufficient |
| Welding table / heavy fabrication | 3/4″ stall mat (rubber) under entire fabrication area | Impact noise from hammering; thick rubber absorbs direct impact |
🛒 Check Price on Amazon — Anti-Vibration Pads for Compressors/Machines →
🛒 Check Price on Amazon — 3/4″ Rubber Stall Mats (Anti-Vibration Floor) →
Surface 5.5: The Ceiling Flanking Path — The Reason Most Garage Soundproofing Disappoints
You can execute every wall treatment in this guide perfectly — MLV, Green Glue, second drywall layer, sealed air gaps — achieve an estimated STC 50 on your shared wall, and still hear the table saw clearly in the bedroom above you. This is not a failure of the materials. It is a flanking path — and it is the single most common reason DIY soundproofing projects disappoint.
Here is what happens: Sound energy generated by your table saw travels in every direction — not just horizontally toward the treated wall. A significant portion travels upward into your garage ceiling, enters the attic space above the garage, and travels horizontally through the attic to re-enter the home through the ceiling of the room above. The treated wall becomes irrelevant because the sound went around it entirely.
How to Identify If You Have a Flanking Problem
Stand in the room above or adjacent to your garage while someone runs a power tool below. Then move to a position directly above where the treated wall is — not next to it. If the sound is clearly audible from directly above the treated wall’s path, the flanking path is active.
The definitive check: open your attic hatch and look at the floor of the attic above the garage. If the attic joists are exposed with no insulation on the attic floor — you have a direct flanking path. Every decibel that enters the attic from the garage below travels unimpeded to the adjacent home ceiling.
The Flanking Fix: The Attic Floor Sound Dam
The solution is straightforward and does not require touching the garage walls at all. Install acoustic insulation on the attic floor directly above the garage footprint — creating what acoustic engineers call a “sound dam” between the garage-originating airborne sound and the home ceiling below the attic.
The recommended material: Rockwool Safe’n’Sound laid flat across the attic joist bays above the garage.
Installation: roll or cut batts to fill the joist bays on the attic floor above the garage. No vapor barrier required for this application — this is purely an acoustic treatment on top of an existing floor, not a wall assembly. If the attic already has some insulation, add a second layer of Rockwool on top, perpendicular to the first layer. The perpendicular layer eliminates thermal bridging at the joist edges and further reduces flanking transmission.
| Attic Floor Condition | Treatment | Approx. Flanking Reduction |
|---|---|---|
| Bare joists, no insulation | Rockwool R-15 in all joist bays | 8–14 dB flanking reduction |
| Existing fiberglass batts | Add Rockwool layer perpendicular on top | 4–8 dB additional reduction |
| Existing blown-in cellulose | Verify minimum 6-inch depth, add if shallow | 3–6 dB additional reduction |
| Attic access blocked / finished | Install resilient channel on garage ceiling + 5/8″ drywall below | 6–10 dB at ceiling |
Shared attic vents are a secondary flanking path. If the attic has gable vents or soffit vents shared between the garage attic space and the home attic space — sound travels through these openings with no resistance. Seal shared vents with acoustical caulk and rigid foam before adding the Rockwool floor layer.
🛒 Check Price on Amazon — Rockwool Safe’n’Sound (Attic Floor Layer) →
🛒 Check Price on Amazon — Resilient Channel for Ceiling Decoupling →
The professional rule: Never soundproof a shared wall without simultaneously addressing the ceiling flanking path. A wall at STC 50 combined with an untreated flanking path produces a perceived result similar to STC 35–38 — the flanking path dominates the user’s experience regardless of the wall’s technical performance. Always treat both together.
Surface 6: The Interior — Acoustic Treatment for Your Comfort
Once you have addressed transmission through the structure, treating the interior of the workshop for reverberation control improves your own working comfort. A reverberant garage — bare concrete floor, bare drywall walls — extends the decay time of loud sounds, making 100 dB tool noise feel louder and more fatiguing than it would in a treated space.
Acoustic panels (NRC 0.80–0.95) mounted on the walls of the workshop reduce reverb time by absorbing reflected sound energy. They do not reduce transmission but they make the workspace more comfortable for sustained use. Target coverage of 15–25% of the total wall area for meaningful reverb reduction without making the space feel acoustically dead.
🛒 Check Price on Amazon — Acoustic Panels (Studio Foam 12-Pack) →
The Complete Material Comparison and Shopping Table
| Material | Mechanism | STC Improvement | Per Sq. Ft. Cost | Difficulty | Amazon |
|---|---|---|---|---|---|
| Mass Loaded Vinyl (1 lb) | Mass | +6–10 STC | $1.20–$2.00 | Medium | Shop → |
| Green Glue Compound | Damping | +8–14 STC (with 2nd layer) | $0.40–$0.60/sq.ft. | Low–Medium | Shop → |
| Rockwool Safe’n’Sound Batts | Absorption | +5–8 STC (cavity fill) | $0.50–$0.80 | Low | Shop → |
| 5/8″ Type X Drywall (2nd layer) | Mass | +4–6 STC | $0.30–$0.50 | Medium | Shop → |
| Acoustical Caulk | Air sealing | +5–15 STC (gap sealing) | Under $0.10 | Very low | Shop → |
| Outlet Foam Gaskets | Air sealing | Preserves system STC | Under $1 each | Very low | Shop → |
| Anti-Vibration Mat (3/4″) | Decoupling | Reduces impact noise | $0.60–$1.00 | Very low | Shop → |
| Acoustic Foam Panels | Absorption | NRC 0.85 (interior only) | $0.80–$2.00 | Very low | Shop → |
| Soundproofing Door Blanket | Mass + Absorption | +4–8 STC (door) | $0.60–$1.20 | Very low | Shop → |
| Solid-Core Service Door | Mass | +6–12 STC vs hollow core | $150–$350 total | Medium | Shop → |
Budget-Level Implementation Plans
Plan A — The $150 Weekend Fix (Renters / Immediate Improvement)
For renters or homeowners who cannot modify walls, this plan addresses the two highest-impact, non-permanent interventions:
- Acoustical caulk — seal all visible gaps around door frame, windows, pipe penetrations: $25
- Outlet foam gaskets — seal all outlets on shared walls: $15
- Door sweep + compression weatherstripping on service door: $35
- Soundproofing blanket on service door (interior hung): $65
- Anti-vibration pads under air compressor and table saw: $40
Estimated total STC improvement on service door path: 8–12 points. Neighbors will notice a significant reduction. Not a complete solution, but immediate and substantial.
Plan B — The $600 Serious Workshop Treatment
- All Plan A items: $150
- MLV on interior garage door face (one 2-car door): $180
- Rockwool insulation in shared wall stud bays (if open): $120
- Green Glue + second drywall layer on 10 linear feet of shared wall: $200
Estimated total improvement: 15–22 STC points on treated surfaces. Your table saw at 100 dB becomes approximately 78–85 dB at the shared wall exterior — within the range of loud conversation rather than machinery.
Plan C — The $1,200 Professional-Level Isolation
- All Plan B items: $600
- MLV + Green Glue + 5/8″ drywall on full shared wall run: $400
- Solid-core service door replacement with full perimeter sealing: $350
- Acoustic foam panels for interior reverberation control: $150
Estimated total improvement: 18–28 STC points on fully treated surfaces. At this level, your table saw at 100 dB becomes approximately 72–82 dB at the shared wall exterior — comparable to a busy office or restaurant, not machinery. Most neighbors find this level tolerable even during evening work sessions.
Garage Ventilation and Soundproofing: The Conflict You Must Solve
Here is the tension that most soundproofing guides ignore entirely: everything that makes a garage quieter also makes it less ventilated. Sealed walls, sealed door frames, sealed air gaps — these all reduce the passive air exchange that removes fumes, heat, and humidity from a working garage.
If you run a vehicle, use spray paint or solvents, weld, or use any combustion equipment in your garage — improving the sealing without improving active ventilation is a safety error.
The solution is simple: replace passive air exchange (gaps you did not intend to have) with controlled active ventilation (an exhaust fan you control deliberately). An exhaust fan with a motorized shutter provides ventilation when running and a tight seal when off — maintaining both your soundproofing and your air quality.
➡️ Best Garage Fans & Ventilation 2026: Exhaust Fans, CFM Calculation, and the Fume Removal System →
Similarly: a well-sealed, soundproofed garage traps heat more effectively in summer. Pair your soundproofing project with a ceiling fan solution to maintain comfort.
➡️ Best Garage Ceiling Fans 2026: The HVLS Guide to Cooling a Hot Workshop →
The Soundproofing Safety Trio: What Every Sealed Garage Must Have
Soundproofing a garage reduces the passive air exchange that previously allowed fumes, heat, and gases to dilute naturally. A garage that was previously “leaky” — with gaps that let fresh air in continuously — becomes a significantly tighter envelope after proper soundproofing treatment. This tighter envelope requires three non-optional safety upgrades:
1 — Interconnected Smoke and CO Alarm: Better acoustic sealing means you are less likely to smell smoke or hear a single alarm from inside the house if an incident begins in the garage. An interconnected wireless alarm triggers every alarm in the home when the garage unit detects an event.
🛒 Check Price on Amazon — Kidde Wireless Interconnect CO + Smoke Alarm →
2 — Controlled Exhaust Ventilation: Replace your former passive air gaps with a motorized wall exhaust fan that provides controlled air exchange when running and a tight seal (motorized damper) when off. This maintains your soundproofing integrity while ensuring air quality during tool use.
🛒 Check Price on Amazon — iLIVING Variable Speed Wall Fan with Motorized Damper →
3 — Class ABC Fire Extinguisher: A sealed workshop concentrates combustible dust (sawdust, finishing vapours) more rapidly than a ventilated one. The correct extinguisher — within arm’s reach of the exit, not next to the equipment — is mandatory.
🛒 Check Price on Amazon — Amerex B456 10 lb. Class ABC Extinguisher →
➡️ For the complete fire safety setup for a sealed workshop: Best Garage Fire Extinguishers 2026: UL Ratings, EV Blankets, and Interconnected Alarms →
Calculate Your STC Improvement Before You Buy a Single Product
Select your current wall setup, choose the upgrades you are planning, and see exactly what your table saw sounds like to your neighbor — before and after. The calculator also tells you which treatment to prioritise for your specific wall condition.
The Realistic Expectations Conversation
Complete soundproofing of a residential garage — eliminating all audible sound transmission from power tools — requires professional construction: floating walls, floating floors, floating ceilings, and an acoustically isolated room-within-a-room. This costs $15,000–$50,000 and is the approach used by professional recording studios.
None of the methods in this guide achieve that. What they achieve is meaningful, substantial, practical reduction — the difference between a neighbor who texts you every time you run the table saw and a neighbor who occasionally hears that you are working but does not find it disruptive.
The goal is not silence. The goal is tolerable. Plan B achieves tolerable for most residential situations for $600 and one serious weekend of work.
Frequently Asked Questions
Does soundproofing foam actually work for a garage?
Acoustic foam works excellently for reducing echo and reverberation inside your garage — making the space sound less reverberant and reducing the perceived harshness of loud sounds inside the room. It does almost nothing to prevent sound from transmitting through walls to the outside. For neighbor noise concerns, you need mass (MLV, additional drywall), damping (Green Glue), and air gap sealing — not absorption foam.
What is the cheapest way to soundproof a garage door?
The cheapest meaningful improvement: seal all gaps around the door frame with acoustical caulk ($15–$25) and install compression weatherstripping on the sides and top ($25–$40). This alone can improve the effective STC of the door assembly by 5–10 points by eliminating the air gaps that bypass the door entirely. The door itself is still acoustically poor but the overall system performance improves significantly.
How much does it cost to professionally soundproof a garage?
Professional acoustic contractor soundproofing of a garage (not a full isolation room — just wall and door treatment) typically costs $2,500–$8,000 depending on garage size and target STC rating. A full acoustic isolation room (room-within-a-room construction) in a garage space costs $15,000–$50,000+. The DIY approach in Plan C of this guide achieves 60–70% of the professional wall treatment result for approximately 10–15% of the cost.
Will soundproofing affect my garage’s fire rating?
In attached garages, the wall between the garage and living space typically has a required fire rating (1-hour fire rating in most codes — achieved with 5/8″ Type X drywall). Adding MLV and additional drywall layers does not compromise this fire rating — it typically improves it. However, if you remove any existing drywall during the project: ensure replacement drywall meets the required fire rating. Check your local building code and consult your building department if uncertain.
What hours can I legally run power tools in my garage?
Local noise ordinances vary significantly. Most US municipalities restrict construction and power tool noise to daytime hours — commonly 7 AM to 8 PM or 9 PM on weekdays, 8 AM to 7 PM on weekends. Check your specific city or county ordinance. HOA rules may be more restrictive. Soundproofing does not exempt you from noise ordinance compliance — but it makes compliance easier and neighbor relations smoother regardless of the legal framework.
Does carpet on the garage floor help with soundproofing?
Carpet absorbs reflected sound within the garage (reducing reverberation) but provides minimal soundproofing against transmission to adjacent spaces. For impact noise decoupling — preventing machinery vibration from transmitting through the concrete slab — rubber is dramatically more effective than carpet. Anti-vibration rubber mats under equipment are the correct floor treatment for soundproofing; carpet is an interior comfort treatment, not a transmission barrier.
The Bottom Line
Soundproofing a garage workshop is not about achieving silence — it is about achieving the right balance between usability, neighbor relations, and budget. The four-mechanism approach (mass, damping, decoupling, absorption) applied in priority order — garage door first, shared walls second, air gaps third, service door fourth — delivers the highest return per dollar of any soundproofing approach available without construction permits or professional contractors.
Start with the air gap audit. It costs under $50 and fixes the weakness that undermines every other investment you make. Then add MLV to the garage door. Then address the shared wall with a second drywall layer and Green Glue. Each step delivers measurable, noticeable improvement — you do not have to do everything at once.
Your workshop should be usable every day of the week, at reasonable hours, without anxiety about the neighborhood. That is a solvable problem. And now you have the complete solution.
Affiliate Disclosure: Pro Garage Gear earns from qualifying Amazon purchases at no extra cost to you. STC ratings cited reflect typical tested assemblies; actual performance varies with installation quality and specific product combinations. For critical acoustic applications, consult a certified acoustic consultant.