
Best Cordless Leaf Blowers for Garage Cleanup 2026: The CFM Number That Clears a Floor in 90 Seconds
Affiliate Disclosure: Pro Garage Gear participates in the Amazon Services LLC Associates Program. We earn from qualifying purchases at no extra cost to you. No manufacturer has paid for placement in this guide. All rankings are based on independent research and hands-on evaluation.
The “Wrong Tool for the Job” Problem: You finish a woodworking project. The garage floor is covered in sawdust, wood chips, and fine debris — wall to wall. You pull out your shop vac. You spend 18 minutes vacuuming the floor, moving items to get into corners, emptying the canister twice, and cleaning the filter afterward. The floor looks good. You are exhausted and it took the better part of half an hour.
Now imagine doing the same floor with the right cordless blower. You sweep the debris toward the garage door in two passes. The entire floor is clear in 90 seconds. Everything is piled at the door threshold — you either sweep it out or vacuum that one small pile. You never touched a filter. You never dragged a hose across the floor. You never emptied a canister.
This is not an exaggeration. A garage floor blower is genuinely the fastest cleaning tool available for large-area debris — faster than a broom, faster than a shop vac, and dramatically faster than any combination of the two. The reason most garage owners do not own one is simple: they think of leaf blowers as outdoor tools. The reality is that every serious shop, every professional detailing bay, and every mechanic’s garage uses a blower for floor cleanup — and has for decades.
This guide explains the one specification that determines whether a blower clears your garage or just moves debris around, ranks the best cordless leaf blowers for garage cleanup models across every battery platform for 2026, and gives you the technique that makes the 90-second floor clear repeatable every time.
Blower vs. Shop Vac vs. Broom: The Honest Comparison
Each cleaning tool has a legitimate role in a well-equipped garage. Understanding what each does best prevents you from using the wrong one for every job.
| Tool | Best Use Case | Worst Use Case | Garage Floor Debris | Time for 20×20 ft. Floor |
|---|---|---|---|---|
| Cordless blower | Dry debris, sawdust, leaves, light grit — large areas | Wet debris, oil, fine metal filings | Excellent — consolidates debris in one motion | 60–120 seconds |
| Shop vac | Fine sawdust, metal shavings, wet spills, corners | Large area dry debris — slow and filter-clogging | Good for finish cleanup; slow for full floor | 15–25 minutes |
| Push broom | Medium debris, light grit, after blower pre-sweep | Fine sawdust (redistributes into air) | Adequate; physically tiring on large floors | 8–15 minutes |
| Broom + dustpan | Small concentrated areas, corners, bench cleanup | Whole-floor debris | Poor for large areas — multiple bends required | 12–20 minutes |
The professional workflow: Blower first (consolidate all debris at the door in 90 seconds) → push broom to collect the pile into a dustpan → shop vac for any remaining fine dust and corners. Three tools, each used for what it does best, total elapsed time under 5 minutes for a full 2-car garage floor.
The One Specification That Determines Whether a Blower Works in a Garage
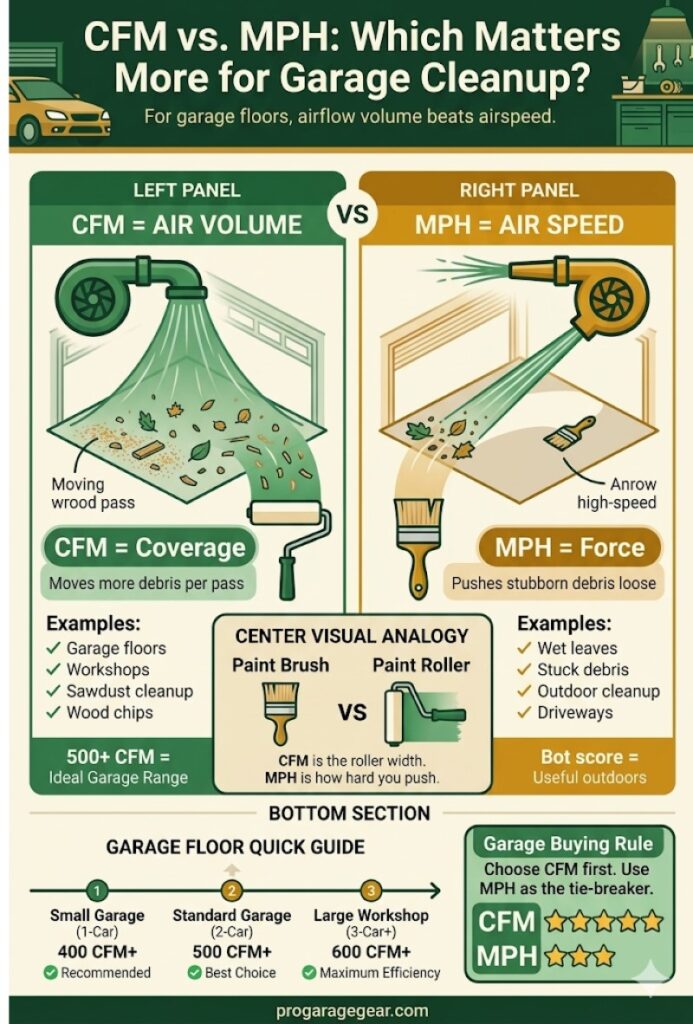
Every leaf blower specification page shows two numbers: CFM and MPH. Most buyers focus on MPH because a higher number sounds more impressive. This is the wrong metric for garage use — and it is why many buyers end up with blowers that move air dramatically but clear garage floors ineffectively.
CFM (Cubic Feet Per Minute) — The Garage Floor Spec
CFM measures the volume of air the blower moves per minute. In a garage context, CFM determines how wide a swath of debris is cleared with each pass — the working width of the airflow across the floor surface. High CFM means you cover more floor area with each movement of the blower wand. Low CFM means you are blowing a narrow lane and must make many passes to cover the same floor.
Think of it this way: CFM is the width of a paint roller. MPH is how hard you press it against the wall. You can press hard (high MPH) with a 2-inch brush and still take much longer to paint the wall than you would with a 9-inch roller at moderate pressure.
MPH (Miles Per Hour) — The Outdoor Debris Spec
MPH measures the velocity of the air exiting the nozzle. High MPH is important for dislodging wet leaves stuck to pavement, moving heavy debris outdoors, and clearing compacted material. For a garage floor covered in dry sawdust and light debris: the material is already loose. You do not need high velocity to dislodge it — you need sufficient volume to move it across the floor in a single efficient sweep.
The Garage Floor CFM Minimum
| Garage Size | Minimum CFM for Efficient Cleanup | Recommended CFM | Why |
|---|---|---|---|
| 1-car (10×20 ft.) | 300 CFM | 400+ CFM | 300 CFM clears adequately; 400+ does it in fewer passes |
| 2-car (20×20 ft.) | 400 CFM | 500+ CFM | Below 400 CFM, full floor takes multiple slow passes |
| 3-car or large workshop | 500 CFM | 600+ CFM | Large floor area rewards maximum CFM for efficiency |
| Any garage with heavy debris | 500 CFM | 600+ CFM | Wood chips, gravel, and coarse material need volume |
The practical minimum: Do not purchase a cordless blower under 400 CFM for garage use if your space is larger than a 1-car garage. Sub-400 CFM blowers work adequately for outdoor leaf cleanup where you follow the natural movement of debris. On a flat concrete floor where you are working against gravity and pushing debris toward a specific exit point, CFM is the limiting factor and 400 CFM is the threshold where the tool becomes genuinely efficient rather than merely functional.
Battery Platform: The Decision That Shapes Everything Else
A cordless blower runs on a battery. If you already own cordless power tools, the most cost-effective blower is almost always the bare tool (no battery, no charger) in the same battery platform you already use — the batteries you already own power the blower, and you do not pay for duplicate charging infrastructure.
If you are starting fresh with no existing cordless tools: choose your blower platform as the anchor for your cordless tool ecosystem. Every future drill, saw, sander, and light you buy will share batteries with it.
For detailed guidance on which cordless platform to commit to based on your use case:
➡️ Best Cordless Tool Sets 2026: DeWalt vs. Milwaukee vs. Ryobi — The Battery Platform Truth →
Quick Platform Compatibility Summary
| Battery Platform | Best Blower Option | Max CFM | Who It Suits |
|---|---|---|---|
| DeWalt 20V MAX / 60V FLEXVOLT | DCBL772 FlexVolt | 600 CFM | Existing DeWalt tool owners |
| Milwaukee M18 | 2724-20 M18 FUEL | 580 CFM | Existing Milwaukee tool owners |
| Ryobi ONE+ 18V | PCL575B 18V | 400+ CFM | Casual use, budget-conscious |
| EGO 56V (standalone) | LB6504 650 CFM | 650 CFM | Maximum performance, no existing platform |
| Greenworks 80V (standalone) | GBL80300 80V | 600 CFM | High performance without brand premium |
| Makita 18V LXT / 40V XGT | GBU01Z 40V XGT | 473–530 CFM | Existing Makita tool owners |
2026 Rankings: The Best Cordless Leaf Blowers for Garage Cleanup
🥇 #1 — EGO Power+ LB6504 56V 650 CFM (Best Performance — Platform-Independent)
The one-sentence reason it earns #1: At 650 CFM with a turbine fan design that maintains output across the battery discharge curve — not just at full charge — the EGO LB6504 delivers the most consistent, powerful airflow of any consumer-grade cordless blower available in 2026.
The Data
- CFM: 650 (maximum) — the highest in the consumer cordless category
- MPH: 200 MPH (maximum)
- Battery: 56V 5.0Ah (EGO ARC Lithium platform)
- Run time: Approximately 70 minutes at mid speed on the included 5.0Ah battery
- Weight (with battery): 8.2 lbs
- Speeds: Variable speed trigger + Turbo button
- Noise level: 65 dB at 50 feet — notably quiet for its output class
Why 650 CFM is meaningfully different from 500 CFM in a garage: On a 20×20 foot garage floor, 650 CFM clears the full floor area in approximately 90 seconds with two diagonal sweeping passes. 500 CFM requires three to four passes to achieve the same result. The difference is 60–90 additional seconds per use — minor individually, meaningful across hundreds of cleanup sessions over years of use.
The turbine design advantage: Most cordless blowers use an axial fan — a propeller-style blade that moves large volumes of air but is sensitive to battery voltage drop. As the battery depletes from 100% to 30%, output drops noticeably. The EGO’s turbine fan design maintains consistent output down to approximately 20% charge — you get the same floor-clearing performance throughout the working session, not just at the beginning.
Honest downside: EGO uses a proprietary 56V battery platform — it does not share batteries with any other brand. If you already own Milwaukee, DeWalt, or Ryobi tools, the EGO battery adds a new charging ecosystem to manage. The performance advantage is real; the ecosystem cost is also real.
🛒 Check Price on Amazon — EGO LB6504 650 CFM Blower (Kit) →
🛒 Check Price on Amazon — EGO LB6504 Bare Tool (if you own EGO batteries) →
🥈 #2 — DeWalt DCBL772B FlexVolt 60V 600 CFM (Best for DeWalt Platform Owners)
The one-sentence reason it earns #2: 600 CFM from a FlexVolt battery that you already use for your circular saw, reciprocating saw, and other heavy DeWalt tools — the most cost-efficient path to near-maximum garage blower performance for the most common cordless platform in North America.
The Data
- CFM: 600 (maximum with FlexVolt 60V battery)
- MPH: 125 MPH
- Battery: DeWalt FlexVolt 60V (also compatible with 20V tools at reduced output)
- Run time: 25–45 minutes on a 6.0Ah FlexVolt battery depending on speed
- Weight (with 6Ah battery): 9.8 lbs
- Speeds: Variable speed trigger + high-speed mode
- Brushless motor: Yes
The FlexVolt dual-chemistry advantage: The DeWalt FlexVolt battery runs as a 60V battery in FlexVolt tools (like this blower, table saws, and miter saws) and as a 20V battery in standard 20V MAX tools. One battery pack covers both. If you own a FlexVolt cordless tool of any kind, the DCBL772B uses the same battery — the blower becomes a bare-tool purchase rather than a kit purchase, saving $80–$120 over the kit price.
Honest downside: At 125 MPH, the DeWalt’s air velocity is lower than the EGO (200 MPH). This is irrelevant for garage dry debris cleanup but noticeable if you also use the blower outdoors for wet compacted leaves. The CFM figure (600 vs. EGO’s 650) is the more meaningful limitation — adequate for most garages, but the EGO’s 50 CFM advantage becomes perceptible in the largest workshop spaces.
🛒 Check Price on Amazon — DeWalt DCBL772B FlexVolt 60V (Bare Tool) →
🛒 Check Price on Amazon — DeWalt DCBL772 Kit (with battery + charger) →
🥉 #3 — Milwaukee M18 FUEL 2724-20 580 CFM (Best for Milwaukee Platform Owners)
The one-sentence reason it earns #3: Milwaukee’s POWERSTATE brushless motor and REDLITHIUM battery management deliver the most consistent CFM output across the battery discharge cycle of any 18V platform blower — the Milwaukee reputation for sustained performance under load applies directly to garage blower use.
The Data
- CFM: 580 (maximum)
- MPH: 120 MPH
- Battery: M18 REDLITHIUM (any M18 battery — widely compatible)
- Run time: 25 minutes on 5.0Ah battery at max speed; 45+ minutes at mid speed
- Weight (with 5Ah battery): 9.0 lbs
- Brushless motor: Yes — POWERSTATE
- ONE-KEY compatible: Yes (speed adjustment and tracking via app)
The Milwaukee battery ecosystem advantage: M18 is the most extensive 18V battery ecosystem in the professional tool market — over 200 compatible tools share the same battery. If you are invested in Milwaukee for professional or serious amateur use, the 2724-20 bare tool at its current street price represents exceptional value. Your existing 5.0Ah or 9.0Ah M18 batteries power the blower without any additional charging infrastructure.
Honest downside: 580 CFM versus the EGO’s 650 CFM is a meaningful gap in a large workshop. For 1-car and 2-car garages: fully adequate. For workshops 30×30 feet or larger: the CFM deficit becomes a genuine efficiency difference. Milwaukee M18 platform owners should accept this trade-off for ecosystem coherence; everyone else should consider the EGO.
🛒 Check Price on Amazon — Milwaukee M18 FUEL 2724-20 (Bare Tool) →
🛒 Check Price on Amazon — Milwaukee M18 FUEL Blower Kit (with batteries) →
⭐ #4 — Greenworks 80V 600 CFM BL80L2510 (Best for Non-Platform Buyers Watching Budget)
Greenworks delivers 600 CFM from their 80V platform at a street price typically $60–$90 below the EGO equivalent. The fan design is comparable, the brushless motor is genuine, and the 80V battery chemistry delivers strong output consistency. The trade-off is a smaller battery ecosystem (fewer compatible tools) and Greenworks’ thinner service network compared to EGO or the power tool brand platforms.
The Data
- CFM: 600 (maximum)
- MPH: 145 MPH
- Battery: Greenworks 80V 2.5Ah (included in kit)
- Run time: Approximately 30–45 minutes at varied speeds
- Weight (with battery): 7.9 lbs — lightest in the 600+ CFM category
🛒 Check Price on Amazon — Greenworks 80V 600 CFM Blower Kit →
⭐ #5 — Ryobi PCL575B ONE+ 18V (Best Budget Pick for Occasional Use)
For homeowners who need a blower for occasional garage cleanup rather than daily or weekly use, the Ryobi PCL575B delivers 100–440 CFM on the widest battery ecosystem in consumer tools — 300+ compatible ONE+ tools share the same 18V battery. The CFM range at maximum is adequate for 1-car garages; in a 2-car garage it requires additional passes compared to the premium options.
The Data
- CFM: 100–440 (variable)
- MPH: 90–110 MPH
- Battery: Ryobi ONE+ 18V (any Ryobi ONE+ battery)
- Weight (with 4Ah battery): 7.2 lbs
- Best for: 1-car garages, monthly cleanup sessions, existing Ryobi ONE+ owners
🛒 Check Price on Amazon — Ryobi PCL575B 18V Blower (Bare Tool) →
🛒 Check Price on Amazon — Ryobi ONE+ 18V Blower Kit (with battery) →
Find Your Exact Blower in 30 Seconds
Tell us your garage size, your existing battery platform, and what you are cleaning — and we’ll calculate the minimum CFM you need, estimate your cleanup time, and match you to the specific model with the best value for your setup.
💨 Garage Blower CFM Matcher
Answer 3 questions about your garage and we’ll calculate your minimum CFM, estimate your cleanup time, and match the right blower to your battery platform.
* Cleanup times are estimates for dry loose debris on a flat concrete floor with correct diagonal sweep technique. Wet debris, packed grit, and heavy leaves increase time. Metal filings should be vacuumed, not blown. Pro Garage Gear earns from qualifying Amazon purchases.
The Complete Blower Comparison Table
| Model | CFM | MPH | Battery | Weight | Best For | Amazon |
|---|---|---|---|---|---|---|
| EGO LB6504 | 650 | 200 | EGO 56V | 8.2 lbs | Maximum performance | Shop → |
| DeWalt DCBL772B | 600 | 125 | FlexVolt 60V | 9.8 lbs | DeWalt tool owners | Shop → |
| Milwaukee 2724-20 | 580 | 120 | M18 | 9.0 lbs | Milwaukee tool owners | Shop → |
| Greenworks BL80L2510 | 600 | 145 | Greenworks 80V | 7.9 lbs | Budget high-performance | Shop → |
| Ryobi PCL575B | 440 | 110 | Ryobi ONE+ 18V | 7.2 lbs | Budget / occasional use | Shop → |
| Makita GBU01Z 40V | 530 | 120 | Makita 40V XGT | 8.4 lbs | Makita tool owners | Shop → |
The 90-Second Floor Clear: The Garage Blower Technique
Owning the right blower is half the result. Using the correct technique on a garage floor is the other half. An inefficient sweeping motion with a 650 CFM blower takes longer and works less effectively than a systematic technique with a 500 CFM blower.

Step 0 — The Pre-Blower Door Seal Check (30 Seconds That Protects Your Home)
Before the first blower pass, do this check once — and only once if it passes. It takes 30 seconds and addresses the most overlooked risk of using a high-CFM blower in an attached garage.
A 650 CFM blower moves air at the equivalent of a sustained 20+ mph indoor wind. In an attached garage with gaps around the interior service door — the door between your garage and your home’s living space — that airstream creates a positive pressure differential that pushes fine particle-laden air through every gap in the door frame directly into your home. Fine sawdust, drywall dust, and ultra-fine particles below 5 microns (invisible to the naked eye) pass through gaps and enter living spaces, HVAC return air intakes, and bedroom air continuously during the blower session.
The Daylight Gap Test:
- Close the service door between your garage and your home completely.
- Turn off all garage lights.
- Stand in the garage and look at the door perimeter — all four edges.
- Any visible daylight (or interior home light) coming through the gap is an air infiltration point.
- The bottom of the door is the most common gap location — a 1/4-inch gap along the full door width passes as much air as a 2-inch circular hole.
If you see daylight: Apply a bead of acoustical caulk to static gaps in the door frame (where the frame meets the wall) and install a proper door sweep on the bottom of the door before using the blower regularly. A door sweep costs $15–$25 and installs in 10 minutes. The acoustical caulk fills frame gaps permanently.
If the door passes the daylight test: You are cleared to use the blower without dust migration concern. Run your blower sessions with the service door closed.
🛒 Check Price on Amazon — Interior Door Bottom Sweep Seal →
🛒 Check Price on Amazon — Acoustical Caulk (Door Frame Gaps) →
➡️ For the complete door sealing guide including weatherstripping replacement and threshold seals: Best Garage Door Seals & Weatherstripping 2026: The Daylight Gap Test →
The HVAC connection: If your garage has an HVAC return air vent or any duct connection to the home — an extremely common situation in attached garages — seal it before blower use. HVAC return vents draw air from the garage into the home’s air handling system. During a blower session, these vents actively pull fine dust from the high-pressure garage environment directly into your home’s ductwork. Cover the vent with a piece of cardboard taped around the edges during the blower session.
Step 1 — Set the Correct Nozzle Angle
Hold the blower so the nozzle tube is angled approximately 10–15 degrees from the floor surface — nearly parallel but with a slight downward tilt. This angle creates maximum horizontal airflow across the floor surface. A perpendicular angle (blowing straight down) scatters debris in all directions rather than directing it. A completely horizontal angle (parallel to the floor) misses the debris entirely as the airflow passes over rather than under it.
Step 2 — Start at the Far Back Corner
Begin at the corner furthest from the garage door. You are always blowing debris toward the exit, never away from it. Any debris that bypasses the first pass can be caught on a return sweep — but if you start at the door and work backward, you are pushing everything you just cleared back into the space you have not yet touched.
Step 3 — Use Diagonal Sweeping Passes
Diagonal passes are more efficient than straight parallel lanes because they cover a wider effective area with each pass and naturally direct debris toward the door corner rather than along the wall. Two diagonal passes — back-right to front-left, then back-left to front-right — consolidate nearly all debris in a central pile near the door threshold.
Speed setting: use variable medium speed (60–70% of maximum) rather than full throttle. Maximum speed scatters light debris unpredictably in turbulent patterns. Medium speed creates a more controlled, directional airstream that moves debris predictably toward the target zone.
Step 4 — Edge the Workbench and Storage Areas
Debris accumulates at the base of walls, workbenches, and storage units — areas that the diagonal passes will not reach cleanly. After the main floor passes, angle the nozzle along the wall base at approximately 30 degrees to the wall surface and make a single pass along each wall section, driving debris from wall to floor center and then toward the door with a finishing sweep.
Step 5 — Final Collection
The consolidated pile at the door threshold can be swept out with a broom (into the driveway for outdoor dispersal), collected with a shop vac in a single pass over the pile, or pushed into a dustpan. The entire floor is now clear. Elapsed time: 60–120 seconds for a 2-car garage.
Beyond the Floor: Using Your Blower for Overhead Racks, Shelves, and Wall Storage
A garage floor is where most blower use begins — but a working garage accumulates dust on every horizontal surface simultaneously. Overhead storage racks (Fleximounts, NewAge, and similar systems) develop a film of fine sawdust and particulate on the top face of every shelf within weeks of active workshop use. Wall-mounted shelving, pegboard, and slatwall panels trap dust in every hook groove and panel slot. These surfaces require different blower technique than floor sweeping.
Overhead Rack Cleaning (Fleximounts, Ceiling Storage Platforms)
Overhead storage racks present a specific challenge: the dust sits on the top face of the rack surface, above your head height. A floor blower pass does not address this surface. Blowing from below pushes dust further onto the rack rather than off it.
The correct technique: Stand on a stable step stool or ladder adjacent to the rack. Hold the blower at the rack surface level and blow across the top face horizontally, directing dust toward the edge of the rack and then downward to the floor. Work from the back of the rack toward the front (away from the wall, toward the aisle) so dust falls clear of the rack rather than recirculating behind stored items.
The weight consideration for overhead use: Any blower used overhead for extended periods creates arm and shoulder fatigue. The practical differentiator for overhead cleaning is not the 0.3 lb difference between the EGO (8.2 lbs) and the Greenworks (7.9 lbs) — that gap is functionally irrelevant at arm’s length. What matters is the variable speed control and nozzle reach:
- Variable speed (DC motor advantage): Rack cleaning requires medium speed — enough to dislodge settled dust without blasting stored items off the shelf. The EGO and Greenworks DC motors offer genuinely usable mid-speed settings. AC motor blowers (including many budget options) are either too fast or too slow in the middle range for overhead precision work.
- Concentrator nozzle: The flat concentrator nozzle attachment narrows the airstream for directed overhead work. Full-width tube output is too diffuse for the 6-inch precision needed between items on a loaded rack shelf.
🛒 Check Price on Amazon — Concentrator Flat Nozzle Attachment →
Wall-Mounted Shelving, Pegboard, and Slatwall Cleaning
Pegboard holes and slatwall grooves trap fine dust that a standard broom cannot reach without dislodging every hook and accessory. A blower pass along the pegboard at 45 degrees — directed away from the board — removes settled dust from the hole faces and groove channels in a single motion.
The sequence for wall storage cleaning:
- Clear the floor area below the wall storage system (or plan to re-sweep it after).
- Use the concentrator nozzle at medium speed, angled 30–45 degrees away from the board.
- Sweep along the board horizontally in one continuous pass — do not point the nozzle directly into pegboard holes at close range (this can dislodge the backing inserts).
- The dislodged dust falls to the floor. Re-run your standard floor clear sequence.
The Full-Garage Cleaning Sequence (Including Overhead Surfaces)
| Step | Surface | Technique | Time |
|---|---|---|---|
| 1 | Overhead storage racks (top face) | Horizontal sweep from ladder, back to front | 60–90 sec |
| 2 | Wall shelving and pegboard | Angled horizontal pass, medium speed | 30–60 sec |
| 3 | Workbench surface | Sweep toward front edge, debris to floor | 20–30 sec |
| 4 | Garage floor (main pass) | Two diagonal passes, front door collection | 90–120 sec |
| 5 | Final pile collection | Shop vac or dustpan for door threshold pile | 30–60 sec |
Total elapsed time for a full 2-car garage: 5–6 minutes. Including every surface, top to bottom, using the correct sequence that does not re-contaminate cleaned surfaces. Compare this to the same job using only a broom and shop vac: 30–45 minutes. The blower does not just change how you clean the floor — it changes the entire economics of keeping a working garage clean.
➡️ For overhead storage rack installation and joist loading guides: Best Overhead Garage Storage Racks 2026: Joist Safety and Load Limits →
Important: When NOT to Use a Blower in Your Garage
A garage blower is the right tool for dry debris on a large floor area. It is the wrong tool in several specific scenarios that are common in working garages:
Scenario 1 — Fine Metalworking Debris
Metal filings, grinding sparks residue, and fine aluminium or steel shavings should never be blown. Suspended metallic particles in air are a respiratory hazard and, at sufficient concentration, a fire risk. Vacuum metal debris with a shop vac rather than blowing it into suspension.
Scenario 2 — Immediately After Spray Painting or Solvent Use
If you have used spray paint, lacquer, or solvent-based cleaners in the past 30 minutes: do not use a blower until the space is fully ventilated. A running blower moves large volumes of air that can redistribute vapour concentration patterns unpredictably in a partially ventilated space.
➡️ For full fume management and ventilation strategy: Best Garage Fans & Ventilation 2026: Exhaust Fans, CFM, and Fume Removal →
Scenario 3 — Asbestos-Containing Materials
Garages in homes built before 1980 may have asbestos-containing floor tiles, ceiling tiles, or insulation materials. If any of these materials are damaged or deteriorating — do not use a blower. Blowing disturbs asbestos fibre bundles and creates airborne asbestos concentration. Contact a licensed abatement professional.
Scenario 4 — Active Epoxy or Polyurea Floor Coating Within 7 Days of Application
A freshly applied floor coating (epoxy, polyurea, polyaspartic) requires 7 full days of vehicle traffic cure time. Using a blower on a floor within this curing window can lift debris and fine particles that then settle on the tacky surface and bond permanently. Wait for full cure before first blower use on a freshly coated floor.
➡️ How to Epoxy Your Garage Floor: Cure Times, Anti-Skid Additive, and the Hot Tire Pickup Warning →
Blower Maintenance: Keeping Your Tool Ready When You Need It
A cordless blower that has been sitting in the garage since last autumn may need 5 minutes of attention before it is useful. Here is the maintenance routine that ensures it is ready every time you reach for it.
The Twice-Yearly Blower Maintenance Protocol
Intake Screen Cleaning (Every 10–15 Hours of Use)
Every cordless blower has an intake screen or grille where air enters before being accelerated through the fan. Garage use deposits sawdust and debris on this screen with every use. A partially blocked intake screen reduces CFM output significantly — a screen at 50% blockage reduces airflow by approximately 25–35%. Remove the intake grille, rinse with water, and dry before reinstalling. This takes 3 minutes and restores full CFM output immediately.
Battery Terminal Cleaning (Every 3 Months)
Battery contact corrosion is the most common cause of “blower won’t start” problems with stored cordless tools. Inspect the battery contacts on both the battery and the tool’s battery receptacle. Any green or white oxidation should be removed with a dry pencil eraser or a cotton swab lightly dampened with isopropyl alcohol.
➡️ For complete battery care across all your cordless tools: Best Cordless Tool Sets 2026: Battery Care and Ecosystem Guide →
Fan Blade Inspection (Annually)
The impeller (fan) inside a cordless blower is the most damage-vulnerable component. Small stones and dense debris drawn through the intake can chip or crack impeller blades — creating vibration and reducing output. Inspect by removing the nozzle tube and shining a light into the fan housing. Any visually damaged blade is cause for a warranty or repair claim — an imbalanced impeller causes bearing wear that progressively worsens.
The Complete Garage Blower Accessories Table
| Accessory | What It Does | Priority | Amazon |
|---|---|---|---|
| Concentrator nozzle (flat tip) | Narrows airflow for tight spaces and workbench edges | 🟡 Recommended | Shop → |
| Dust mask (N95) | Protects against airborne sawdust during blower use | 🔴 Essential | Shop → |
| Safety glasses | Flying debris eye protection — mandatory when blowing | 🔴 Essential | Shop → |
| Wall-mount tool hook (garage) | Stores blower off the floor, always accessible | 🟡 Recommended | Shop → |
| Extra battery (platform-matched) | Extended run time for large garages or battery sharing | 🟢 Optional | Shop → |
| Shop vac (companion tool) | Final debris collection + fine dust after blower pre-sweep | 🔴 Essential (pair) | Shop → |
For the best shop vac options to pair with your blower for the final fine-dust pass:
➡️ Best Shop Vacs 2026: Tested for Dust, Water, and Debris →
The Complete Blower Cleanup Ecosystem: What to Buy With Your Blower
The blower is the productivity multiplier. These four accessories complete the system — each one addressing a specific gap that the blower alone cannot cover:
| Item | Why It Pairs With the Blower | Amazon |
|---|---|---|
| N95 Dust Mask (10-Pack) | Mandatory PPE — blower use puts fine particles in the air around your face. The mask costs $1 per session and protects your lungs for the life of your workshop | Shop → |
| Safety Glasses (ANSI Z87.1) | Flying debris eye protection — non-negotiable during blower operation. Grit, wood chips, and debris become projectiles at 120+ MPH | Shop → |
| Wall-Mount Tool Hook (Blower Storage) | Storing the blower off the floor prevents intake screen clogging from floor-level dust — the #1 cause of reduced CFM output over time. Mount at shoulder height, nozzle down | Shop → |
| EGO 56V 5.0Ah Spare Battery (EGO platform owners) | EGO is a standalone platform. A spare battery means the blower is always ready — charge the spare while the primary is in use. EGO batteries cross-compatible with all EGO tools (mower, trimmer, chainsaw) | Shop → |
🛒 Check Price on Amazon — N95 Dust Masks (10-Pack) →
🛒 Check Price on Amazon — ANSI Z87 Safety Glasses →
🛒 Check Price on Amazon — EGO 56V 5.0Ah Spare Battery (ARC Lithium) →
Garage Air Quality: The Blower’s Hidden Benefit
The Blower’s Hidden Financial Benefit: What It Does to Your Shop Vac Filter Budget
Beyond the obvious floor-clearing function, a garage blower delivers a measurable financial return on your shop vac operating costs that most owners never calculate — and never realise they are missing.
The Filter Clogging Problem Every Workshop Owner Experiences
A shop vac filter works by trapping particles in a pleated paper or foam element. When you vacuum a garage floor directly — without a pre-blower sweep — the filter processes the full spectrum of debris in a single pass: large wood chips, coarse shavings, fine sawdust, and the ultra-fine particles below 10 microns that lodge permanently in the filter pleats. It is the ultra-fine fraction that destroys filters fastest.
Large particles — chips, shavings, visible grit — pass through the filter path and collect in the canister. Fine particles bind to the filter media electrostatically and mechanically. Once bonded, they cannot be knocked loose by tapping or compressed air. The filter’s effective area progressively decreases with every session until suction drops noticeably. At that point the filter is replaced.
The blower changes this dynamic entirely. A 90-second blower pre-sweep consolidates all the large and medium debris into a pile at the door. The shop vac then processes only the remaining fine dust — the fraction that was already airborne or too light to be swept. The filter never encounters wood chips, coarse shavings, or heavy grit. It processes only the fine particles it cannot avoid.
The Filter ROI Calculation
The financial impact of this workflow change is real and calculable:
| Scenario | Filter Replacement Frequency | Annual Filter Cost |
|---|---|---|
| Shop vac only — full floor vacuum without pre-sweep | Every 6–10 weeks (heavy workshop use) | $80–$120/year |
| Shop vac only — moderate use (1–2 projects/week) | Every 3–4 months | $40–$60/year |
| Blower pre-sweep + shop vac finish pass | Once per year (fine dust only) | $15–$25/year |
The net result: For a workshop owner replacing a HEPA shop vac filter every 2 months at $20 per filter, that is $120/year in filter costs. Switching to the blower pre-sweep workflow reduces that to one annual filter replacement at $20. The $100 annual savings pays for a mid-range cordless blower in under two years — and the savings continue every year after that.
For HEPA filter users specifically: HEPA-rated shop vac filters cost $25–$45 each. At 6 replacements per year under direct-vacuum workflow: $150–$270/year. Under the blower pre-sweep workflow: one replacement per year, $25–$45. Annual savings: $125–$225. A premium EGO blower pays for itself in filter savings alone in 3–4 years — everything else is pure gain.
Additionally: a filter operating at full efficiency (not partially clogged) maintains suction throughout the vac session, meaning your shop vac also takes less time to complete the same area. The blower does not just save money on filters — it makes the shop vac faster at everything it handles.
🛒 Check Price on Amazon — HEPA Shop Vac Filter Replacements →
➡️ For shop vac selection and filter specification comparison across all major models, our companion guide covers every option:
Best Shop Vacs 2026: Tested for Dust, Water and Debris →
➡️ Best Garage Air Filtration Systems 2026: Filter Maintenance and Unit Rankings →
Frequently Asked Questions
Can I use a gas leaf blower in my garage?
No. Gas-powered blowers produce carbon monoxide exhaust. Using any combustion engine equipment in an enclosed garage — even briefly — creates CO concentration risks. A garage is not sufficiently ventilated to safely operate a gas blower indoors. Cordless electric blowers produce zero emissions and are the only safe option for garage interior use.
What is the minimum CFM I need for a garage blower?
For a 1-car garage (10×20 ft.): 300 CFM minimum, 400 CFM recommended. For a 2-car garage (20×20 ft.): 400 CFM minimum, 500+ CFM recommended. For a 3-car garage or large workshop: 550–650 CFM. Below the minimum, the blower still works but requires significantly more passes to clear the same floor area, eliminating most of the time advantage over a broom.
How long does a cordless blower battery last for garage use?
A garage cleanup session uses the blower for 90–180 seconds of active operation per cleanup. On a 5.0Ah battery, any blower in this guide provides 20–60 minutes of run time — meaning a single fully charged battery handles 30–120 garage cleanup sessions before depleting. In practice, garage blower use depletes batteries very slowly. Monthly users may run a year on a single charge cycle if the battery starts at full.
Is a cordless leaf blower better than a broom for garage cleanup?
For large-area dry debris: yes, significantly faster and less physically demanding. A broom requires 8–15 minutes and multiple bending motions to clean a 2-car garage floor. A blower covers the same floor in 60–120 seconds without bending. For precise cleanup of small areas, corners, and under equipment: a broom remains useful as a finishing tool. The blower replaces the broom for the primary sweep; the broom handles the detailed cleanup the blower cannot reach efficiently.
Will a leaf blower scratch my epoxy garage floor?
No — the airflow itself does not scratch epoxy. However, the debris being moved by the airflow can scratch the floor if it contains sharp-edged particles (metal chips, grit, stone fragments). For epoxy or polyurea-coated floors, check the debris type before using the blower. For coarse metal shavings: vacuum first, then blow the remaining fine dust. For typical sawdust and wood chips: blow freely, no scratch risk.
My garage has an attached home — will the blower create too much dust in the air?
A blower moves debris along the floor surface. Fine particulates (sawdust finer than 100 microns) will become temporarily airborne during blower use. If you have an attached home and are concerned about fine dust migration, run your garage air filtration system before and during blower use, and ensure the door between the garage and home is closed during the blower session.
The Bottom Line: Your Battery Platform Decides, Your Garage Size Confirms
The decision tree is simple:
- You already own DeWalt FlexVolt tools: Buy the DCBL772B bare tool. 600 CFM. Done.
- You already own Milwaukee M18 tools: Buy the 2724-20 bare tool. 580 CFM. Done.
- You already own Ryobi ONE+: Buy the PCL575B bare tool if your garage is 1-car or 2-car. Acceptable for occasional use.
- You have no existing platform or want maximum performance: Buy the EGO LB6504 kit. 650 CFM. The best cordless garage blower available in 2026.
Add a $12 N95 dust mask. Store the blower on a wall hook adjacent to the garage door so it is within reach every time you need it. Use the diagonal sweep technique.
The 90-second floor clear is not a promise. It is a technique. And once you have done it once with the right tool, you will never go back to spending 20 minutes pushing a broom across the same floor.
Affiliate Disclosure: Pro Garage Gear earns from qualifying Amazon purchases at no extra cost to you. Battery run time figures are approximate and vary with temperature, load, and battery age. Never use gas-powered blowers in enclosed spaces.