How to Epoxy Your Garage Floor: The Step-by-Step Guide That Actually Works (2026)
Affiliate Disclosure: Pro Garage Gear earns from qualifying Amazon purchases at no extra cost to you
The “Peeling Nightmare” Warning: You spend a Saturday applying your DIY epoxy kit. You wait 72 hours. You’re thrilled with the results — glossy, professional-looking floor. Then you park your car. The hot tires lift the coating when you pull out the next morning. By week 3, it’s peeling. By month 6, it looks worse than the bare concrete you started with. That’s why we put up this guide on how to epoxy your garage floor correctly.
This is the hot tire pickup failure — the #1 cause of DIY epoxy floor disasters. And it’s entirely avoidable with the right product and preparation protocol.
Here’s the thing about most failed epoxy floors: the epoxy wasn’t the problem. The surface preparation was. Concrete is a porous matrix that must be chemically opened before any coating will bond permanently. Skip — or rush — the prep, and no coating on earth will stick.
🌡️ Hot Tire Pickup Risk Test
Before you buy an epoxy kit — find out if water-based epoxy will survive your tires. This tool calculates your tire temperature and matches the right coating for your situation.
| Epoxy Type | Tg (°F) | Your Risk | Right for You? |
|---|
* Tire temperature estimates based on published SAE and Goodyear tire temperature research. Glass transition temperatures (Tg) are typical ranges — specific products may vary. Always verify your product’s Tg with the manufacturer’s technical data sheet. Pro Garage Gear earns from qualifying Amazon purchases at no extra cost to you.
Epoxy vs. Polyurea vs. Polyaspartic: Choosing Your Coating
Before buying a single bucket, understand the product category you’re choosing:
| Coating Type | Cure Time | UV Stable? | Hot Tire Resistance | DIY Friendly? | Cost (2-car garage) |
|---|---|---|---|---|---|
| Water-Based Epoxy | 24–72 hrs | No (yellows) | Poor | ✅ Yes | $80–$150 |
| 100% Solids Epoxy | 12–24 hrs | No (yellows slightly) | Good | ⚠️ Requires skill | $150–$300 |
| Polyurea | 1–6 hrs | Good | Excellent | ⚠️ Very fast work time | $300–$500 |
| Polyaspartic | 1–4 hrs | Excellent | Excellent | ❌ Usually professional | $400–$800 |
For DIYers: 100% solids epoxy kits are the best balance of performance, cost, and workability. They resist hot tire pickup far better than water-based kits (the big-box store standard) and give you enough working time to apply carefully without rushing.
The hot tire pickup truth: Water-based epoxy (the $50 kit at Home Depot) has a glass transition temperature (Tg) of approximately 40–60°C. Hot tires from highway driving can reach 65–75°C. When a hot tire contacts a coating that’s below its Tg — it literally softens the coating and pulls it away. 100% solids epoxy has a Tg of 80–100°C — well above tire temperatures.
Best Garage Flooring 2026 (epoxy vs. tile systems)
Phase 1: Testing Your Concrete (Non-Skippable)
The Moisture Test (Before Buying Anything)
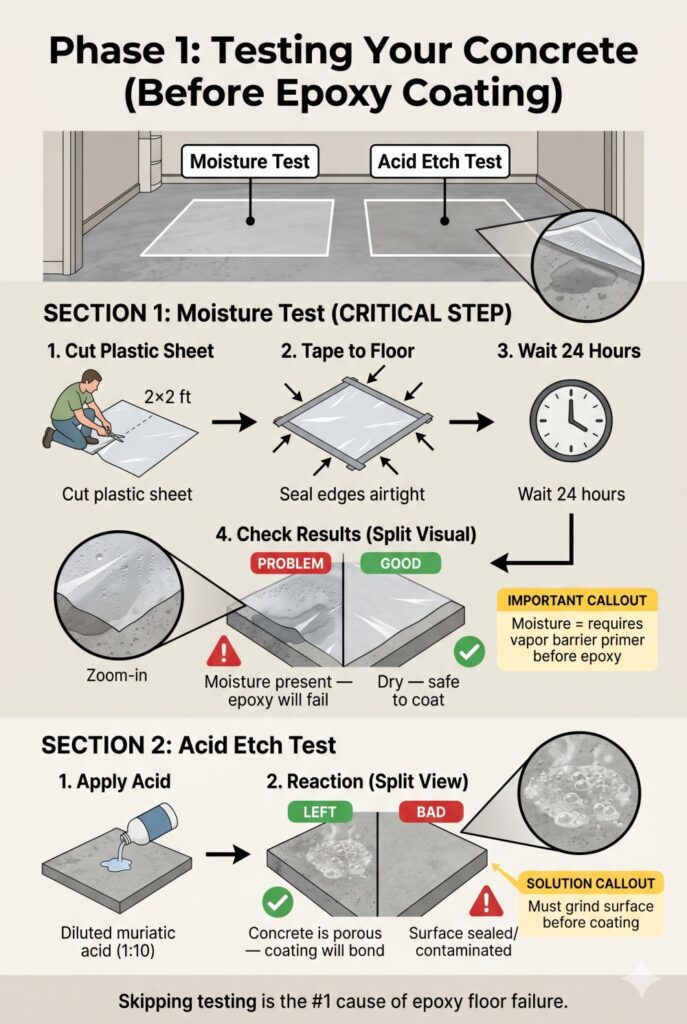
Concrete slabs emit moisture vapor from below — called vapor transmission. If your slab has excessive moisture vapor transmission, no epoxy will bond. Test before you buy:
- Cut a 2×2 ft. piece of plastic sheeting
- Tape all four edges to the bare concrete with duct tape — make it airtight
- Leave for 24 hours
- Remove and check: Wet concrete underneath = excessive moisture vapor. Dry = you’re good to coat.
Slabs with moisture problems need a moisture-vapor-suppressing primer coat before epoxy — add this to your materials list.
The Acid Etch Test: Pour a small amount of muriatic acid (diluted 1:10) on the concrete. If it bubbles vigorously — good, the concrete is reactive and will accept a coating. If it doesn’t bubble — the concrete is sealed or contaminated with curing compound that must be ground off first.
Phase 2: Surface Preparation (The Most Important Phase)
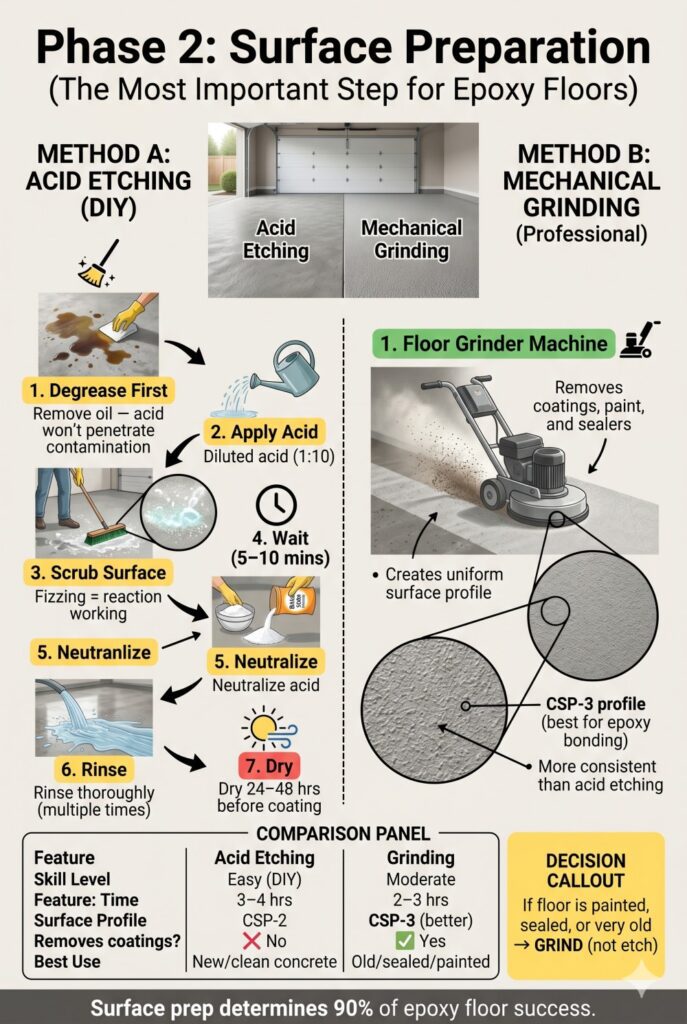
Method A: Acid Etching (DIY Standard Method)
Materials: Muriatic acid, baking soda, stiff brush, mop, water Time: 3–4 hours
Acid etching chemically opens the pores of the concrete, creating the profile the epoxy needs to bond. Most DIY epoxy kits include an acid etching solution.
Process:
- Remove all oil stains with degreaser (see our floor cleaning guide) — acid won’t etch through oil contamination
- Apply diluted acid (typically 1 part muriatic to 10 parts water) across the entire floor using a watering can
- Scrub with a stiff-bristle push broom — the acid reaction produces slight fizzing. This is normal.
- Allow to react for 5–10 minutes
- Neutralize with baking soda solution (1 lb. per gallon of water) — wait for fizzing to stop
- Rinse thoroughly with clean water — multiple times
- Allow to dry completely (24–48 hours minimum, test with moisture sheet before coating)
How to Clean a Garage Floor for degreasing pre-etch
Method B: Mechanical Grinding (Professional Standard, Better Results)
Equipment: Floor grinder/scarifier (rent from Home Depot: $80–$150/day) Time: 2–3 hours for a 2-car garage
Mechanical grinding opens the concrete surface profile more consistently than acid and removes any curing compound, paint, or sealer that acid cannot penetrate. If your concrete has been painted, sealed, or is older than 30 years — grind, don’t etch.
The grinder leaves a CSP-3 profile (Concrete Surface Profile) — the standard required for a long-lasting epoxy bond. Acid etching typically achieves CSP-2.
Phase 3: Priming (Often Skipped, Always Regretted)
A penetrating epoxy primer seals the concrete pores and creates a chemical bridge between the concrete substrate and the top coat. Skipping primer is the second most common DIY failure after insufficient prep.
The penetrating primer rule: Thin the first primer coat by 10–15% with acetone or denatured alcohol. This low-viscosity coat penetrates deeper into the opened concrete pores and creates a stronger mechanical bond than a standard-viscosity coat.
Apply two primer coats: First coat thin (penetrating), second coat at standard viscosity. Allow first coat to become tacky (not dry) before applying second — this creates chemical cross-linking between the two coats.
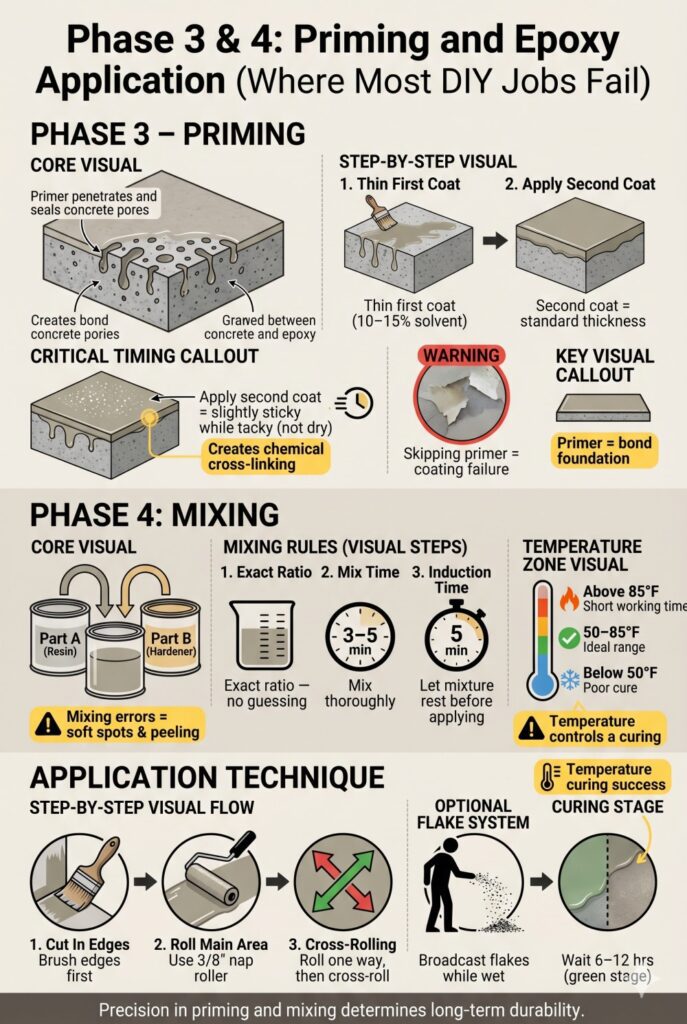
Phase 4: Mixing and Applying the Epoxy
The Mixing Non-Negotiable
Epoxy is a two-component system — Part A (resin) + Part B (hardener). Incorrect mixing ratio or insufficient mixing time creates soft spots, peeling, and non-cure.
Mixing rules:
- Mix to the exact ratio specified — not approximately. Use a scale if the kit doesn’t include graduated containers.
- Mix for the full specified time — typically 3–5 minutes. Under-mixed epoxy has unreacted hardener that creates soft spots.
- Let the mixed batch induction cure for 5 minutes before application. This allows the chemical reaction to begin uniformly before you spread it.
- Work in temperature range: Most epoxies specify 50–85°F air and surface temperature. Below 50°F, the hardener reacts too slowly and may not cure fully. Above 85°F, pot life shortens dramatically — you may have only 15 minutes before it becomes unworkable.
Application Technique
- Cut in corners and edges with a brush first (4-inch brush, the roller can’t reach corners)
- Roll the main field with a 3/8″ nap roller — NOT a long-nap roller, which creates bubbles
- Roll in one direction first, then immediately cross-roll perpendicular — this creates a consistent film thickness
- Apply flake chips immediately while the coat is wet (if using flake finish) — broadcast by hand from waist height, letting them fall randomly
- Allow first coat to achieve “green” state (firm but tacky) before second coat — typically 6–12 hours
The Clear Top Coat (Don’t Skip)
The clear polyurethane or epoxy top coat provides chemical resistance, shine retention, and UV protection (if using a UV-stable top coat). Without a top coat, the base epoxy color coat erodes under foot traffic and chemical exposure within 12–18 months.
⚠️ The Slip Hazard Warning: The Safety Step Manufacturers Underemphasize
A freshly epoxy-coated garage floor is one of the most beautiful surfaces you can create in a workshop. It’s also, when wet, one of the most dangerous. Clear epoxy and polyurethane top coats have a coefficient of friction (COF) of 0.30–0.40 when wet — well below the OSHA minimum of 0.50 for walking surfaces and dangerously close to the slipperiness of polished marble.
A 5-gallon oil drip, water tracked in during rain, or a spilled coolant container on a clear-coat floor can create conditions where a slip-and-fall happens at normal walking speed. And in a garage where you’re carrying heavy tools, this is a serious injury risk.
Anti-skid additive is not an optional enhancement. It is a safety requirement for any vehicle-use garage floor.
Anti-Skid Additives: What They Are and How to Add Them
Anti-skid additives are fine particles mixed directly into the clear top coat before application. They create microscopic surface texture that maintains friction even when wet.
| Additive Type | Particle Size | Texture | Best For |
|---|---|---|---|
| Fine aluminum oxide | 60–80 grit | Subtle, nearly invisible | Showroom garages, aesthetics priority |
| Medium aluminum oxide | 36–60 grit | Visible but fine | Daily-use garages, balanced look/safety |
| Polymer grit | Variable | Slightly visible | DIY-friendly, durable |
| Walnut shell | 20–40 grit | Noticeable texture | Maximum traction in wet conditions |
Application rate: Most additives mix at 1–2 oz. per gallon of top coat. Start with the manufacturer’s minimum recommendation — you can always add more on the second coat, but you can’t remove it from the first.
Application method: Mix the additive into the top coat and stir continuously during application (the particles settle). Apply the top coat at 25–30% more material than without additive — the particles increase coverage consumption slightly.
➡️ Check Price — Anti-Skid Additive for Epoxy/Polyurethane Floors on Amazon
The Legal Consideration: If someone other than yourself ever walks in your garage — family members, tradespeople, delivery personnel — a slip-and-fall on an unsealed, non-textured floor creates a premises liability situation. Anti-skid additive costs $15–$25. It is the cheapest protection you can add to a floor you’ve invested a weekend and $200+ in materials to create.
Upgrade Your Top Coat: Polyurethane vs. Epoxy Clear Coat
Most DIY kits include an epoxy clear coat as the final layer. It’s functional — but a polyurethane top coat delivers significantly better UV stability, chemical resistance, and long-term gloss retention for only a modest price premium.
| Property | Epoxy Clear Coat | Polyurethane Top Coat |
|---|---|---|
| UV resistance | Poor (yellows in sunlight) | Excellent (maintains clarity) |
| Chemical resistance | Good | Excellent |
| Abrasion resistance | Good | Excellent |
| Re-coat window | Short (~12 hours) | Flexible (24–48 hours) |
| VOC (fumes during application) | Moderate | Higher — needs ventilation |
| Cost (2-car garage) | $40–$70 | $60–$100 |
Best pick: Rust-Oleum EpoxyShield Professional Floor Top Coat (Polyurethane) — purpose-formulated for garage use, UV-stable, compatible with their base coat system.
➡️ Check Price — Rust-Oleum Polyurethane Floor Top Coat on Amazon
➡️ Shop Premium Polyurethane Floor Top Coat on Amazon
The UV Reality: If your garage door is open during daylight hours regularly — as most garages are — UV exposure from indirect sunlight is significant. An epoxy clear coat begins to yellow and chalk within 2–3 years. A polyurethane coat maintains its clarity and gloss for 8–12 years under the same conditions. The $30 premium is one of the best per-dollar upgrades in the floor coating process.
The Complete DIY Epoxy Floor Shopping List
| Item | Notes | Amazon |
|---|---|---|
| ArmorPoxy 100% Solids Epoxy Kit | Best DIY 2-car garage kit | Shop → |
| Rustoleum EpoxyShield (2-car kit) | Best availability / budget pick | Shop → |
| Muriatic Acid (1 gallon) | Concrete etching | Shop → |
| Baking Soda (5 lbs.) | Acid neutralization | Shop → |
| Stiff Push Broom | Scrubbing during etch | Shop → |
| 3/8″ Nap Roller Kit | Application (no longer nap) | Shop → |
| Decorative Flake Chips | Optional but dramatically improves look | Shop → |
| Nitrile Gloves (box) | Protection from epoxy/acid | Shop → |
| Safety Glasses | Acid splash protection | Shop → |
How long does epoxy garage flooring last?
Properly applied 100% solids epoxy with a clear top coat lasts 10–20 years in a residential garage. DIY water-based epoxy typically lasts 2–5 years. Professional polyurea/polyaspartic coatings last 20–30 years.
Can I apply epoxy over old epoxy?
Only if the old epoxy is fully bonded, free of peeling, and mechanically abraded. Lightly sand with 60-grit and clean thoroughly. If any section is lifting — remove all loose material first.
How long until I can park on it?
Most 100% solids epoxy systems: 72 hours before foot traffic, 7 days before vehicle traffic. Parking too early is the third most common DIY failure — be patient.
What temperature does it need to be to apply epoxy?
Most epoxies require 50–85°F for both air and concrete surface temperature. Use a non-contact infrared thermometer to check concrete surface temp — on a cold morning, concrete can be 20°F colder than the air temperature.
The Bottom Line
A DIY garage epoxy floor done correctly costs $150–$300 in materials, takes 2 weekends (prep + application), and lasts 10+ years. The key decisions: choose 100% solids epoxy (not water-based), mechanical grind or thoroughly acid etch, prime with a penetrating coat, and apply a clear top coat. Get those four things right and your floor will look professional because it is.
Skip any of them and you’ll be watching your investment peel within a year.
.