Best Pegboard Accessories & Kits 2026: The “Hook Pop” Problem (And How to Fix It Permanently)
Affiliate Disclosure: Pro Garage Gear earns from qualifying Amazon purchases at no extra cost to you.
The Pegboard Frustration: You install a sheet of pegboard. You organize every tool perfectly. You hang everything you own. You stand back and feel proud. Then you grab your hammer. The hook that held the hammer falls out. You try to put it back — it falls out again. The hook next to it falls out sympathetically. Within a week, 30% of your hooks are on the floor and the other 70% are constantly migrating.
This is the #1 complaint about pegboard systems — and it’s not caused by cheap hooks. It’s caused by the wrong pegboard standard, wrong hook type for the application, and an installation without a backer board. This guide solves every one of those problems; sets up a system that actually stays where you put it by guiding you on the best pegboard accessories.
The Pegboard Standards Problem: Are Your Hooks Compatible?
There are two main pegboard hole standards sold in the US, and they are NOT compatible:
| Standard | Hole Diameter | Hole Spacing | Common Source |
|---|---|---|---|
| Standard US (National Hardware) | 3/16″ | 1-inch center-to-center | Home Depot, Lowe’s |
| Euro Standard | 5mm (0.197″) | 25mm center-to-center | Some import boards |
Buy hooks designed for your board’s hole size. A hook designed for a 3/16″ hole will wobble and fall in a 1/4″ hole. If you’re unsure of your board’s standard, measure the hole diameter with a ruler.
The thickness trap: Standard pegboard is 1/8-inch (thin, budget) or 1/4-inch (thick, premium). 1/8-inch board flexes when you hang significant loads — the hooks rock, loosen, and fall. 1/4-inch board is rigid enough for real workshop use. If you already have 1/8-inch board installed, adding a second layer behind it solves the problem.
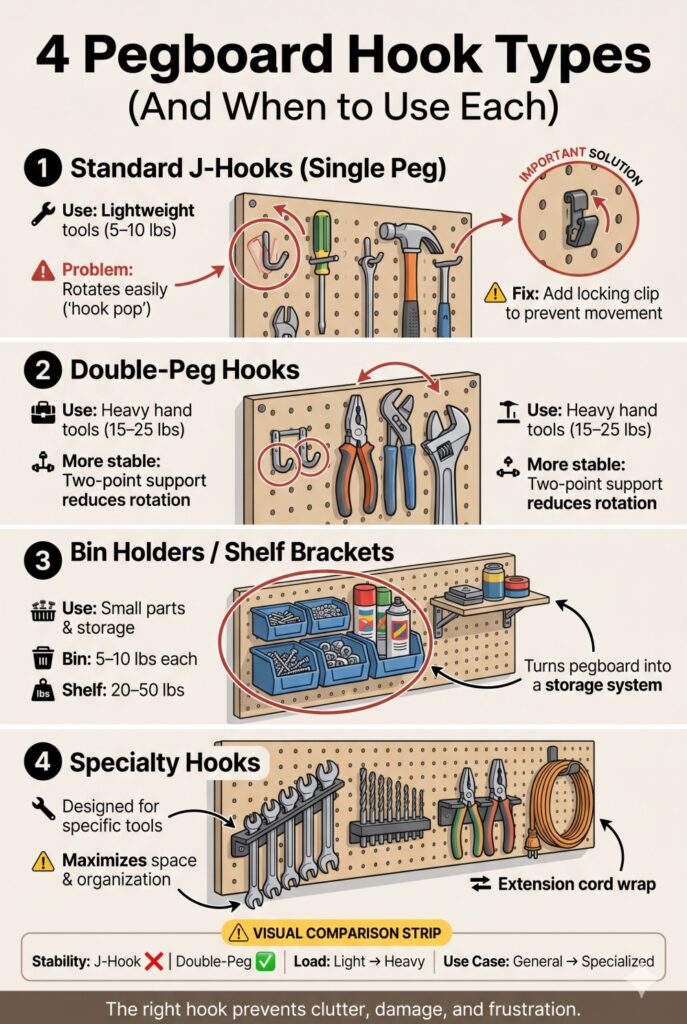
The 4 Hook Types and When to Use Each
1. Standard J-Hooks (Single Peg)
Use for: Lightweight items — screwdrivers, levels, hammers, small hand tools Load limit: 5–10 lbs per hook The pop problem: High — single-peg hooks have one contact point with the board and rotate easily under any lateral load
Solution: Use a locking clip (sold separately or as a kit) that snaps over the hook behind the board, locking it in place. This eliminates hook pop entirely.
➡️ Shop J-Hook Sets with Locking Clips on Amazon
2. Double-Peg Hooks (Two-Point Contact)
Use for: Heavy hand tools — wrenches, pliers, larger hammers, files Load limit: 15–25 lbs per hook Why they’re better: Two contact points distribute the load and dramatically reduce rotation. The hook must tip both contact points simultaneously to fall out — exponentially more stable than single-peg.
➡️ Shop Double Peg Heavy Duty Hooks on Amazon
3. Bin Holders / Shelf Brackets
Use for: Small parts bins, spray cans, electrical components, screws and fasteners Load limit: Shelf bracket: 20–50 lbs. Bin holder: 5–10 lbs. per bin The organization impact: Bins transform a tool wall from a display surface into a parts storage system. A 12-bin holder system replaces an entire drawer cabinet for small parts.
➡️ Shop Pegboard Bin Holders on Amazon
4. Specialty Hooks (Wrenches, Drill Bits, Pliers, Extension Cord)
Use for: Specific tool shapes that standard hooks don’t accommodate well Examples: Wrench racks (angled to display wrench sizes in order), drill bit holders (slot in individual bits), plier racks (spring-loaded to grip plier handles), cord wraps (loop for extension cords)
🔩 Metal vs. Hardboard: When to Upgrade (The Load Limit Most Users Hit)
Standard hardboard pegboard (the brown board from every hardware store) has a critical structural limitation that only becomes apparent after 12–18 months of use: the holes tear out under sustained heavy loads.
When a heavy power tool (a drill press, a large circular saw, a heat gun) hangs from a double-peg hook for months, the hook exerts continuous point loads on the 1/8-inch fiber surrounding the pegboard hole. Hardboard fibers compress and the hole gradually enlarges. Once the hole is 20% larger than the hook peg, the hook rocks — and eventually the workpiece falls.
This isn’t a hook quality issue. It’s a substrate limitation.
| Material | Hole Durability | Max Hook Load | Cost per Panel |
|---|---|---|---|
| 1/8″ Hardboard | Low — holes enlarge over time | 10–15 lbs. sustained | $8–$15 |
| 1/4″ Hardboard | Medium — holes last longer | 20–25 lbs. sustained | $15–$25 |
| Steel (16-gauge) | High — holes maintain size permanently | 50–75 lbs. sustained | $35–$65 |
| Steel (WallControl 16-ga.) | Very High — roll-formed edges reinforce each hole | 75+ lbs. sustained | $50–$80 |
The “Upgrade to Metal” Decision Rule
Stay with hardboard if:
- Your heaviest hung item is under 15 lbs. (hand tools, small items)
- You reconfigure frequently (hardboard is cheaper to replace)
- Budget is the primary concern
Upgrade to metal pegboard if:
- You plan to hang power tools, angle grinders, or heavy drills
- Any single hook will carry 20+ lbs. sustained
- You’ve already had holes tear out on hardboard
- You want a system that lasts indefinitely without hole maintenance
The Metal Pegboard Leader: WallControl Metal Pegboard System
WallControl uses 16-gauge cold-rolled steel panels with roll-formed hole edges — the edge rolling process adds a steel lip around each hole that dramatically reinforces the load-bearing capacity. A WallControl panel can support tools that would destroy hardboard holes within months.
The integrated T-slot channel design also means any WallControl accessory (hooks, bins, shelves, magnetic rails) can be repositioned anywhere on the panel without lifting the hook off the board — you slide it horizontally within the channel, then lock it in place.
➡️ Check Price — WallControl Metal Pegboard System (White, 16-gauge) on Amazon
➡️ Shop WallControl Accessories Kit on Amazon
The Long-Term Cost Math: A WallControl system costs 3× more than hardboard upfront. But hardboard that requires re-drilling holes or replacing panels every 2–3 years under heavy tool loads costs more over 10 years. For serious workshop users who hang power tools — metal pegboard is the lower lifetime cost option.
2026 Rankings: Best Pegboard Accessories & Kits
🥇 #1 — Greenpro 100-Piece Pegboard Hooks Assortment Kit (Best Starter Kit)
The Greenpro 100-piece kit covers every common hook type in sufficient quantity to fill a 4×8 pegboard fully. The kit includes J-hooks, double-peg hooks, L-hooks, straight hooks, curved hooks, and 10 small bins — plus locking clips for every hook.
Why it wins: At this price, you’re getting locking clips included — most competitor kits omit these, making the hooks prone to the pop problem from day one. Greenpro includes a loop clip for every hook in the assortment.
🥈 #2 — Stalwart 75-Hook Pegboard and Tool Organization Set
What makes it stand out: Stalwart includes 8 clear bins and 4 shelf brackets in addition to 63 hooks — giving you both display hanging and parts storage in a single purchase. For someone setting up their first pegboard system from scratch, this is the most complete single-purchase option.
🥉 #3 — Wallpeg 132 Piece Pegboard Bins & Hook Assortment
What makes it stand out: Maximum bin quantity — 20 assorted bins in addition to 112 hooks. For garages where parts storage is as important as tool hanging (electrical components, hardware, automotive parts), the Wallpeg kit is the best parts-bin-forward option.
The Complete Pegboard System Shopping List
| Item | Purpose | Amazon |
|---|---|---|
| 1/4″ Hardboard Pegboard (4×4 ft, 2-pack) | The actual board — 1/4″ for rigidity | Shop → |
| 1×4 Furring Strip Backer (for standoff) | Creates 1″ gap behind board for hooks to hang | Shop → |
| Greenpro 100-pc Hook Kit | All hook types with locking clips | Shop → |
| Small Parts Bins (16-pack) | Screws, fasteners, small parts | Shop → |
| Wrench Holder Rack (pegboard mount) | Organize wrench sets in size order | Shop → |
| Screwdriver Holder (pegboard mount) | Keeps drivers visible and organized | Shop → |
| Extension Cord Hook (pegboard mount) | Cord winding and storage | Shop → |
| Spray Can Holder Rack | Paints/lubricants visible and accessible | Shop → |
The Permanent Fix for Hook Pop: The Backer Board Method
Here’s the installation technique that eliminates hook pop forever:
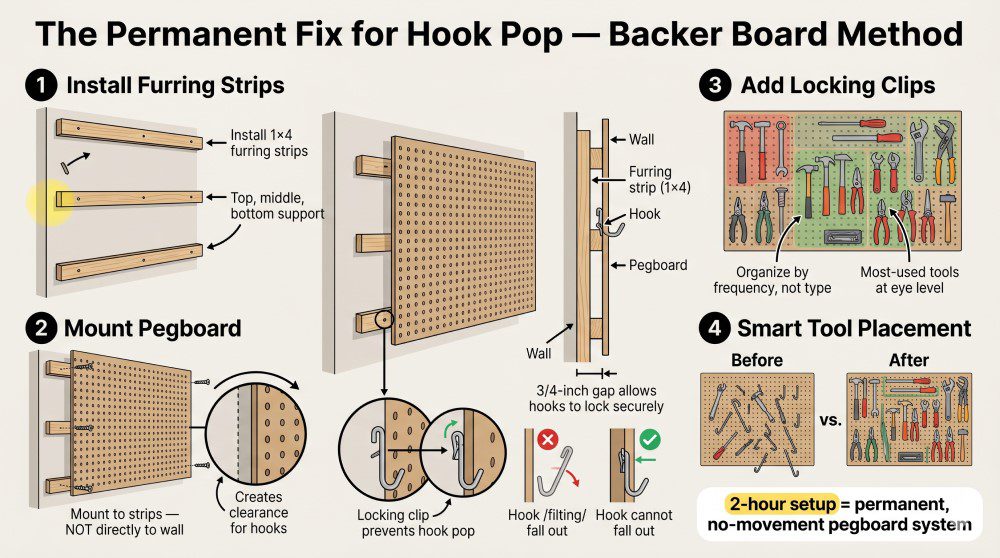
Step 1: Install 1×4 furring strips horizontally across the wall at the top, middle, and bottom of your pegboard area. These create a 3/4-inch standoff gap between the wall and the board — essential for hook clearance.
Step 2: Mount the pegboard to the furring strips, not directly to the wall. This creates the required gap behind the board for hooks to insert and angle properly.
Step 3: Apply locking clips to every hook. A locking clip is a small loop of wire or plastic that slides over the hook behind the board, preventing the hook from tilting out. With a locking clip, the hook cannot fall out unless you intentionally remove the clip.
Step 4: Group tools by frequency of use, not by type. Your most-used tools go at eye level, center. Less-used tools go at the edges and top.
This four-step setup takes 2 hours and creates a pegboard system that doesn’t move — ever.
Slatwall vs. Pegboard slatwall comparison
What’s the difference between pegboard and slatwall for garages?
Pegboard has a fixed 1-inch hole grid — hooks must align with specific holes. Slatwall has continuous horizontal channels — hooks can be placed anywhere. Slatwall is more flexible and easier to reconfigure. Pegboard is cheaper. For a permanent workshop layout, slatwall is superior. For a first tool wall on a budget, pegboard wins.
Can I cut pegboard to size?
Yes — pegboard cuts with a jigsaw, circular saw, or table saw. Use a fine-tooth blade and cut slowly to prevent the fibers from tearing. Sand the edges after cutting.
What paint can I use on pegboard?
Latex (water-based) paint works fine on standard hardboard pegboard. Oil-based paint provides a harder, more durable finish. Do not paint metal pegboard with paint not designed for metal — it peels under thermal cycling.
The Bottom Line
The best pegboard accessory kit for most garages is the Greenpro 100-Piece Assortment — it has every hook type you’ll need, in sufficient quantity for a full 4×8 board, with locking clips included. Install on 1/4-inch board with a backer gap, clip every hook, and you’ll have a tool wall that stays organized through years of daily use.
Pegboard that falls apart is a hardware problem. Pegboard with locking clips and proper backer installation is a system that works.