Best Welding Machines for Garage Hobbyists 2026: Which Process to Start With (And the Machine That Makes It Easy)
Affiliate Disclosure: Pro Garage Gear earns from qualifying Amazon purchases at no extra cost to you.
The “Welder Paralysis” Problem: You need to weld. It might be repairing a trailer frame, fabricating a shelf bracket, restoring a classic car, or building something from scratch. You Google “best welding machines for garage.” You immediately encounter four different welding processes, arguments about shielding gas, debate about duty cycles, and recommendations ranging from $90 to $4,000. Two hours later you know more jargon and are less certain than when you started.
This guide fixes that. We’re going to explain the four welding processes in plain language, tell you exactly which one to learn first based on your likely use case, and then rank the best machines for each category. By the end, you’ll know exactly what to buy and why — without second-guessing yourself.
⚙️ Welder Setting & Process Matcher
Answer 3 questions about your project. We’ll tell you the exact process, shielding gas, amperage range, and the best machine — matched to your garage’s electrical supply.
* Amperage recommendations are typical starting points. Always test on scrap material first. Electrical requirements assume standard US residential wiring. Pro Garage Gear earns from qualifying Amazon purchases.
The Four Welding Processes: What They Are and When You Need Each
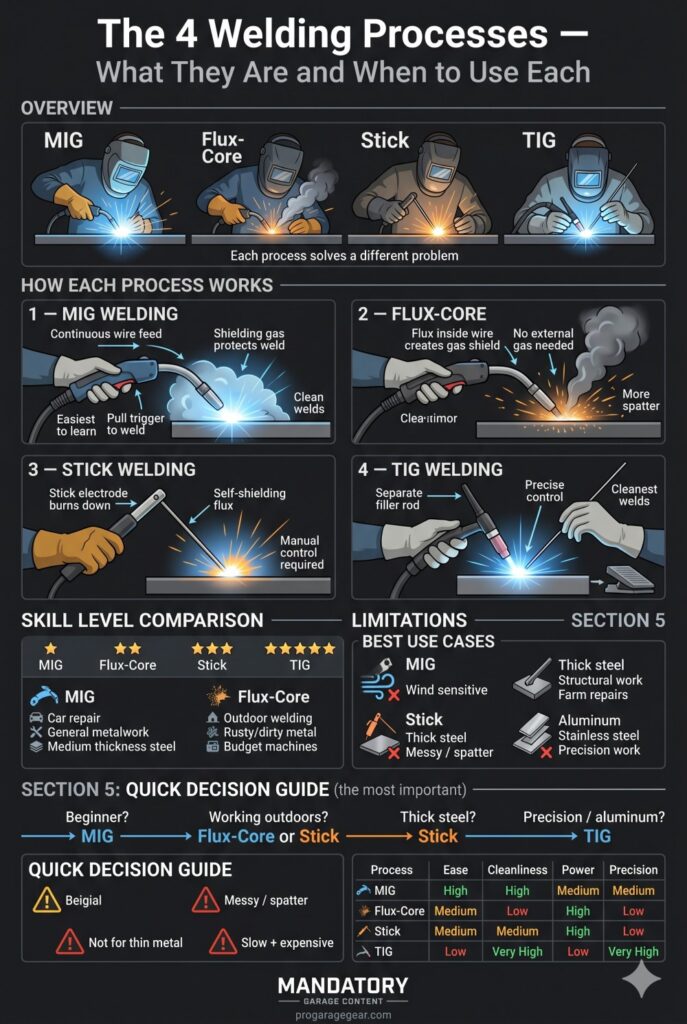
MIG Welding (GMAW — Gas Metal Arc Welding)
How it works: A wire electrode feeds continuously from a spool through the welding gun. An inert shielding gas (typically 75% argon / 25% CO2, called C25) flows around the weld to protect it from atmospheric contamination. The gun delivers both the wire and the gas simultaneously. You pull the trigger, move the gun, and weld.
Skill curve: The lowest of any process. A complete beginner can make structurally sound welds on their second or third try. The machine does most of the technical work.
Best for: Automotive body work, frame repair, structural steel fabrication, general metalwork in 18-gauge to 3/8-inch thickness. The most versatile process for garage hobbyists.
Limitation: Requires shielding gas cylinders ($150–$250 for tank + first fill). Cannot weld outdoors in wind (gas blows away). Not ideal for very thin sheet metal (<18 gauge) or thick materials (>1/2 inch) at hobbyist voltage levels.
Flux-Core Welding (FCAW — Flux-Cored Arc Welding)
How it works: Similar to MIG, but uses a tubular wire with flux inside instead of shielding gas. The flux burns during the weld and creates its own gas shield. No external gas cylinder required.
Skill curve: Slightly harder than MIG (more spatter, slag removal required), but accessible for beginners.
Best for: Outdoor welding, thicker mild steel, dirty or rusty metal where gas shielding would be compromised. Most budget “MIG” machines are actually flux-core only (no gas connection) — read the spec sheet carefully.
Limitation: More spatter than gas-shielded MIG, requires slag chipping and wire brushing after each pass, produces a rougher bead.
Stick Welding (SMAW — Shielded Metal Arc Welding)
How it works: A consumable electrode (stick) is clamped into an electrode holder. You strike an arc between the stick and the workpiece. The stick burns, depositing weld metal and generating its own shielding flux. No wire feeder, no gas.
Skill curve: Moderate to high. Maintaining arc length as the electrode burns down requires constant hand adjustment. Not the easiest process to learn.
Best for: Thick steel (3/16 inch and up), structural welding, farm/ranch equipment repair, situations where portability matters most (no gas tank). Works outdoors in wind.
Limitation: Cannot weld thin sheet metal. Cannot weld aluminum with standard electrodes.
TIG Welding (GTAW — Gas Tungsten Arc Welding)
How it works: A non-consumable tungsten electrode creates the arc. Filler metal is added separately by hand, one rod at a time. Shielding gas (pure argon) protects the weld. The torch, filler, and foot pedal (for heat control) are operated simultaneously.
Skill curve: The highest of any process. Two-hand coordination plus foot pedal. Typically requires months to develop basic competency.
Best for: Stainless steel, aluminum, precision welds, thin materials, visible welds on finished surfaces. The process preferred for custom fabrication, roll cage work, and fine metalwork.
Limitation: Slowest process. Highest skill requirement. Most expensive equipment.
Best Garage Air Filtration – welding fume management
Which Process Should a Garage Hobbyist Learn First?
The answer for 95% of garage hobbyists: MIG with shielding gas.
MIG welding handles the widest range of materials and thicknesses that hobbyists realistically encounter, has the lowest skill barrier, produces the cleanest welds of any beginner process, and the machine investment is reasonable ($250–$700 for a quality hobbyist unit).
The only reasons to choose differently:
- Budget is very tight + mostly outdoor welding: Flux-core (no gas cost, works outdoors)
- Primarily thick steel (3/16″+) + outdoors: Stick
- Stainless/aluminum + willing to invest time learning: TIG
🔌 The Garage Electrical Audit: Do This Before Your Welder Arrives
The “Day One Return” Problem: A welder arrives. You plug it in to the nearest garage outlet. You strike your first arc. The breaker trips. You reset it. It trips again. You call it defective and box it up for return. The welder is not defective. Your garage circuit is undersized for it.
This plays out thousands of times every month on Amazon, generating negative reviews for perfectly functional welding machines. Here’s how to prevent it in 15 minutes.
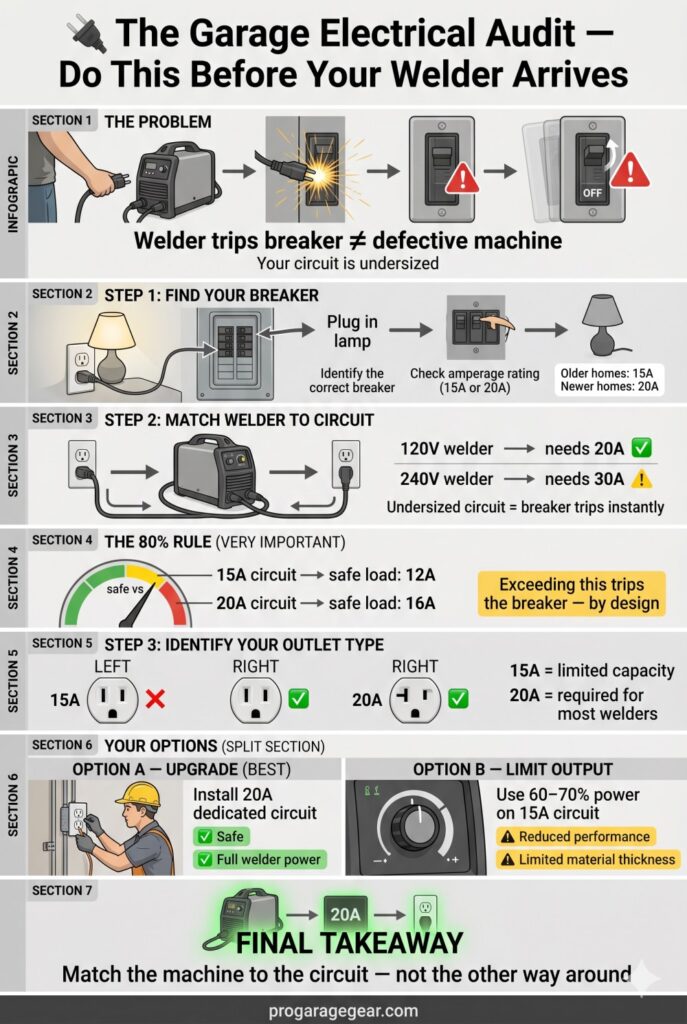
Step 1 — Identify Your Outlet’s Circuit Breaker
Every outlet in your garage is protected by a circuit breaker in your electrical panel. To find which breaker controls your garage outlets:
- Plug a lamp or radio into the garage outlet you plan to use
- Go to your electrical panel (usually in the garage or utility room)
- Flip breakers one at a time until the lamp/radio turns off
- Note the amperage rating printed on that breaker handle
What you’ll find: Most garage outlets in homes built before 2000 are on 15-amp circuits. Homes built after 2000 typically have 20-amp garage circuits (required by NEC 210.52(G) since 1999).
Step 2 — Match Your Welder to Your Circuit
| Welder | Input Current Draw | Minimum Circuit | What Happens on Undersized Circuit |
|---|---|---|---|
| Hobart Handler 140 (120V, max) | 20A at max | 20A dedicated | Trips 15A breaker at high heat settings |
| Lincoln 210 MP (120V mode) | 20A at max | 20A dedicated | Same — needs 20A |
| Lincoln 210 MP (240V mode) | 30A at max | 30A 240V circuit | Needs dedicated outlet installed |
| YesWelder 205 (110V mode) | 18A at max | 20A circuit | Safe on most post-2000 garages |
The 80% Rule: The NEC requires circuits to be loaded to no more than 80% of their rated amperage on sustained loads. A 15-amp circuit’s safe welding load is 12 amps. A 20-amp circuit’s safe welding load is 16 amps. A welder drawing 20 amps on a 15-amp circuit will trip the breaker within seconds — not because it’s broken, but because it’s following electrical code.
Step 3 — Identify a 20A Outlet by the Slot Shape
You can identify a 20-amp outlet without a multimeter by looking at the outlet face. A 15-amp outlet has two vertical slots. A 20-amp outlet has one vertical slot and one T-shaped slot (the horizontal bar extends from the left vertical slot). If your garage outlet is 15-amp only, you have two options:
Option A — Dedicate the circuit: Have an electrician install a new 20-amp circuit to your welding area ($150–$300). This is the correct long-term solution and makes your entire garage safer.
Option B — Weld at lower heat settings only: Most 120V welders have heat settings from 30% to 100%. On a 15-amp circuit, limiting yourself to 60–70% of maximum output keeps current draw within the circuit’s safe range. You give up maximum penetration on thicker materials, but the circuit holds.
🛒 Check Price on Amazon — Outlet Circuit Tester →Garage Electrical Wiring Guide:240V outlet for welders
🛒 The New Welder’s Pro Bundle
Every new welder needs three items beyond the machine itself. Buy these before your first session:
Auto-Darkening Welding Helmet: The most important safety item. Auto-darkening shades (shade 9–13 adjustable) protect your eyes while allowing you to see your work clearly before striking the arc. Fixed-shade helmets ($20) require you to position blindly before nodding to lower the lens — a bad habit that leads to poor bead starts.
🛒 Check Price on Amazon — Auto-Darkening Welding Helmet →Welding Cart: A welding cart keeps the welder, gas cylinder, and cable/hose organized and mobile. Without a cart, your welder sits on the floor (risk of moisture and foot traffic damage), the gas cylinder leans against the wall (safety hazard — cylinders must be secured upright), and the cables tangle. A good cart costs $60–$120 and immediately professionalizes the setup.
🛒 Check Price on Amazon — MIG Welding Cart with Cylinder Storage →Heavy-Duty MIG Welding Gloves: Standard work gloves are not welding gloves. MIG welding gloves are made from split cowhide leather with a gauntlet cuff that protects the wrist and forearm from spatter. The insulation layer provides 2–3 seconds of spatter contact protection — enough time to react and move. Thin gloves that transfer spatter heat immediately cause reflexive flinching that destroys weld quality.
🛒 Check Price on Amazon — MIG Welding Gloves (Leather) →The Complete New Welder Setup: Machine + Auto-Darkening Helmet + Welding Cart + MIG Gloves + 10-lb. wire spool + C25 gas cylinder = a complete, professional first setup. Everything you need to start making structurally sound welds on day one.
The Welding Safety Essentials (Before We Rank Machines)
Welding produces UV radiation, infrared radiation, intense visible light, metal fumes, and spatter. Every session requires:
Auto-darkening welding helmet: An essential, not an optional. Fixed-shade helmets ($20) require you to nod your head to lower the lens — a practiced but annoying motion. Auto-darkening helmets ($80–$400) sense the arc and darken in 1/25,000th of a second. For beginners learning bead placement, auto-darkening is transformative.
🛒 Check Price on Amazon — Auto-Darkening Welding Helmet →Welding gloves: Heavy leather, gauntlet-style. Not work gloves. Not thin leather. Welding gloves.
🛒 Check Price on Amazon — MIG Welding Gloves →Ventilation: Welding fumes are toxic. Never weld in a sealed garage. Open doors and use a fan pushing fumes away from your breathing zone. For extended sessions, a welding fume extractor ($150–$400) is strongly recommended.
🛒 Check Price on Amazon — Portable Welding Fume Extractor →[Best Garage Air Filtration Systems: https://progaragegear.com/best-garage-air-filtration-systems/] [Garage Electrical Wiring Guide (for 240V welder requirements): https://progaragegear.com/garage-electrical-wiring-guide/]
2026 Rankings: Best Welding Machines for Garage Hobbyists
🥇 #1 — Lincoln Electric POWER MIG 210 MP (Best All-Around — Multi-Process)
Why it earns #1: The Lincoln POWER MIG 210 MP is a multi-process machine (MIG, flux-core, TIG, and stick in one unit) that starts with the beginner-friendly MIG process and grows with you as your skills develop. When you’re ready to try TIG or stick — the machine already handles it.
The data:
- Processes: MIG, Flux-Core, TIG (DC), Stick
- Output: 30–210A
- Input: 120V or 240V (dual voltage — plugs into standard outlet or shop outlet)
- Duty cycle: 40% at 130A (for a hobbyist, this is more than sufficient)
- Wire sizes: 0.025″–0.035″
- Weight: 40 lbs.
What “dual voltage” means for you: 120V (standard household outlet) for light work up to 3/16-inch steel. 240V for heavier work up to 3/8-inch. Having both options means you start welding the day it arrives, without waiting to have a 240V outlet installed.
The Lincoln advantage: Lincoln Electric has the longest established service network in the welding industry. Parts, consumables, and technical support are available at welding supply stores across the US. For a beginner, access to consumables (tips, wire, nozzles) at local stores — not just online — is a practical advantage.
Honest downside: Expensive relative to import machines of similar amperage. But for a tool you’ll use for 15–20 years, the service support and build quality justify the premium.
🛒 Check Price on Amazon — Lincoln POWER MIG 210 MP →🥈 #2 — Hobart Handler 140 MIG Welder (Best Pure MIG — 120V)
Why it earns #2: For the hobbyist who knows they want MIG specifically and doesn’t need multi-process capability, the Hobart Handler 140 is the most proven consumer MIG welder available. Hobarts have been recommended in welding communities for 25+ years — their reliability track record is verified by generations of garage welders.
The data:
- Process: MIG (flux-core capable without gas)
- Output: 25–140A
- Input: 120V only (standard outlet)
- Duty cycle: 20% at 90A
- Wire sizes: 0.024″–0.030″
- Capacity: Up to 1/4-inch mild steel in multiple passes
- Weight: 57 lbs.
Who it’s for: Someone doing auto body work, trailer repair, fence work, and fabrication of lighter steel structures. The 120V input means zero electrical work required — plug in and weld.
Honest downside: 120V only means it tops out at 140A and 1/4-inch steel capacity. Anything heavier requires 240V or multi-pass technique. For typical garage projects, this is rarely a limitation — most home fabrication involves steel 3/16-inch or lighter.
🛒 Check Price on Amazon — Hobart Handler 140 MIG Welder →🥉 #3 — YesWelder MIG-205DS (Best Budget Multi-Process)
Why it earns #3: The YesWelder MIG-205DS delivers multi-process capability (MIG, flux-core, stick, TIG-capable) at less than half the price of the Lincoln equivalent. For a budget-constrained hobbyist who wants to learn multiple processes without a major investment, it offers the best capability-to-cost ratio available.
The data:
- Processes: MIG, Flux-Core, Stick, DC TIG (lift start)
- Output: 20–200A
- Input: 110V or 220V dual voltage
- Duty cycle: 60% at 180A (excellent for the price)
- Weight: 19 lbs. (significantly lighter than competitors)
- Warranty: 1 year
The honest trade-off: YesWelder’s build quality and component longevity are noticeably below Lincoln or Hobart. The wire feeder mechanism is the weakest point — irregular wire feed causes porosity and poor bead quality. Many experienced welders upgrade the feed mechanism after purchase. For occasional hobbyist use (not daily professional use), the stock unit performs adequately.
🛒 Check Price on Amazon — YesWelder 205DS Budget Multi-Process →The Complete Welder Comparison Table
| Welder | Process | Max Amps | Voltage | Duty Cycle | Max Steel | Amazon |
|---|---|---|---|---|---|---|
| Lincoln POWER MIG 210 MP | MIG/TIG/Stick/FC | 210A | 120/240V | 40% @ 130A | 3/8″ | Shop → |
| Hobart Handler 140 | MIG/FC | 140A | 120V | 20% @ 90A | 1/4″ | Shop → |
| Hobart Handler 190 | MIG/FC | 190A | 240V | 30% @ 130A | 5/16″ | Shop → |
| YesWelder MIG-205DS | MIG/TIG/Stick/FC | 200A | 110/220V | 60% @ 180A | 3/8″ | Shop → |
| Lincoln Electric 225 | Stick only | 225A | 240V | 40% @ 225A | 1/2″+ | Shop → |
| Miller Diversion 165 | TIG only | 165A | 120/240V | 40% @ 100A | 3/16″ (Al) | Shop → |
Essential Accessories Every Garage Welder Needs
Wire and consumables: Buy quality wire from the same manufacturer as your welder. Lincoln wire in a Lincoln machine, Hobart wire in a Hobart. Third-party wire varies significantly in quality and can cause feeding problems.
🛒 Check Price on Amazon — ER70S-6 MIG Wire (11 lb. Spool) →Shielding gas: 75% Argon / 25% CO2 (C25) is the standard for mild steel MIG welding. Rent a cylinder from a local welding supply (not big-box store) — typically $50–$80 for the rental and $25–$40 per fill. A 40 cu. ft. cylinder lasts approximately 2–4 hours of actual welding time.
Angle grinder + flap discs: Welding requires grinding — cleaning welds, removing slag, fitting joints. An angle grinder (4.5-inch) with flap discs (40 and 80 grit) is used in every session.
🛒 Check Price on Amazon — 4.5″ Angle Grinder → 🛒 Check Price on Amazon — Flap Discs (10-Pack) →Welding table or clamps: A metal welding table (or heavy-gauge steel mounted to sawhorses) is the ideal work surface — metal won’t burn from spatter. If a dedicated table isn’t in the budget, heavy-duty welding clamps and magnets hold workpieces while you weld.
🛒 Check Price on Amazon — Welding Magnets & Angle Clamps Set →Learning to Weld: What to Practice First
First session — flat position on scrap: Weld flat beads (no joint) on 3/16-inch mild steel scrap. Focus on maintaining consistent travel speed and gun angle (10–15° push angle). Your first welds will be ugly. This is expected and irrelevant. Focus on consistency over appearance.
Second session — T-joint (fillet weld): The T-joint (two pieces at 90°) is the most common weld in real fabrication. Practice a basic fillet weld with the pieces tacked in place. Learn to control penetration (heat input) by adjusting wire speed and voltage.
Third session — butt joint: Two pieces edge-to-edge. Gap management and penetration control are the challenges here.
YouTube resources: The channel “Welding Tips and Tricks” (Jody Collier) is the gold standard for MIG technique instruction — the channel is extensive, precise, and free.
Practice material: Buy scrap steel at local metal suppliers (often sold by the pound, cheaper than retail steel). 3/16-inch mild steel plate is the best learning material — thick enough to see penetration, thin enough to weld on 120V.
Do I need a 240V outlet for a home garage welder?
Not necessarily. 120V machines (Hobart Handler 140, Lincoln 180 dual-voltage on 120V mode) handle most hobbyist work up to 1/4-inch steel. For thicker materials or faster welding, 240V is needed. Many garage welders start on 120V and add a 240V outlet when they find they need more capacity
Can I weld aluminum with a MIG welder?
Yes, but it requires: a spool gun (feeds soft aluminum wire without tangling), 100% argon shielding gas (not C25), and aluminum-specific wire (ER4043 or ER5356). The machine must also be capable of higher amperage for aluminum’s high thermal conductivity. Not all hobbyist MIG machines support spool guns.
Is TIG welding realistic to learn at home without instruction?
It is slow and frustrating without hands-on instruction. MIG and flux-core are realistically self-taught from video. TIG is best learned with at least a few hours of in-person instruction — community college welding courses often offer TIG sessions inexpensively.
What’s a “duty cycle” and does it matter for hobbyists?
Duty cycle is the percentage of a 10-minute period the welder can run continuously before needing to cool. A 20% duty cycle at 90A means 2 minutes on, 8 minutes off at that amperage. For hobbyists who weld in short bursts, even 20% duty cycle is rarely a practical limitation. For sustained fabrication (long weld runs), 30%+ matters.
The Bottom Line
Start with the Hobart Handler 140 if your budget is firm and your work is primarily auto body and light steel fabrication on 120V. Spend the saved money on quality consumables, a good auto-darkening helmet, and a cylinder of C25 gas.
If you want a machine that grows with your skills, the Lincoln POWER MIG 210 MP is the correct lifetime investment — multi-process capability means you’re never “outgrowing” the machine, and Lincoln’s service network means parts are available in 10 years.
Install ventilation before your first session. The fumes are real and cumulative. A window fan costs nothing. Your lungs cost everything.
Now go make something.