Best Garage Car Lifts 2026: The Slab Qualification Test Every Buyer Must Pass Before Spending $2,000
Affiliate Disclosure: Pro Garage Gear participates in the Amazon Services LLC Associates Program. We earn from qualifying purchases at no extra cost to you. No manufacturer has paid for placement in this guide.
Best Garage Car Lifts – The Wrong Number to Focus On: Every car lift listing leads with weight capacity. 9,000 lbs. 10,000 lbs. 12,000 lbs. Buyers compare these numbers as if they were the primary purchase criterion — as if a lift rated at 10,000 lbs is automatically better for a home garage than one rated at 7,000 lbs. Meanwhile, the number that actually determines whether the lift can be safely installed in your specific garage — and whether it stays installed — appears nowhere in the product listing at all.
That number is your concrete slab thickness.
A two-post car lift anchors to the garage floor through four column base plates, each secured by four to six anchor bolts driven into the concrete. When the lift is loaded — a 4,500 lb vehicle raised to working height — the full weight of that vehicle plus the dynamic loads from a mechanic working underneath it transfer through those anchor bolts into the slab at the four column positions. The concentrated load at each column base can reach 3,000–4,500 lbs at a single point.
A residential garage slab that is 3.5 inches thick with no reinforcing rebar — the construction specification used in millions of North American homes — cannot reliably hold that load over time. It does not fail immediately and dramatically. It fails gradually: hairline cracks appear around the anchor bolt holes, which widen under repeated loading cycles, which eventually allow the bolt to work loose in the concrete, which introduces movement into the column base, which creates a lateral instability that was not present on day one. A lift that felt solid on installation day develops a barely perceptible wobble at full extension after 18 months of use. That wobble is not a product defect. It is a slab failure.
This guide leads with the four-point Slab Qualification Test that determines whether your garage can actually hold the lift you want — then ranks the best two-post and four-post car lifts for home garages in 2026, explains the symmetric versus asymmetric decision that confuses most buyers, and provides the exact overhead clearance formula for your specific garage dimensions.
The Four-Point Slab Qualification Test
Run this test before any purchase decision. If your slab fails any of the four points, the installation section of this guide covers the remediation for each failure mode.
Test 1 — Slab Thickness: Minimum 4 Inches, Recommended 6 Inches
Four inches of concrete is the absolute minimum thickness for a two-post lift installation. At 4 inches, the installation is viable if the concrete is in good condition, properly reinforced, and the anchor bolts are correctly specified and installed. Below 4 inches — a common specification in older residential construction — the anchor bolt embedment depth is insufficient and the concrete section around each bolt is too thin to develop the required shear and pull-out capacity.
Six inches is the recommended minimum for worry-free installation of any lift rated above 7,000 lbs, for garages where the vehicle collection includes heavier trucks or SUVs, and for any lift that will see daily professional use rather than weekend personal use.
How to measure your slab thickness without breaking concrete: The most accurate non-destructive method is to drill a 3/4-inch hole at the planned column base location — which you will need for the anchor bolts anyway — and insert a bent wire until it catches on the underside of the slab. Mark the wire at the surface and measure the distance. If the wire passes through without catching, the slab has no aggregate fill or sand below it and the full wire length is the slab thickness. Alternatively: where a floor drain, control joint crack, or existing bolt hole gives you an exposed edge, a direct measurement is possible.
Test 2 — Concrete Compressive Strength: Minimum 3,000 PSI
Concrete compressive strength determines how much load the concrete itself can bear before crushing around the anchor bolts. Standard residential garage slab concrete is typically specified at 3,000–4,000 PSI — sufficient for lift installation. Older slabs from the 1960s–1970s may have been poured at 2,500 PSI or lower.
You cannot determine PSI from visual inspection. The two practical options: pull the original construction documents (some municipalities require these for building permits), or use a Schmidt hammer rebound tester to estimate surface hardness, which correlates approximately with compressive strength. For most garages built after 1990 in the US: the slab is almost certainly 3,000 PSI or above unless there is visible aggregate exposure, severe cracking, or powdering of the surface under pressure.
Test 3 — Rebar or Wire Mesh Reinforcement: Confirm Before Drilling
Unreinforced concrete slabs have dramatically lower resistance to the shear forces generated at anchor bolt locations. A slab without rebar or wire mesh relies entirely on the concrete’s own tensile strength, which is approximately one-tenth of its compressive strength, to resist the lateral forces generated when a loaded lift is in use.
Rebar presence can be verified non-destructively with a rebar locator (a specialised type of stud finder that detects ferrous metal inside concrete) before drilling. The position matters as much as the presence — drilling through rebar weakens the rebar itself and may leave the anchor bolt in a compromised position relative to the reinforcement grid. Map the rebar positions at your planned column locations before drilling any hole.
🛒 Check Price on Amazon — Rebar Locator / Concrete Scanner →
🔬 The Pre-Purchase Slab Audit Kit: $150 Before You Spend $2,000
The four-point slab qualification test requires two tools that most homeowners do not own. Renting them from a tool library or home centre costs $40–$80 per day. Buying them means you have them permanently for all future concrete work — and you know your slab’s exact qualification status before ordering the lift, not after it arrives.
| Tool | What It Confirms | Amazon |
|---|---|---|
| Digital Rebar & Conduit Scanner | Rebar position before drilling — prevents cutting reinforcement | Shop → |
| Masonry Drill Bit Set (SDS, 3/4-in + 1/2-in) | Correct bit for anchor bolt holes in concrete — standard drill bits deflect on aggregate | Shop → |
| Concrete Depth Gauge (bent wire + tape) | Slab thickness measurement — confirms minimum 4-inch qualification | Shop → |
🛒 Shop Amazon — Rebar Locator + Scanner (Slab Audit Kit) →
Test 4 — Existing Cracks: Map and Assess Before Installation
Cracks in concrete are not automatically disqualifying for lift installation, but their location relative to planned column positions is critical. A structural crack running within 12 inches of a planned anchor bolt location will propagate further under the concentrated loads generated by lift use. The crack relief path follows the path of least resistance — directly through the existing crack rather than into solid concrete.
Walk the slab and photograph all cracks before making any placement decisions. Hairline shrinkage cracks (under 1/16-inch wide, no vertical displacement) are generally acceptable if the column base is at least 18 inches from the crack. Structural cracks (wider than 1/8-inch, showing any vertical displacement between the two sides of the crack) require professional evaluation before lift installation.
What to Do If Your Slab Fails the Test
| Failure Mode | Remediation | Cost Range | Difficulty |
|---|---|---|---|
| Slab under 4 inches thick | Grind the slab surface and pour a bonded concrete overlay — minimum 2 inches — at the column locations only, or full slab. Cure 28 days before anchoring. | $800–$3,000 | Professional required |
| Unknown or low PSI | Core sample testing ($150–$300) to confirm. If below 3,000 PSI, encapsulate with concrete hardener or pour reinforced pads. | $150–$800 | Contractor recommended |
| No rebar / wire mesh | Consider a four-post surface-mount lift (spreads load over larger area) rather than a two-post. Or: cut and pin rebar at column locations before overlay pour. | $200–$600 for rebar reinforcement | Moderate DIY |
| Structural cracks at column positions | Reposition column to maintain 18-inch minimum clearance from crack. Fill crack with polyurethane sealant before installation regardless. | $20–$100 | DIY |
Two-Post vs. Four-Post: The Use Case That Decides Everything
This is not a brand decision or a budget decision — it is a use case decision. Getting it wrong costs more than the price difference between the two types.
Two-Post Lifts: For Mechanical Work
A two-post lift lifts the vehicle by its frame or factory lift points, suspending the vehicle with all four wheels hanging free. This is the configuration that allows full access to brakes, suspension, exhaust, differentials, and wheel bearings — every component that requires wheel-off, unloaded access.
Choose a two-post lift if: Your primary use is mechanical — oil changes, brake jobs, suspension work, exhaust repairs, tyre rotation. You need complete underbody access with wheels hanging. You are comfortable with the vehicle contact points and understand your specific vehicle’s lift point locations from the service manual.
The two-post limitation: A two-post lift should never be used as long-term storage — the vehicle rests on four contact points rather than its tyres, which creates uneven stress on the body structure over weeks or months. For storage: use a four-post.
Four-Post Lifts: For Storage and Drive-On Convenience
A four-post lift uses two long runways that the vehicle drives onto. The vehicle’s weight is supported through its tyres — exactly as it sits on the ground. This is why four-post lifts are ideal for storage: the vehicle is supported in its designed load-bearing position. Four-post lifts also require no knowledge of vehicle lift points.
Choose a four-post lift if: Your primary use is storage — parking two vehicles in one bay, storing a classic car above a daily driver, or maximising garage floor space. You also want some ability to do oil changes and exhaust work, but not suspension or brake work that requires wheels hanging free.
The four-post limitation: No brake or suspension work possible in the standard configuration because the wheels are load-bearing. A rolling bridge jack accessory (sold separately) can be added between the runways to allow jack stand positioning under the axles — but this is an additional investment and an additional setup step.
| Use Case | Two-Post | Four-Post |
|---|---|---|
| Oil changes | ✅ Excellent — full underside access | ✅ Good — limited access without bridge jack |
| Brake jobs / suspension work | ✅ Excellent — wheels hang free | ❌ Not possible without bridge jack |
| Exhaust / drivetrain work | ✅ Excellent | ⚠️ Limited — some access restricted by runways |
| Long-term vehicle storage | ❌ Not recommended — stresses body | ✅ Ideal — vehicle sits on tyres |
| Parking two vehicles in one bay | ❌ Not designed for this | ✅ Primary use case for many buyers |
| Floor space recovered | ⚠️ Columns occupy corners | ✅ Both vehicle spots stacked vertically |
| Ease of use / drive-on | ❌ Requires positioning, attaching arms | ✅ Drive-on — minimal setup |
| Installation complexity | Higher — anchor bolts, equaliser cables | Lower — surface-mount options available |
The Symmetric vs. Asymmetric Decision: The Choice Most Buyers Get Wrong
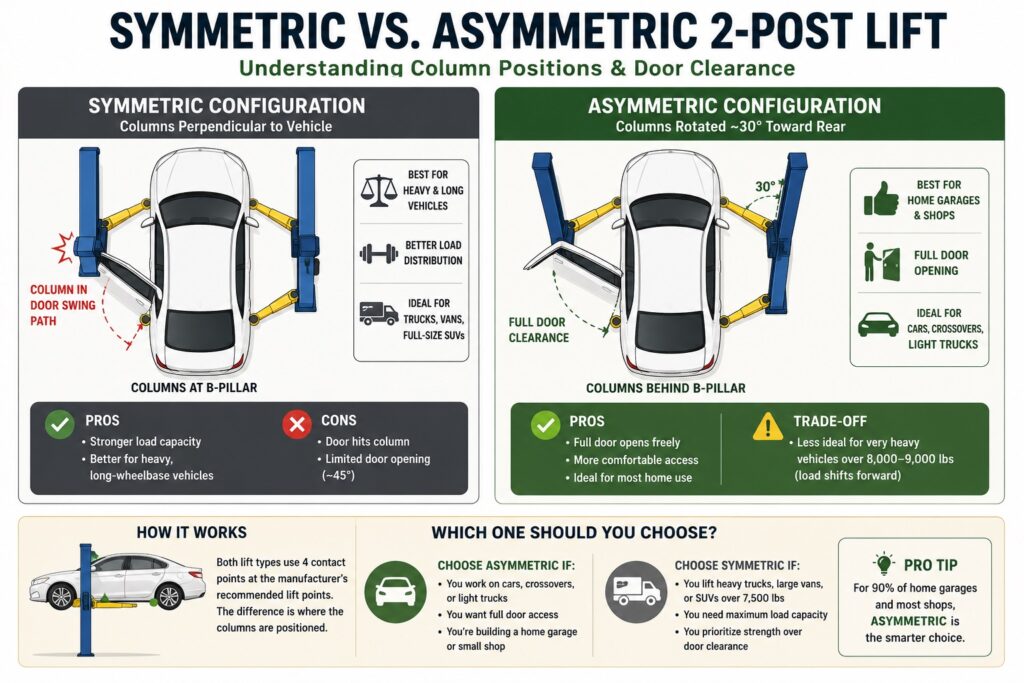
Every two-post lift is either symmetric or asymmetric. This is the most frequently misunderstood specification in the home garage lift category — and getting it wrong means either constantly hitting your door on the column or repositioning the vehicle every time you work on it.
The Symmetric Configuration
On a symmetric two-post lift, the columns are positioned perpendicular to the vehicle’s length — the front and rear swing arms extend equal distances in both directions from the column. The lift contact point positions relative to the column fall at the B-pillar (the door pillar) on most vehicles.
The result: when you open the driver’s door of a vehicle on a symmetric lift, the front column is directly in the door’s swing path. On most passenger vehicles, opening the door more than 45 degrees requires stepping around the column or manoeuvring awkwardly. For a professional shop with experienced technicians who load and unload vehicles efficiently, this is a minor inconvenience. For a home mechanic who gets in and out of the vehicle multiple times during a job to check gauges or release parking brakes: it becomes genuinely frustrating.
Symmetric lifts carry their full rated weight capacity more reliably for heavy, longer-wheelbase vehicles (trucks, full-size SUVs, vans) where the vehicle’s centre of gravity tends to fall closer to the column position.
The Asymmetric Configuration
An asymmetric lift rotates both columns approximately 30 degrees toward the rear of the vehicle. The front swing arms are longer to compensate for the rotated column position; the rear arms are shorter. The geometry is designed so that the four vehicle contact points still fall at the manufacturer’s specified lift points — but the columns themselves are now positioned behind the B-pillar rather than at it.
The result: the driver’s door swings fully open without contacting the column. This is why most home mechanics and independent shops in North America specify asymmetric configuration as the default. The ergonomic improvement is significant for any job that requires repeated vehicle entry.
The asymmetric trade-off: Because the column is rotated rearward, more of the vehicle’s weight sits ahead of the column — toward the longer front arms. This shifts the load distribution away from the column centre, which is why asymmetric lifts are typically not recommended for vehicles over 8,000–9,000 lbs. For passenger cars, crossovers, and light trucks: asymmetric is the correct choice. For heavy-duty trucks, large vans, and SUVs over 7,500 lbs curb weight: symmetric provides better load distribution.
The Overhead Clearance Formula: The Measurement That Eliminates Buyer’s Remorse
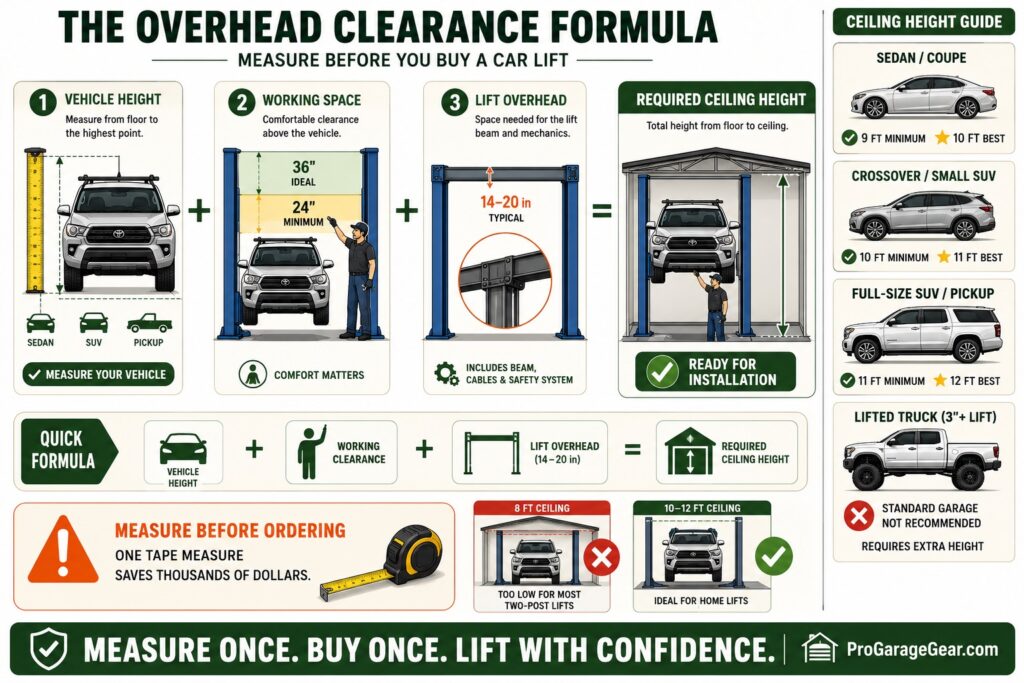
The most common reason for car lift returns and installation failures — after slab thickness — is insufficient overhead clearance. A lift that arrives, is installed, and then cannot raise a vehicle to working height because the vehicle’s roof reaches the ceiling first is not the manufacturer’s error. It is a measurement error that every buyer can prevent with a single formula before purchase.
The Three Numbers That Determine Your Required Ceiling Height
Number 1 — Your tallest vehicle’s height: This is the measurement from the floor to the highest point of the vehicle (usually the roof, but antennas and roof racks add height). Measure your specific vehicles rather than using published specifications — actual height varies with tyre pressure and suspension setting. A stock Toyota 4Runner measures approximately 73 inches (6.1 ft). A lifted version may reach 77–82 inches.
Number 2 — Minimum comfortable working clearance above the roof: 24 inches is the absolute minimum to work above the vehicle without constantly crouching. 36 inches (3 feet) is the standard professional specification. At 24 inches of clearance above a 6-foot vehicle, a 5-foot-10-inch mechanic is crouching uncomfortably for any work on the upper third of the engine bay.
Number 3 — Lift mechanical overhead requirement: Two-post lifts have an overhead beam connecting the two columns — the equaliser cable and safety mechanism run through this beam. The beam occupies typically 14–20 inches of space at ceiling height. The lift’s total installation height (column height plus beam clearance to ceiling) must fit within your garage ceiling.
The formula: Required ceiling height = Vehicle height + Working clearance + Lift overhead requirement
| Vehicle Type | Typical Height | Min. Ceiling (24″ clearance) | Rec. Ceiling (36″ clearance) |
|---|---|---|---|
| Sedan / coupe | 54–58 inches (4.5–4.8 ft) | 9 ft | 10 ft |
| Crossover / small SUV | 62–68 inches (5.2–5.7 ft) | 10 ft | 11 ft |
| Full-size SUV / pickup truck | 70–78 inches (5.8–6.5 ft) | 11 ft | 12 ft |
| Lifted truck (3″+ suspension lift) | 80–90 inches (6.7–7.5 ft) | 12 ft | Not recommended for standard lift |
⚠️ The Opener Rail Problem: The Obstruction the Clearance Formula Cannot See
The overhead clearance formula calculates whether your garage ceiling height accommodates the lift and vehicle combination. It does not account for what is already occupying the ceiling space between the door header and the back wall — and in most residential garages, something significant is: the garage door opener.
A standard chain-drive or belt-drive garage door opener consists of a motor unit mounted near the ceiling at the back of the garage and a trolley rail running from the motor forward to the door header — a horizontal steel channel 1.5–2 inches deep that spans 8–11 feet of ceiling length directly down the centre of the garage bay. This rail hangs typically 8–12 inches below the finished ceiling depending on the opener model and the bracket mounting position.
In a 10-foot ceiling garage with a standard opener rail at 9 feet 4 inches: a crossover at 64 inches on a lift reaching 70 inches of rise hits the trolley rail before the vehicle reaches working height. The lift stops. The vehicle roof does not.
This scenario plays out in a predictable sequence: the buyer correctly measures ceiling height, runs the clearance formula, confirms the numbers work, orders the lift, installs it over a weekend — and discovers on the first test cycle that the opener rail prevents the vehicle from reaching the height the formula said was available. The lift is operational. The ceiling geometry is not.
The Two Solutions — In Priority Order
Solution 1 — Wall-Mount Jackshaft Opener (Recommended): A jackshaft opener — also called a side-mount or wall-mount opener — mounts directly on the wall beside the door frame rather than overhead. The torsion bar that operates the door runs along the door header at the very top of the door opening, with no rail extending back into the garage interior. The entire ceiling from the door to the back wall is completely clear of all opener hardware.
The LiftMaster 8500W and Chamberlain B6765T are the benchmark jackshaft openers for this application. Both mount on the wall at the torsion spring level, operate via a drive motor on the torsion bar, and reclaim the full ceiling depth for the lift installation. The ceiling above the lift is unobstructed from front to back.
This is the correct long-term solution for any home garage where a two-post lift will be permanently installed. The cost of a jackshaft opener — $250–$400 — is a one-time investment that permanently resolves the overhead obstruction problem. It is not an optional upgrade. For a garage where the opener rail conflicts with the lift’s operating range, it is a required component of the installation.
🛒 Check Price on Amazon — LiftMaster 8500W Wall-Mount Jackshaft Opener →
🛒 Check Price on Amazon — Chamberlain B6765T Wall-Mount Jackshaft Opener →
Solution 2 — Reposition the Lift (If the Rail Is Avoidable): If the garage has two bays and only one is used for the lift, positioning the lift in the bay without the opener rail may provide clearance. Measure the exact hanging depth of the rail at its lowest point relative to your finished ceiling, then verify whether the rail can be avoided entirely based on the lift’s column placement. In a two-bay garage with one opener, this is sometimes a viable solution without replacing the opener.
How to Measure Your Opener Rail Clearance Before Ordering a Lift
- Open the garage door fully.
- Measure from the floor to the bottom of the opener trolley rail at its lowest point — typically at the midpoint of the rail’s run where the trolley carriage hangs.
- Compare this measurement to your vehicle’s roof height plus 6 inches of minimum clearance.
- If the rail bottom is within 6 inches of the vehicle roof at any point during its travel arc: the rail conflicts with the lift and Solution 1 (jackshaft opener replacement) is required before the lift installation can proceed.
The 8-foot ceiling reality: Standard residential garages have 8-foot finished ceiling heights. An 8-foot ceiling accommodates a compact sedan on a low-rise or mid-rise portable lift only — not a full two-post or four-post lift for any vehicle type. If your garage has an 8-foot ceiling, a portable scissor lift (QuickJack or similar) is the correct solution, not a fixed two-post installation.
➡️ If your ceiling is under 9 feet and a fixed lift is not feasible: Best Overhead Garage Storage Racks 2026: Maximising Vertical Space with Low Ceilings →
ALI Certification: The Non-Negotiable Safety Standard
Before any product ranking, one standard must be addressed that filters the entire car lift market.
The Automotive Lift Institute (ALI) is an independent organisation that certifies car lifts to ANSI/ALI ALCTV safety standards — a set of load testing, materials testing, and design verification requirements that evaluate whether a lift actually performs as rated. ALI certification requires physical testing of production units by an accredited independent laboratory. It is not a self-certification process.
A significant portion of car lifts sold at lower price points — particularly from overseas direct-import brands — carry no ALI certification. These lifts may carry a “CE” mark (a European declaration of conformity that the manufacturer self-declares, with no independent verification required) or no certification at all. CE marking on a car lift is not equivalent to ALI certification and does not verify that the lift meets North American safety standards.
The ALI certification rule for this guide is non-negotiable: every lift ranked here carries ALI Gold Label certification. This is not a premium filter that eliminates otherwise acceptable products — it is the minimum safety standard for equipment that suspends a 4,000 lb vehicle above a person.
If a lift is not ALI certified: it does not appear in this guide. If it appears in another guide without this disclosure: read that guide with appropriate scepticism.
🛒 Check Price on Amazon — ALI Vehicle Lift Reference Guide →
2026 Rankings: The Best Garage Car Lifts
🥇 #1 — BendPak HD-9 Two-Post Lift (Best Overall Two-Post)
Why it earns #1: BendPak is the reference standard for home and professional garage lifts in North America — the brand that independent shops, dealer service departments, and serious home mechanics specify when they want equipment that will still be running in 20 years. The HD-9 is their core asymmetric two-post lift and the starting point against which every other home garage two-post lift is evaluated.
The Data
- Rated capacity: 9,000 lbs — handles any passenger car, crossover, or light-duty truck
- Configuration: Asymmetric — door-swing clearance standard
- ALI certified: Yes — ALI Gold Label
- Column height: 144 inches (12 feet) — requires minimum 11-foot ceiling for installation clearance
- Minimum overhead clearance required: 11 feet 4 inches
- Power: 110V single-phase — standard household outlet, no special wiring
- Rise height: 73.5 inches maximum — brings the floor of most vehicles to comfortable working height
- Safety locks: Automatic safety latches on each arm — cannot lower if a latch is engaged
- Arm configuration: Three-stage telescoping swing arms — accommodates wheelbase variation
- Warranty: Lifetime structural warranty on columns and beams
The 110V specification matters more than most buyers realise. Many two-post lifts in the 9,000–10,000 lb class require 220V/240V single-phase power — the same circuit as an electric dryer or electric range. If your garage does not already have a 240V outlet, adding one costs $200–$500 in electrical work. The BendPak HD-9 runs on standard 110V, eliminating this requirement entirely. For a home garage where adding a dedicated 240V circuit is not straightforward, this is a meaningful practical advantage.
The 30-Amp Breaker Rule for Any 220V Lift
If you choose a 220V/240V lift model — any brand — the electrical requirement is not simply “a 240V outlet.” It is a dedicated 30-amp 240V circuit with nothing else connected to it.
Here is why the amperage specification matters: a hydraulic lift motor draws 15–18 amps at steady-state running speed. At startup — the moment the motor begins rotating against a loaded hydraulic pump — the startup surge reaches 2.5–3× the running amperage. On a 220V lift, that surge is 40–50 amps for the first half-second of every cycle. A 20-amp breaker trips at 40 amps. A 15-amp breaker trips immediately. The lift does not fault, the motor does not fail — but the garage goes dark every time you press the raise button until you identify the undersized breaker.
The correct specification: a dedicated 240V circuit with a 30-amp breaker, 10-gauge wire from panel to outlet, and nothing else on the circuit. An existing 240V outlet in the garage — wired for a previous compressor, welder, or dryer — may be on a 20-amp or 15-amp breaker. Verify the breaker amperage before assuming any existing 240V outlet is compatible with a lift motor.
For 110V lifts (BendPak HD-9 and HD-9LR): a dedicated 20-amp 120V circuit is recommended. Most garages have 20-amp circuits already — verify that the outlet the lift will use is on its own breaker rather than shared with shop lighting or other outlets.
➡️ For complete garage circuit planning and breaker sizing: The 8-Point Garage Electrical Audit: Dedicated Circuit Planning for Workshop Equipment →
🛒 Check Price on Amazon — NEMA 6-30 Outlet Receptacle (30A 240V — Lift Circuit)
The honest trade-off: The BendPak HD-9’s 12-foot column height requires minimum 11 feet 4 inches of ceiling clearance — above the standard 9-foot garage ceiling. If your garage has a standard 9-foot ceiling, the HD-9 cannot be fully installed. BendPak offers a low-rise version (HD-9LR) with a shorter column designed for lower-ceiling garages — specify this version if your ceiling is under 11 feet.
🛒 Check Price on Amazon — BendPak HD-9 Two-Post Car Lift →
🛒 Check Price on Amazon — BendPak HD-9LR Low-Rise (For Ceilings Under 11 ft) →
🥈 #2 — Titan Lifts HD-9 Two-Post (Best Value Two-Post — ALI Certified)
Why it earns #2: Titan Lifts produces the most credible ALI-certified alternative to BendPak at a meaningfully lower price point. For a home mechanic doing 30–40 lift cycles per year rather than 30–40 per day, the HD-9’s heavier-duty commercial construction is an advantage that comes with a cost premium that is not always warranted. Titan’s ALI certification, 9,000 lb capacity, and asymmetric configuration cover every passenger vehicle application without paying for commercial-shop durability the home user will not need.
The Data
- Rated capacity: 9,000 lbs
- Configuration: Asymmetric
- ALI certified: Yes
- Power: 110V or 220V (model dependent — verify at order)
- Rise height: 70.5 inches
- Equaliser system: Overhead cable with automatic equalization
- Warranty: Lifetime structural, 1 year parts
The Titan vs BendPak honest comparison: The BendPak uses heavier-gauge column steel and a more robust overhead beam assembly. In a shop where the lift runs 8 hours a day, this matters over a 10-year service life. In a home garage with 2–3 uses per week, both lifts will outlast the owner’s interest in car maintenance. Buy Titan if the price difference meaningfully affects your budget. Buy BendPak if budget allows and you want the industry’s most respected name on the equipment holding your vehicle in the air.
🛒 Check Price on Amazon — Titan Lifts HD-9 Two-Post Car Lift →
🥉 #3 — BendPak HD-9000L Four-Post Storage Lift (Best Four-Post)
Why it earns #3: The BendPak HD-9000L is the four-post version of the reference standard — drive-on runways, 9,000 lb capacity, full drive-over clearance underneath for ramps and oil drain access, and the same lifetime structural warranty. For the home mechanic whose primary goal is parking two vehicles vertically or storing a classic car above a daily driver while retaining some underneath access for basic maintenance, the HD-9000L is the correct specification.
The Data
- Rated capacity: 9,000 lbs (total — across all four posts)
- Configuration: Drive-on runways, 14-inch runway width
- ALI certified: Yes
- Rise height: 72 inches
- Runway length: 175 inches — accommodates wheelbases up to 155 inches
- Power: 110V single-phase
- Approach ramps: Included — bolt-on bolt-off
- Drip tray compatible: Yes — positions between runways under vehicle
The rolling bridge jack question: The HD-9000L can be used with a rolling bridge jack (sold separately, approximately $350–$500) positioned between the runways to lift the vehicle’s axles off the runways for tyre rotation or brake work. This adds wheel-free access without requiring a separate two-post lift. For mechanics who want one lift that handles both storage and periodic brake/tyre work: the four-post plus bridge jack combination is a compelling single-unit solution.
🛒 Check Price on Amazon — BendPak HD-9000L Four-Post Storage Lift →
🛒 Check Price on Amazon — Rolling Bridge Jack Accessory (Four-Post Lifts) →
⭐ Best for Low-Ceiling and No-Drill Garages — QuickJack BL-7000EX Portable Lift
The QuickJack is the correct answer for every garage situation where a fixed two-post or four-post lift is not feasible: ceilings under 9 feet, rented garage space, insufficient slab thickness, or a budget under $800. It is not a compromise — it is a correctly specified tool for a different set of constraints.
The QuickJack uses two portable frame rails that slide under the vehicle’s rocker panels or lift points. A hydraulic power unit inflates both rails simultaneously, lifting the vehicle to working height in under 2 minutes. No drilling. No permanent installation. Stores flat against a wall when not in use.
The Data
- Rated capacity: 7,000 lbs (BL-7000EX) — covers all passenger cars and most crossovers
- ALI certified: Yes
- Rise height: 24 inches maximum — sufficient for oil changes, exhaust, and brake jobs, not for standing-height underbody work
- Installation required: None
- Power: 110V — included power unit
- Storage footprint: Stacks flat — under 8 inches high when folded
- Setup time: Under 5 minutes including vehicle positioning
The QuickJack limitation to understand before buying: 24 inches of rise height brings the vehicle up to knee level, not working height. You cannot stand under a vehicle on a QuickJack — you work on your back, as you would with floor jack and stands, but with significantly better access and stability. For mechanics who primarily do oil changes, filter replacements, and inspections: the QuickJack is effective and well-suited. For any work that requires standing posture underneath the vehicle: a full-height two-post lift is the correct tool.
🛒 Check Price on Amazon — QuickJack BL-7000EX Portable Car Lift →
Complete Comparison Table
| Model | Type | Capacity | ALI Cert | Min. Ceiling | Power | Best For | Amazon |
|---|---|---|---|---|---|---|---|
| BendPak HD-9 | 2-post asymmetric | 9,000 lbs | ✅ Gold | 11 ft 4 in | 110V | Mechanical work — all passenger vehicles | Shop → |
| BendPak HD-9LR | 2-post asymmetric low-rise | 9,000 lbs | ✅ Gold | 9 ft 10 in | 110V | Standard 9-10 ft garage ceilings | Shop → |
| Titan Lifts HD-9 | 2-post asymmetric | 9,000 lbs | ✅ Gold | 11 ft | 110V/220V | Budget-conscious home mechanics | Shop → |
| BendPak HD-9000L | 4-post drive-on | 9,000 lbs | ✅ Gold | 11 ft | 110V | Storage + light maintenance | Shop → |
| QuickJack BL-7000EX | Portable scissor | 7,000 lbs | ✅ Gold | Any height | 110V | Low ceilings, renters, oil changes | Shop → |
The Essential Accessories: What Every Lift Installation Needs
Day-One Consumables: What Your Lift Needs Before Its First Cycle
Every two-post and four-post car lift ships dry. No hydraulic fluid is included. This detail appears in the installation manual at the point when you are already finished with assembly, the lift is bolted to the floor, the arms are attached — and you press the raise button for the first time. Nothing happens. The pump runs but moves no fluid, because there is no fluid to move.
Returning to the hardware store at this point is a minor inconvenience. Discovering it on a Sunday evening when the store is closed is not. Order the consumables before the lift arrives.
Hydraulic Fluid: AW32 vs. AW46 — Which Specification Your Lift Requires
The viscosity grade of hydraulic fluid matters for lift performance. Most residential car lifts specify either AW32 (ISO VG 32) or AW46 (ISO VG 46). The difference is cold-temperature flow performance:
| Fluid Grade | Best Climate | Cold-Start Performance | Typical Application |
|---|---|---|---|
| AW32 | Cold climates — unheated garages | Flows well below 40°F | Northern US, Canada, any unheated space |
| AW46 | Warm climates — heated garages | May be sluggish below 50°F | Southern US, consistently heated garages |
Check your specific lift’s owner’s manual for the manufacturer’s fluid specification — some brands call for AW32 exclusively, others accept either grade. When in doubt: AW32 is compatible with virtually all residential lift hydraulic systems and performs correctly across a wider temperature range.
Volume required: A two-post lift typically requires 2.5–4 gallons to fill the hydraulic cylinder and reservoir from empty. A four-post lift with longer cylinders may require 4–6 gallons. Buy 5 gallons — the overage stores cleanly and is needed for the first annual top-up check.
🛒 Check Price on Amazon — AW32 Hydraulic Fluid (5-Gallon Pail) →
🛒 Check Price on Amazon — AW46 Hydraulic Fluid (5-Gallon Pail) →
High-Pressure Grease for Cables and Pulleys
Two-post lifts use equaliser cables running over steel pulleys at the top of the columns. These cables require lubrication at installation and annually thereafter. Dry cables develop surface corrosion, which creates microscopic stress risers in the cable strands, which eventually cause individual strands to break — the precursor to cable failure. A cable that looks intact from the outside may have broken internal strands that only become visible on close inspection.
At installation: apply high-pressure grease (NLGI Grade 2) along the full cable length at the overhead sheave contact points. Wipe off any excess that would transfer to the vehicle. Mark “cable inspection” in your annual maintenance calendar from day one.
🛒 Check Price on Amazon — High-Pressure Grease Gun + NLGI 2 Cartridges →
The Day-One Consumables Checklist
| Item | Quantity | When Needed | Amazon |
|---|---|---|---|
| AW32 or AW46 Hydraulic Fluid | 5 gallons | Before first test cycle | Shop → |
| NLGI 2 High-Pressure Grease | 1 cartridge | Cable lubrication at install | Shop → |
| Thread-locking fluid (medium strength) | 1 bottle | Column bolt fastening | Shop → |
| Torque wrench (3/4-in drive, 150 ft-lb+) | 1 | Anchor bolt final torque | Shop → |
| Rotary hammer drill + SDS bits | 1 set | Drilling anchor bolt holes in concrete | Shop → |
Anchor Bolt Upgrade
Most lift kits include anchor bolts, but the included hardware is often the minimum specification. Upgrade to a wedge anchor with a higher pull-out rating than the kit provides — specifically a 3/4-inch diameter wedge anchor with 3.5-inch minimum embedment. At this specification, each anchor develops approximately 9,000 lbs of pull-out resistance in 3,000 PSI concrete — a meaningful safety margin over a 9,000 lb rated lift that distributes load across four column bases.🛒 Check Price on Amazon — 3/4″ Wedge Anchors for Car Lift Installation →
Rubber Arm Pads
The contact pads on lift swing arms are either rubber-padded or bare steel at the point of vehicle contact. Replace bare steel pads with rubber arm pads before the lift’s first use — they prevent the marring of rocker panels and frame rails that bare steel creates under the clamping force of a loaded lift. For vehicles with composite or carbon-fibre body components: rubber pads are non-negotiable.
🛒 Check Price on Amazon — Rubber Lift Arm Pad Set (Universal) →
Drip Tray
Oil drain work on a lift produces drips between the collection pan and the drain plug. A large-format drip tray positioned under the vehicle’s engine bay catches the inevitable spills and protects your floor coating from oil contamination. Oil is the most difficult contaminate to remove from epoxy — preventing contact is dramatically easier than removing it after the fact.
🏗️ The High-Clearance Conversion Bundle: Required for Standard Opener Garages
If your garage has a standard overhead chain or belt drive opener, this is not an optional upgrade — it is an enabling requirement for the lift installation. The jackshaft opener, the wall-mount bracket, and the torsion spring compatibility check together constitute the conversion that frees your ceiling.
| Component | What It Does | Cost | Amazon |
|---|---|---|---|
| LiftMaster 8500W Jackshaft Opener | Replaces overhead rail — mounts on wall, zero ceiling intrusion | $300–$380 | Shop → |
| Chamberlain B6765T Jackshaft Opener | Alternative wall-mount model — compatible with standard torsion springs | $250–$330 | Shop → |
| Torsion Spring Winding Bars | Required for jackshaft installation — do not attempt spring work without proper bars | $15–$25 | Shop → |
Jackshaft opener installation note: Jackshaft openers require a standard torsion spring setup on the door — they are not compatible with extension spring systems (the springs that run parallel to the horizontal tracks on each side). If your garage door uses extension springs, either convert the spring system to torsion before installing the jackshaft opener, or consult a garage door technician for a compatible solution.
🛒 Check Price on Amazon — Extra-Large Floor Drip Tray (Oil Drain Protection) →
Vehicle Lift Point Reference Chart
Knowing where the manufacturer-specified lift points are for every vehicle you work on is not optional — it is the difference between lifting a vehicle safely at engineered contact points and lifting it by a section of body structure that was not designed to bear the load. The ALI/ETI Vehicle Lift Reference Guide covers lift points for thousands of vehicles and belongs in every garage where a lift is installed.
➡️ For the electrical circuit requirements for your lift and garage: The 8-Point Garage Electrical Audit: Dedicated Circuit Planning →
➡️ For floor coating protection under lift operations: How to Epoxy Your Garage Floor: The Oil-Resistance Specification You Need →
The Garage Car Lift Compatibility Calculator
Enter your garage dimensions, ceiling height, vehicle type, and primary use. The calculator runs the Slab Qualification pre-check, calculates your required overhead clearance, and recommends the specific lift architecture and model for your situation.
🚗 Garage Car Lift Compatibility Calculator
Enter your garage dimensions, ceiling height, vehicle type, and primary use. The calculator runs the Slab Qualification pre-check, calculates your required overhead clearance, and recommends the specific lift architecture and model for your situation.
🚗 Garage Car Lift Compatibility Calculator
Enter your garage and vehicle details. Get a slab qualification result, overhead clearance check, and specific lift recommendation.
* Slab checks are based on general residential construction guidelines. Always have your specific slab professionally assessed before installing any permanent lift system. Clearance calculations assume standard residential lift column heights — verify with manufacturer specs for your chosen model.
Frequently Asked Questions
Do I need a permit to install a car lift in my garage?
In most US jurisdictions, a permanent car lift installation requires a building permit because it involves structural modifications to the concrete slab (anchor bolt drilling) and potentially an electrical upgrade. Permit requirements vary significantly by municipality — some require inspection of the completed installation, others require only a submitted application. Check with your local building department before drilling. Unpermitted installations create liability issues at the point of home sale and may affect homeowner’s insurance coverage if the lift is involved in an incident.
What is the difference between a 9,000 lb and a 10,000 lb lift for home use?
For all passenger vehicles, crossovers, and light-duty trucks currently sold in North America, a 9,000 lb capacity lift is sufficient — no currently produced passenger vehicle approaches 9,000 lbs curb weight. The 10,000 lb and 12,000 lb ratings matter for commercial applications: ambulances, full-size vans, and heavy-duty trucks. The relevant specification for home use is not the maximum capacity but the arm reach, overhead clearance requirement, and column configuration that fits your garage and your specific vehicles.
Can I install a car lift myself or do I need a professional?
The mechanical assembly of a two-post or four-post lift is within the capability of a mechanically competent homeowner working with a helper — most kits require two people and basic hand tools for the column and beam assembly. The anchor bolt installation into concrete requires a rotary hammer drill, the correct anchor specification, and accurate column base positioning — also DIY-viable with care. The portion that most homeowners should leave to a professional: verifying the slab qualification, locating rebar before drilling, and setting the anchor bolts to the correct torque specification. An improperly set anchor bolt that appears solid initially can work loose over time — a professional installation with a torque wrench confirmation is worth the cost on equipment that holds a vehicle above your body.
Will a car lift void my vehicle’s warranty?
Using a car lift for routine maintenance does not void a vehicle warranty. The Magnuson-Moss Warranty Act (US) prevents manufacturers from voiding warranty coverage simply because the owner performed maintenance themselves or used non-dealer service facilities. Using a lift at incorrect contact points that causes structural damage to the vehicle is a different matter — which is exactly why the ALI Vehicle Lift Reference Guide for vehicle-specific lift points belongs in any garage where a lift is installed.
Q: How long does a quality car lift last?
BendPak lifts come with a lifetime structural warranty on columns and beams because the structural components do not wear out under normal residential use. The consumable components — hydraulic seals, equaliser cables, and locking mechanism springs — have finite service lives and require periodic inspection. In a home garage with 2–5 uses per week, a BendPak or Titan lift installed correctly on a qualified slab should provide 20–30 years of service with proper cable lubrication and annual safety inspection. The seals and cables that eventually require replacement are available as service parts from the manufacturer and are DIY-replaceable.
The Bottom Line: Qualify the Slab First, Then Buy the Lift
The slab qualification test is not a bureaucratic step before the interesting purchase decision — it is the purchase decision. A 9,000 lb lift installed on a 3-inch unreinforced slab is not a 9,000 lb lift. It is a potentially dangerous piece of equipment waiting for the loading cycle or temperature differential that causes the anchor bolts to shift.
A 9,000 lb lift installed on a 6-inch reinforced slab with properly specified wedge anchors at correct torque is exactly what it claims to be — a piece of professional equipment that transforms your garage from a place where you change oil on the ground into a shop where you perform any mechanical task a service department can, at your convenience, on your schedule.
Measure the slab. Check the ceiling. Decide between two-post and four-post based on use case, not appearance. And buy ALI certified, always. The Gold Label is not a premium — it is the minimum standard for equipment that holds your vehicle in the air above your body.
Affiliate Disclosure: Pro Garage Gear earns from qualifying Amazon purchases at no extra cost to you. Capacity ratings are manufacturer specifications. Slab qualification guidance is general — consult a structural engineer for your specific installation before drilling.