
The DIY Garage Makeover 30-Day Plan: The Sequence That Prevents Every Expensive Mistake
Affiliate Disclosure: Pro Garage Gear participates in the Amazon Services LLC Associates Program. We earn from qualifying purchases at no extra cost to you. No manufacturer has paid for placement in this guide.
The DIY Garage Makeover 30-Day Plan – The Wrong Starting Point: Walk into any home improvement store on a Saturday morning in April and you will find a predictable queue at the epoxy floor coating display. Homeowners loading floor coating kits into their carts, planning to start their garage makeover this weekend with the most visually dramatic upgrade available. The floor is the first thing you see when the door opens. A freshly coated floor looks like a showroom. It is the obvious starting point.
It is also the most expensive mistake in DIY garage transformation.
Here is what happens next: the floor gets coated on Saturday. It cures beautifully. On Thursday, an electrician comes to add the dedicated workshop circuits, drills through the wall, and chips the edge of the new floor coating dragging equipment in. On the following Saturday, the overhead storage rack goes up — and a dropped fastener takes a small divot out of the coating at knee level. Three months later when the wall-mount tool system goes in, a falling drill leaves a hairline crack at the far corner. By the end of the makeover, the floor that was done first is the floor that needs the most touch-up work. In some cases, sections need to be recoated entirely.
The sequence of a garage makeover determines its outcome more than the budget, the products, or the amount of time invested. Do work in the correct order and each phase builds cleanly on the last with no rework. Do it in the wrong order and you pay twice — once to do it and once to fix the damage the next phase caused.
This guide introduces the 4-Phase Garage Transformation Method — the sequence professional garage builders use — and translates it into an exact 30-day plan any homeowner can execute with weekends and evenings, a realistic budget for every phase, and specific product recommendations at three investment levels for each step.
Why Sequence Is the Most Important Variable in Any Garage Makeover
Every element of a garage makeover belongs to one of two categories: infrastructure that everything else attaches to, or systems that attach to that infrastructure. The 4-Phase sequence is built on one rule:
Never install a finish surface before every system that penetrates, damages, or attaches to that surface has been installed and tested.
Applied to a garage: the electrical circuits must be finished before the walls are drywalled over the wiring. The insulation must be complete before the drywall goes up. The ceiling lighting must be installed before the walls are painted (overspray and cutting-in sequence). The floor must be the very last surface finished before the organisational systems are installed — because every cabinet, rack, and workbench installed after the floor coating requires movement and positioning that risks damage.
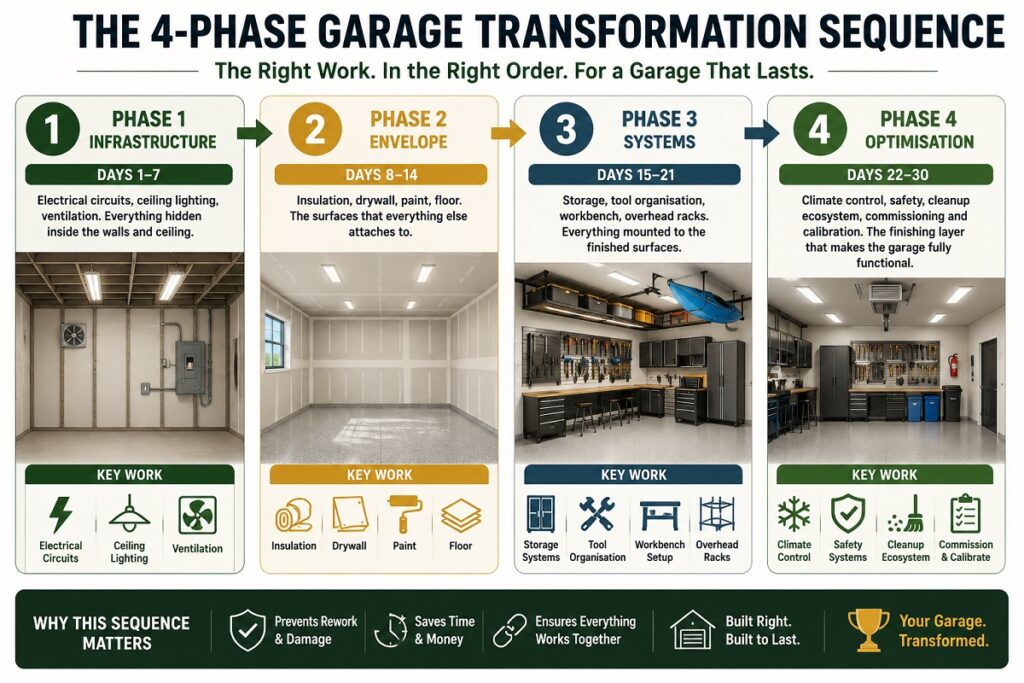
The four phases in the correct sequence:
- Phase 1 — Infrastructure (Days 1–7): Electrical circuits, ceiling lighting, ventilation. Everything that is hidden inside the walls and ceiling before any surface is finished.
- Phase 2 — Envelope (Days 8–14): Insulation, drywall, paint, floor. The surfaces that everything else attaches to — done in the order that prevents each surface from damaging the next.
- Phase 3 — Systems (Days 15–21): Storage, tool organisation, workbench, overhead racks. Everything mounted to the finished surfaces.
- Phase 4 — Optimisation (Days 22–30): Climate control, safety, cleanup ecosystem, commissioning and calibration. The finishing layer that makes the garage fully functional.
The Pre-Makeover Audit: 3 Hours Before You Spend a Dollar
Before Phase 1 begins — before any product is ordered, any measurement taken, any contractor called — do the pre-makeover audit. This takes 3 hours on a weekend morning and tells you everything that determines the cost, sequence, and feasibility of your specific garage transformation.
Audit Item 1 — Electrical: What You Have and What You Need
Walk your electrical panel. Count breaker slots. Test every outlet with a 3-light outlet tester. Identify whether your garage has any dedicated 20-amp circuits or whether every outlet shares a single breaker with other areas of the home. Identify your panel’s main breaker rating (100A, 150A, or 200A). Photograph the panel with the door open.
This audit determines whether Phase 1 requires a same-week electrician call or whether your existing electrical is workshop-ready. Most garages built before 2000 fail this audit on at least two of eight checks — which means Phase 1 has work to do before anything else can proceed.
➡️ The Complete 8-Point Garage Electrical Audit: Every Check, Every Upgrade Path →
Audit Item 2 — Structure: Joists, Studs, and Ceiling Height
Measure ceiling height at the centre of the garage and at the walls (cathedral ceilings slope — many homeowners discover this only when the overhead rack arrives). Locate ceiling joists with a stud finder and mark their positions with pencil on the ceiling — you will reference these marks repeatedly throughout the makeover. Identify whether wall studs are wood or metal (magnetic test, as described in the kayak storage article). Identify whether any walls are shared with the home’s interior — these are the walls where insulation and soundproofing decisions carry the most impact.
Audit Item 3 — Floor: Moisture and Condition
Tape a 12-inch square of plastic sheeting flat to the concrete floor using duct tape on all four edges. Leave it for 24 hours. If moisture collects on the underside of the plastic — the concrete has active moisture transmission from below. An epoxy or polyaspartic coating applied over active moisture transmission will delaminate within 6–18 months. Address moisture intrusion before any floor coating is considered.
Also check for oil stains (require degreasing before any coating), existing coatings that are peeling (must be ground off before recoating), and low spots where water collects (require skim coat levelling before coating).
Audit Item 4 — The Layout Decision
Stand in the empty garage with a tape measure and sketch your planned layout: where will the vehicle park, where is the workbench, where is the tool wall, where is the storage zone. Mark the electrical panel clearance zone (36-inch depth in front, 30-inch width) on the sketch — nothing can be permanently installed in this zone. This layout sketch becomes your installation guide for Phase 3.
Audit Item 5 — The Displacement Plan: Where Does Everything Go for 30 Days?
This is the question that prevents most garage makeovers from starting. The garage is emptied on Day 1. The floor coating goes down on Day 14 and requires 7 days before heavy items return. The cabinets go in on Days 19–21. The full space is not usable again until approximately Day 22. That is three weeks during which a family’s garage contents — mowers, bikes, sports equipment, power tools, seasonal bins, and everything else a garage accumulates — needs somewhere to live.
Without a specific displacement plan confirmed before Day 1, the project stalls. Items get left inside the garage because there is nowhere to put them. The floor cannot be fully prepped or coated. The makeover loses momentum and frequently does not restart.
The four staging options in order of cost:
Option 1 — Neighbour or Family Garage Trade (Cost: Free)
The most underused and most cost-effective option. Offer a neighbour the same arrangement they likely need: temporary overflow storage for a 3–4 week project period, with a return favour available. Most households within a neighbourhood have at least one neighbour with available garage space during any given month. This conversation takes 10 minutes and solves the problem entirely at zero cost.
Option 2 — Outdoor Storage Tent (Cost: $80–$200)
A heavy-duty outdoor storage canopy — 10×20 feet to match a standard single garage bay — provides covered, lockable temporary storage for everything that can tolerate outdoor temperatures. Appropriate for mowers, bikes, sports equipment, and plastic-binned items. Not appropriate for power tools, electronics, or moisture-sensitive equipment. Purchase the tent in the week before Day 1 and assemble it in the driveway or backyard.
🛒 Check Price on Amazon — Heavy-Duty Outdoor Storage Canopy (10×20 ft.) →
Option 3 — Portable Storage Container (Cost: $150–$300 / month)
Companies like PODS, 1-800-PACK-RAT, and U-Pack deliver a portable storage container to your driveway for the project duration and retrieve it when you are ready. The container sits on the driveway, weather-protected, locked, with your full garage contents accessible. This is the highest-convenience option and the only one that handles the full volume of a 2-car garage in a single solution. Schedule delivery for the day before Day 1 and pickup for Day 22.
Option 4 — Short-Term Self-Storage Unit (Cost: $80–$150 / month)
A 10×10 self-storage unit rented for one month handles the contents of a typical garage with room to access items. Climate-controlled units protect power tools and electronics during the storage period. Factor in two truck or van rental days (move-out and move-back) when calculating total cost.
The Displacement Triage Checklist
Before choosing a staging option, triage your garage contents into three groups:
| Group | Contents | Staging Destination |
|---|---|---|
| Group A — Discard | Items not used in 2+ years, duplicates, broken equipment | Landfill, donation, or marketplace sale before Day 1 |
| Group B — Outdoor-safe | Bikes, mowers, sports equipment, plastic bins | Outdoor tent or neighbour garage |
| Group C — Indoor-required | Power tools, electronics, batteries, moisture-sensitive items | Portable container or climate-controlled storage |
Most households discover during this triage that Group A is larger than expected. A thorough pre-makeover sort typically reduces the displacement volume by 30–40% — which often makes the neighbour garage or outdoor tent option viable for what remains.
🛒 Check Price on Amazon — Heavy-Duty Stackable Moving Totes (Triage and Transport) →
The Day Zero Audit Bundle: $50 Before You Spend $5,000
Two tools. Thirty minutes. Everything the pre-makeover audit requires to tell you what Phase 1 actually needs before any money is committed to contractors, products, or timelines.
| Tool | What It Tells You in the Audit | Cost | Amazon |
|---|---|---|---|
| 3-Light Outlet Circuit Tester | Wiring faults at every outlet — finds open grounds, open neutrals, hot/neutral reversals in 3 seconds per outlet | $12 | Shop → |
| Franklin ProSensor 710 Stud Finder | Locates all joists and studs accurately — marks the positions every Phase 3 installation depends on | $38 | Shop → |
🛒 Check Price on Amazon — 3-Light Outlet Tester ($12) →
🛒 Check Price on Amazon — Franklin ProSensor 710 Stud Finder ($38) →
Phase 1 — Infrastructure (Days 1–7)
The Principle: Everything Hidden Goes In First
Phase 1 is the phase nobody photographs for Instagram. It is wiring, conduit, and junction boxes. It is the exhaust fan mounted before the wall is drywalled over it. It is the LED fixture electrical boxes installed in the ceiling before the drywall goes up. None of it looks dramatic. All of it determines the quality of everything that follows.
A garage with correctly installed electrical infrastructure can run every tool simultaneously without a tripped breaker. A garage with correctly positioned lighting has no shadows at the workbench and no dark corners. A garage with a properly installed exhaust fan has controlled air quality during the most intensive project days. None of this can be added after the walls are finished without expensive remediation work.
Days 1–2: Schedule the Electrician
Based on your pre-makeover electrical audit results, schedule a licensed electrician for the end of week 1. Provide the scope in writing: dedicated circuits needed (20A for workshop, 30A or 50A for any 240V equipment), outlet positions required, whether a sub-panel is needed, GFCI protection on all garage outlets, and a 20-amp outlet at Zone 1 wall height (approximately 50 inches from floor) for the future tool wall charging station.
Getting the scope right in a single electrician visit costs $400–$900. Getting it partially right and calling back for additions costs 40–60% more through separate visit charges.
Days 3–4: Overhead Lighting Plan and Installation
Overhead LED shop lights are a Phase 1 element — they mount directly to ceiling joists or to a junction box that the electrician installs, and they should be in position before drywall or paint. The linkable LED strip format (Barrina T5 series) runs from a single junction box to cover 24–48 feet of ceiling in one circuit — plan the run length and the single outlet connection point before the electrician’s visit so the junction box ends up in the right position.
Lighting placement for a standard 2-car garage: Two parallel runs of 4-foot LED strips, spaced 6 feet apart and 3 feet from each side wall, provide even coverage across the full floor area. The workbench wall should have an additional single run positioned directly above the workbench — this is the task lighting that eliminates the shadow triangle when overhead lights are the only source.
➡️ Best Garage Lighting 2026: The 3-Zone Lighting System That Eliminates Every Shadow →🛒 Check Price on Amazon — Barrina T5 LED Shop Lights (6-Pack, Linkable) →
Days 5–7: Ventilation and Pre-Wire for Future Systems
Install the wall exhaust fan in this phase — after the electrician has connected it to a dedicated circuit but before the interior wall surface is painted. The exhaust fan’s wall penetration and exterior louver are easier to seal cleanly against a primed but unpainted surface than against finished paint.
Also in this phase: run conduit or cable for any future smart systems you plan (garage door camera, CO detector wiring, smart panel monitoring). Routing these cables inside the wall is a 20-minute task during Phase 1. Routing them on the surface after Phase 2 is a 3-hour job that never looks clean.
➡️ Best Garage Fans & Ventilation 2026: Exhaust Fan CFM and Installation Guide →
⚠️ The Phase 1 Permit Checkpoint: Do Not Move to Phase 2 Without This
This is the most expensive mistake in DIY garage makeovers — and it happens exclusively because nobody mentions it before it is too late.
Any electrical work that adds new circuits, moves outlets, or modifies your panel requires a permit in virtually every US jurisdiction. The permit requirement exists for a specific reason: once the walls are closed over the new wiring, nobody can verify the work was done correctly without tearing the walls back open. The permit process ensures that an independent building inspector signs off on the rough-in wiring before the walls close — protecting you, your home’s resale value, and your homeowner’s insurance coverage.
The rough-in inspection must happen before Day 8. It must happen while the wiring is still accessible — before any insulation, drywall, or wall surface covers the new circuits. An inspector who arrives after Phase 2 is complete will require you to open the walls at your expense before they can sign off. In a finished garage, that means cutting through new drywall, patching, repriming, and repainting. The cost of skipping the permit inspection and being discovered later — either on a re-inspection during a home sale or through a damage claim — typically exceeds $2,000 in remediation work plus the cost of the original electrical work performed again.
The Phase 1 Permit Checkpoint — Day 7 Actions
- Confirm your electrician pulled a permit before any work began. Ask for the permit number. A licensed electrician performing legitimate work will always pull a permit — if yours did not, this is a red flag that requires immediate resolution.
- Schedule the rough-in inspection with your local building department. Inspection wait times vary from same-day to 5 business days depending on jurisdiction. Build this into your Phase 1 timeline — if your jurisdiction has 5-day waits, Phase 1 extends from 7 days to 12 days before Phase 2 can begin.
- Do not start insulation or drywall until the inspection is passed and signed. A passed rough-in inspection is documented proof that your electrical work is code-compliant — it protects every future homeowner, every contractor, and every insurance claim involving that space.
- Get the signed inspection card and photograph it. Store the photo in a home improvement folder alongside your permit documentation. This documentation adds measurable value at the point of home sale.
The homeowner permit option: In some US states, homeowners performing electrical work on their own primary residence can pull a homeowner permit rather than requiring a licensed electrician to pull one. Requirements vary significantly by state. Check with your local building department before beginning any electrical work to understand the permit requirements specific to your jurisdiction. A 20-minute phone call to the building department before Phase 1 begins saves all potential remediation costs.
Phase 1 Budget Guide
| Item | Essential | Recommended | Premium |
|---|---|---|---|
| Electrical work (dedicated circuits) | $400 (one 20A circuit) | $700 (two 20A + one 240V) | $1,200+ (full workshop buildout) |
| LED overhead lighting | $80 (Barrina 6-pack) | $160 (two 6-packs, full coverage) | $400 (high-bay + workbench strips) |
| Wall exhaust fan | $60 (basic) | $120 (iLIVING variable speed) | $250 (louvred + timer + CO sensor) |
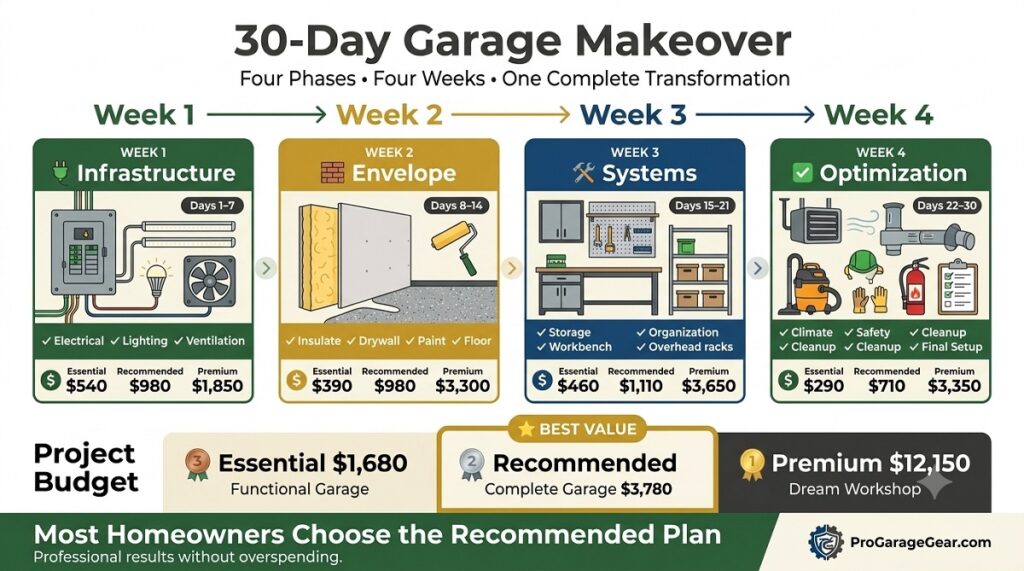
| Phase 1 Total | $540 | $980 | $1,850 |
Phase 2 — Envelope (Days 8–14)
The Principle: Surfaces in Dependency Order
Phase 2 finishes every surface — walls, ceiling, floor. The dependency order within Phase 2 is as important as the phase sequence itself. Ceiling before walls (ceiling painting inevitably drips on unfinished wall surfaces — and you cannot paint a ceiling cleanly without touching the upper wall edge). Walls before floor (wall painting drips downward, floor coating applied before walls are painted gets paint on the new floor surface). The floor is always last.
Days 8–10: Insulation
If the garage is unfinished and you plan to drywall it, insulation is the first envelope task. Roll batts into every stud bay on the shared-wall side with the home (the wall where temperature and sound control matter most), into the ceiling joist bays if the garage is conditioned space, and into the garage door cavities using a purpose-built insulation kit.
Insulating an unfinished garage is not a cosmetic choice — it changes the thermal performance of the space by 30–60% depending on climate, and it is one of the very few tasks that is dramatically cheaper to do during an active makeover (with walls open) than after they are finished.
➡️ How to Insulate a Garage: Walls, Ceiling, Door — Complete Phase-by-Phase Guide →
Days 11–12: Drywall and Primer
For a finished-wall garage makeover where drywall already exists: this is the sanding, patching, and priming phase. Fill nail pops, sand joint compound smooth, apply a PVA primer to the full wall surface before colour. A primed surface accepts paint more evenly and uses 30–40% less finish coat volume than unprimed drywall. Skipping primer is the single largest source of blotchy, uneven garage wall results.
For an unfinished-stud garage: hang 1/2-inch drywall (5/8-inch on garage-home shared walls for fire resistance per most codes) and apply joint compound to all seams. Allow compound to dry fully — minimum 24 hours between coats, 48 hours in cold or humid conditions — before sanding and priming.
Day 13: Paint
The colour decision that most people overthink: White or near-white on walls and ceiling is not a design default — it is the correct functional choice for a working garage. Light-coloured surfaces reflect the LED lighting you just installed, doubling the effective brightness without any additional fixtures. Dark walls absorb light, require brighter (and more expensive) lighting to achieve the same lux at the work surface, and make the garage feel smaller. If aesthetics are important, introduce colour through equipment, accessories, and floor flake patterns — not wall paint.
Garage wall paint specification: Semi-gloss or satin finish, not flat. Flat paint shows every mark in a working environment and cannot be wiped clean. Semi-gloss is wipeable, reflects light well, and shows less scuffing from equipment movement. Apply two coats of a quality interior latex in semi-gloss for a finish that will last the full life of the makeover without touching up.
🛒 Check Price on Amazon — Semi-Gloss Interior Latex Paint (Garage Walls) →
Day 14: Floor Coating
Day 14 is the floor. Not Day 1. Day 14. After every electrical penetration has been made, every wall has been painted, and every piece of heavy equipment has been walked in and out to position check it. The floor is the most damage-vulnerable surface in the garage, and it should be the last major surface completed before the organisational systems are installed on top of it.
The floor preparation sequence that prevents delamination: Degrease with a commercial concrete degreaser and scrub with a stiff-bristle brush. Rinse thoroughly and allow to dry completely — minimum 24 hours. Acid etch the concrete surface, rinse, and allow to dry — minimum 24 hours. Apply the coating only to a completely dry, properly etched, degreased surface. Delamination is almost never a product failure — it is a surface preparation failure.
The anti-skid additive instruction that most kits omit: Every garage floor coating — epoxy, polyaspartic, or polyurea — becomes dangerously slippery when wet without an anti-skid additive mixed into the topcoat. Anti-skid additives are inexpensive ($15–$20), and the safety case for including them is absolute. Any coated floor that will ever have vehicle traffic, water entry from rain, or wet boots from snow is a slip hazard without grit.
Option A — Temporary heating: A propane construction heater or electric space heater can raise the garage ambient temperature above 65°F for the duration of the application and initial cure period (24–48 hours for floor coatings). The heater must run during application and for the first 24 hours of cure. Ensure adequate ventilation — do not use combustion heaters in a sealed space during floor coating application due to solvent vapour risk.
➡️ How to Epoxy a Garage Floor: Surface Prep, the Hot Tile Test, and Anti-Skid Requirements →🛒 Check Price on Amazon — Rust-Oleum EpoxyShield Professional Floor Kit
→🛒 Check Price on Amazon — Anti-Skid Additive for Epoxy/Polyaspartic Coatings →
⚠️ Mandatory PPE for Day 14 — Acid Etching is a Chemical Process
Acid etching concrete — whether using diluted muriatic acid or phosphoric acid — is a chemical process that causes skin and eye burns on direct contact. The etching step is not optional, and neither is the PPE. None of these items is expensive. All of them matter.
| PPE Item | Why Required | Amazon |
|---|---|---|
| Chemical-resistant rubber boots | Acid solution runs across the floor — regular shoes wick the solution through stitching to your feet | Shop → |
| Heavy-duty nitrile gloves (chemical resistant) | Standard dishwashing gloves are not acid-resistant — use 6-mil+ nitrile rated for acid contact | Shop → |
| Safety goggles (chemical splash rated) | Acid mist from brushing and scrubbing reaches eye height — standard safety glasses do not seal | Shop → |
| Acid-resistant respirator (N95 minimum) | Muriatic acid produces chlorine fumes — adequate ventilation plus respiratory protection required | Shop → |
🛒 Check Price on Amazon — Chemical-Resistant Rubber Boots →
🛒 Check Price on Amazon — 6-mil Nitrile Chemical-Resistant Gloves →
🛒 Check Price on Amazon — Chemical Splash Safety Goggles (Z87.1 Sealed) →
⚠️ The Temperature Rule: Why Your Garage’s Ambient Temperature Determines Every Phase 2 Cure Timeline
The cure times listed throughout Phase 2 — 24–48 hours between drywall compound coats, 7 days before vehicle traffic on the floor — assume a specific temperature range. Below the minimum threshold, chemical reactions slow dramatically or stop entirely. A product that appears cured on its surface may be completely uncured below that surface. Loading that product before it has genuinely cured at the actual temperature causes failures that require full remediation — not touch-up.
Drywall Joint Compound Temperature Rules
| Ambient Temperature | Standard Coat Dry Time | Consequence of Rushing |
|---|---|---|
| Below 40°F (4°C) | Do not apply — compound freezes | Compound crumbles and delaminates from drywall face |
| 40°F–55°F (4–13°C) | 48–72 hours per coat minimum | Surface appears dry; interior remains wet; sanding tears compound |
| 55°F–65°F (13–18°C) | 36–48 hours per coat | Acceptable if additional drying time is allowed |
| 65°F–75°F (18–24°C) | 24 hours per coat (standard) | Standard timeline applies |
| Above 90°F (32°C) | May dry too fast — hairline shrinkage cracks | Mist the surface with water during application in extreme heat |
Epoxy and Polyaspartic Floor Coating Temperature Rules
| Ambient Temperature | Minimum Coat Recoat Time | Minimum Vehicle Traffic Wait | Risk |
|---|---|---|---|
| Below 50°F (10°C) | Do not apply | N/A | Amine blush — waxy uncured surface that never hardens |
| 50°F–60°F (10–16°C) | 24+ hours between coats | 14+ days before vehicle traffic | Incomplete cure; soft surface under vehicle load |
| 60°F–70°F (16–21°C) | 16–20 hours between coats | 10 days before vehicle traffic | Acceptable with extended timeline |
| 70°F–85°F (21–29°C) | 12–16 hours between coats | 7 days before vehicle traffic | Standard timeline — optimal application conditions |
| Above 90°F (32°C) | Reduce working time | 5–6 days before vehicle traffic | Coating flashes too fast — bubbles from outgassing concrete |
The Temperature Fix for Cold-Season Makeovers
If your makeover falls in autumn or winter and your garage is uninsulated (the Phase 2 insulation work is incomplete when the floor is due), you have two options:
Option B — Reschedule the floor to warmer months: The Phase 2 sequencing allows this — complete drywall, compound, and paint in cool weather (all tolerate lower temperatures better than floor coatings), and hold the floor coating for the first consistently warm week. The floor is the last Phase 2 task and can be delayed by weeks without disrupting Phase 3 if rubber floor mats are used temporarily to protect the uncured concrete during the wait.
🛒 Check Price on Amazon — Portable Propane Construction Heater (Cold-Season Curing) →
🛒 Check Price on Amazon — Wireless Garage Thermometer (Monitor Cure Conditions) →
Phase 2 Budget Guide
| Item | Essential | Recommended | Premium |
|---|---|---|---|
| Insulation (if unfinished walls) | $120 (shared wall only) | $280 (all walls + ceiling batts) | $500 (spray foam perimeter + batts) |
| Drywall/prep/primer/paint | $150 (paint + primer only) | $400 (drywall + compound + paint) | $800 (full finish including labour) |
| Floor coating | $120 (water-based DIY kit) | $300 (100% solids epoxy + flake) | $2,000+ (professional polyaspartic) |
| Phase 2 Total | $390 | $980 | $3,300 |
Phase 3 — Systems (Days 15–21)
The Principle: Zone Before Purchase
Phase 3 is where the garage becomes functional. It is also where most makeovers spend money in the wrong order — buying a specific cabinet system before the layout is confirmed, ordering a workbench before the wall stud positions are known, purchasing overhead racks before the ceiling joist span is measured.
The 3-Zone framework from the power tool organiser article applies directly here. Before purchasing any Phase 3 item, finalise the zone map on your layout sketch: where is Zone 1 (daily driver tools at waist-to-eye height), where is Zone 2 (weekly tools and accessories), where is Zone 3 (seasonal and archive storage overhead). Every Phase 3 purchase serves a specific zone — nothing gets bought without a confirmed position on the layout sketch.
Days 15–16: Overhead Storage First
Overhead storage racks go in first in Phase 3 because they attach to ceiling joists — which you already marked in the pre-makeover audit — and because their installation requires unobstructed floor access below the installation zone. Install the racks before the workbench, before cabinets, before anything is positioned on the floor. A ceiling rack installed over a workbench already in place is an awkward 3-hour job that should have been a 45-minute job.
Verify joist load ratings before installation. A 4×8 overhead rack on residential garage joists with a 16-foot span handles 250–400 lbs across the rack’s full footprint — not 400 lbs concentrated at one mounting point. Distribute items across the full rack surface rather than piling weight at the centre.
➡️ Best Overhead Garage Storage Racks 2026: Joist Load Ratings and Safe Installation →🛒 Check Price on Amazon — Fleximounts 4×8 Overhead Garage Storage Rack →
Days 17–18: Workbench and Tool Wall
The workbench and tool wall are installed together in the same 2-day block because their positions are interdependent. The tool wall goes directly behind or perpendicular to the workbench — within arm’s reach of the standing work position. Installing the workbench first and then trying to position the tool wall relative to it produces better results than installing either system independently.
The wall-mount tool system goes on the finished, painted, primed wall surface that Phase 2 produced. The WallControl steel pegboard panels fasten directly to studs through the drywall. The charging station outlet — installed by the electrician in Phase 1 at Zone 1 height — is now exactly where the charging station needs to connect.
➡️ Best Garage Power Tool Organizers 2026: The 3-Zone System →
➡️ Best Adjustable Garage Workbenches 2026: The Shake Test Rankings →
Days 19–21: Cabinets, Shelving, and Floor-Level Systems
Cabinets and freestanding shelving units go in last within Phase 3 because they rest on the newly coated floor. The floor coating specified for Day 14 requires a minimum of 7 full days before heavy equipment is placed on it — cabinets loaded with tools and supplies easily weigh 200–500 lbs. The 7-day gap between Day 14 (floor) and Days 19–21 (cabinets) is not accidental — it is the cure time built into the sequence.
Position cabinets first, unfastened and empty, to verify fit against the layout sketch. Only fasten them to the wall once the position is confirmed — moving a wall-fastened cabinet after fastening requires patching the wall at the previous anchor holes.
Phase 3 Budget Guide
| Item | Essential | Recommended | Premium |
|---|---|---|---|
| Overhead storage rack | $85 (basic 4×8 rack) | $160 (Fleximounts with anti-drop) | $350 (dual-tier system) |
| Workbench | $180 (Husky basic) | $350 (Husky 52″ mobile) | $800+ (custom or premium) |
| Tool wall system | $75 (starter WallControl kit) | $200 (full WallControl + holders) | $500 (brand platform system) |
| Cabinets / shelving | $120 (wire shelving) | $400 (steel cabinet set) | $2,000+ (NewAge Pro series) |
| Phase 3 Total | $460 | $1,110 | $3,650 |
Phase 4 — Optimisation (Days 22–30)
The Principle: Make the Garage Serve You, Not the Other Way Around
Phase 4 is where most makeover guides stop — they hand over a list of products and call the project done. Phase 4 is actually the phase that determines whether the makeover produces a garage you use every day or one that looked good in photos and gradually reverts over the following year.
The four optimisation systems that make the difference between a garage that functions and one that just looks like it does:
Days 22–23: Climate Control
A garage that is unusable in summer (too hot) or winter (too cold) is a garage that accumulates clutter. The climate system choice depends on your primary use and climate zone. An electric ceiling fan handles summer heat for garages used primarily for storage and light projects. A dedicated electric heater handles winter for workshop use. For year-round intensive use, a mini-split handles both — but at a significant investment that only makes sense for garages that will be used 4+ hours per day year-round.
➡️ Best Garage Ceiling Fans 2026: HVLS Cooling for Hot Workshop Summers →
Days 24–25: Safety Equipment
Three safety additions are non-negotiable in any finished garage and are always Phase 4 items — they mount to the finished walls and ceiling of the completed space:
Class ABC fire extinguisher: One at the exit door and one near the workbench. The rule is two, always — the exit-adjacent one is accessible even if the workbench area is the fire source.
Interconnected CO and smoke detector: Mounted to the finished ceiling in Phase 4. The interconnected model alerts every alarm in the home when the garage unit triggers — essential for attached garages.
Whole-home surge protector: Added to the electrical panel during or after the Phase 1 electrician visit. Protects every circuit in the garage — and every piece of electronics in the home — from utility voltage spikes. Costs $75–$150 installed. Protects $2,000–$5,000 in workshop electronics.
🛒 Check Price on Amazon — Amerex B456 ABC Fire Extinguisher →
🛒 Check Price on Amazon — Kidde Wireless Interconnected CO + Smoke Alarm →
Days 26–27: The Cleanup Ecosystem
A makeover garage without a cleanup system reverts to disorder in 60 days. The maintenance rhythm that keeps the finished garage functional is a direct product of how easy cleaning is to initiate and complete. The two-tool cleanup ecosystem — cordless blower for the 90-second floor sweep, shop vac for fine dust and wet spills — makes every cleanup session require less effort than finding a broom and pushing it.
These tools mount on the tool wall in Zone 1 — the blower on a wall hook adjacent to the garage door, the shop vac positioned under the workbench or in the corner nearest the primary work area. Their storage position determines whether they get used after every session or gradually migrate to a corner and stop being used.
➡️ Best Cordless Blowers for Garage Cleanup 2026: The 90-Second Floor Clear Method →
Days 28–30: The 30-Day Commissioning Review
The final three days of the 30-day plan are not construction days — they are evaluation days. Use the garage as it was designed to be used: complete a project, park the vehicle, do a full cleanup session, retrieve a seasonal item from overhead storage. Observe what requires more effort than it should.
Specific questions to answer during the commissioning review:
- Can you retrieve any Zone 1 tool in under 5 seconds without looking? If not — the holder position needs adjustment.
- Does the floor clear completely in 90 seconds with the blower? If not — the blower’s wall position needs to move closer to the door.
- Did you trip any breakers during the commissioning session? If yes — a load audit is needed on the affected circuit.
- Is any surface showing moisture, condensation, or temperature-related issues? If yes — the insulation or ventilation work needs review.
- Is anything consistently being set down on the floor or a random surface instead of its designated position? If yes — either the designated position is wrong or the holder needs to be relocated to a more convenient height.
The 30-day review is the step that converts a makeover into a system. It is the difference between a garage that performs well on Day 30 and one that still performs well on Day 730.
Phase 4 Budget Guide
| Item | Essential | Recommended | Premium |
|---|---|---|---|
| Climate control | $45 (box fan / basic) | $200 (ceiling fan or electric heater) | $2,500+ (mini-split) |
| Safety equipment (extinguisher + detector) | $65 (2 extinguishers + basic detector) | $130 (Amerex + interconnected CO alarm) | $250 (full safety suite + surge protector) |
| Cleanup ecosystem (blower + vac) | $180 (Ryobi blower + basic vac) | $380 (EGO 650 CFM + RIDGID vac) | $600 (platform blower + HEPA vac) |
| Phase 4 Total | $290 | $710 | $3,350 |
The Complete 30-Day Budget Summary
| Phase | Essential Total | Recommended Total | Premium Total |
|---|---|---|---|
| Phase 1 — Infrastructure | $540 | $980 | $1,850 |
| Phase 2 — Envelope | $390 | $980 | $3,300 |
| Phase 3 — Systems | $460 | $1,110 | $3,650 |
| Phase 4 — Optimisation | $290 | $710 | $3,350 |
| 30-Day Total | $1,680 | $3,780 | $12,150 |
The budget reality: The recommended tier ($3,780) represents a finished, functional, properly equipped garage with correct electrical infrastructure, a quality floor coating, organised tool storage, and a maintained cleanup system. The essential tier ($1,680) produces a functional garage with correct sequencing and the most critical upgrades — electrical safety, basic lighting, and organised storage — at a cost most households can absorb in one or two months of planned spending.
Build Your Custom 30-Day Plan and Budget
Select your investment tier, starting point, and current garage temperature. The calculator generates your personalised timeline with adjusted cure days, a phase-by-phase budget breakdown, and a printable shopping checklist.
📋 Garage Makeover Budget & Timeline Calculator
Select your tier, starting point, and ambient temperature. Get a custom 30-day calendar with adjusted cure times and a printable phase-by-phase checklist.
* Budget estimates are typical US ranges. Cure times assume standard ventilation. Always verify permit requirements with your local building department before beginning Phase 1. Pro Garage Gear earns from qualifying Amazon purchases.
Frequently Asked Questions
Can I do the makeover in weekends only, not 30 consecutive days?
Yes — the 30-day plan is structured around weekend execution with minimal weekday involvement. Each phase maps cleanly to two weekends: Phase 1 (Weekend 1: audit + electrician coordination; Weekend 2: lighting + fan), Phase 2 (Weekend 3: insulation + prep; Weekend 4: paint + floor), Phase 3 (Weekend 5: overhead + workbench; Weekend 6: cabinets + tool wall), Phase 4 (Weekend 7: climate + safety; Weekend 8: commissioning). The 8-weekend timeline adds buffer for the mandatory cure times between phases and aligns with most household schedules better than 30 consecutive daily tasks.
What if my garage floor has existing cracks or damage?
Address structural cracks (running from wall to wall, or with vertical displacement) with a concrete crack filler and a self-levelling floor underlayment before any coating is applied. Hairline cracks (less than 1/16-inch wide) can be filled with epoxy crack filler as part of the Day 14 surface preparation. Do not coat over any crack without filling it first — the crack transmits through the coating within 1–2 seasons and creates an irreparable line in the finished surface.
In what order do I remove everything from the garage before the makeover begins?
Empty in reverse zone order: Zone 3 (overhead and deep storage) first, then Zone 2 (wall storage and secondary items), then Zone 1 tools, then the largest floor items last. This sequence means the items you want to keep accessible during the makeover (tools you might need) stay available longest. Sort simultaneously with removal — a garage makeover is the correct moment to permanently discard items that have not been used in two or more years. Returning clutter to a finished garage is the most common reason a $3,000 makeover looks like the old garage within 90 days.
Should I hire a contractor for any phase or do all of it myself?
Phase 1 electrical work requires a licensed electrician in virtually all US jurisdictions — this is non-negotiable and non-DIYable without the appropriate licence and permits. Everything else in the 30-day plan is within the capability of any homeowner comfortable with basic tools, following manufacturer instructions, and prepared to move at the pace that surface cure times require. The floor coating is the highest-stakes DIY task — inadequate surface preparation is very difficult to correct after the fact. If the floor audit reveals significant moisture transmission, active cracks, or heavy oil contamination, the floor is the one phase where professional application may provide better long-term value than DIY.
How long does the floor coating need to cure before I drive on it?
Vehicle traffic requires 7 full days of cure time for most epoxy and polyaspartic systems, regardless of the “24-hour drive-ready” claims on many consumer product labels. “24-hour drive-ready” typically refers to light foot traffic, not vehicle weight. One vehicle parked on a 48-hour-cured epoxy floor leaves tire compression marks. The 30-day plan builds this cure time into the sequence by placing the floor on Day 14 and not introducing heavy floor loads (cabinets) until Day 19–21 — five days of cure for equipment foot traffic. Vehicle access should wait until Day 21 at minimum, Day 23 is better.
What is the single most impactful upgrade if my budget is under $500?
Electrical first, always. A $400 electrician visit that adds one dedicated 20-amp circuit and GFCI-protects all existing outlets transforms the safety and usability of the space more than any cosmetic upgrade. If the electrical is already correct, the second-highest impact upgrade under $500 is overhead LED lighting — two 6-packs of Barrina T5 strips at $80 each plus a single junction box installation produces daylight-quality illumination across the full garage area and makes every subsequent task in the space more accurate and less fatiguing.
The Bottom Line: Sequence Is Free
The most important thing in this guide costs nothing. The sequence — Phase 1 before Phase 2 before Phase 3 before Phase 4, floor last within Phase 2 — is free information that prevents every common and expensive mistake in a garage makeover. It is not complicated. It is not proprietary. Most homeowners just never encounter it before starting.
Now you have it. The 30-day plan maps it to a calendar. The budget guides show you what it costs at three investment levels. The linked guides cover every individual phase in complete technical detail.
The only remaining step is starting. And starting with the right step first.
Affiliate Disclosure: Pro Garage Gear earns from qualifying Amazon purchases at no extra cost to you. All budget estimates are indicative ranges based on typical US retail pricing at time of publication. Electrical work costs vary significantly by location and local permit requirements — obtain three quotes before proceeding.