
Garage Kayak & Paddleboard Storage 2026: The Hull Contact Rule That Prevents $400 in Damage — and the Systems That Get You on the Water in 90 Seconds
Affiliate Disclosure: Pro Garage Gear participates in the Amazon Services LLC Associates Program. We earn from qualifying purchases at no extra cost to you.
Garage Kayak & Paddleboard Storage : The Two-Sawhorse Problem: The most common kayak storage setup in North America is two sawhorses, a garage corner, and a prayer. The kayak rests on two narrow contact points — the sawhorse crossbars — directly on the hull’s widest beam. Over one season of storage in a temperature-cycling garage, the repeated thermal expansion and contraction of the hull material under concentrated point load causes the hull to deform at exactly those two contact points. Composite kayaks develop flat spots. Polyethylene kayaks develop permanent indentations. Either way, the boat that tracked straight last summer wobbles this summer — and the damage is not covered by any manufacturer warranty because it is a storage failure, not a manufacturing defect.
The fix costs $80–$400 depending on the system. The damage costs $400–$2,000 to repair or replace.
This guide explains the Hull Contact Rule — the principle that determines whether any storage system protects or damages your boat — then ranks the best garage storage systems for kayaks, canoes, and SUP paddleboards across every garage size and budget. It also introduces the 90-Second Deploy Test: the functional standard that determines whether your storage system is genuinely useful or just keeps the boat out of the way.
The Hull Contact Rule: The One Principle Every Storage Decision Depends On
Every kayak, canoe, and paddleboard hull has a correct and incorrect way to receive static storage load. Getting this wrong is the most expensive storage mistake a paddler makes — and the most preventable.
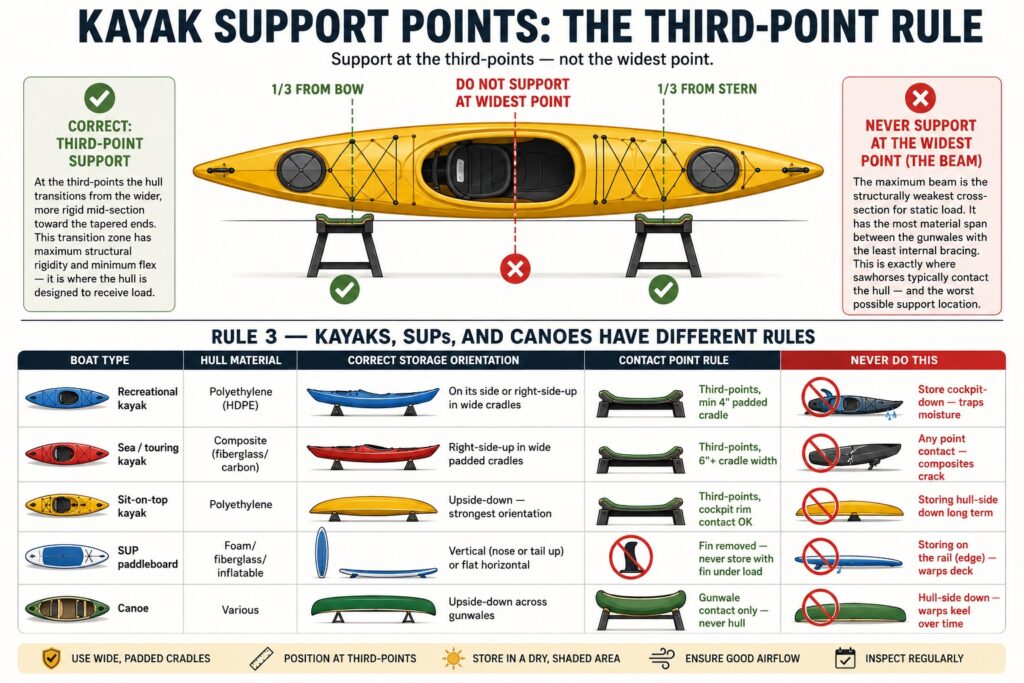
Rule 1 — Distribute Load Across the Widest, Strongest Hull Surface
Hull deformation under storage load is a function of pressure — force divided by contact area. Two sawhorses create two contact points with very small surface area each. A correctly designed storage cradle distributes the same weight across 12–18 inches of padded contact surface on each side. Same weight, dramatically larger area, dramatically lower pressure per square inch, zero deformation over a full storage season.
The minimum contact pad width for any storage system is 4 inches per contact point. Below that, you are creating point load that concentrates stress. Above 8 inches per contact point, the system distributes load well enough to protect any hull material including thin composite layups.
Rule 2 — Support at the Correct Hull Positions
The correct support positions for a kayak are at the third-points of its length — approximately one-third of the way from the bow and one-third of the way from the stern. At these positions the hull transitions from the wider, more rigid mid-section toward the tapered ends. This transition zone has maximum structural rigidity and minimum flex — it is where the hull is designed to receive load.
Never support a kayak at its widest point (the beam). The maximum beam is structurally the weakest cross-section for static load because it has the most material span between the gunwales with the least internal bracing. This is exactly where sawhorses typically contact the hull — at the widest, most visible, most photogenic point. It is also the worst possible support location.
Rule 3 — Kayaks, SUPs, and Canoes Have Different Rules
| Boat Type | Hull Material | Correct Storage Orientation | Contact Point Rule | Never Do This |
|---|---|---|---|---|
| Recreational kayak | Polyethylene (HDPE) | On its side or right-side-up in wide cradles | Third-points, min 4″ padded cradle | Store cockpit-down — traps moisture |
| Sea / touring kayak | Composite (fibreglass/carbon) | Right-side-up in wide padded cradles | Third-points, 6″+ cradle width | Any point contact — composites crack |
| Sit-on-top kayak | Polyethylene | Upside-down — strongest orientation | Third-points, cockpit rim contact OK | Storing hull-side down long term |
| SUP paddleboard | Foam/fibreglass/inflatable | Vertical (nose or tail up) or flat horizontal | Fin removed — never store with fin under load | Storing on the rail (edge) — warps deck |
| Canoe | Various | Upside-down across gunwales | Gunwale contact only — never hull | Hull-side down — warps keel over time |
The 90-Second Deploy Test: The Standard Every Storage System Must Pass
Before evaluating any kayak storage product, apply this test: starting from the storage position, can one person move the boat from stored to loaded on a roof rack or vehicle hitch carrier in 90 seconds or less, without assistance, without dropping the boat, and without rearranging any other items in the garage?
If the answer is no — the storage system fails regardless of how well it protects the hull. A system that perfectly preserves the boat but requires 10 minutes of effort, a ladder, a helper, or reorganising three other items to access creates the friction that leads to boats sitting in the garage for months at a time. The boat that is hardest to deploy gets used least. The boat used least degrades fastest from inactivity.
The 90-second standard is not arbitrary. It is the threshold where retrieval feels effortless rather than effortful — where you reach for the boat the same way you reach for a bike rather than treating it as a production. Systems that pass this test get used. Systems that fail it collect dust and eventually get sold.
The three factors that determine whether a system passes:
- Retrieval height: A kayak stored overhead at 10 feet requires a ladder. A kayak stored at 5–6 feet requires only a reach. Ceiling hoist systems solve the height problem by bringing the boat down to working height — but only if the hoist operates smoothly under load and does not require both hands to control while the boat is suspended.
- Clearance path: The boat must have a clear path from its stored position to the garage door without moving other items. This sounds obvious but most garage layouts fail it — the kayak is stored in the corner with bikes, sports equipment, or shelving blocking the extraction path.
- One-person operation: A storage system that requires a second person to lower, carry, or load the boat fails for the majority of paddlers who launch solo. The system must be operable by one person of average strength.
The Four Storage Architectures: Which One Suits Your Garage
Architecture 1 — Ceiling Hoist System
A ceiling hoist uses a pulley system mounted to the ceiling joists to lift the kayak overhead and lower it to working height on demand. The boat hangs horizontally from two webbing loops positioned at the third-points — the correct hull contact positions — and the entire system is operated by a single rope with a cam lock that holds the load at any height.
Best for: Any garage with 10+ foot ceilings, owners who want maximum floor space recovery, single person operation, and kayaks in the 35–80 lb range.
⚠️ Step 0 Before Any Ceiling Hoist Purchase: The Garage Door Track Clearance Audit
Most homeowners plan their kayak ceiling hoist position by looking at the ceiling with the garage door closed. This is the wrong starting point and it leads to one of the most expensive and avoidable mistakes in garage storage — a suspended kayak that collides with the garage door on its first opening cycle.
Here is what happens when the door opens: a standard 7-foot sectional garage door does not disappear into the ceiling. The door panels roll up along the horizontal tracks and lie horizontally along the ceiling, parallel to the floor, occupying 18–24 inches of vertical ceiling space from the door opening inward. The garage door opener rail extends an additional 4–6 feet from the opener motor toward the front wall, at approximately the same height as the open door panels. The combined “door zone” — the ceiling space that becomes physically occupied when the door opens — extends anywhere from 6 to 10 feet back from the front wall depending on door height, track style, and opener model.
A kayak hoisted directly above a parked car — the intuitively logical hoist position — is almost always within or immediately adjacent to this door zone.
How to Measure Your Door Zone Before Choosing a Hoist Position
- Open the garage door completely and leave it in the fully-open position.
- Stand inside the garage and look up. Note the lowest point of the open door panels and the opener rail. Measure the distance from the floor to the bottom of the open door — this is your maximum hoist height in the door zone. The kayak, when hoisted, must have its lowest point above this measurement.
- Measure the horizontal depth of the door zone. With the door fully open, measure from the front wall inward to where the last door panel ends. This is the “no-hoist zone” for a kayak stored at vehicle height — the boat will physically contact the rolling door within this distance.
- Mark the safe hoist position. The first safe hoist position is at least 12 inches behind the rear edge of the fully open door. In most standard 20-foot deep garages, this places the hoist at 8–12 feet from the front wall — still above the parking zone for most vehicles, but clear of the door track.
| Garage Door Height | Approx. Door Zone Depth | Minimum Safe Hoist Distance from Front Wall |
|---|---|---|
| 7 feet (standard) | 7–8 feet from front wall | 9+ feet from front wall |
| 8 feet (high door) | 8–9 feet from front wall | 10+ feet from front wall |
| 9 feet (low-headroom) | Uses low-headroom track — verify individually | Measure specifically — may be impractical |
The low-headroom situation: Some garage door tracks use “low-headroom” hardware specifically designed for garages with less than 12 inches between the top of the door opening and the ceiling. Low-headroom track systems have a different geometry that places the open door panels closer to the ceiling and closer to horizontal. These configurations leave very little clearance for a ceiling hoist. If your garage has low-headroom track hardware: wall mounting or freestanding storage is almost always the correct architecture, not a ceiling hoist.
🛒 Check Price on Amazon — 25 ft. Tape Measure (For Door Zone Measurement) →
The critical installation requirement: Every hoist must be mounted into ceiling joists — not into drywall, not into strapping, not into a single joist with a single fastener. The combined weight of the boat plus dynamic load during lowering can reach 3–4× the static weight. A 60 lb kayak generates up to 240 lbs of dynamic load on a hoist mounting point under fast-release conditions. Both mounting points must be into separate joists with appropriately rated lag bolts.
➡️ For joist location and ceiling load rating guidance: Best Overhead Garage Storage Racks 2026: The Joist Load Rating Guide →
Architecture 2 — Wall Mount System
Wall mount systems hold the kayak horizontally against the wall on padded arm brackets. The boat becomes a visual element of the garage wall rather than taking floor or ceiling space. Most wall mounts use two J-cradle or saddle-style arms that swing flat against the wall when not in use, minimising intrusion into the garage workspace.
Best for: Garages with limited ceiling height, kayaks under 65 lbs, owners who want quick visual access and minimal setup, and SUP paddleboards stored vertically on wall-mounted racks.
The correct arm spacing for wall mounts: The two bracket arms must be positioned at the third-point rule distances — not evenly spaced and not at the maximum beam. Measure the kayak’s total length, divide by three, and position one arm at that measurement from each end. Mark the wall positions before drilling.
⚠️ Wood Stud vs. Metal Stud: The Mounting Difference That Determines Whether Your Kayak Stays on the Wall
Every kayak wall mount installation guide — including Thule’s own instructions — assumes wood stud construction. Most residential homes built before 2000 have wood-framed interior walls: 2×4 or 2×6 dimensional lumber at 16 or 24 inches on-centre, with full wood mass for lag screw engagement. A 3/8-inch lag screw driven 2.5 inches into a wood stud develops 400–600 lbs of pull-out resistance. A kayak wall mount loaded to its 75 lb rating generates approximately 100–150 lbs of pull-out force at the fasteners. The safety margin is enormous.
Modern construction changes this equation entirely. Condominiums, townhomes, commercial conversions, and many residential garages built after approximately 2005 increasingly use metal stud framing — 25-gauge or 20-gauge steel C-channel studs at 16 or 24 inches on-centre. A standard lag screw driven into a metal stud does not thread into solid material — it passes through the hollow centre of the C-channel and engages only the thin steel flanges at the front and back of the stud. The pull-out resistance of a lag screw in a 25-gauge metal stud is approximately 40–80 lbs — one-tenth of its wood stud equivalent. A 75 lb kayak in a wall mount cradle is at or beyond this limit before dynamic load is factored in.
How to identify whether you have metal or wood studs:
- Magnetic test: A strong magnet held against the drywall will detect metal studs directly (magnetic attraction to the stud itself) rather than just the drywall screws. A standard stud finder detects only the drywall fasteners — it does not distinguish between wood and metal studs.
- Drill test: Drill a small pilot hole at your planned mounting location. Wood studs produce fine sawdust. Metal studs produce fine metallic shavings and a distinctly different resistance feel.
- Visual check: If your garage walls are unfinished, the stud type is directly visible.
The Correct Solution for Metal Stud Wall Mounts
| Scenario | Correct Fastener | Pull-out Strength | Notes |
|---|---|---|---|
| Metal stud — single stud width | SnapToggle TOGGLER bolt (#6) | 265 lbs per anchor | Requires 1/2″ drywall minimum — anchor expands behind wall |
| Metal stud — wide mounting plate | Two SnapToggles spanning stud width | 530 lbs combined | Distribute load across both flanges of the stud |
| Masonry / concrete wall | Tapcon concrete screw 3/16″ × 2-3/4″ | 600+ lbs per anchor | Requires masonry drill bit and hammer drill |
| Wood stud (confirmed) | 3/8″ lag screw, 2.5″ minimum depth | 400–600 lbs per fastener | Standard approach — always verify with magnetic/drill test first |
The critical rule: Never use drywall anchors — plastic expansion anchors or “butterfly” style toggles — for kayak wall mount installation. Drywall anchors are rated for vertical loads (like picture frames or shelves with books). Kayak mounts apply horizontal pull-out force that drywall anchors are specifically not designed to resist. Even a 50 lb-rated drywall anchor fails under the combined horizontal and downward load of a mounted kayak.
🛒 Check Price on Amazon — SnapToggle TOGGLER Anchors (Metal Stud Solution) →
🛒 Check Price on Amazon — Tapcon Masonry Screws (Concrete/Block Walls) →
Architecture 3 — Freestanding Rack
A freestanding rack is a floor-standing A-frame or horizontal bar structure that holds one or more kayaks without any wall or ceiling fastening. The advantage is flexibility — it can be repositioned, it requires no drilling, and it can hold multiple boats at different heights on a single unit.
Best for: Renters who cannot drill, multiple boat households (2–4 boats), garages where wall and ceiling mounting locations are occupied, and temporary storage situations.
The limitation: Freestanding racks occupy floor space — the resource that is usually the scarcest in a single or two-car garage. A freestanding rack storing two kayaks takes up approximately the same floor footprint as one parked car’s width. If the garage is already space-constrained, wall or ceiling systems recover more usable area.
Architecture 4 — Vertical Wall Storage (SUP and Short Kayaks)
Vertical storage mounts the board or kayak nose-up or tail-up against the wall, using a padded floor cradle and a wall-mounted strap or hook at the upper third of the board’s length to hold it vertical. A 10-foot SUP paddleboard stored vertically takes 14 inches of wall width instead of 10 feet of wall length — a dramatic space recovery.
Best for: SUP paddleboards exclusively and kayaks under 10 feet. Not appropriate for kayaks over 10 feet — the top-heavy load creates instability in the vertical position that no wall strap adequately controls for longer boats.
Find Your Correct Storage System in 60 Seconds
Answer five questions about your garage and boats. The matcher calculates your available ceiling clearance after the door opens, checks your drilling situation, identifies any joist alignment issues, and recommends the specific storage architecture and product for your exact setup.
🚣 Kayak Storage Matcher & Clearance Calculator
Five questions — your ceiling clearance calculated, your architecture matched, and the specific product recommended for your exact garage.
* Clearance calculations are based on standard sectional door track geometry. Low-headroom tracks, torsion spring configurations, and custom door heights may vary. Always measure with your specific door open before purchasing a hoist system.
2026 Rankings: The Best Garage Kayak and Paddleboard Storage Systems
🥇 #1 — RAD Cycle Heavy-Duty Kayak Ceiling Hoist (Best Overall)
Why it earns #1: The RAD Cycle hoist delivers the best combination of load rating, rope quality, and cam-lock reliability of any ceiling hoist under $60. The 2:1 mechanical advantage pulley system means lifting a 60 lb kayak requires only 30 lbs of pull force — manageable for one person regardless of upper body strength. The cam lock holds at any position without creep, which is the critical safety feature most budget hoists omit.
The Data
- Maximum load rating: 200 lbs — handles any recreational or touring kayak
- Rope: Braided nylon, 1/4-inch diameter — does not stretch under load the way polyester ropes do
- Cam lock: Auto-locking at any position — load does not creep down when released
- Ceiling spread: Adjustable to any joist spacing
- Cradle pads: Foam-padded nylon webbing loops — correct hull contact surface
- Weight capacity per loop: 100 lbs — supports both the boat weight and mild dynamic load
The 90-Second Deploy performance: With the RAD Cycle system correctly installed and the boat stored at ceiling height, one person can lower the kayak to working height, unhook one end, walk it to the garage door, and have it ready to carry or load in under 90 seconds. The 2:1 pulley means there is no breath-holding moment as the boat descends — the load is always under control.
Honest limitation: The included webbing loops are functional but basic. For composite kayaks or boats over 70 lbs, upgrading to wider neoprene cradle pads (sold separately) is worth the additional $20 to increase the hull contact surface area.
🛒 Check Price on Amazon — RAD Cycle Kayak Ceiling Hoist →
🛒 Check Price on Amazon — Wide Neoprene Kayak Cradle Pads (Upgrade) →
🔧 The Hardware Store Bypass Bundle: Don’t Trust Factory Hardware With a $1,500 Boat
The RAD Cycle hoist kit includes small generic eye bolts with no stated working load limit. On a $59 hoist supporting a $1,200 composite kayak, these are the weakest link in the system — and the one failure point that cannot be inspected without taking the system down. Replace them before first use.
| Component | Why Replace It | Spec to Buy | Amazon |
|---|---|---|---|
| Kit eye bolts | No load rating — unknown steel grade | 5/16″ forged steel lag eye bolt, 300 lb WLL, 3″ shank | Shop → |
| Kit webbing loops | Narrow — incorrect hull contact for composite boats | Wide neoprene kayak cradle pads, 6″+ contact width | Shop → |
| Stud finder | Required before drilling — not included | Franklin ProSensor 710 — detects joists accurately | Shop → |
🛒 Check Price on Amazon — 5/16″ Forged Lag Eye Bolts 300 lb WLL (Safety Upgrade) →
🛒 Check Price on Amazon — Wide Neoprene Cradle Pads (Hull Protection Upgrade) →
🥈 #2 — Malone Auto Racks MPG115 Telos XL Freestanding Kayak Rack (Best Freestanding)
Why it earns #2: The Malone Telos XL is the freestanding rack that serious paddlers actually use — not because it is the cheapest (it is not) but because its 6-boat capacity on a footprint smaller than a refrigerator, combined with the padded cradle geometry that correctly contacts the hull at its structural zones, justifies the investment for any household with more than one boat.
The Data
- Boat capacity: Up to 6 kayaks or paddleboards simultaneously
- Floor footprint: 30 inches wide × 30 inches deep — the smallest multi-boat freestanding system available
- Height: 66 inches — boats stored at accessible heights without a ladder
- Cradle material: Foam-padded steel arms — exceeds the 4-inch contact width minimum
- Weight capacity: 150 lbs total across all arms
- Assembly: Tool-free — steel tubes lock together without fasteners
Who this is specifically for: A household with two kayaks and two paddleboards has 40–50 feet of combined boat length to store. Ceiling hoists require two separate installations per boat. Wall mounts require 40–50 feet of continuous wall space. The Malone Telos consolidates all four boats into a 30×30-inch floor space — genuinely transformative for a multi-paddler household.
🛒 Check Price on Amazon — Malone Telos XL Freestanding Kayak Rack →
🥉 #3 — Thule 591 Hull-a-Port Wall Hanger (Best Wall Mount)
Why it earns #3: Thule’s Hull-a-Port arm folds completely flat against the wall when not in use — reducing wall intrusion to less than 3 inches when the kayak is removed. The arm swings out to receive the boat and swings back to a stored position that recaptures virtually all of the wall space. The padded cradle surface is the widest in the wall-mount category at 7.5 inches of hull contact — well above the 4-inch minimum for safe hull support.
The Data
- Contact pad width: 7.5 inches — excellent hull load distribution
- Folded wall intrusion: 2.8 inches — recaptures wall space when not in use
- Load rating: 75 lbs per arm — sufficient for all recreational kayaks
- Mounting: Two screws into studs or masonry — simple installation
- Boats per set: Two arms per kit — one kayak per kit
The arm spacing instruction that most installers miss: Thule’s installation guide suggests spacing the two arms evenly across the available wall section. This is wrong for hull protection. Position the arms at the third-points of your specific kayak’s length — measure your boat, not the wall — then mark the stud positions closest to those measurements and install accordingly. This single adjustment is the difference between a correctly supported kayak and one that develops deformation at the contact points over time.
🛒 Check Price on Amazon — Thule 591 Hull-a-Port Kayak Wall Hanger →
⭐ Best SUP Paddleboard Storage — StoreYourBoard SUP Ceiling Hoist
The StoreYourBoard SUP hoist uses the same ceiling-mount pulley architecture as kayak hoists but with wide flat webbing straps rather than cradle loops — appropriate for the flat deck surface of a paddleboard. The board hangs face-down (deck side toward the floor) which distributes weight across the full flat deck surface rather than concentrating it on the rails.
The Data
- Maximum load: 125 lbs — handles all hardboards including inflatable boards when folded
- Strap width: 2-inch nylon webbing — appropriate contact surface for SUP deck material
- Clearance when stored: Board hangs flat — minimal ceiling clearance required vs. kayak orientation
- Fin removal: Always remove the fin before hoisting — fin creates an uneven load point that warps the deck under storage
🛒 Check Price on Amazon — StoreYourBoard SUP Paddleboard Ceiling Hoist →
⭐ Best Budget Option — Suspenz EZ Kayak & SUP Storage Rack (Under $80)
For the paddler who needs a functional, hull-safe storage solution without a significant investment, the Suspenz EZ rack is a freestanding two-boat system with padded cradles, a 200 lb combined load rating, and assembly that requires no tools. It is not the most space-efficient solution and it does not have the build quality of the Malone system — but it keeps boats off the floor, protects the hull correctly at the third-points, and passes the 90-Second Deploy Test for ground-level retrieval.
🛒 Check Price on Amazon — Suspenz EZ Kayak Storage Rack →
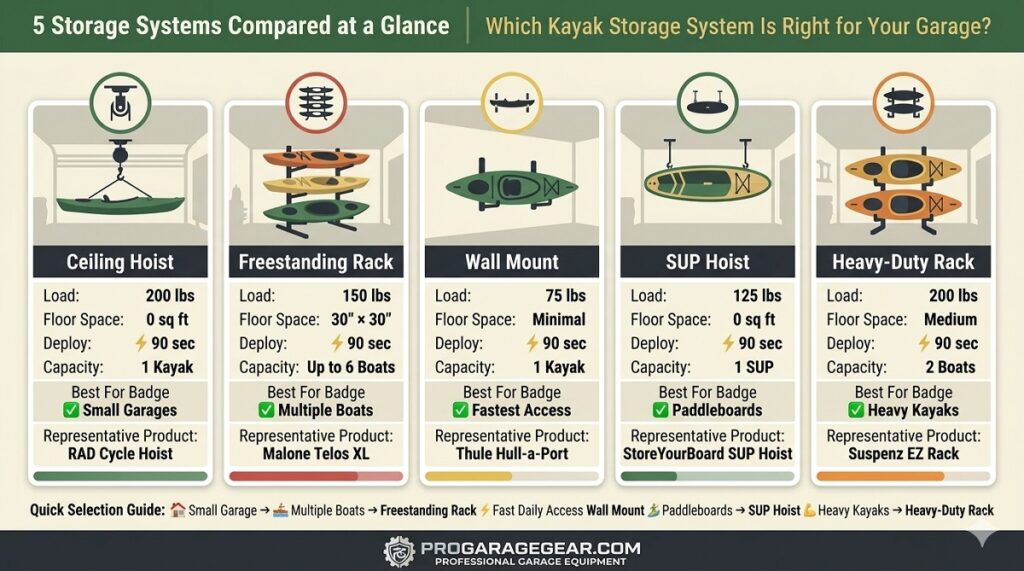
Complete System Comparison Table
| System | Type | Max Load | Floor Space Used | 90-Sec Deploy? | Boats Stored | Amazon |
|---|---|---|---|---|---|---|
| RAD Cycle Hoist | Ceiling hoist | 200 lbs | Zero | ✅ Yes | 1 kayak | Shop → |
| Malone Telos XL | Freestanding | 150 lbs | 30×30 inches | ✅ Yes | Up to 6 | Shop → |
| Thule Hull-a-Port | Wall mount | 75 lbs | Minimal | ✅ Yes | 1 kayak | Shop → |
| StoreYourBoard SUP Hoist | Ceiling hoist | 125 lbs | Zero | ✅ Yes | 1 SUP | Shop → |
| Suspenz EZ Rack | Freestanding | 200 lbs | Medium | ✅ Yes | 2 boats | Shop → |
Ceiling Hoist Installation: The Four Steps Most Guides Skip
A ceiling hoist installed incorrectly is more dangerous than a kayak on the floor. A 60 lb boat falling from ceiling height in a garage workspace is a serious injury risk. These are the four installation steps that the product instructions summarise inadequately.
Step 1 — Locate and Verify Joist Capacity Before Drilling
Locate joists with a stud finder. Verify the joist span — the distance the joist travels without intermediate support. A residential garage ceiling joist with a 16-foot span has significantly less load capacity at mid-span than at its supported ends. For a kayak stored at the mid-span position of a long joist: add a perpendicular blocking board between two adjacent joists to distribute the hoist load across two joists rather than one.
🛒 Check Price on Amazon — Franklin ProSensor 710 Stud/Joist Finder →
Step 2 — Use the Correct Fastener Specification
Most hoist kits include small eye bolts with no stated load rating. Replace them with 5/16-inch lag eye bolts with a minimum 300 lb working load limit per fastener. Drive them into the joist a minimum of 2.5 inches — the thread engagement length that develops full fastener load capacity in SPF lumber. Pre-drill a pilot hole at 75% of the lag diameter to prevent joist splitting.
🛒 Check Price on Amazon — 5/16″ Lag Eye Bolts 300 lb WLL (2-Pack) →
Step 3 — Set the Correct Pulley Spread
The two ceiling pulleys must be positioned directly above the boat’s third-point contact positions — not evenly spaced across the ceiling. If the pulleys are too far apart, the webbing cradles angle inward and create hull pressure at incorrect contact points. If too close together, the boat hangs at an angle. Measure the boat’s third-point positions, mark them on the ceiling, locate the nearest joists to those marks, and install accordingly. This sometimes means the pulleys are not symmetrically placed on the ceiling — that is correct.
When Joists Don’t Align With Your Third-Points: The Stringer Board Solution
Residential garage ceiling joists are fixed at either 16-inch or 24-inch on-centre spacing — they cannot be repositioned. Your kayak’s third-points are fixed by the boat’s length — they also cannot be repositioned. The probability that these two fixed measurements align perfectly is low. In most installations, the third-point positions fall between joists rather than directly on them.
The instinctive response — mount the pulley on the nearest joist to the third-point — creates a problem that most installers do not notice until the boat is in the air. When both pulleys are offset from the true third-point positions, the lifting straps angle toward the centre of the boat rather than hanging vertically. This angled strap geometry creates three problems: the rope binds in the pulley cam under load, the boat hangs at a slight angle rather than level, and the hull contact points shift away from the protected third-point positions toward less structurally sound sections.
The correct solution: the perpendicular stringer board.
A stringer board is a length of 2×4 or 2×6 lumber installed horizontally across the ceiling joists, perpendicular to them — spanning across three or four joists and creating a new mounting surface at any horizontal position. The hoist eye bolts mount into the stringer at the exact third-point positions, and the stringer transfers the load into the joists across its full span.
Stringer board installation:
- Cut a 2×4 to span at least three ceiling joists (minimum 32 inches for 16-inch OC joists, 48 inches for 24-inch OC joists).
- Position the stringer perpendicular to the joists, centred over the planned hoist position.
- Fasten the stringer to each joist with two 3-inch structural screws per joist — minimum 6 screws total. Stagger the screws vertically to avoid splitting the joist at a single cross-section.
- Mark the exact third-point positions on the stringer face.
- Install the hoist eye bolts at those exact marks — the stringer allows precise positioning regardless of joist spacing.
Why this is structurally superior to direct joist mounting: The stringer distributes the hoist load across three joists rather than concentrating it in one. The distributed load reduces the bending stress on each individual joist to approximately one-third of the single-joist load. For heavier boats (60–80 lbs) or older joists with any signs of checking or splitting, this distribution is the difference between a safe installation and a progressive failure over time.
🛒 Check Price on Amazon — 2×4 Lumber (Stringer Board) →
🛒 Check Price on Amazon — 3-Inch Structural Screws (Stringer Fasteners) →
Step 4 — Test at Ground Level Before Full Installation
Before raising the kayak for the first time, load the webbing loops with the boat at floor level and apply upward tension manually to verify even load distribution. Look at the hull contact points — are both cradle pads making full-width contact with the hull? Is the boat hanging level? Adjust loop positions along the webbing before the boat is ever at ceiling height.
The UV and Temperature Problem: Why Garage Storage Requires Protective Measures
A garage resolves the outdoor UV exposure problem but creates two new ones that outdoor storage does not have: temperature extremes and rodent access.
Temperature Cycling
An uninsulated garage in a cold climate reaches −20°F in winter. Polyethylene kayaks become brittle at extreme cold temperatures — dropping a cold polyethylene boat on concrete causes cracking that would not occur at room temperature. Similarly, a garage reaching 130°F in summer accelerates UV-stabiliser degradation in the plastic even without direct sunlight.
The practical fix: store kayaks at least 12 inches away from any exterior wall or garage door, where thermal cycling is most extreme. The interior wall positions maintain more stable temperatures throughout the year.
➡️ For garage insulation to moderate temperature extremes: How to Insulate a Garage: Complete Guide Including Door Insulation →
Cockpit and Hull Protection
An open kayak cockpit in a garage is a perfect nesting location for mice and insects. A single season of nesting damage to cockpit foam, seat padding, and footpeg mechanisms can cost $150–$300 to repair.
The fix: A cockpit cover — a neoprene or nylon cover that seals the cockpit opening — costs $15–$30 and eliminates nesting access entirely. This is the most undervalued accessory in kayak storage and one of the most frequently mentioned regrets among paddlers who did not use one.🛒 Check Price on Amazon — Neoprene Kayak Cockpit Cover →
🛒 Check Price on Amazon — 303 Aerospace Protectant (UV and Oxidation) →
🛡️ The Off-Season Preservation Kit: The $40 Investment That Protects a $1,500 Boat
A single season without a cockpit cover costs more than three years of cockpit covers. Mice nest in kayak cockpits. Spiders colonise the dry dark space. Both cause damage that costs far more to repair than the protective accessories cost to buy — and the damage is always discovered at the start of paddling season when you are already carrying the boat to the car.
| Item | What It Prevents | Cost | Damage Prevented | Amazon |
|---|---|---|---|---|
| Neoprene cockpit cover | Mice, insects, debris, moisture in cockpit | $15–$25 | $150–$300 foam/seat repair | Shop → |
| 303 Aerospace Protectant | UV degradation, oxidation, hull fading | $12–$18 | $400–$800 hull replacement | Shop → |
| Bow and stern tie-down straps | Hoist swing in wind or movement | $8–$15 | Hull dings from wall contact | Shop → |
🛒 Search Amazon — Complete Kayak Off-Season Storage Kit →
The Complete Kayak Storage Accessories List
| Accessory | What It Does | Priority | Amazon |
|---|---|---|---|
| Cockpit cover (neoprene) | Prevents nesting, dust, and moisture in cockpit | 🔴 Essential | Shop → |
| 303 Aerospace Protectant | UV protection and oxidation prevention for hull and deck | 🔴 Essential | Shop → |
| Wide neoprene cradle pads | Upgrade from narrow webbing — increases hull contact area | 🟡 Recommended | Shop → |
| Paddle wall mount (horizontal) | Stores paddles adjacent to boat — completes the launch kit | 🟡 Recommended | Shop → |
| Dry bag storage hook | PFD, spray skirt, and dry bags hung adjacent to kayak | 🟡 Recommended | Shop → |
| Bow and stern tie-down straps | Secures boat in hoist during storage — prevents swing damage | 🟢 Optional | Shop → |
The Space Planning Reality: Kayaks in Small Garages
The most common scenario is a 14-foot recreational kayak in a one-car or two-car garage that is also used for vehicles, bikes, and general storage. Here is the honest space math for the three most practical systems in that scenario:
Ceiling hoist in a one-car garage (12×20 ft): The kayak hangs above the parked car when the vehicle is inside — a 14-foot kayak suspended at ceiling height above a standard sedan requires minimum 24 inches of vertical clearance above the roof line. In a 9-foot ceiling garage with a 6-foot vehicle, the hoist system works. In an 8-foot ceiling garage: it does not, and the boat must be stored against the wall or outside the parking zone entirely.
Wall mount in a one-car garage: A 14-foot kayak stored horizontally on wall mounts occupies 14 linear feet of wall space — more than half of a 20-foot garage’s back wall. This is usually manageable on the back wall with careful planning but eliminates that wall for other storage purposes. The side walls in a one-car garage are typically 12 feet long — a 14-foot kayak cannot be stored on a 12-foot wall. Plan your wall selection before purchasing.
Freestanding rack in a one-car garage: A single-boat freestanding rack’s floor footprint (approximately 20×36 inches for most systems) parked along the side wall is the most flexible option for garages where both ceiling and long walls are occupied. The boat is accessible without moving other items and can be repositioned seasonally.
➡️ For overall garage space planning and storage zoning: Best Overhead Garage Storage Racks 2026: Space Planning for Every Garage Size →
Frequently Asked Questions
Can I store a kayak vertically (nose up) in a garage?
For kayaks under 10 feet: yes, with a padded floor cradle and a wall strap at the upper third of the boat’s length to prevent tipping. For kayaks over 10 feet: not recommended. A 14-foot kayak stored vertically with its nose at ceiling height and its tail on the floor creates a pendulum that swings dangerously with any contact or vibration. The weight distribution also places concentrated load on the tail section — a structurally weak hull position — over extended storage. Horizontal storage at third-point contact is always correct for full-length kayaks.
How do I store a kayak and still park my car in the garage?
The ceiling hoist is specifically designed to answer this question. The kayak stores overhead in the same space the car occupies below it. The car parks under the stored kayak, the kayak is lowered when the car is out, and the system requires zero additional floor space. The only requirement is that the boat clears the vehicle roof by at least 18–24 inches when fully raised — verify this measurement before purchasing a hoist for a low-ceiling garage.
What is the maximum weight a residential ceiling can hold for kayak storage?
This depends entirely on the joist size, span, and fastener installation quality rather than any universal number. A 2×6 joist at 16 feet of span supports approximately 40–50 lbs at mid-span before approaching deflection limits. A 2×8 joist at the same span supports 70–90 lbs. The conservative approach: install the hoist pulleys close to the supported ends of the joist (within 3–4 feet of the wall) where load capacity is highest, and always use two separate joists for the two hoist mounting points rather than both on the same joist. When in doubt: add blocking between two adjacent joists and distribute the load across both.
How do I store an inflatable SUP in a garage?
Deflated and rolled in its carry bag — stored on a shelf, in a cabinet, or hung on a wall hook. This is the single genuine advantage of an inflatable SUP over a hardboard for garage storage: a deflated inflatable takes the same space as a large backpack. Do not store inflatables in extreme heat — air pressure inside a partially inflated board increases significantly above 90°F and can stress seams. A cool interior wall position is correct; a south-facing exterior wall position in summer is not.
Do I need to clean my kayak before storing it in the garage?
Yes — and specifically for two reasons beyond general cleanliness. Saltwater residue left on polyethylene hulls accelerates UV-stabiliser degradation even in indoor storage. Sand trapped in the cockpit becomes an abrasive against foam padding over a full storage season. Rinse with fresh water, allow to dry completely before covering the cockpit or placing in cradles — storing a wet kayak in closed cradles against the hull creates the moisture-trapping conditions that cause deck delamination in composite boats and mould growth in recreational polyethylene boats with foam outfitting.
The Bottom Line
The boat that is easy to access gets used. The boat that is protected from hull deformation lasts 15–20 years rather than 5–7. These two objectives — easy access and correct hull support — are not in conflict. Every system in this guide satisfies both when installed correctly.
For a single kayak in a standard garage: the RAD Cycle ceiling hoist passes both tests, costs under $60, and takes 45 minutes to install correctly. For a multi-boat household: the Malone Telos XL consolidates everything into one footprint with correct hull contact on every boat. For renters or low-ceiling garages: the Suspenz EZ freestanding rack requires no fasteners and protects the hull correctly at ground level.
Fix the contact points. Pass the 90-second test. Get on the water faster.
Affiliate Disclosure: Pro Garage Gear earns from qualifying Amazon purchases at no extra cost to you. Load ratings cited are manufacturer specifications — always verify fastener installation with a qualified contractor for ceiling-mounted