
Best Garage Cabinets Under $1,000 (2026): The “Thin Steel” Warning Nobody Talks About
Affiliate Disclosure: Pro Garage Gear earns from qualifying Amazon purchases at no extra cost to you.
The “Six-Month Sag” Story: You assemble your brand-new garage cabinet set on a Saturday. You load it with tools. You step back and feel genuinely proud. Six months later, the door hinges are pulling out. The shelves bow under the weight of your tool collection. The bottom panel is separating from the side. You just experienced what experienced garage builders call “the six-month sag” — and it happens because you didn’t know the one number that predicts cabinet failure before you buy.
That number is steel gauge. And in the sub-$1,000 cabinet market, it separates the gear that lasts from the gear that disappoints.
The good news: there are legitimate, durable cabinet systems in this price range — if you know exactly what to look for. We’ve spent weeks analyzing specs, reading verified long-term owner reviews, and dissecting exactly where manufacturers cut corners in the budget segment. This guide is the result.
Why Budget Garage Cabinets Fail: The Three Silent Killers
1. The Steel Gauge Deception
Best Garage Tool Chests 2026 for a full steel gauge breakdown:
As we covered in our tool chest guide, lower gauge numbers mean thicker, stronger steel. The critical threshold for garage cabinet walls:
| Gauge | Thickness | Real-World Performance |
|---|---|---|
| 18-gauge | 0.048″ | Resists dents. Professional quality. Rarely found under $1,000 |
| 20-gauge | 0.036″ | Solid for moderate loads. The sweet spot in budget cabinets |
| 22-gauge | 0.030″ | Acceptable for upper cabinets only — not floor-standing units |
| 24-gauge | 0.024″ | Avoid. Will flex, dent, and fail under workshop loads |
The In-Store Test: Press your thumb firmly against the side panel of any floor cabinet. Quality 18–20 gauge steel shows zero movement. 22-gauge flexes slightly. 24-gauge deflects visibly. This test takes 3 seconds and tells you more than any spec sheet.
2. The MDF Shelf Trap
Many cabinets advertise “wood shelves” as a premium feature — but that wood is often medium-density fiberboard (MDF), which swells and crumbles when exposed to garage humidity, oil mist, and cleaning products. True steel shelves last indefinitely in garage conditions. MDF shelves in an unsealed garage typically last 2–4 years before failing.
The Magnet Test: Hold a magnet to the shelf. If it attracts — steel shelf. No attraction — wood or MDF. Do this before buying any cabinet that doesn’t explicitly specify steel shelving throughout.
3. The Hinge Quality Trap
Cheap cabinet hinges are European-style pressed steel with a 90-day service life under heavy use. Quality hinges are solid stainless or hardened steel with adjustment screws that allow door realignment over time. Run the cabinet door through 20 complete open-close cycles in the store. Quality hinges feel the same on cycle 20 as cycle 1.
What $1,000 Realistically Gets You
Here’s the honest market breakdown:
| Budget Range | What’s Available | Steel Quality | Shelf Type |
|---|---|---|---|
| Under $300 | Single wall or base cabinet | 22–24 gauge | Often MDF |
| $300–$500 | 2-piece combo (base + upper) | 20–22 gauge | Mixed |
| $500–$750 | 4–6 piece modular system | 18–20 gauge | Usually steel |
| $750–$1,000 | 6–8 piece full wall system | 18–20 gauge | Steel throughout |
The $750–$1,000 range is where budget meets legitimacy. In this range, you can cover an entire garage wall in matching, steel-shelved cabinets that will last 10+ years with reasonable use.
The 2026 Rankings: Best Garage Cabinets Under $1,000
🥇 #1 — Gladiator GAWG28KDYG 28″ Wall GearBox (Best Single Cabinet Under $300)
Why it earns #1 at this price: Gladiator’s wall cabinet uses 24-gauge steel — not premium, but appropriate for an upper wall-mounted unit that doesn’t carry floor loads. The real standout is the powder-coat finish (Hammertone Silver), which resists oil and chemical spills better than painted finishes. The full-width piano hinge eliminates the point-load stress that destroys individual hinges on cheap cabinets.
The data:
- Steel: 24-gauge (wall unit — acceptable for upper storage)
- Door: Single-piece with full piano hinge (eliminates individual hinge failures)
- Finish: Hammertone powder coat
- Capacity: 200 lbs. rated
Honest downside: 24-gauge is thinner than we’d prefer, and it’s a single cabinet — not a system. But for a first garage cabinet or a dedicated overhead storage piece, it’s the best option at this price.
Best for: Renters, first-time garage organizers, or adding overhead storage above existing systems.
➡️ Check Price & Reviews on Amazon
🥈 #2 — Husky 52″ x 37″ Regular Duty Welded Steel Cabinet (Best Mid-Budget Full Cabinet)
Why it earns #2: Husky’s 52-inch welded steel cabinet is one of the few budget-range cabinets that comes pre-assembled — no flat-pack assembly, no wobbly bolted joints. Welded construction means the frame is one continuous piece of steel, which eliminates the #1 structural failure point in flat-pack cabinets (the corner joints).
The data:
- Steel: 21-gauge (welded frame, 20-gauge doors)
- Shelves: Adjustable steel shelves, 4 included
- Capacity: 1,000 lbs. total
- Doors: Lockable, 3-point locking bar
- Dimensions: 52″W × 37″H × 18″D
Why welded matters: A bolted flat-pack cabinet under 400 lbs. of tool load flexes laterally — you can watch it rack (lean) sideways over time as the bolted joints loosen. A welded cabinet under the same load shows zero movement. The frame acts as a single rigid structure.
Honest downside: Heavy — 148 lbs. pre-assembled. Plan to have two people for delivery placement. Not easily relocated once loaded.
➡️ Check Price & Reviews on Amazon
🥉 #3 — Ulti-MATE Garage PRO Series 5-Piece Cabinet System (~$850–$950)
Why it earns #3: The Ulti-MATE PRO system delivers a 5-piece garage cabinet system (two base cabinets, two wall cabinets, one tall cabinet) at a price point that competitive systems charge for 3 pieces. The 18-gauge steel throughout — including the shelves — is the specification threshold that separates garage-grade from storage-grade.
The data:
- Steel: 18-gauge (wall panels and shelving — top-tier for this price)
- System: 5 pieces including tall wardrobe-style cabinet
- Finish: Aluminum Silver (resists chips)
- Assembly: Bolt-together (quality hardware, 4–6 hours for full system)
- Shelf capacity: 200 lbs. per shelf
Why the tall cabinet changes the game: Most budget systems omit a full-height cabinet. The tall piece in the PRO system creates a dedicated space for long items — brooms, shovels, tall power tools — that otherwise lean against walls and fall constantly.
Honest downside: Assembly takes 4–6 hours for all 5 pieces. The instructions are functional but not exceptional — watch YouTube assembly videos alongside the manual.
➡️ Check Price & Reviews on Amazon
Also Recommended
Seville Classics UltraHD 4-Door Cabinet: Consistently strong reviews for 18-gauge construction at around $400 for a standalone unit. Best single-cabinet pick for floor storage without investing in a full system.
YITAHOME Metal Garage Cabinet with Wheels: The best mobile cabinet option under $300. 22-gauge, but the mobility factor (4 locking casters) earns it a place in flexible workshop layouts where you need storage that rolls to the work.
How to Build a Full Garage Wall for Under $1,000
The most cost-efficient approach isn’t buying a pre-packaged system — it’s mixing and matching the right individual pieces:
| Piece | Purpose | Budget |
|---|---|---|
| 1× Husky Welded 52″ Base Cabinet | Primary tool/heavy item storage | ~$350 |
| 2× Gladiator Wall GearBox (28″) | Overhead storage (seasonal / smaller items) | ~$160 |
| 1× YITAHOME Mobile Cabinet | Rolling storage / portable tool station | ~$180 |
| Basic workbench top board (pine, cut to fit) | Surface across the base cabinet | ~$60 |
| Wall-mount slatwall panel (2×4 ft.) | Tool display above base cabinet | ~$80 |
| Total | Full functional wall system | ~$830 |
This mixed-brand approach gives you: a structural base cabinet, overhead storage, a mobile unit, a workbench surface, and wall tool display — for under $1,000 without compromising on the pieces that carry real load.
15 Genius Garage Shelving Ideas – Garage storage system
Assembly Tips That Prevent Regret
1. Assemble on a flat surface. Assembling cabinet carcasses on an uneven garage floor creates a built-in twist in the frame. Find the flattest section of your floor, use a level, and shim if necessary before tightening any bolt.
2. Don’t fully tighten until all panels are in. Run every bolt finger-tight first. Check square with a tape measure across the diagonals (equal diagonals = square). Then tighten in sequence — corners first, then centers.
3. Wall cabinets need two studs, no exceptions. A 200 lb. rated wall cabinet loaded to 150 lbs. and mounted to a single stud or into drywall anchors will fail. Find both studs (16″ on center in most U.S. homes), and use 3″ minimum lag screws.
4. Apply cabinet liner to MDF shelves immediately. If your cabinets have MDF shelves, line them with peel-and-stick vinyl shelf liner before loading. It won’t prevent swelling from a direct liquid spill, but it dramatically slows the ambient humidity damage.
Best Garage Flooring 2026 (protect the floor under your cabinets)
🔧 The Sloped Floor Problem: Why Your Cabinet Doors Won’t Close Straight
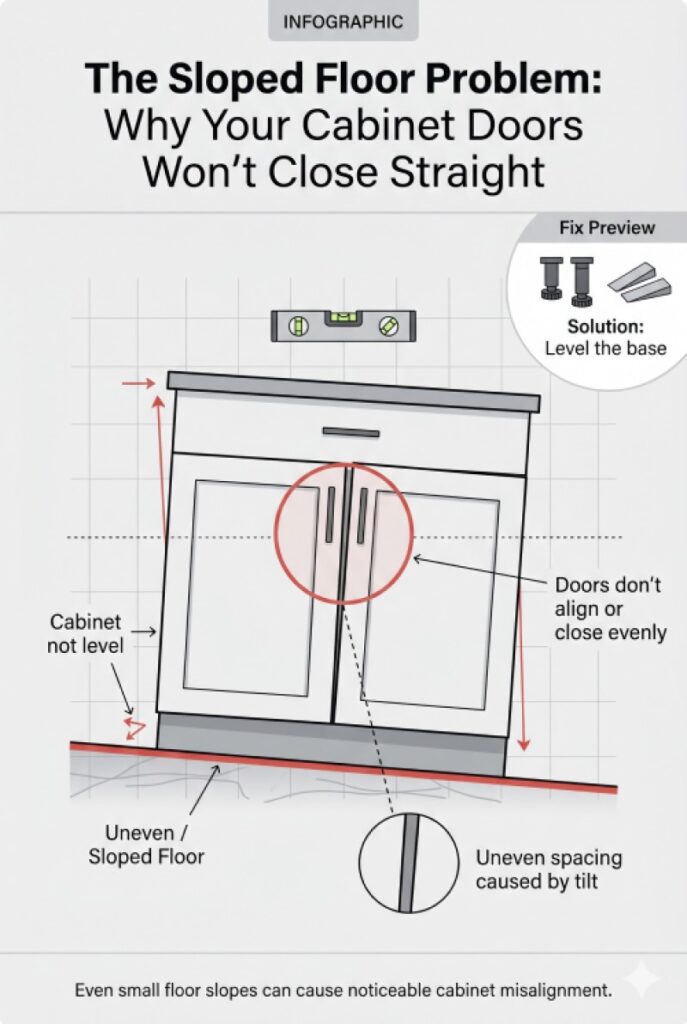
Here’s the installation reality that most garage cabinet guides completely ignore: residential garage floors slope. By design, they slope toward the door at a rate of 1/8″ to 1/4″ per linear foot for drainage. A standard 52-inch Husky cabinet sitting across a typical slope will be out of level by up to 3/4 inch — enough to make doors rack, refuse to close flush, and bind on their hinges within months.
This isn’t a cabinet defect. It’s a floor reality. Here’s how to fix it before it becomes a problem.
The 3-Step Cabinet Levelling Process
Step 1 — Measure the Slope Place your 4-foot level on the floor where the cabinet will sit. Measure the gap between the level and the floor at the low end using a tape measure or feeler gauge. This measurement tells you the total correction needed.
| Gap at Low End | Correction Needed | Solution |
|---|---|---|
| Under 1/4″ | Minimal | Single composite shim |
| 1/4″ to 1/2″ | Moderate | Stacked composite shims or levelling feet |
| 1/2″ to 3/4″ | Significant | Levelling feet (adjustable, 1.5″ range) |
| Over 3/4″ | Major slope | Levelling feet + consult a concrete contractor about self-levelling compound |
Step 2 — Choose Your Correction Method
Option A — Composite Shims (Budget Method, ~$8–$12) Composite shims are made from recycled plastic — unlike wood shims, they don’t compress, rot, or shrink over time. Stack them under the low side of the cabinet until the top reads level. Score and snap off the protruding end with a utility knife.
➡️ Shop Composite Shims on Amazon
Option B — Adjustable Levelling Feet (Professional Method, ~$20–$35 for 4-pack) Bolt-on adjustable feet screw into the cabinet base and allow ±3/4″ of adjustment per foot. Superior to shims because you can re-level if the floor settles further. The Husky Welded Cabinet has pre-drilled base holes compatible with standard 5/16″ levelling feet.
➡️ Shop Adjustable Cabinet Levelling Feet on Amazon
Step 3 — Verify and Wall-Anchor After Levelling After achieving level in both directions (front-to-back AND side-to-side), check that the cabinet doesn’t rock on any corner before wall-anchoring. A rocking cabinet means one foot is still too high — adjust until all four contact the floor solidly. Then anchor to the wall stud.
The “Door Rack Test”: After installation, open and close every door 10 times. A properly levelled cabinet’s doors swing freely and latch without lifting the handle. If a door requires lifting to latch — the cabinet is still out of level. Do not skip this test. Hinges that work under lateral stress fail 3–5x faster than hinges on a plumb cabinet.
💡 The Add-On Nobody Thinks About Until It’s Too Late: LED Cabinet Lighting
You install your cabinet. You load it with tools. You open it in the morning before work. You can’t find anything because the interior is completely dark. Every shelf casts a shadow on the shelf below it.
LED cabinet lighting is a $20–$40 add-on that transforms cabinet usability — and it’s dramatically easier to install before the cabinet is fully loaded.
Motion-activated LED strips (battery-powered, no wiring) mount to the inside of the door with adhesive tape. The light activates the moment the door opens, illuminating every shelf simultaneously.
Best pick: AMIR LED Motion Sensor Cabinet Light — battery powered, magnetic mount, auto-off after 15 seconds. Zero wiring, zero drilling.
➡️ Check Price on Amazon — AMIR LED Cabinet Motion Light
For hardwired setups (if your cabinet area has an outlet): A 12V LED strip kit connected to a smart plug gives you voice-control lighting inside your cabinets and consistent illumination across all shelves.
➡️ Shop LED Strip Lights for Cabinet Interior on Amazon
Pro Tip: Install lighting before loading the cabinet. Running adhesive tape or fishing wire through a fully loaded cabinet is one of the most frustrating tasks in garage organization. 20 minutes before loading saves 2 hours after.
Are metal garage cabinets worth it over plastic?
Plastic storage cabinets (Keter, Suncast, similar) are fine for garden tools and lightweight seasonal items. For workshop use — power tools, hardware, heavy equipment — metal cabinets are non-negotiable. Plastic shelves flex, crack in cold temperatures, and cannot hold workshop-level loads without deforming.
Should I bolt my garage cabinets to the wall?
Always, for any floor-standing cabinet over 42 inches tall. A top-heavy cabinet loaded with tools has a tipping moment that can cause it to fall if bumped. A single lag bolt through the cabinet back into a stud is the insurance policy.
Can I install garage cabinets myself?
Yes, for most flat-pack systems. Pre-assembled welded cabinets require two people due to weight. Budget 1–2 hours per flat-pack cabinet; 30 minutes to mount wall cabinets once studs are located.
What’s the best color for garage cabinets?
Lighter colors (silver, white, light grey) make a garage feel larger and brighter. Dark colors absorb light. For a professional workshop look, Hammertone silver or similar metallic finishes hide fingerprints and minor scuffs better than flat colors.
The Bottom Line
The best garage cabinet under $1,000 for most homeowners is the Husky 52″ Welded Steel Cabinet — welded construction eliminates the structural failure point that kills flat-pack systems, and the 21-gauge steel holds workshop loads reliably for a decade. Pair it with two Gladiator wall-mount boxes overhead and a slatwall panel, and you have a complete garage storage wall for under $800.
Don’t buy the cheapest option. Buy the most structurally honest option at your budget. The cabinet you assemble once and use for 15 years costs less in the long run than the one you replace in 3.