
Garage Organization on a Budget: 12 Upgrades Under $50 That Actually Work (2026)
Affiliate Disclosure: Pro Garage Gear earns from qualifying Amazon purchases at no extra cost to you.
The Paralysis of the Perfect Plan: You’ve watched the YouTube channel with the $40,000 garage makeover. You’ve seen the Instagram garage with the matching NewAge cabinets, the custom slatwall, and the epoxy floor. It’s beautiful. It’s also completely unrelated to your life and your budget. And so the project never starts, because “if I can’t do it right, I won’t do it at all.”
Here’s what that logic costs you: another year of tripping over bikes, losing tools under piles of things, and parking in the driveway because the garage is unusable. The $40,000 garage doesn’t help you today. The $47 upgrade you do this weekend does.
This guide is built entirely on the principle that the best organization system is the one that actually gets done. Every item on this list costs under $50. Several cost under $10. None require professional installation. All of them return their cost in reclaimed floor space or recovered time within 30 days. This guide on garage organization on a budget will surely be helpful for those that wants to get highly organized garage on a low budget.
The Ground Rule: Purge Before You Purchase
Every dollar you spend on storage for items you shouldn’t own is wasted. Before buying a single hook, bin, or rack — spend 90 minutes doing the 4-Box method:
Box 1 — Keep in Garage: Items you use at least annually that make sense in a garage Box 2 — Relocate: Items that belong inside the house (documents, food, electronics) Box 3 — Sell/Donate: Functional items unused for 2+ years Box 4 — Trash: Broken, expired, or mystery items
Most garages shed 25–35% of their contents in this step. That’s 25–35% more usable space before a single dollar is spent.
🧹 Phase 0: Surface Preparation (The Step That Determines Whether Budget Hooks Actually Work)
Here is why garage organization projects fail on the first rainy Saturday: someone buys $40 worth of adhesive hooks, slap-sticks them on the garage wall, loads them up, and by Tuesday half of them are on the floor with the items they were holding.
Adhesive hooks are legitimate load-bearing products — the 3M Command Large Hook is rated for 5 lbs. and the 3M Jumbo Hook for 7.5 lbs. under proper conditions. The critical phrase is proper conditions. Garage walls are rarely proper conditions.
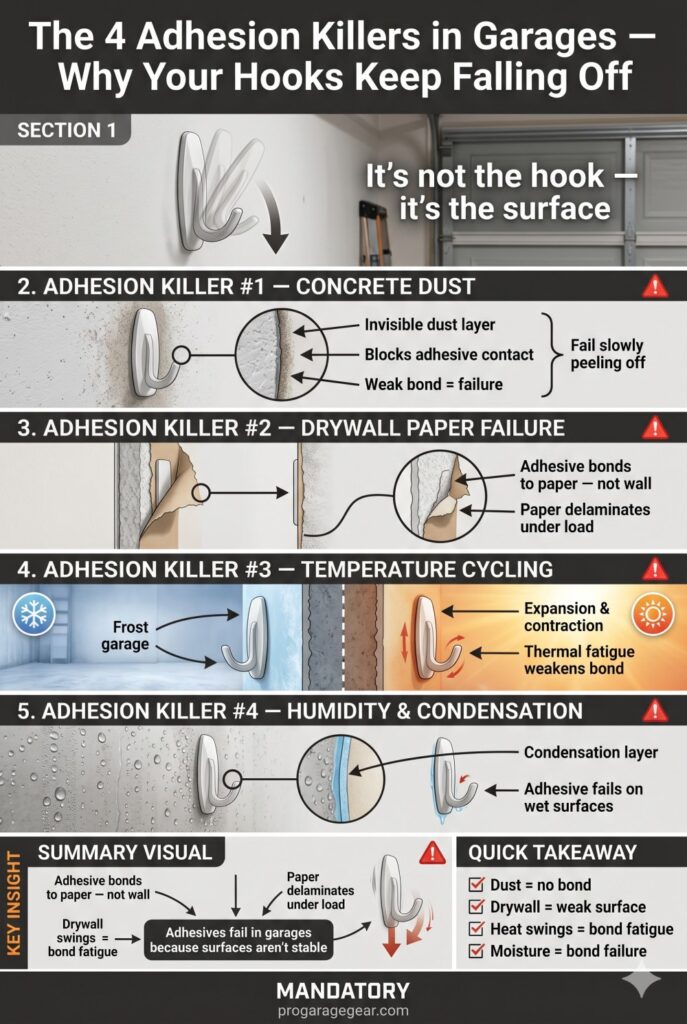
The 4 Adhesion Killers in Garages:
1. Concrete dust on painted walls. Paint over concrete block or poured concrete walls accumulates a micro-fine concrete dust layer from the wall itself continuously releasing mineral particles. This dust layer prevents direct adhesive-to-paint contact and is invisible to the naked eye.
2. Porous drywall paper. Standard drywall paper is semi-porous. Adhesive bonds to the paper surface, which can delaminate from the gypsum core under load — taking the hook and the paper with it.
3. Temperature cycling. Garage temperatures swing from below freezing to 100°F+ in many climates. Adhesive bonds expand and contract at different rates than wall surfaces, progressively weakening the bond through thermal fatigue.
4. Humidity-driven condensation. Morning condensation (when cold surfaces meet warm air) deposits moisture films on walls — exactly the condition that degrades pressure-sensitive adhesives.
The Surface Preparation Protocol (2 Minutes, Saves $40 Every Time)
For any adhesive hook, strip, or mounting tape in your garage — follow this protocol before application:
Step 1 — Wipe with 70% isopropyl alcohol. 70% isopropyl (not 91% — the diluted version is more effective at dissolving oils and dust) removes concrete dust, oil film, and skin oils from the surface. Apply to a clean cloth, wipe firmly in one direction (not circular — circular redistributes contamination). Let dry completely (30–60 seconds).
🛒 Check Price on Amazon — 70% Isopropyl Alcohol →Step 2 — For concrete/masonry walls: prime with bonding adhesive. Raw concrete, concrete block, and bare masonry are not suitable surfaces for standard pressure-sensitive adhesives regardless of preparation. On these surfaces, use a concrete bonding primer ($8–$12) applied to a 4-inch patch where the hook will mount. Allow to cure 30 minutes. The primer creates a receptive surface layer that adhesive hooks actually bond to.
🛒 Check Price on Amazon — Concrete Bonding Primer →Step 3 — Press and hold for 60 seconds per hook, then wait 72 hours before loading. Pressure-sensitive adhesives need sustained contact pressure to achieve maximum bond strength. Press each hook firmly for 60 seconds — not a quick press-and-release. Then wait 72 hours before hanging anything. The adhesive continues curing during this window and reaches 90% of its rated strength at the 72-hour mark.
Step 4 — Buy the multi-pack. Once you’ve prepared a surface and installed one hook successfully, the cost to install additional hooks on the same prepared surface is effectively zero. Buy the 10-pack or 20-pack and solve multiple problems in the same session — the per-hook price drops from $3–$4 each to under $1.50 each.
🛒 Check Price on Amazon — 3M Command Large Hooks (20-Pack) →Surface Compatibility Quick Reference:
| Wall Surface | Suitable for Adhesive Hooks? | Preparation Required |
|---|---|---|
| Painted drywall (smooth) | Yes | IPA wipe only |
| Painted concrete block | Marginal | IPA + bonding primer |
| Bare concrete | No | Use mechanical anchor instead |
| Metal studs/panels | Yes | IPA wipe, use metal-rated adhesive |
| OSB / plywood | Yes | IPA wipe only |
| Textured/orange-peel paint | Marginal | IPA + allow 96-hour cure before loading |
The bottom line: Two minutes of surface preparation using $3 of isopropyl alcohol determines whether your $40 in hooks lasts 3 years or falls off in 3 days. It is the most cost-effective step in any garage organization project.
The 12 Upgrades (Ranked by Impact per Dollar)
Upgrade 1 — Magnetic Tool Strip (~$15–$25)
Impact: Extreme | Difficulty: 10 minutes
A 24-inch magnetic tool strip mounted at eye level above your workbench eliminates the most common garage time-waster: searching for hand tools. Every screwdriver, wrench, and plier has a visible, instantly accessible home. No drawer to open, no searching. You see the tool, you grab the tool.
What to look for: Neodymium magnet strips (not ceramic) — they hold heavy tools like wrenches and ratchets without sliding. A 24-inch neodymium strip holds 25–35 hand tools.
🛒 Check Price on Amazon — 24″ Magnetic Tool Strip →Installation: Two screws into a wall stud. Done in 10 minutes.
Upgrade 2 — A Label Maker (~$20–$35)
Impact: High | Difficulty: 1 afternoon
The most consistently underestimated organizational tool. A label maker applied systematically to every bin, drawer, shelf, and hook on your wall transforms your garage from a “search by memory” system to a “find by reading” system. The difference is enormous when someone else needs to find something, and when you return from a 3-month project gap.
The discipline: Label everything. The bin you “know is screws” will be misidentified by every other person in the household. Label it anyway.
🛒 Check Price on Amazon — DYMO LabelManager Label Maker →Upgrade 3 — Bungee Ball Bin for Balls and Sports Gear (~$20–$35)
Impact: High | Difficulty: 15 minutes
Sports balls on the garage floor are a trip hazard and a rolling obstacle. A bungee ball bin — essentially a wall-mounted or corner-standing net held open by bungee cords — holds 6–10 balls (soccer, basketball, football, tennis) in a 2 sq. ft. footprint and costs less than a single replacement soccer ball.
🛒 Check Price on Amazon — Ball Storage Bungee Rack →Floor space reclaimed: 8–15 sq. ft. (multiple balls no longer rolling across the entire garage).
Upgrade 4 — Bike Wall Hooks (2-Pack, ~$25–$40)
Impact: Extreme | Difficulty: 15 minutes per hook
Two bikes on the floor consume 12+ sq. ft. Two bikes on wall hooks consume zero floor space. This is the single highest return-per-dollar upgrade in the budget category — you are buying back 12 sq. ft. of floor space for $35.
What to look for: Hooks rated for at least 50 lbs., with foam or rubber coating on the contact point to protect the bike frame. Install into wall studs (not drywall) with 2.5-inch lag screws.
🛒 Check Price on Amazon — Bike Wall Mount Hooks (2-Pack) →Best Garage Bike Storage 2026 for more options – more bike storage options
Upgrade 5 — Garden Tool Wall Organizer (~$20–$35)
Impact: High | Difficulty: 10 minutes
Long-handle tools (brooms, shovels, rakes, hoes) leaning against walls are the #1 fall hazard in garages. A wall-mounted tool organizer holds 10–15 long-handle tools in a single row along the wall, each in its own spring-clip holder.
These organizers mount to studs or concrete with included hardware, cost $20–$35, and eliminate the daily game of picking up tools that fall when you reach past them.
🛒 Check Price on Amazon — Garden Tool Wall Organizer →Upgrade 6 — Hose Hanger (~$15–$25)
Impact: Medium | Difficulty: 10 minutes
A garden hose on the garage floor is a tripping hazard, a kinking-point, and a breeding ground for mildew inside the hose. A wall-mount hose hanger ($15–$20) keeps the hose coiled, off the floor, and ready to connect without untangling.
Upgrade version: A hose hanger with an integrated tray for the spray nozzle and attachments ($25–$35) eliminates the “where did I put the spray nozzle” problem permanently.
🛒 Check Price on Amazon — Hose Hanger with Storage Tray →Upgrade 7 — Stackable Clear Bins with Lids (12-Pack, ~$35–$50)
Impact: High | Difficulty: 1 afternoon (sorting)
The difference between a functional garage and a chaotic one is often simply visible, labeled storage. Opaque bins hide contents and create mystery piles. Clear bins with standardized sizes mean items are visible at a glance and bins can be stacked uniformly without toppling.
The key principle: Every bin must have a label on the front face (not the top — you’ll never see the top when bins are stacked). Standardize to one or two bin sizes so they stack neatly.
🛒 Check Price on Amazon — Clear Stackable Storage Bins (12-Pack) →Upgrade 8 — Overhead Garage Door Shelves (~$30–$45)
Impact: High | Difficulty: 20 minutes
The space above the garage door (between the door in its open position and the ceiling) is often completely unused — it’s typically 2–4 feet of clearance that can hold a pair of over-door shelves. These mount to the door frame sides and extend into the overhead space, storing items up to 24 inches deep.
Best for: Car emergency kits, touch-up paint, seasonal small items, spare light bulbs — things that need to be in the garage but don’t need frequent access.
🛒 Check Price on Amazon — Over-Door Garage Shelf →Upgrade 9 — Wall-Mount Extension Cord Holder (~$10–$20)
Impact: Medium | Difficulty: 5 minutes
An extension cord on the garage floor is a trip hazard, a kinking problem, and a dirt magnet. A simple wall-mount cord holder keeps the cord coiled, off the floor, and in the same spot every time. The best versions have a hook that swings out from the wall, allowing you to uncoil the cord without removing it from the mount.
🛒 Check Price on Amazon — Wall Mount Cord Holder →Upgrade 10 — Oil Drip Mat (~$15–$30)
Impact: Medium | Difficulty: 0 minutes (just place it)
Place an oil drip mat under your parked vehicle’s engine bay. It collects drips before they reach the concrete, protects your floor investment, and is machine-washable. A car that drips even occasionally will stain bare concrete in 3–6 months — a stain that costs significant effort to remove.
🛒 Check Price on Amazon — Garage Floor Drip Mat →Upgrade 11 — Small Parts Organizer for the Workbench (~$15–$30)
Impact: High | Difficulty: 30 minutes (sorting)
Hardware chaos — screws, nails, bolts, anchors, picture hooks, zip ties — is one of the most time-consuming organizational problems in any garage. A divided organizer (typically 20–40 compartments with adjustable dividers) on the workbench sorts all hardware by type and size, making any task faster.
The discipline: When you finish a project, return remaining hardware to its correct compartment immediately. Resisting this adds up to hours of re-sorting over a year.
🛒 Check Price on Amazon — Hardware Parts Organizer →Upgrade 12 — Carbon Monoxide Detector (~$20–$35)
Impact: Life-safety | Difficulty: 5 minutes
This is the only upgrade on this list that is a safety requirement, not an organization choice. If you have an attached garage, run a vehicle, use a generator, or use a combustion heater inside the garage — you need a CO detector within 10 feet of the interior access door. Carbon monoxide is colorless and odorless. You will not detect it without a device.
🛒 Check Price on Amazon — CO Detector for Garage →Attached Garage Health Risks: CO safety in garages
The Complete Budget Shopping List
| Upgrade | Cost | Floor Space Reclaimed | Amazon |
|---|---|---|---|
| Magnetic tool strip (24″) | $18 | — | Shop → |
| Label maker | $25 | — | Shop → |
| Ball storage bin (bungee) | $28 | 10–15 sq. ft. | Shop → |
| Bike wall hooks (2-pack) | $32 | 12+ sq. ft. | Shop → |
| Garden tool organizer | $28 | 6–10 sq. ft. | Shop → |
| Hose hanger + tray | $22 | 4–8 sq. ft. | Shop → |
| Clear stackable bins (12-pk) | $42 | Varies | Shop → |
| Over-door garage shelf | $38 | Overhead use | Shop → |
| Cord holder (wall mount) | $14 | Floor hazard removed | Shop → |
| Oil drip mat | $22 | Preventive | Shop → |
| Small parts organizer | $20 | Bench space | Shop → |
| CO detector | $28 | Safety | Shop → |
| Total (all 12) | ~$317 | 30–50 sq. ft. reclaimed |
In what order should I do these upgrades?
Safety first — CO detector immediately. Then the highest floor space impact: bike hooks, ball bin, garden tool organizer. Then workbench organization: magnetic strip, parts organizer. Then labeling and binning. The CO detector is non-negotiable regardless of order.
Is it better to buy a complete organization system or individual pieces?
Individual pieces, assembled based on your specific needs, always outperform generic “complete kits.” The kits are designed for an average garage that doesn’t exist. Your garage has specific things that are in your way — buy the solutions for those specific things.
How do I stop my garage from getting cluttered again after organizing it?
One rule: every item in the garage must have a designated home. Items without homes create the piles. The label maker enforces this — if something doesn’t have a labeled location, it hasn’t been given a home yet.
The Bottom Line
An organized garage doesn’t require a budget. It requires starting. These 12 upgrades total $317 if you buy all of them — or $47 for the most impactful single purchase (bike hooks). Every one of them returns more in time saved, floor space recovered, and frustration eliminated than they cost.
Start with the CO detector (tonight), the bike hooks (this weekend), and the magnetic tool strip (20 minutes). That’s under $75 and will visibly transform your workspace before next week.
The $40,000 garage starts with the $25 label maker.