
Best Table Saws for Garage Workshops 2026: The Rip Capacity Rule That Determines What You Can Actually Build
Affiliate Disclosure: Pro Garage Gear participates in the Amazon Services LLC Associates Program. We earn from qualifying purchases at no extra cost to you. No manufacturer has paid for placement in this guide.
The Wrong Number to Focus On: Every table saw listing leads with horsepower. 15 amp. 2 HP. 3 HP. Buyers compare these numbers as the primary purchase criterion — assuming a 3 HP cabinet saw is automatically the better tool than a 15-amp jobsite saw. Motor power matters for ripping thick hardwood all day, but it is not the number that determines whether the saw you buy can actually build the projects you have in mind.
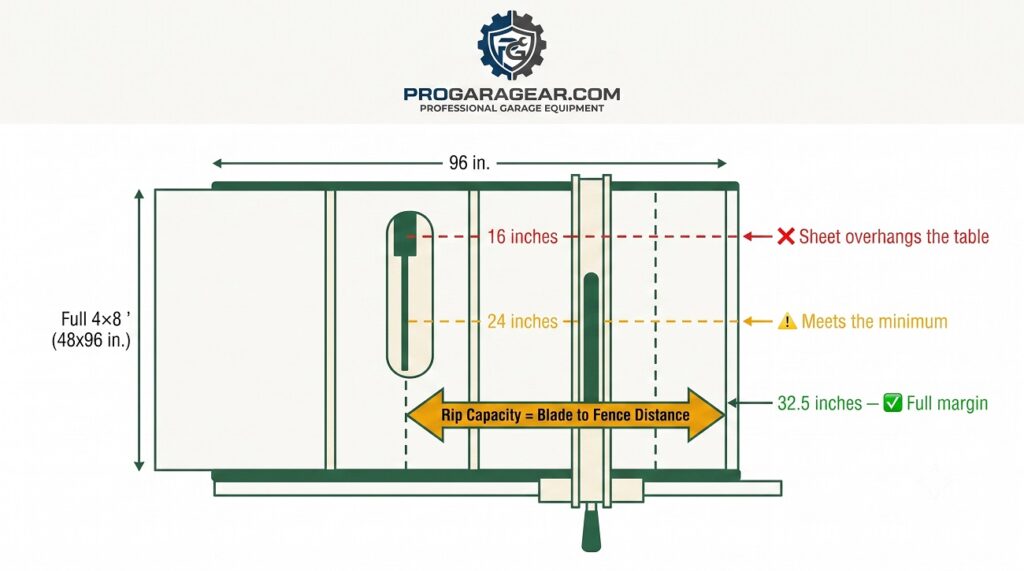
That number is rip capacity — the maximum distance between the blade and the fence, which determines the widest board you can rip in a single pass.
A full sheet of plywood is 48 inches wide. To rip that sheet in half — the single most common cut in garage woodworking, whether you are building shelving, cabinets, or a workbench top — you need a saw with at least 24 inches of rip capacity to the right of the blade. Most portable jobsite saws top out at 24–25 inches. Most benchtop and compact saws stop at 12–16 inches. A buyer who selects a saw by horsepower alone, without checking this number, discovers on their first plywood project that the saw physically cannot make the cut their project requires — the fence runs out of rail before the cut is complete.
This guide leads with the Rip Capacity Rule that determines which saw category fits your actual projects, explains the jobsite-vs-contractor-vs-cabinet saw decision that confuses most first-time buyers, and ranks the best table saws for garage workshops in 2026 — from compact benchtop units to full cabinet saws — across every space and budget constraint a garage imposes.
The Rip Capacity Rule: Match the Saw to Your Actual Projects
Before any brand or horsepower comparison, answer one question: what is the widest single cut your projects typically require? This determines your minimum rip capacity, which eliminates entire categories of saw before you compare a single spec sheet.
| Your Typical Project | Widest Common Cut | Minimum Rip Capacity Needed | Saw Category |
|---|---|---|---|
| Small parts, trim, hobby joinery | Under 12 inches | 12–15 inches | Benchtop / compact |
| Furniture, cabinets built from smaller stock | 16–20 inches | 20–24 inches | Compact jobsite / contractor |
| Full plywood sheet goods (shelving, cabinet boxes) | Half a 48″ sheet (24″) | 24–30 inches | Full-size jobsite / hybrid |
| Full sheet ripped to a narrow strip (the hardest case) | Full 48″ sheet minus a narrow rip | 30+ inches | Contractor / hybrid / cabinet saw |
| Production work, daily heavy hardwood ripping | Any width, high volume | 30–52 inches | Cabinet saw |
The practical rule for most garage woodworkers: If plywood sheet goods are part of your project mix — and for most garage shops building storage, shelving, or furniture, they are — a minimum of 24 inches of rip capacity is the baseline. Buying a saw with less than this because it was cheaper or more compact means every full-sheet rip becomes a two-step workaround: cut the sheet down with a circular saw and track first, then finish on the table saw. This is a legitimate workflow many experienced woodworkers use deliberately — but it should be a choice, not a surprise discovered after purchase.
Jobsite vs. Contractor vs. Cabinet Saw: The Category Decision
This is not a budget decision — it is a use-case and space decision. Getting it wrong costs more than the price difference between categories.
Jobsite Saws: For Portability and Limited Space
A jobsite saw is a compact, portable table saw built around a direct-drive universal motor, typically mounted on a folding stand with wheels. Designed to be loaded into a truck, carried up stairs, and set up on location — which also makes it the correct category for a garage where the saw must be stored against a wall or rolled out only when needed.
Choose a jobsite saw if: Your garage doubles as parking space and the saw needs to store compactly or roll out of the way. You work on projects intermittently rather than running the saw for hours daily. Portability — moving the saw to a driveway or another location — is a genuine requirement, not a nice-to-have.
The jobsite saw limitation: The direct-drive universal motor is louder and less smooth-running than the belt-drive induction motors in larger saws, and it has less momentum to power through dense hardwood without bogging down. For plywood, MDF, and softwoods — the majority of garage shop material — this limitation rarely matters in practice.
Contractor Saws: The Middle Ground
A contractor saw uses a belt-driven induction motor mounted at the rear of the saw, hanging outside the cabinet — the motor housing you see protruding from the back is the identifying feature of this category. This design trades some portability for a smoother-running, quieter motor with better torque under load than a jobsite saw’s direct-drive motor, at a lower price and smaller footprint than a full cabinet saw.
Choose a contractor saw if: You have a dedicated corner of the garage where the saw can live semi-permanently rather than needing to fold and roll away daily. You do enough hardwood ripping that the smoother induction motor is worth the reduced portability. You want cabinet-saw cut quality without cabinet-saw price or footprint.
The contractor saw limitation: The rear-mounted motor takes up floor space behind the saw that a jobsite saw’s enclosed motor does not require — factor this into your footprint planning, not just the saw’s stated dimensions.
Cabinet Saws: For Serious, Frequent Work
A cabinet saw fully encloses its motor and drive mechanism inside a closed base cabinet, uses a heavier trunnion system mounted to the cabinet rather than the table, and typically runs on a 3 HP+ motor requiring a dedicated 220V circuit. This is professional-grade equipment — the category shops and serious hobbyists specify when saw performance is the limiting factor in their work rather than an occasional convenience.
Choose a cabinet saw if: You run the saw for hours at a time, regularly rip dense hardwood, and the cut quality and vibration-free operation of a heavy cast-iron trunnion system genuinely improves your results. Your garage has a permanent, dedicated shop area — cabinet saws are not designed to be moved or stored away.
The cabinet saw commitment: Weight (300–600+ lbs), footprint, and the 220V electrical requirement make this a permanent installation decision, not a purchase you reverse easily. Confirm your garage has — or can have — a dedicated 220V circuit before specifying this category.
| Feature | Jobsite | Contractor | Cabinet |
|---|---|---|---|
| Motor type | Direct-drive universal | Belt-driven induction | Belt-driven induction (larger) |
| Typical weight | 45–90 lbs | 200–300 lbs | 300–600+ lbs |
| Portability | ✅ Rolling stand, foldable | ⚠️ Semi-mobile with mobile base | ❌ Permanent installation |
| Power requirement | 110V standard outlet | 110V or 220V | 220V dedicated circuit (usually) |
| Typical rip capacity | 24–25 inches | 24–30 inches | 30–52 inches |
| Noise and vibration | Higher | Moderate | Lowest — heaviest trunnion mass |
| Best for | Limited space, intermittent use | Dedicated corner, regular use | Serious daily shop use |
The Riving Knife vs. Splitter Safety Distinction
Every table saw sold today includes either a riving knife or a splitter mounted behind the blade, and the difference between them is a genuine safety consideration, not a marketing distinction.
A riving knife is a curved blade-shaped guard that rises and falls with the blade and moves in an arc that follows the blade’s profile precisely. Because it tracks the blade’s height and matches its curvature, it stays close to the blade at all times — closing the gap where a workpiece could pinch against the blade and kick back toward the operator. Riving knives are the current safety standard and are required equipment on virtually all new saws sold in North America since regulatory changes in the past decade.
A standard splitter is a fixed blade-shaped guard that does not move with blade height adjustments and sits further from the blade than a riving knife. Older saws and some basic benchtop models still use this design. It provides real kickback protection but is less effective than a riving knife because of the larger gap and its inability to track height changes.
The practical purchase rule: Confirm any saw you are considering — new or used — has a riving knife, not a fixed splitter. This single specification is worth prioritizing over horsepower, fence quality, or almost any other feature on the list, because it is the component most directly responsible for preventing the single most dangerous table saw failure mode: kickback.
🛒 Check Price on Amazon — Table Saw Push Block Set (Kickback Protection) →
The 2-Minute Fence Check Every New Saw Needs Before Its First Cut
A fence that looks straight can still be out of alignment in a way that causes burning, binding, or kickback — and this has nothing to do with fence quality. Even a premium rack-and-pinion or T-square fence needs to be checked and, if necessary, adjusted before the saw’s first real cut, and periodically afterward.
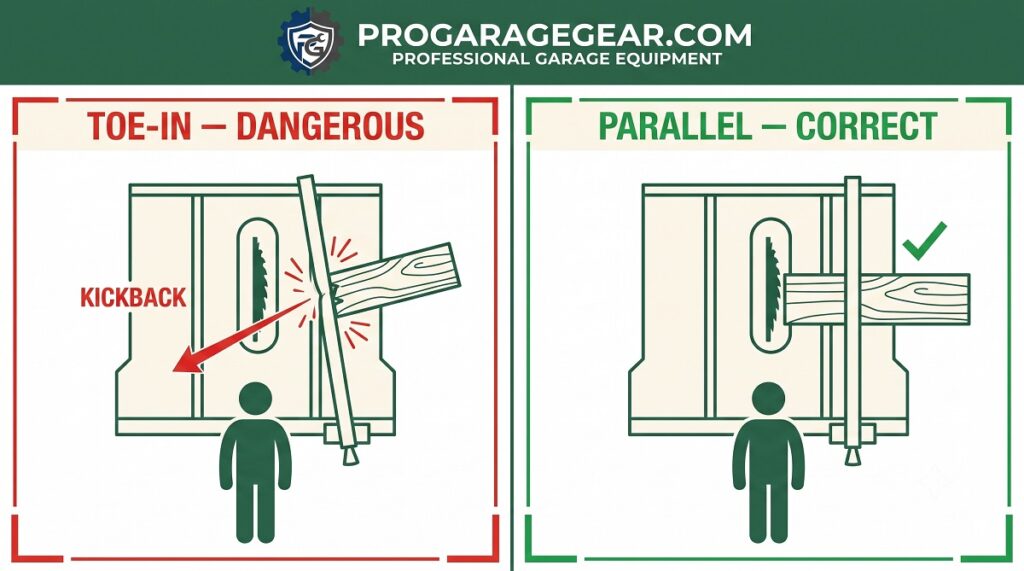
The problem to check for is toe-in — the fence sitting at a slight angle relative to the blade rather than perfectly parallel to it. If the fence toes in toward the back of the blade (the gap between fence and blade narrows from front to back), the workpiece gets pinched between the fence and the blade as it exits the cut. The spinning blade grabs the pinched stock and throws it back toward the operator — a kickback caused entirely by fence alignment, not by anything a riving knife or push block can prevent.
How to Check It
- Raise the blade to its maximum height and unplug the saw.
- Place a combination square or a reliable straightedge flat against the blade body (not a tooth — the flat steel plate) at the front of the blade, near the table surface.
- Slide the fence over until it just touches the straightedge, then lock it.
- Move the straightedge to the back of the blade, in the same position relative to the fence rail, and check the gap between the fence and the straightedge.
- The gap should be identical front and back — zero toe-in, or a hair of toe-out (fence angled a fraction away from the blade at the back) if any imperfection exists. Toe-in of any measurable amount needs correcting before use.
The acceptable tolerance: Most manufacturers specify a maximum of 0.010″–0.015″ of variance across the blade’s length — a hair’s width. If you don’t have a dial indicator to measure that precisely, the practical test is simpler: if a scrap rip cut burns along one edge, smokes, or binds against the blade partway through, toe-in is the most likely cause and the fence needs adjustment per your saw’s specific alignment procedure in its manual.
Check this at initial setup, and again any time the saw has been moved, folded, or transported — fence rails on portable jobsite saws are the component most likely to shift out of alignment during transport and storage.
The Flesh-Detection Question: SawStop and the Category It Created
SawStop’s flesh-detection technology deserves its own section because it represents a genuinely different safety category, not an incremental improvement. The system runs a small electrical signal through the blade and monitors for the signal change that occurs on contact with human skin — which conducts electricity differently than wood. On detection, a spring-loaded aluminum brake block fires into the blade within 3–5 milliseconds, stopping blade rotation and dropping the blade below the table surface before a fast-moving blade can produce more than a minor nick.
What this costs beyond the purchase price: Triggering the brake destroys the brake cartridge (approximately $70–$100 to replace) and can damage the blade if it was mid-cut at the moment of activation. The system can also false-trigger on wet or green lumber, which conducts electricity similarly to skin — a documented inconvenience for anyone regularly cutting damp material. Despite these costs, for any garage shop where children, inexperienced users, or the shop owner’s own long-term finger count matter: the safety case is difficult to argue against. SawStop’s data, drawn from real-world incidents, shows the technology has prevented thousands of serious injuries since its introduction.
Every SawStop model — jobsite, contractor, and cabinet saw tiers — includes the flesh-detection system as standard, not an add-on. The category comparison rankings below include SawStop’s jobsite-tier saw specifically because it is the only saw in this guide with this technology, and for many buyers that single feature is the deciding factor above rip capacity, motor power, or price.
2026 Rankings: The Best Table Saws for Garage Workshops
🥇 #1 — DeWalt DWE7491RS (Best Overall — Jobsite/Contractor Hybrid)
Why it earns #1: The DWE7491RS is the reference standard for garage and jobsite table saws in North America — the saw that consistently tops independent comparison tests and remains the default recommendation for anyone asking “what table saw should I buy” in woodworking forums. It combines a genuinely useful 32.5-inch rip capacity (well above the 24-inch plywood-sheet minimum) with a rolling stand that folds for storage, at a price point accessible to most first-time buyers.
The Data
- Motor: 15-amp direct-drive, 4,800 RPM no-load
- Rip capacity: 32.5 inches right of blade — handles a full plywood sheet rip with margin
- Weight: 90 lbs — heavier than compact jobsite saws, still one-person portable with the rolling stand
- Stand: Integrated rolling stand — folds flat, wheels for repositioning without lifting
- Riving knife: Yes — quick-release tool-free removal
- Blade: 10-inch, 24-tooth combination blade included
- Dado capable: Yes — accepts stacked dado sets up to 13/16″
- Fence: Rack-and-pinion telescoping fence rail — locks square automatically
- Power: 110V standard outlet — no special wiring
The rolling stand advantage that matters specifically for garages: The integrated stand folds to a compact footprint and rolls on built-in wheels, meaning the saw can be pushed against a wall between uses without a separate mobile base purchase or dedicated floor space. For a garage that parks a vehicle overnight, this is the single most practical feature in the saw’s design — set-up and breakdown both take under two minutes.
🛒 Check Price on Amazon — DeWalt DWE7491RS Table Saw with Rolling Stand →
🥈 #2 — SawStop Jobsite Saw PCS (Best Safety — Flesh Detection)
Why it earns #2: The only saw in this ranking with flesh-detection blade-stop technology, at the most accessible price point in SawStop’s product line. For any garage shop where safety is prioritized above matching the DeWalt’s rip capacity or price — a shop with children present, a shop the owner uses after a long workday when fatigue and attention lapses are more likely, or simply a buyer who has decided the injury-prevention case is worth the premium — this is the correct saw regardless of what the spec sheet comparison shows.
The Data
- Motor: 15-amp, 1.5 HP
- Rip capacity: 24.5 inches right of blade — meets the plywood-sheet minimum with less margin than the DeWalt
- Safety system: Active flesh-detection blade brake — stops blade in 3–5 milliseconds on contact
- Weight: 97 lbs with stand
- Riving knife: Yes, integrated with the blade-stop cartridge system
- Brake cartridge replacement cost: Approximately $70–$100 per activation
- Stand: Folding mobile stand included
The honest cost consideration: The purchase price premium over the DeWalt is real, and the brake cartridge replacement cost after any activation — including false triggers on wet lumber — is an ongoing cost the DeWalt does not carry. For a shop cutting primarily dry dimensional lumber and sheet goods, false triggers are rare. For a shop that regularly processes green or wet wood: budget for occasional cartridge replacement as a cost of the safety system, not a defect.
🛒 Check Price on Amazon — SawStop Jobsite Saw PCS (Flesh-Detection Safety) →
🥉 #3 — Ridgid R4514 (Best Contractor-Class — Dedicated Corner Setup)
Why it earns #3: The Ridgid R4514 is the correct specification for a garage with a permanent dedicated shop corner rather than a saw that needs to fold away. Its belt-driven induction motor runs quieter and with more consistent torque through hardwood than the direct-drive jobsite saws above it, and its cast-iron table wings provide more mass for vibration dampening and outfeed support than any folding-stand saw can match.
The Data
- Motor: 13-amp belt-driven induction, 2 HP equivalent
- Rip capacity: 30 inches right of blade
- Table: Cast-iron centre table with steel wing extensions
- Weight: 245 lbs — semi-permanent, requires mobile base for repositioning
- Riving knife: Yes, tool-free removal
- Fence: T-square style fence, locks parallel automatically
- Power: 110V standard, does not require 220V circuit
- Lifetime warranty: Yes — registered owners
Why cast iron matters beyond durability: A cast-iron table has significantly more mass than the stamped-steel or aluminum tables on jobsite saws — mass that absorbs vibration during the cut. Less vibration translates directly to a cleaner cut edge and less blade deflection in thick or dense material. For anyone building furniture-grade projects where cut quality directly affects the final glue-up and finish: this is a meaningful, not marginal, upgrade over a jobsite saw’s stamped table.
🛒 Check Price on Amazon — Ridgid R4514 Contractor Table Saw (Cast Iron) →
Budget for a mobile base alongside this saw: Unlike the jobsite saws above it in this ranking, the R4514 has no integrated folding stand — at 245 lbs, it needs a mobile base with locking casters to be repositioned by one person. Treat this as part of the purchase cost, not a later add-on.
🛒 Check Price on Amazon — Bora Portamate Universal Mobile Base →
Mobile Base (For Contractor and Cabinet Saws)
Contractor and cabinet saws lack the integrated folding stands of jobsite saws — a mobile base with locking casters is the correct solution for repositioning a 200–400 lb saw without a forklift. Look for a base rated to at least 1.5× your saw’s weight and confirm the locking mechanism engages on all wheels, not just two.
🛒 Check Price on Amazon — Heavy-Duty Mobile Base (Table Saw) →
⭐ Best Compact / Space-Constrained — SKIL TS6307-00 (Under $250)
For a garage where floor space is the binding constraint and project scope is genuinely smaller — trim work, small furniture, hobby projects rather than full sheet goods — the SKIL TS6307 delivers a folding stand, a usable 25-inch rip capacity, and a riving knife at the lowest price point in this guide that still meets the current safety standard.
The Data
- Motor: 15-amp direct-drive
- Rip capacity: 25 inches right of blade
- Weight: 62 lbs — one of the lightest full-size saws in this category
- Stand: Folding, wheeled
- Riving knife: Yes
- Blade: 10-inch, 24-tooth included
🛒 Check Price on Amazon — SKIL TS6307-00 Compact Table Saw →
⭐ Best Cabinet Saw — SawStop Professional Cabinet Saw PCS (For Dedicated Shops)
For any garage that has become a genuine dedicated woodworking shop — daily use, hardwood ripping, and a permanent 220V-equipped space — the SawStop Professional Cabinet Saw represents the ceiling of what a residential garage shop typically specifies. Full flesh-detection safety, a 3 HP induction motor, and a fully enclosed cast-iron trunnion system that delivers cut quality and dust collection efficiency no portable saw can match.
The Data
- Motor: 3 HP, single-phase, 220V — dedicated circuit required
- Rip capacity: 30 or 52 inches depending on fence rail configuration ordered
- Weight: 400+ lbs — permanent installation
- Safety system: Flesh-detection blade brake, same technology as the jobsite tier
- Dust collection: Fully enclosed cabinet with dedicated 4-inch dust port — captures significantly more dust than any open-base saw
- Trunnion: Mounted to cabinet, not table — more stable blade angle adjustments under load
The electrical planning this requires: A dedicated 220V/20A circuit is mandatory before this saw can be installed — confirm your garage panel has capacity and budget for an electrician if a suitable circuit does not already exist.
➡️ For circuit planning and dedicated outlet sizing: Garage Electrical Audit 2026: Dedicated Circuit Planning →
🛒 Check Price on Amazon — SawStop Professional Cabinet Saw PCS (3HP) →
Complete Comparison Table
| Model | Category | Rip Capacity | Motor | Riving Knife | Flesh Detection | Weight | Best For | Amazon |
|---|---|---|---|---|---|---|---|---|
| DeWalt DWE7491RS | Jobsite/Contractor hybrid | 32.5″ | 15A direct-drive | ✅ | ❌ | 90 lbs | Best overall — full sheet capacity | Shop → |
| SawStop Jobsite PCS | Jobsite | 24.5″ | 15A, 1.5HP | ✅ | ✅ | 97 lbs | Safety priority | Shop → |
| Ridgid R4514 | Contractor | 30″ | 13A belt-drive, 2HP eq. | ✅ | ❌ | 245 lbs | Dedicated corner, cut quality | Shop → |
| SKIL TS6307-00 | Compact jobsite | 25″ | 15A direct-drive | ✅ | ❌ | 62 lbs | Small space, budget | Shop → |
| SawStop Cabinet PCS | Cabinet saw | 30″ or 52″ | 3HP, 220V | ✅ | ✅ | 400+ lbs | Dedicated daily-use shop | Shop → |
The Essential Accessories: What Every Garage Table Saw Needs
Push Blocks and Push Sticks
The single most important safety accessory for any table saw, and the one most commonly skipped after the first few cuts out of impatience. A push block keeps hands at least 6 inches from the blade at all times during a rip cut — the included plastic push stick that ships with most saws is minimally functional; a proper GRR-RIPPER-style push block with adjustable feet and a solid grip is worth the separate purchase.
Why the Stock Push Stick Isn’t Enough
The plastic push stick that ships in the box with most saws controls the board at one point, near the back — it does nothing to hold the workpiece down against the table or against the fence during the cut, which is where most hand-feeding accidents actually originate. A GRR-RIPPER-style push block controls the board from three directions at once — down, against the fence, and forward — and keeps the operator’s hand a consistent 6+ inches from the blade throughout the entire cut, not just at the moment of final push-through.
Treat this as a required accessory purchased alongside the saw itself, not an optional upgrade to consider later.
🛒 Check Price on Amazon — GRR-RIPPER 3D Advance Push Block →
🛒 Check Price on Amazon — GRR-RIPPER Style Push Block →
Outfeed Support
Ripping a long board or a full sheet of plywood without outfeed support means the workpiece tips off the back of the table mid-cut — the single most common cause of a kickback event that has nothing to do with the saw’s safety system and everything to do with workpiece control. A folding roller stand positioned at table height behind the saw eliminates this risk and is inexpensive relative to the injury it prevents.
The Height Calibration Most Buyers Get Wrong
Buying an outfeed roller stand solves half the problem. Setting its height incorrectly recreates the danger it was bought to prevent.
If the roller sits higher than the saw table, the leading edge of the board catches on the roller as it exits the blade — the workpiece stops moving forward while the blade keeps cutting, which twists the stock against the blade and is a direct kickback trigger. This is a more common cause of kickback in home shops than any defect in the saw itself, precisely because it looks like a helpful setup rather than a hazard.
The correct setup: set the roller stand level with the saw table, or very slightly below it — roughly 1/16″ to 1/8″ lower. At this height, the board’s own weight lets it settle onto the roller smoothly as it clears the table rather than catching an edge. Check the height with a straightedge laid across the saw table into the roller before your first cut of the session, not just once at initial setup — folding stands and roller stands can shift slightly with garage floor vibration or repeated folding and unfolding.
The practical test: Push a scrap board across the table by hand, unpowered, and watch how it transitions onto the roller. It should glide without a bump, catch, or dip. If you feel or see either, adjust the roller height before running the saw.
🛒 Check Price on Amazon — Folding Roller Stand (Outfeed Support) →
Dado Blade Set (For Saws Rated to Accept One)
A stacked dado blade set cuts flat-bottomed grooves and rabbets in a single setup — essential for cabinet and shelving construction where shelves sit in dado grooves rather than on brackets. Confirm your saw’s arbor length and motor power rating accept a dado stack before purchasing; not every compact jobsite saw is rated for the added load.
The Insert Plate a Dado Set Actually Requires
A stock table saw insert plate is cut for the width of a standard blade — a dado stack, which is significantly wider, will not fit through it and cannot be used with the stock plate installed. A dado-rated saw needs a separate zero-clearance insert plate sized for dado use, sold specifically for that saw model. This is not an optional accessory for dado work — it’s a required one, and it’s easy to discover this only after the dado set has already been purchased.
🛒 Check Price on Amazon — 8-Inch Stacked Dado Blade Set →
🛒 Check Price on Amazon — Zero-Clearance Dado Insert Plate →
Dust Collection Connection
Table saws generate significant fine dust at the blade and below the table, and portable jobsite saws in particular have minimal built-in dust capture compared to enclosed cabinet saws. Connecting a shop vac or dust collector to the saw’s dust port — using the correct hose diameter for your saw’s port — captures the majority of fine dust before it becomes airborne.
One circuit warning before connecting a vac to your saw: Confirm your saw and shop vac are not sharing a circuit that can’t handle both motors’ combined startup surge — see the Circuit and Space Planning Checklist above. This is the most common cause of a breaker tripping mid-cut in a home shop, and it has nothing to do with either machine being faulty.
➡️ For hose diameter compatibility and auto-start dust collection setup: Best Shop Vacs 2026: The Hose Diameter Rule and Auto-Start Advantage →
➡️ For workbench outfeed and assembly table setup alongside the saw: Best Garage Workbenches 2026: The Shake Test and Vise Overhang Rule →
➡️ For dedicated task lighting positioned over the saw’s cut line: Best Deformable LED Garage Lights 2026 →
The Auto-Start Dust Switch
Rather than manually switching a shop vac on before every cut and off after — a step that gets skipped constantly once the novelty wears off — an automated dust control switch plugs between the saw and the vac and senses when the saw’s motor draws current, firing the vac automatically within a fraction of a second and keeping it running briefly after the saw stops to clear the line. This turns dust collection from an extra step into something that simply happens every time the saw is used.
Note: pair this with the circuit inrush warning above — an auto-start switch is exactly the setup where two motors can fire close enough together to challenge a shared circuit’s capacity, so confirm your circuit before adding one.
🛒 Check Price on Amazon — iVac Automated Dust Control Switch →
The Circuit and Space Planning Checklist Before You Buy
Run this checklist before ordering any saw in the contractor or cabinet category — jobsite saws on a standard 110V outlet can generally skip most of these steps.
- Confirm available amperage. A 15-amp direct-drive motor on a shared 15-amp household circuit with other loads (lights, a shop vac running simultaneously) will trip the breaker under load. Verify the saw has its own circuit or at minimum a 20-amp circuit with no other simultaneous heavy loads.
The Saw + Dust Collection Circuit Trap
A table saw and a shop vac are almost always paired in a garage workshop — the vac captures the fine dust the saw throws below the table. Running both on the same circuit is where a surprising number of home shops discover a breaker problem mid-cut.
A 15-amp direct-drive table saw motor draws a real startup surge above its rated running amperage the instant it’s switched on. A shop vac motor does the same on its own start. If both machines start at or near the same moment — which happens constantly with auto-start dust collection setups, where the vac fires the instant the saw’s trigger is pulled — their combined inrush current can exceed a standard 15-amp or even 20-amp circuit’s capacity, tripping the breaker at the exact moment you’re mid-cut with a board partway through the blade. Stopping to reset a breaker while holding a workpiece against a spinning blade is not a minor inconvenience — it is a genuine safety hazard.
The fix: Put the saw and the dust collection vac on separate dedicated circuits wherever possible. If a shared circuit is unavoidable, confirm the combined running amperage (not just the saw’s alone) stays safely under the circuit’s rating, and consider a soft-start or auto-start switch designed to stagger the two motors’ startup rather than firing them simultaneously.
➡️ For dedicated circuit planning across all garage power tools: Garage Electrical Audit 2026: Dedicated Circuit Planning →
- Confirm 220V availability for cabinet saws. Most cabinet saws and some contractor saws require a dedicated 220V/20A circuit. Adding one where none exists costs $200–$500 in electrical work — budget this into the total cost before comparing sticker prices between saw categories.
- Measure your actual available floor space, including outfeed and infeed clearance. A saw’s footprint in the spec sheet does not include the 4+ feet of infeed and outfeed clearance needed to actually rip a long board. Measure the clear path, not just the saw’s base dimensions.
- Confirm the saw fits through your access path. A 400-lb cabinet saw arrives on a pallet and must pass through your garage door or a side door — verify doorway width and any stairs or thresholds before ordering a saw too large to physically move into position.
Frequently Asked Questions
What size table saw do I need for a garage workshop?
Size should be determined by rip capacity first, footprint second. For most garage woodworkers building furniture, shelving, and cabinets from plywood sheet goods: a minimum 24-inch rip capacity is the practical floor, with 30+ inches providing meaningful extra margin for full-sheet work. Footprint matters most for saws that must store away between uses — a folding jobsite saw with a rolling stand solves the space problem regardless of its rip capacity rating, since it can be pushed against a wall when not in use.
Is a jobsite table saw good enough for furniture making?
Yes, for the majority of furniture projects built from dimensional lumber and sheet goods, a quality jobsite saw like the DeWalt DWE7491RS produces cut quality indistinguishable from a contractor or cabinet saw for the average home woodworker’s skill level. The difference becomes noticeable in dense, thick hardwood ripping (where a jobsite saw’s direct-drive motor can bog down where an induction motor maintains speed) and in very fine, precision joinery work where a cabinet saw’s cast-iron mass reduces vibration-induced cut variance. For most garage furniture projects — tables, shelving units, cabinets — a jobsite saw is a legitimate long-term tool, not a starter tool to be outgrown.
Do I need a SawStop, or is a riving knife enough?
A riving knife is the current minimum safety standard and is required equipment on essentially all new saws sold today — it substantially reduces kickback risk when used correctly with push blocks and proper technique. SawStop’s flesh-detection technology is a different category of protection entirely: it addresses the scenario where a hand makes direct contact with a spinning blade, which a riving knife does not prevent (a riving knife prevents kickback, not blade contact). Whether the added cost and brake-cartridge replacement expense of SawStop is justified is a personal risk calculation — for shops used by multiple people of varying experience levels, or where the owner has decided finger preservation justifies the premium regardless of statistical injury odds, SawStop is a defensible and increasingly common choice.
Can I run a table saw on a standard household outlet?
Jobsite saws with 15-amp direct-drive motors run on a standard 110V/15-amp or 20-amp household outlet without any electrical modification — this is one of the category’s core advantages. Contractor saws typically also run on 110V, though some higher-powered models offer a 220V option for improved performance. Cabinet saws with 3 HP+ motors generally require a dedicated 220V circuit and will not run correctly, or may not start at all, on a standard 110V household circuit — confirm your specific saw’s power requirement before purchase, and budget for electrical work if a 220V circuit does not already exist in your garage.
How much clearance do I need around a table saw in a garage?
Beyond the saw’s physical footprint, plan for a minimum of 4 feet of clear infeed space in front of the blade and 4 feet of clear outfeed space behind it for cutting standard 8-foot lumber — more if you regularly work with longer stock. Side clearance for the fence rail extension (the DeWalt’s 32.5-inch rip capacity, for example, requires that full 32.5 inches of clear space to the right of the blade, not just the saw’s stated footprint) is equally important and is the dimension most commonly underestimated when planning a garage shop layout around a parked vehicle.
The Bottom Line
Rip capacity determines what you can build. Motor type and category determine how comfortably and quietly you build it. Safety features — riving knife at minimum, flesh detection if the budget and risk calculation support it — determine whether you keep all ten fingers through years of use. Buy in that order of priority, not by horsepower headline number.
For most garage workshops: the DeWalt DWE7491RS remains the correct default — full plywood-sheet rip capacity, a rolling stand that solves the storage problem, and a price point that does not require justifying a 220V electrical upgrade. For anyone who has decided flesh-detection safety is worth the premium: the SawStop Jobsite Saw delivers that protection without stepping up to cabinet-saw size or cost. For a genuine dedicated shop corner with daily use: the Ridgid contractor saw or SawStop cabinet saw reward the investment with cut quality a portable saw cannot match.
Measure your rip capacity requirement first. Everything else follows from that number.
Affiliate Disclosure: Pro Garage Gear earns from qualifying Amazon purchases at no extra cost to you. Specifications are manufacturer-stated. Always follow the manufacturer’s safety instructions and use appropriate push blocks, blade guards, and riving knife/splitter at all times when operating a table saw.
The Garage Table Saw & Space Matcher
Answer three questions about your space, your projects, and your available power. Get a specific saw recommendation from this guide’s rankings, matched to your actual constraints rather than a generic “best overall” pick.