
Best Overhead Garage Storage Racks 2026: How Much Weight Can Your Joists Actually Hold?
This post contains affiliate links. We may earn a commission if you purchase through these links.
The “Ceiling Collapse” Scenario Nobody Warns You About: It starts with a creak. Then a longer groan. And then — if you ignored the warning signs — a rack loaded with holiday bins, camping gear, and two sets of tires comes down. It doesn’t just destroy the rack and everything on it. It can injure someone standing below. And it happens more often than manufacturers admit, almost always for the same reason: the buyer focused on the rack’s weight rating and completely ignored the ceiling’s weight limit.
This guide is going to fix that. We’ll teach you how to read your joists before you buy anything, explain what “600 lb. capacity” actually means on an overhead rack label, and then rank the best systems for 2026.
The Joist Reality Check (Do This Before You Buy Anything)
Your overhead storage rack doesn’t hang from the rack itself — it hangs from your ceiling joists. Those joists have a maximum load capacity that is completely separate from anything printed on a storage rack’s product page.

Step 1: Identify Your Joist Type
Standard residential floor joists: 2×8, 2×10, or 2×12 lumber spanning between walls. In most homes, garage ceiling joists (if the garage is below a living space) follow the same grade.
Truss-style roof joists (most common in detached garages): These are NOT designed for hanging loads in the middle of the span. They’re engineered specifically for roofing loads at the edges.
The Critical Warning: If your garage has a roof truss system (the web of diagonal lumber you see when you look up), you can ONLY safely hang loads near the connection points at the walls — not in the middle of the span. Hanging 400 lbs. from the center of a roof truss is how rack systems fail catastrophically.
Step 2: Measure Your Joist Span
The longer the unsupported span of your joist, the lower its hanging capacity. A 2×8 joist spanning 8 feet can carry significantly more hanging load than the same 2×8 spanning 16 feet.
Safe hanging load estimates (for standard 2×8 lumber joists):
| Joist Span | Safe Hanging Load (Total) |
|---|---|
| Up to 8 ft. | 400–600 lbs. |
| 8–12 ft. | 200–400 lbs. |
| 12–16 ft. | 100–200 lbs. |
| 16+ ft. | Consult a structural engineer |
These are conservative estimates for residential lumber. Your specific home may differ. When in doubt, hire a structural engineer for a one-time $150 consultation. It’s the cheapest insurance you can buy.
Step 3: Find the Studs/Joists
Use a quality stud finder (not a $10 magnetic pin type — those only find nails). A quality sensor-based finder like the Franklin ProSensor 710 detects the full width of the joist, not just its edge.
The Screw Test: Before hanging anything heavy, drill a pilot hole and drive a 3″ lag screw into what you believe is a joist. If it goes in with solid resistance and doesn’t wobble — you’re in solid wood. If it goes in 3/4″ and then becomes easy — you hit a nail plate or missed the joist.
Installing heavy overhead racks involves the same anchoring principles as wall-mounted systems. Read our Heavy Duty Garage Wall Mounts Engineer’s Guide for a deeper breakdown of fastener types and substrate preparation.
🏗️ Overhead Rack Joist Safety Estimator
Before drilling a single hole, know exactly how much weight your ceiling can safely carry. This tool estimates safe hanging loads based on your joist type, size, and span.
| Common Storage Item | Typical Weight | Can You Add It? |
|---|
⚠️ This tool provides educational estimates only. Actual joist load capacity depends on lumber grade, species, condition, fastener quality, and local building codes. When in doubt, consult a licensed structural engineer. Never exceed your safe hanging capacity for static loads above people or vehicles.
⚠️ The Over-Torque Warning: The Most Common Installation Mistake Nobody Warns You About
You pre-drilled your pilot holes. You lined up the lag screw. You’re tightening it down with your impact driver and — crack. The head snapped off. Or worse: it went in fine, but 3 months later the screw begins to back out slowly because the pilot hole fibers were over-compressed during installation.
Over-torquing lag screws into ceiling joists is one of the most common — and most dangerous — errors in overhead rack installation. Here’s how to avoid it:
What Over-Torquing Does: When you apply excessive torque to a lag screw, three things can happen:
- The head snaps — leaving an embedded screw shaft you cannot remove without drilling out
- The wood fibers around the shank compress and strip — the screw “feels” tight but has zero holding strength. Give it a lateral wiggle test: if it moves even slightly, it’s stripped.
- The pilot hole enlarges — micro-splits radiate outward from the hole, weakening the joist structure around the anchor point
The Correct Torque Approach:
| Lag Screw Size | Correct Torque | Signs of Approaching Limit |
|---|---|---|
| 5/16″ x 3″ | 25–35 ft-lbs | Screw stops advancing, driver strains |
| 3/8″ x 3″ | 40–55 ft-lbs | Screw head is flush with hardware plate |
| 3/8″ x 4″ | 45–65 ft-lbs | Hardware plate draws tight to ceiling surface |
If you’re using an impact driver (as most DIYers do): Use the lowest torque setting that will seat the screw head flush. Impact drivers can easily deliver 150+ ft-lbs — far exceeding what any ceiling lag screw needs. Set your driver to medium torque and finish the last 2–3 turns slowly.
How to Detect a Stripped Pilot Hole: After driving a lag screw, perform this test before moving on:
- Apply lateral pressure to the installed bolt (sideways push). Zero movement = good. Any wiggle = stripped.
- Try to back the screw out 1/4 turn. If it backs out with no resistance on the first turn — the hole is stripped.
- Listen during installation. A good screw has increasing resistance as it seats. A stripped hole has decreasing resistance — the screw suddenly gets easier to turn. Stop immediately when this happens.
What to Do If You Strip a Hole:
- Back the screw out completely
- Inject a small amount of wood glue or epoxy into the hole
- Insert wooden toothpicks or matchsticks to pack the hole tightly
- Allow to cure for 4 hours minimum
- Re-drill your pilot hole slightly offset from the original
- Re-drive the lag screw — the repacked fibers will hold
Do not move to a larger screw size to “fill” a stripped hole. This over-enlarges the hole further and creates a compounding problem.
The safety principle: An overhead rack is a permanently static load directly above people, vehicles, and equipment. The 10 extra minutes to verify fastener integrity before loading the rack is the most important 10 minutes of the entire installation.
Understanding “Weight Capacity” Labels on Overhead Racks
Most overhead storage racks advertise capacity between 400 and 1,500 lbs. Here’s what that number really means:
Capacity = the rack structure’s rated limit, NOT what your ceiling can hold.
A rack rated for 1,000 lbs. mounted to joists that can only safely carry 300 lbs. of hanging load is a 300 lb. system. The rack’s rating is irrelevant beyond the weaker link — your ceiling.
Always calculate the lower of: (a) rack’s rated capacity, or (b) your joist’s safe hanging load. Load to that lower number.
The Safety Margin Rule: Never exceed 70% of any rated capacity for a static overhead load. A rack rated for 600 lbs. should not hold more than 420 lbs. of real-world, static storage weight.
What to Store (and What NOT to Store) Overhead
Good candidates for overhead storage:
- Seasonal items (holiday decorations, summer furniture cushions)
- Camping gear (tents, sleeping bags, camp chairs)
- Sports equipment (skiing gear, snowboards)
- Lightweight bins and totes
- Roof cargo boxes (when off the vehicle)
Items you should NEVER store overhead:
- Liquid containers (paint, chemicals) — they can leak onto anything below
- Heavy power tools (unpredictable weight distribution, difficult to retrieve safely)
- Lumber or long pipe (creates point-loading stress on rack rails)
- Anything you access more than once per month (overhead storage is for seasonal, not daily use)
2026 Rankings: Best Overhead Garage Storage Racks
🥇 #1 — Fleximounts 4×8 Overhead Garage Storage Rack (Best Overall)
Capacity: 600 lbs. (rack structure) Adjustable Height: 22″–40″ from ceiling Footprint: 4 ft. x 8 ft. Steel: Cold-rolled, wire grid design Hardware: Lag screws included (4″ for wood joists)
The Fleximounts 4×8 is the benchmark for residential overhead storage in 2026 for one specific reason: adjustable drop height. Most overhead racks are fixed at one height. Fleximounts allows you to adjust the hanging distance from the ceiling in 2″ increments — critical for fitting over garage door rails, car rooflines, or tall shelving units below.
The wire grid design distributes load better than solid shelf designs and lets you see through the platform to check what’s stored. Installation takes about 2 hours with a drill and two people. The included lag screws (4″ length) are appropriate for wood joists — do not substitute shorter screws.
What reviewers consistently note: The instructions are excellent, the hardware is quality, and the assembly is logical. The anti-drop system uses a secondary bracket that prevents the platform from detaching if a lag screw loosens over time — a safety feature most competitors lack.
Fleximounts 4×8 Overhead Garage Storage Rack
target=”_blank” rel=”nofollow sponsored”>
🥈 #2 — Proslat Heavy-Duty Ceiling Storage Rack (Best for High-Clearance Garages)
Capacity: 800 lbs. (rack structure) Adjustable Height: 24″–45″ from ceiling Footprint: 4 ft. x 8 ft. Steel: 14-gauge (thicker than most competitors)
The Proslat rack earns its second-place ranking on steel quality alone. At 14-gauge cold-rolled steel, it’s one of the heavier-duty consumer-grade racks available. The 45″ maximum drop makes it ideal for garages with high ceilings (10+ ft.) where you want the storage well above head height but still accessible from a step stool.
The installation system uses a ceiling-mounted track rather than individual vertical supports, which distributes load across more anchor points. More anchor points into more joists means a more secure install.
The downside: More expensive than Fleximounts, and the track system requires more precise measuring during installation. Plan on 3–4 hours for first-time installers.

🥉 #3 — NewAge Products Garage Ceiling Storage Rack (Best for Branded Garage Buildouts)
Capacity: 600 lbs. (rack structure) Adjustable Height: Fixed (multiple height options available) Footprint: 4 ft. x 6 ft. or 4 ft. x 8 ft. Finish: Hammertone grey (matches NewAge cabinet line)
If you’re building a NewAge cabinet system in your garage, the NewAge ceiling rack integrates visually. The hammertone grey finish matches the cabinet line exactly. Structurally, it’s comparable to Fleximounts — solid but not exceptional. The value is in the aesthetic coherence of a matched system.
For a full breakdown of NewAge cabinet options to pair with your ceiling rack, read our NewAge Bold 3.0 vs. Pro 3.0 Comparison.
Installation Guide: The 4-Step Safe Install Process
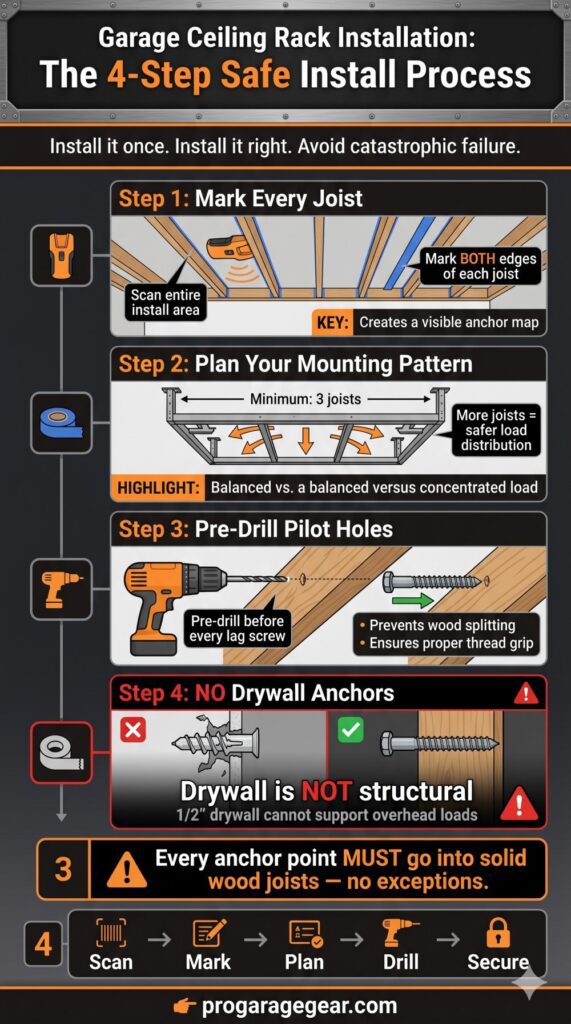
Step 1 — Mark every joist. Use your stud finder across the entire installation area. Mark each joist edge with blue painter’s tape. This gives you a clear visual of where you can anchor.
Step 2 — Determine your mounting pattern. Plan your anchor points to hit a minimum of 3 joists. Distributing load across more joists is always better than concentrating it on fewer.
Step 3 — Pre-drill pilot holes. Always pre-drill before lag screws. This prevents splitting the joist and ensures the screw threads actually grab wood rather than pushing fibers apart.
Step 4 — Never use drywall anchors. Ceiling drywall is 1/2″ thick. It cannot support dynamic or static loads. Every anchor point on an overhead rack must go directly into a joist. If a lag screw misses the joist, remove it, fill the hole, and relocate.
Combine ceiling storage with wall-mounted systems for a complete garage organization overhaul. See our 15 Genius Garage Shelving Ideas for a full layout strategy.
Can I hang an overhead rack from metal ceiling joists?
Metal studs in garage ceilings (common in steel-framed buildings) require specific toggle bolts rated for metal. Standard wood lag screws will not hold in metal. Look for racks that specify metal ceiling installation or use a toggle bolt adapter kit.
How do I know if my garage has trusses vs. floor joists?
Go into your garage and look up. If you see a web of angled 2×4 lumber forming triangles — those are roof trusses. If you see parallel horizontal lumber with no diagonals — those are floor joists from the room above (if any). Trusses require you to anchor only at or near the wall ends of the truss chord.
How much does professional overhead rack installation cost?
Most handymen charge $100–$200 for a standard 4×8 overhead rack install. It’s worth it if you’re unsure about your ceiling structure or don’t own a drill.
Will an overhead rack void my home insurance?
Not typically, but a collapse that causes damage would be reviewed for proper installation. Keep your receipt and installation photos — they document that you used a rated system and proper anchoring.
The Bottom Line
Buy the Fleximounts 4×8 for most residential garages. It’s the best-tested, most-reviewed overhead rack available with a legitimate safety track record. Adjust the height to clear your garage door rail and load it conservatively.
Know your ceiling before you hang anything. The ceiling’s joist capacity is the real limit — not what’s printed on the rack’s label.
And once you’ve claimed your ceiling, your floor opens up for the work that matters.