
Best Garage Workbench Lighting 2026: Fix the Shadow That’s Ruining Your Work
Affiliate Disclosure: Pro Garage Gear earns from qualifying Amazon purchases at no extra cost to you.
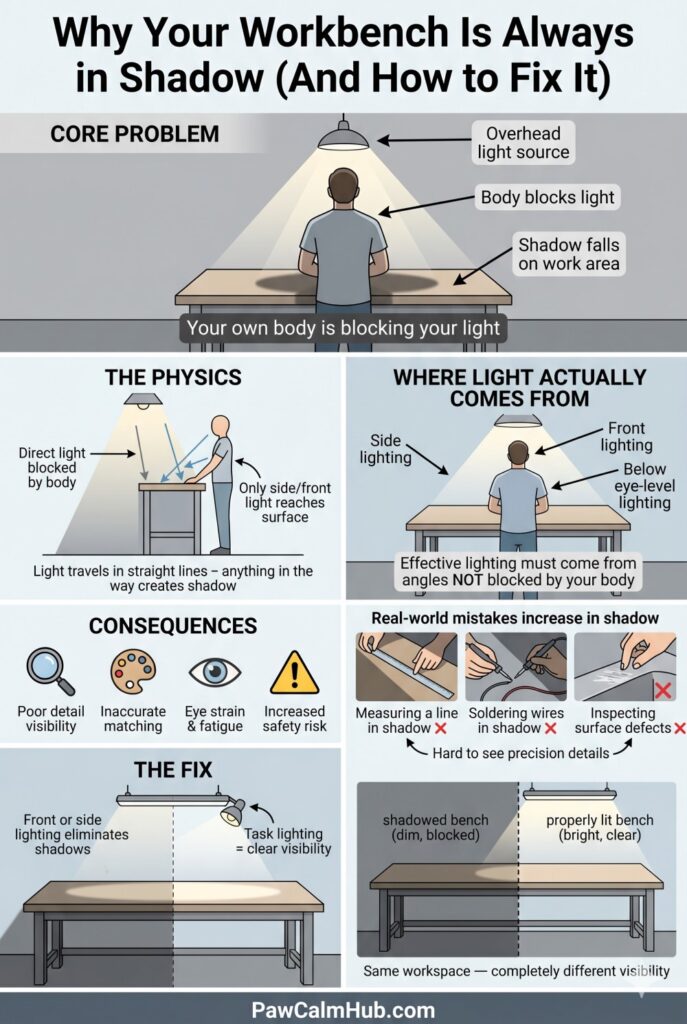
The “Shadow Triangle” Problem: Every garage has overhead lighting. Every workbench has a person standing in front of it. And every person standing in front of their overhead light creates a shadow — cast directly onto the work surface where their hands are. The overhead light is perfectly positioned to illuminate the back of your head and cast darkness on the exact spot where precision matters most.
This is not a lumens problem. Adding more overhead lights does not fix it. The shadow moves with you. The only solution is task lighting mounted below the shadow source — at or below eye level — positioned so the light source is between your eyes and the work surface.
We’ve tested this extensively across different workbench configurations and lighting types. This guide explains the physics, ranks the best solutions, and tells you exactly where to mount each one for maximum effectiveness.
Why Your Existing Garage Lights Are Failing Your Workbench
Before we recommend products, you need to understand why the problem exists so you don’t repeat the mistake with a bigger bulb.
The physics of workbench shadows:
When an overhead light is directly above you, your body blocks the light from reaching the surface below — your chest, arms, and hands create a cascading shadow on the bench. This shadow follows the angle of the light source. The only light that reaches your bench comes from angles that are NOT blocked by your body — meaning from the sides, from below your eye line, or from the front of the bench.
The consequence of working in shadow:
- Fine detail work (measuring, cutting to a line, wiring, soldering) requires shadows-free illumination
- Color matching (paint, wood stain, rust assessment) is nearly impossible in indirect light
- Eye strain from squinting into shadow causes real fatigue — a 4-hour workbench session in poor task lighting creates as much eye fatigue as 8 hours in proper light
- Safety risk: misreading measurements, missing hairline cracks, or misjudging chisel depth are all shadow-caused errors
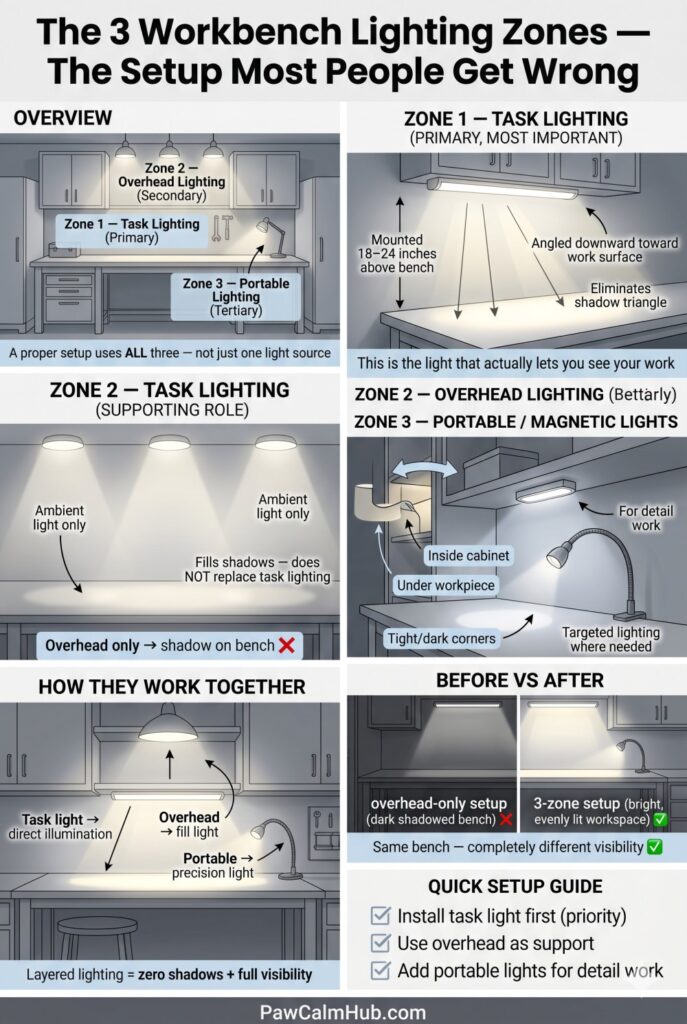
The 3 Workbench Lighting Zones
A complete workbench lighting system uses three zones, not one. Understanding each zone tells you which products to buy:
Zone 1 — Under-Cabinet / Wall-Mount Task Lighting (Primary Zone)
Mounted directly under a shelf or wall cabinet above the bench, or on the wall directly above the bench surface. This is the most important zone — it eliminates the shadow triangle entirely by placing the light source between your body and the work.
Target: Position the light 18–24 inches above the bench surface, angled slightly downward toward the work area. This creates even, shadow-free illumination across the entire work surface.
Zone 2 — Overhead General Illumination (Secondary Zone)
Your existing overhead lights. These provide ambient fill light that reduces harsh shadows from Zone 1 lighting and illuminates the area behind and beside the bench. They are not replacements for task lighting — they are the supporting cast.
Zone 3 — Portable / Magnetic Work Lights (Tertiary Zone)
Battery-powered magnetic work lights, gooseneck lights, and flexible lamps. These fill specific needs: lighting inside cabinet drawers, illuminating under vehicles, lighting the inside of a workpiece while your hands are in it. Not the main event, but irreplaceable for detail work.
🔆 The Glare Problem Nobody Warns You About (Even With Great Lighting)
Here’s the irony of installing 4,000-lumen under-cabinet lighting: if your garage floor is epoxy-coated, your workbench surface is stainless steel or polished hardwood, or you have metallic pegboard behind your bench — you may find yourself squinting more after the upgrade than before it.
This is reflective glare, and it’s the other half of the workbench lighting problem. The shadow triangle sends light too far from the work surface. Reflective glare sends too much light directly back from the work surface into your eyes. Both cause eye strain. Both have solutions.
Diffused vs. Direct Light: Choosing the Right Output for Your Bench
LED strips and bars come in two output types that are rarely clearly labeled on product pages:
| Output Type | What It Looks Like | Best Surface | Worst Surface |
|---|---|---|---|
| Direct (clear lens) | Bright, small point sources | Matte/bare wood bench | Epoxy floor, steel bench, polished surfaces |
| Diffused (frosted lens) | Soft, even spread | Any surface | None — works everywhere |
The test: Hold your hand over your workbench under the new lights. Can you clearly see the individual LED chips reflected in the bench surface? If yes — you have a glare problem. Diffused lens covers ($8–$15 for a strip set) solve it immediately.
The 3-Step Glare Elimination Protocol
Step 1 — Add frosted diffuser covers to your LED strips. Most T5 linkable strips (including Barrina) accept clip-on frosted diffuser sleeves that spread the point-source LED output into a soft, even plane. This drops the peak brightness but dramatically improves comfort over a 4-hour work session.
🛒 Check Price on Amazon — LED Frosted Diffuser Covers →Step 2 — Angle the light slightly backward (toward the wall, not the bench). Instead of mounting the strip horizontal to the ceiling, tilt it 10–15° so the light bounces off the wall above the bench before reaching the work surface. This indirect illumination is significantly softer than direct downlight and eliminates hot spots on reflective surfaces.
Step 3 — Add a matte work surface mat to the bench.
A matte rubber or foam workbench mat eliminates reflections at the surface level entirely — the matte finish scatters light rather than returning it to your eyes. This also protects finished workpieces, dampens vibration during cutting and hammering, and provides a non-slip surface for small parts.
🛒 Check Price on Amazon — Matte Rubber Workbench Mat →The Combined Solution: Frosted diffuser covers + matte bench mat + lights angled 10° toward the wall = a workbench environment where you can work for 6 hours with zero eye strain. Each fix costs under $20. Together they solve a problem that no amount of additional lumens can address.
Key Specifications for Workbench Lighting
Before comparing products, understand the specs that actually matter:
| Specification | What It Means | Workbench Target |
|---|---|---|
| Lumens | Total light output | 2,000–4,000 lm for a 6 ft. bench |
| CRI (Color Rendering Index) | How accurately colors are rendered | 90+ CRI (critical for finishing work) |
| Color Temperature | Warmth/coolness of light | 4,000–5,000K for task work |
| Beam Angle | Spread of the light | 100–120° for wide bench coverage |
| Flicker (Flicker Index) | Imperceptible flicker causing eye strain | <0.1 flicker index |
| IP Rating | Dust/moisture resistance | IP40+ for garage use |
The CRI truth for workbench use: A 95 CRI light makes wood grain, rust, paint runs, and wire insulation colors look exactly as they are. A 70 CRI light (common in cheap LEDs) makes everything slightly off — colors that look matched under task lighting look wrong in daylight. If you do any finishing, detailing, or electrical work at your bench, CRI 90+ is non-negotiable.
The flicker problem: Cheap LED driver circuits produce imperceptible flicker at 60 or 120 Hz. You cannot consciously detect it, but your visual system does — the result is eye strain and headaches during extended work sessions. Quality LEDs with proper driver circuits have a flicker index below 0.1. Look for “flicker-free” specification or TÜV certification.
Best Garage Lighting 2026 for overall garage lighting context:
2026 Rankings: Best Garage Workbench Lighting
🥇 #1 — Barrina LED T5 Under Cabinet Light (Best Under-Cabinet System)
Why it earns #1: Barrina’s T5 linkable strips are the most cost-effective under-cabinet task lighting available. At 2,000 lumens per 4-foot strip at 5000K, they deliver the daylight-equivalent illumination a workbench needs. The linkable design is critical — you can daisy-chain up to 6 strips from a single power outlet, running them across the full width of your bench without multiple outlets.
The data:
- Lumens: 2,200 per 4-foot strip
- CRI: 85 (acceptable; not ideal for finishing work)
- Color temp: 5000K (daylight — excellent for detailed work)
- Link capability: Up to 6 strips per circuit
- Install: Double-sided tape or included clips — no electrician needed
Honest downside: CRI 85 is below the 90+ threshold for color-critical work like painting or matching wood stain. For general assembly, electrical work, and metalworking — it’s excellent. For finishing and color matching, step up to the CRI 95+ option below.
🛒 Check Price on Amazon — Barrina T5 LED (6-Pack) →🥈 #2 — Sunco Lighting LED Under Cabinet Light Bar (Best for Finishing Work — CRI 90+)
Why it earns #2: For anyone who paints, stains, matches colors, or does finish woodworking, Sunco’s under-cabinet bar is the correct choice. The 90+ CRI rating means colors at the bench look the same as they do in daylight — eliminating the “finished it in the shop, looked wrong outside” problem.
The data:
- Lumens: 650 per 12-inch bar (use multiple for bench coverage)
- CRI: 90+
- Color temp: 4000K (neutral white — the best balance for task work)
- Dimming: 3-way dimmable (100%, 50%, 10%)
- Install: Hardwire or plug-in options
The 3-way dimming is a practical advantage: full power for detailed work, 50% for assembly tasks where you need ambient without the glare.
🛒 Check Price on Amazon — Sunco High-CRI Cabinet Light →🥉 #3 — Milwaukee M18 LED Worklight (Best Portable/Magnetic Zone 3)
Why it earns #3: No fixed under-cabinet system reaches into drawers, inside engine bays, or under the bench lip. The Milwaukee M18 LED worklight (compatible with your M18 battery if you’re in that ecosystem) uses a magnetic base and 360° rotation to put directed light exactly where the fixed system can’t reach. At 2,000 lumens with a rechargeable battery, it runs 4–8 hours per charge.
What makes it the right choice: Magnetic base sticks to any steel surface — bench leg, tool chest, vehicle body. The pivoting head directs light at any angle. The M18 battery is interchangeable with your existing Milwaukee tools.
🛒 Check Price on Amazon — Milwaukee M18 Work Light →For non-Milwaukee users: The DEWALT 20V MAX area light and the RIDGID 18V worklight are equivalent options in their respective battery ecosystems.
🛒 Check Price on Amazon — DeWalt 20V Work Light →The Complete Workbench Lighting Product Table
| Product | Type | Lumens | CRI | Best For | Amazon |
|---|---|---|---|---|---|
| Barrina T5 6-Pack | Under-cabinet | 2,200/strip | 85 | General workbench (budget) | Search Amazon→ |
| Sunco CRI 90+ Bar | Under-cabinet | 650/bar | 90+ | Finishing, color-matching | Search → |
| Lithonia LCLM LED | Under-cabinet | 1,000/bar | 90 | Premium hardwired | Search → |
| Milwaukee M18 Light | Portable | 2,000 | — | Inside drawers, under vehicles | Search → |
| LEPOWER Clamp Light | Clamp-on | 1,600 | 85 | Budget portable option | Search → |
| Noxon LED Gooseneck | Gooseneck | 800 | 90 | Detail/precision work | Search → |
Installation Guide: Getting It Right the First Time
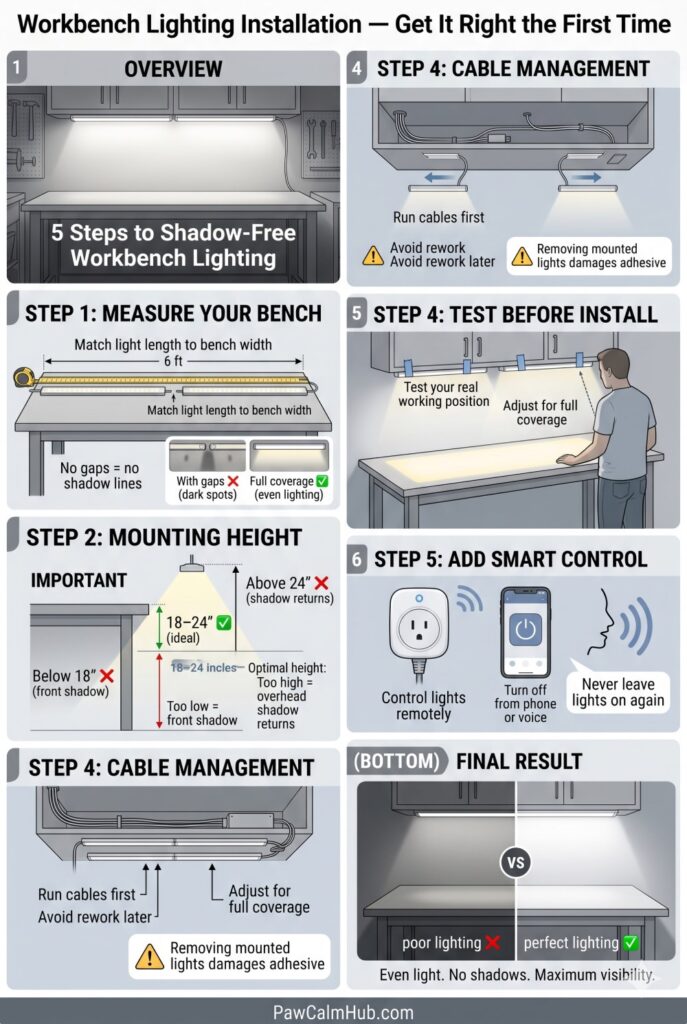
Step 1 — Measure your bench width. For a 6-foot bench, you need 6 feet of under-cabinet LED coverage. Two 3-foot bars or three 2-foot bars. Do not leave gaps — shadows appear at the dark joints between bars.
Step 2 — Choose your mounting height. 18–24 inches above the bench surface is the optimal range. Below 18 inches, the light hits the front edge of the bench and creates a shadow on the back. Above 24 inches, the light begins to come from above your work plane and the shadow triangle creeps back.
Step 3 — Cable management before mounting. Run the connecting cables along the underside of the shelf or cabinet before sticking the lights down. Rerouting after mounting requires pulling the lights off — and double-sided tape rarely re-adheres cleanly.
Step 4 — Test the position before permanent mount. Use painter’s tape to temporarily hold the lights in position. Stand at the bench in your normal working stance and look at the work surface. The light should illuminate the entire bench surface without hot spots or dark corners. Adjust before permanent installation.
Step 5 — Add a smart plug. A smart plug ($12–$20) lets you control all your workbench lights with a voice command or phone app. When you’re done for the night and realize in bed that you might have left them on — you can check and turn off remotely.
🛒 Check Price on Amazon — Smart Plug for Light Automation →Best Garage Deformable LED Lights – Led Deformable options
Garage Electrical Wiring Guide – Adding outlets for lighting
Do I need both overhead lights and under-cabinet lights?
Yes. Under-cabinet lighting alone creates harsh shadows on the wall and cabinets behind your bench. Overhead general lighting fills these in. The combination gives you bright, even, shadow-free illumination across the entire workspace.
What color temperature is best for workbench use?
4,000K (neutral white) is the best all-around choice — it renders colors accurately without the clinical harshness of 6,500K. For detail and precision work: 5,000K. For finishing and paint work: 4,000K with 90+ CRI is essential
Can I use regular LED strips instead of under-cabinet bars?
LED strips work but have significant drawbacks for workbench use: they’re often lower CRI, harder to aim precisely, and require more complex wiring than plug-in under-cabinet bars. For a simple DIY workbench lighting setup, purpose-built under-cabinet bars are more practical.
How many lumens does a 6-foot workbench need?
Target 3,000–4,000 lumens for a 6-foot bench under-cabinet, supplemented by your overhead general lighting. Below 2,000 lumens of task lighting, you’ll still find yourself squinting at fine detail.
The Bottom Line
Fix the shadow triangle before you buy any more tools or spend any more time at your bench. One 6-pack of Barrina T5 strips, properly mounted 20 inches above your work surface, transforms a frustrating, squint-inducing workstation into a professional-grade workspace in under an hour.
If you do color-critical work — finishing, detailing, electrical — invest in the Sunco CRI 90+ bars. The color accuracy difference is immediately apparent and worth every dollar.
Your best work happens in the best light. Install the light first.