
How to Set Up EV Home Charging in Your Garage: Level 1 vs. Level 2 (The Complete Electrician’s Guide)
Affiliate Disclosure: Pro Garage Gear participates in the Amazon Services LLC Associates Program. We earn from qualifying purchases at no extra cost to you. This article contains no manufacturer sponsorships. All recommendations reflect independent research.
How to Set Up EV Home Charging in Your Garage: Level 1 vs. Level 2 (The Complete Electrician’s Guide)
The Morning Anxiety Calculation: You bought an electric vehicle. You plugged it in using the cable that came in the box — the one that connects to your standard 120V garage outlet. You woke up the next morning to 47 miles of added range after 10 hours of charging. Your daily commute is 38 miles. You have 9 miles of margin. One longer day, one detour, one forgotten plug-in and you are the person on the side of the road waiting for a flatbed.
This is the Level 1 home charging reality that nobody fully communicates at the dealership. The cable they hand you is a trickle charger — an emergency backup, not a daily charging solution. And it is installed in 90% of new EV owner garages simply because it requires no setup, no cost, and no electrician.
The correct solution — a Level 2 home charging station — requires all three. But it also delivers 25–35 miles of range per hour of charging rather than 3–5, pays itself back through off-peak electricity pricing within 18 months in most US markets, and qualifies for a federal tax credit that most EV owners do not claim because they did not know it existed.
This is the guide that the dealer should have given you.
The Federal Tax Credit You Need to Know First: The Inflation Reduction Act provides a tax credit of 30% of the cost of EV charging equipment and installation, up to $1,000 per year (Form 8911, Alternative Fuel Vehicle Refueling Property Credit). This applies to Level 2 EVSE (Electric Vehicle Supply Equipment) purchased and installed at your primary residence. A $600 charger plus $800 in installation costs = $1,400 total × 30% = $420 back on your federal taxes. Keep every receipt.
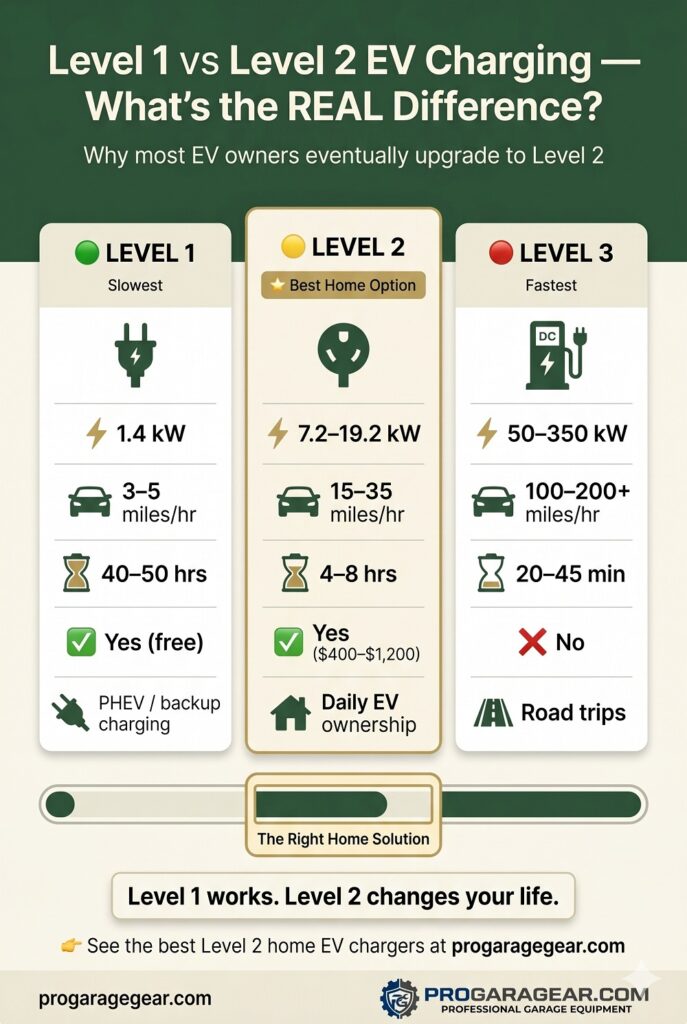
Level 1 vs. Level 2 vs. Level 3: The Charging Hierarchy Explained
The “Level” designation in EV charging refers to the power delivery capability of the equipment — not the quality of the charge delivered to the battery. All three levels deliver the same electrons to the same battery. The difference is how fast they deliver them.
Level 1 Charging (120V AC)
Level 1 charging uses a standard North American household outlet — the same three-prong outlet that powers your toaster. The charging cable included with your vehicle (called a EVSE — Electric Vehicle Supply Equipment) plugs directly into any grounded 120V outlet and into your car’s charge port.
- Power delivered: 1.0–1.9 kW
- Range added per hour: 3–5 miles
- Full charge time (60 kWh battery): 30–50 hours
- Outlet required: Standard 120V/15A or 20A
- Equipment cost: $0 (included with vehicle)
- Installation cost: $0 (existing outlet)
When Level 1 is genuinely adequate: Plug-in hybrid vehicles (PHEVs) with battery packs under 15 kWh, drivers with daily commutes under 25 miles, and secondary vehicles used occasionally. If you add more range every night than you use each day — Level 1 is technically sufficient.
When Level 1 fails: Battery EVs with 60–100 kWh packs (Tesla Model 3, Chevy Equinox EV, Ford Mustang Mach-E, Rivian R1T), any driver with a commute exceeding 30 miles, and anyone who uses their vehicle for errands beyond the daily commute. At 4 miles per hour, a 100 kWh EV takes 50+ hours to charge from empty — more than two full days.
Level 2 Charging (240V AC)
Level 2 charging uses a 240V outlet — the same voltage as your electric dryer or range. A dedicated Level 2 EVSE unit (the “charger” — though technically the charger is inside the vehicle) delivers power 5–7 times faster than Level 1.
- Power delivered: 7.2–19.2 kW (depending on vehicle onboard charger and EVSE amperage)
- Range added per hour: 15–35 miles
- Full charge time (60 kWh battery): 4–10 hours
- Circuit required: Dedicated 240V/40A–60A circuit
- Equipment cost: $200–$800
- Installation cost: $200–$1,200 (electrician required)
Level 2 is the correct home charging solution for the vast majority of EV owners. Plugging in when you arrive home and unplugging when you leave — at Level 2 speeds — keeps most EVs between 80–100% charge daily regardless of driving patterns. It eliminates range anxiety entirely for typical residential use.
Level 3 / DC Fast Charging
Level 3 (DCFC — DC Fast Charging, including Tesla Superchargers) delivers direct current at 50–350 kW. These are the commercial stations you see at highway rest stops, shopping centers, and Tesla service locations. Level 3 equipment costs $10,000–$100,000+ and requires three-phase commercial power infrastructure. It is not a home installation option for residential garages.
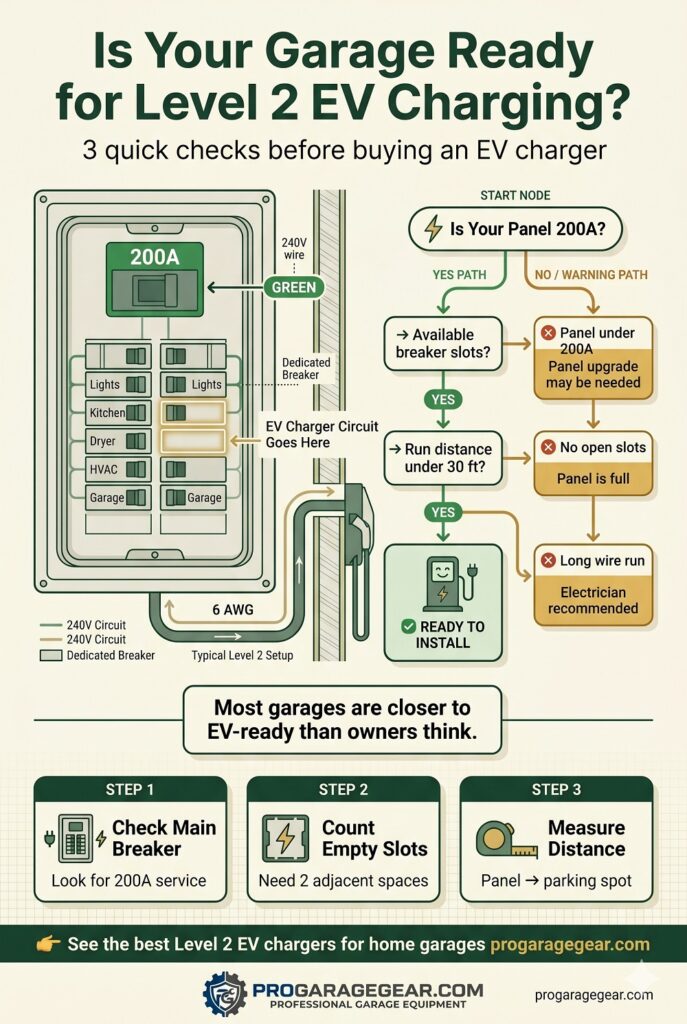
Before You Buy a Charger: The Garage Electrical Panel Readiness Audit
The single most important factor in Level 2 home charging is not the charger brand. It is your home electrical panel. The best EVSE in the world cannot deliver power that your panel cannot supply. Buying a charger before auditing your panel is the most common — and most expensive — mistake new EV owners make.
Step 1 — Locate and Inspect Your Electrical Panel
Your main electrical panel (breaker box) is typically in the garage, utility room, or basement. Open the panel door and look for the main breaker at the top — the large breaker controlling everything. Its amperage rating is printed on the breaker handle.
For Level 2 EV charging, the minimum practical panel size is:
| Panel Size | EV Charging Viability | Notes |
|---|---|---|
| 60A main breaker | ❌ Insufficient | Cannot support EV charging without panel upgrade. Contact an electrician. |
| 100A main breaker | ⚠️ Marginal | Possible with a 24A (6kW) EVSE only. No electric dryer, range, or HVAC running simultaneously. Load calculation required. |
| 150A main breaker | ✅ Adequate | Supports 40A EVSE with room for typical household loads. |
| 200A main breaker | ✅ Recommended | The standard for modern homes. Comfortably supports 50A EVSE plus all household appliances. |
| 400A main breaker | ✅ Excellent | Can support two EVs charging simultaneously plus a home EV battery backup system. |
If your panel is 100A or below, consult a licensed electrician before purchasing any Level 2 charging equipment. A panel upgrade to 200A typically costs $1,500–$4,000 depending on local code requirements and utility coordination — but it is also frequently the right decision for a home being modernized regardless of EV charging, as 100A panels are increasingly insufficient for modern appliance loads.
Your existing garage wiring is directly relevant to this decision. For a complete breakdown of garage circuit requirements and how to identify what your current wiring can support, our detailed guide covers exactly this territory:
➡️ Garage Electrical Load Guide 2026: Circuit Sizing, Breaker Identification, and the 20-Amp Upgrade →
The Panel Headroom Calculation: The Step That Prevents a Tripped Main Breaker
The panel size table above tells you whether your panel is large enough in isolation. But a garage is never used in isolation. While your EV charges overnight at 48A, your garage heater may be running. While you work on the car the next morning, the air compressor fires up. Every load that runs simultaneously draws from the same panel capacity — and if the combined draw exceeds your main breaker rating, the main breaker trips.
This is not a minor inconvenience. Repeated main breaker tripping from sustained overload stresses the breaker mechanism, degrades it faster than normal cycling, and in older panels can cause arcing at the bus bar. The panel headroom calculation takes four minutes and eliminates this risk entirely.
How to Calculate Your Available Panel Headroom
The formula:
Available Headroom (Amps) = Main Breaker Rating − Sum of All Simultaneous Loads
For safe continuous operation: Headroom must exceed your EV charger amperage × 1.25 (the NEC 125% continuous load rule).
Step A — List every load that could realistically run while the EV charges:
| Common Garage/Home Load | Typical Amperage Draw | 240V or 120V? |
|---|---|---|
| Electric garage heater (240V, 5,000W) | 21A | 240V |
| Electric garage heater (240V, 7,500W) | 31A | 240V |
| Air compressor (California Air Tools 20-gal) | 15A | 120V |
| Air compressor (large 240V, 3HP) | 15A | 240V |
| LED garage shop lights (full garage) | 3A | 120V |
| Electric dryer (home) | 24A | 240V |
| Electric range/oven | 40A | 240V |
| Central HVAC (3-ton) | 20A | 240V |
| Water heater (electric) | 19A | 240V |
| Refrigerator | 6A | 120V |
Step B — Run the headroom calculation for your specific scenario:
Example 1 — 200A panel, overnight charging (most appliances off):
- Main breaker: 200A
- EV charger (48A × 1.25): 60A reserved
- Refrigerator + standby loads: 15A
- HVAC (cycling overnight): 20A
- Total load: 95A | Available headroom: 105A ✅ Safe
Example 2 — 100A panel, daytime charging while working in garage:
- Main breaker: 100A
- EV charger (32A × 1.25): 40A reserved
- Garage heater (240V, 5,000W): 21A
- Air compressor (120V): 15A
- Lights + refrigerator + standby: 12A
- Total load: 88A | Available headroom: 12A ⚠️ Dangerously tight — one additional appliance trips the main
Example 3 — 100A panel, 48A charger during evening peak use:
- Main breaker: 100A
- EV charger (48A × 1.25): 60A reserved
- Electric dryer running: 24A
- HVAC: 20A
- Kitchen appliances + standby: 15A
- Total load: 119A ❌ Exceeds panel — main breaker WILL trip
The Solution When Your Headroom Is Insufficient
You have three options ranked by cost and disruption:
Option 1 — Reduce charger amperage (lowest cost, immediate):
Switch from a 48A to a 24A or 32A EVSE. The ChargePoint Home Flex and Emporia allow amperage adjustment in the app without any electrical work. A 24A charger on a 100A panel still adds 15–20 miles per hour — adequate for most daily driving needs — while consuming only 30A of panel capacity (24A × 1.25).
Option 2 — Install a load management EVSE (medium cost, best long-term):
The Emporia Smart EVSE with their Vue energy monitor performs dynamic load management — it automatically reduces charging amperage in real time when other home loads are high, then increases it when loads drop. On a 100A panel, this means the charger always uses exactly as much capacity as is safely available at any given moment.
🛒 Check Price on Amazon — Emporia Vue Whole-Home Energy Monitor →
Option 3 — Panel upgrade to 200A (highest cost, permanently solves the problem):
A 200A panel upgrade ($1,500–$4,000 installed) eliminates the headroom problem for the life of the home and accommodates future loads — a second EV, a whole-home battery backup system, or additional 240V workshop equipment. If your panel is 100A and more than 20 years old, this is likely the correct long-term decision regardless of EV charging needs.
The GFCI Breaker Requirement
NEC 625.54 (2020 NEC and later, adopted by most states) requires GFCI protection on all EV charging circuits. Your electrician will install a 2-pole GFCI breaker at the panel — not a standard breaker. GFCI breakers for 50A and 60A circuits are not stocked at every hardware store; your electrician should source them in advance to avoid installation delays.
🛒 Check Price on Amazon — 50A 2-Pole GFCI Breaker (Siemens) →
🛒 Check Price on Amazon — 60A 2-Pole GFCI Breaker (Square D) →
⚠️ Match your breaker brand to your panel manufacturer. Siemens breakers in a Siemens panel, Square D breakers in a Square D (QO or Homeline) panel, Eaton breakers in an Eaton CH or BR panel. Cross-brand breakers may physically fit but are not listed for use in other manufacturers’ panels and void the panel warranty.
Step 2 — Count Your Available Breaker Slots
A Level 2 EV charger requires a dedicated double-pole breaker (it occupies two slots in your panel). Open your panel and count the empty slots — the spaces where no breaker is installed. You need at least 2 empty adjacent slots for the EV circuit breaker.
If all slots are full: your electrician can install a tandem breaker in an eligible slot, add a sub-panel, or replace double-pole breakers with space-saver versions to create room. This adds $200–$400 to the installation cost.
Step 3 — Identify the Distance from Panel to Parking Position
The longer the wire run from your electrical panel to the EVSE mounting location, the higher the installation cost — wire is priced per foot, and longer runs require larger wire gauge to compensate for voltage drop. Measure the actual route the wire will travel (not a straight-line measurement — wire runs along walls, through conduit, around obstacles).
For runs under 30 feet: 6 AWG wire is typically adequate for a 60A circuit. For runs of 30–50 feet: 4 AWG wire may be required depending on circuit amperage. For runs over 50 feet: consult an electrician — wire gauge requirements increase significantly.
Choosing Your Level 2 EVSE: The Specifications That Actually Matter
The home EV charger market has expanded dramatically alongside EV adoption. There are now dozens of options between $150 and $800. Most of the price difference comes down to four specifications — two that matter enormously and two that are largely marketing.
The Two Specs That Matter: Amperage and Connector Type
Amperage Output (The Most Important Spec)
EVSE amperage determines how fast the charger delivers power — but only up to the limit of your vehicle’s onboard charger. Before selecting a charger, check your vehicle’s maximum AC charging rate:
| Vehicle | Max AC Charge Rate | Optimal EVSE Amperage | Miles Per Hour |
|---|---|---|---|
| Nissan Leaf (standard) | 6.6 kW | 32A | ~22 miles/hr |
| Chevy Bolt EV | 11.5 kW | 48A | ~25 miles/hr |
| Tesla Model 3 (standard) | 11.5 kW | 48A | ~30 miles/hr |
| Tesla Model 3 (long range) | 11.5 kW | 48A | ~35 miles/hr |
| Ford Mustang Mach-E | 10.5 kW | 48A | ~28 miles/hr |
| Rivian R1T/R1S | 11.5 kW | 48A | ~25 miles/hr |
| Chevy Equinox EV | 11.5 kW | 48A | ~25 miles/hr |
| BMW iX (high spec) | 22 kW | 80A (requires 100A circuit) | ~40+ miles/hr |
The practical rule: A 48A (11.5 kW) EVSE paired with a 60A dedicated circuit covers the vast majority of current EVs at their maximum charging rate. Buying a 32A charger for a vehicle that accepts 48A wastes 33% of your available charging speed — you paid for a circuit that is underused. Buying an 80A charger for a vehicle that only accepts 32A wastes money on equipment capability you cannot use.
Connector Type: J1772 vs. NACS
As of 2024–2026, North American EVs are transitioning to the NACS (North American Charging Standard) connector — originally the Tesla connector, now adopted by Ford, GM, Rivian, and most major manufacturers. All Legacy J1772 charging equipment works with NACS vehicles through an adapter (usually included or available for $35–$50).
- If you own a Tesla: Buy a NACS-native charger or use a Tesla Wall Connector.
- If you own a non-Tesla EV (2023 or older): J1772 EVSE is fully compatible.
- If you own a 2024+ Ford, GM, or Rivian: Your vehicle uses NACS natively. Either a NACS charger or a J1772 with NACS adapter works.
- Future-proofing for multiple vehicles: Consider a dual-port EVSE or a unit that offers field-installable connector swaps.
The Two Specs That Are Largely Marketing
Cord length: Manufacturers advertise 18-foot, 20-foot, and 25-foot charging cables as premium features. In practice, a wall-mounted EVSE installed at a thoughtful location needs no more than 20 feet to reach both front and rear charge ports of a standard vehicle. Longer cords tangle, drag on the floor, and wear at the connection point. Mount the charger at the midpoint of your vehicle’s parking position and 18 feet is sufficient for nearly every configuration.
LCD displays and touch screens: A charger that shows kWh delivered, session cost, and charge rate is a useful feature — but only if you actually reference it. Smartphone-connected smart chargers deliver this data more usefully via app. A charger with a large LCD display and no smart connectivity is the worst of both worlds.
2026 Rankings: The Best Home EV Chargers for Garage Installation
🥇 #1 — ChargePoint Home Flex (Best All-Around, Most Future-Proof)
Why it earns #1: The ChargePoint Home Flex is the most flexible Level 2 EVSE available for residential installation. It adjusts from 16A to 50A output in the app — meaning if you install it today on a 50A circuit and later upgrade to a 60A circuit, you simply change the app setting rather than replacing the unit. It is also the best-supported charger in terms of software updates, utility rebate programs, and long-term manufacturer commitment.
The Data
- Output: 16–50A (adjustable via app)
- Max delivery: 12 kW / ~37 miles per hour
- Connector: J1772 (NACS adapter available)
- WiFi: Yes — ChargePoint app with scheduling, energy monitoring, and utility rate integration
- Weatherproof rating: NEMA 3R (indoor/outdoor)
- Warranty: 3 years
- Cord length: 23 feet
- UL Listed: Yes
The smart scheduling advantage: Electricity is cheapest between 11 PM and 6 AM in most US utility zones (off-peak rates). The ChargePoint app schedules charging to begin automatically at your cheapest rate period. Over a year of daily charging, this scheduling alone saves $80–$180 in electricity costs depending on your utility’s rate differential. The charger pays attention to electricity pricing so you do not have to.
Honest downside: Requires WiFi connectivity for the smart features to function. In garages with poor WiFi signal, a WiFi extender ($30–$50) is a necessary companion purchase.🛒 Check Price on Amazon — ChargePoint Home Flex →🛒 WiFi Extender for Garage (if needed) →
🥈 #2 — Grizzl-E Classic Level 2 EV Charger (Best Value — No Compromises on Safety)
Why it earns #2: Grizzl-E is a Canadian-manufactured EVSE that has earned a reputation in EV owner communities for exceptional build quality at below-market pricing. It lacks smart features — no WiFi, no app, no scheduling — but its hardwired metal housing, 40A output, and outdoor-rated NEMA 6-50 build quality significantly exceed what most plastic-housed competitors deliver at the same price.
The Data
- Output: 16–40A (dip-switch adjustable, no app needed)
- Max delivery: 9.6 kW / ~32 miles per hour
- Housing: Aluminum NEMA 4 (fully weatherproof — superior to most competitors)
- WiFi: No (Grizzl-E Smart version adds WiFi for ~$80 more)
- Weatherproof rating: NEMA 4 (better than most residential EVSE)
- Warranty: 3 years
- Cord length: 24 feet
- UL Listed: Yes
Who it is for: EV owners who want maximum reliability and outdoor-grade build quality without paying for smart features they will not use. If you know you will charge at the same time every day and have no interest in app control, the Grizzl-E delivers exceptional hardware at a lower total cost.
Honest downside: Amperage adjustment requires accessing a dip-switch inside the unit — a one-time setup, not a recurring inconvenience, but less convenient than an app setting.
🛒 Check Price on Amazon — Grizzl-E Classic Level 2 Charger →
The Cold-Weather Advantage: Why Cable Jacket Material Is a Real Specification
Here is what you discover when you handle EV charging cables at -10°F — and what no product page discloses: cable jacket material determines whether your cable coils normally or becomes a rigid, kinked rod that fights you every morning.
Standard EV charging cables use PVC (polyvinyl chloride) jacket insulation — the same material used in standard extension cords. PVC has a glass transition temperature of approximately 32°F (0°C). At temperatures below that point, PVC progressively stiffens. At -10°F, a PVC-jacketed Level 2 charging cable is effectively inflexible — it holds whatever shape it was left in, cannot be coiled without cracking the outer jacket, and resists plugging into the charge port because the cable cannot bend to approach the connector at the correct angle.
The Grizzl-E Classic uses an EPDM (Ethylene Propylene Diene Monomer) rubber jacket — the same material used in industrial and automotive cables specifically because it maintains flexibility down to approximately -40°F. An EPDM cable at -10°F handles identically to how it handles at 70°F: it coils, bends, and plugs in without resistance.
This is not a minor comfort difference. In a Climate Zone 5–7 garage (Minnesota, Wisconsin, Maine, Colorado, Michigan, upstate New York) where overnight temperatures regularly reach -10°F to -30°F, a PVC cable makes daily EV charging a genuinely frustrating physical task. An EPDM cable makes it invisible.
How to identify cable jacket material at purchase:
Look in the product specifications for “cable jacket material,” “cable type,” or “cord type.” EPDM will be explicitly stated. If the specification says “PVC,” “TPE” (thermoplastic elastomer — also stiffens in cold), or does not specify the jacket material at all — assume PVC.
Cold-climate cable recommendation table:
| Climate Zone | Winter Low Temp | Minimum Cable Standard | Recommended |
|---|---|---|---|
| Zone 1–3 (South, Gulf Coast) | Above 20°F | PVC acceptable | Any rated EVSE |
| Zone 4 (Mid-Atlantic, Pacific NW) | 0–20°F | TPE minimum | Grizzl-E or ChargePoint |
| Zone 5–6 (Midwest, Mountain West) | -10°F to 0°F | EPDM strongly recommended | Grizzl-E Classic |
| Zone 7 (Northern MN, ME, ND, AK) | Below -10°F | EPDM required | Grizzl-E Classic only |
The experience-based reality: A Level 2 charger that works perfectly in October becomes a daily annoyance in January if the cable jacket is wrong for your climate. Of all the specification decisions in an EV charging setup, cable jacket material is the one most likely to affect your daily experience and the one least likely to be mentioned by the person selling you the charger.
🥉 #3 — Emporia EV Charger Level 2 (Best Smart Features — Energy Management)
Why it earns #3: Emporia’s home EVSE integrates with their whole-home energy monitoring system — which means it can automatically reduce charging speed when your home’s total electrical load approaches the panel’s capacity limit. If your air conditioner, electric dryer, and oven all run simultaneously, the Emporia EVSE steps down its charging amperage in real time to prevent overloading the panel circuit. For homes with 100A or 150A panels where headroom is limited, this dynamic load management is a genuinely valuable feature.
The Data
- Output: 12–48A (dynamic load adjustment)
- Max delivery: 11.5 kW / ~34 miles per hour
- WiFi: Yes — Emporia app with energy monitoring, utility rate scheduling, solar integration
- Dynamic load management: Yes (requires Emporia Vue energy monitor — sold separately)
- Weatherproof rating: NEMA 4
- Warranty: 3 years
- UL Listed: Yes
🛒 Check Price on Amazon — Emporia Smart Level 2 EV Charger →
Also Recommended
Tesla Wall Connector (Gen 3) — Best for Tesla Owners
If you own a Tesla and plan to keep one long-term, the Tesla Wall Connector is the native solution. It delivers up to 48A / 11.5 kW, supports power sharing between two vehicles on the same circuit, and integrates directly with the Tesla app for scheduling and monitoring. Works with non-Tesla vehicles via J1772 adapter.🛒 Check Price on Amazon — Tesla Wall Connector Gen 3 →
Lectron V-BOX (Best Budget Pick — Under $250)
For EV owners on a tight budget or those with PHEVs that charge at 6.6 kW maximum, the Lectron V-BOX delivers 32A / 7.7 kW at a price point that makes Level 2 accessible for every garage. Basic features, solid UL listing, and 16-foot cord. Not recommended for EVs with 48A+ capability — you will outgrow it quickly.🛒 Check Price on Amazon — Lectron V-BOX Budget Level 2 →
The Complete EV Charger Comparison Table
| Charger | Max Amps | Miles/Hr | Smart? | NEMA Rating | Warranty | Amazon |
|---|---|---|---|---|---|---|
| ChargePoint Home Flex | 50A | ~37 | ✅ Full app | NEMA 3R | 3 yr | Shop → |
| Grizzl-E Classic | 40A | ~32 | ❌ No | NEMA 4 | 3 yr | Shop → |
| Emporia Smart | 48A | ~34 | ✅ + Load mgmt | NEMA 4 | 3 yr | Shop → |
| Tesla Wall Connector | 48A | ~34 | ✅ Tesla app | NEMA 3R | 4 yr | Shop → |
| Lectron V-BOX | 32A | ~22 | ❌ No | NEMA 4 | 1 yr | Shop → |
Installation: Hardwired vs. NEMA Outlet — Which Is Right for You?
Level 2 EVSE units can be installed in two configurations. The choice determines installation cost, permit requirements, and future flexibility.
Option A: Hardwired Installation
The EVSE is wired directly to a dedicated circuit — no outlet is involved. This is the most streamlined installation and typically the lower-cost option for new circuit runs.
Advantages: Permanent, tamper-resistant, no plug to wear out, slightly lower total cost for new installations. Required by some local codes for permanent EVSE.
Disadvantages: If you move, the charger stays with the house (or requires an electrician to remove and reinstall). If the EVSE unit fails, the replacement must also be hardwired.
Option B: NEMA 14-50 Outlet Installation
Why the Outlet Grade Matters: Industrial vs. Residential NEMA 14-50
This is the detail most EV charging installation guides skip — and it is a safety-critical one. A standard residential NEMA 14-50 outlet costs $10–$15. An industrial-grade equivalent from Hubbell or Bryant costs $30–$45. The difference is not cosmetic.
A 48A EV charger draws sustained current at 40A (80% of rated circuit capacity per NEC code). A standard residential outlet is rated for this current but built to residential duty-cycle assumptions — occasional high-current events like dryers or ranges that run for 60–90 minutes at a time, not 6–8 hours of continuous overnight EV charging load.
Under sustained overnight charging loads, the contact points inside cheap residential outlets heat, oxidise, and gradually develop resistance. Increased resistance means more heat at the connection point. Over 18–24 months of daily use, this cycle produces the discolouration and melting that electricians regularly find when investigating EV charging outlet failures.
Industrial-grade outlets (Hubbell HBL9450A, Bryant 9450FR) use:
- Silver-nickel alloy contacts (vs. brass in residential grade) — significantly better conductivity and oxidation resistance
- Heavier brass mounting screws rated for sustained high-current termination
- Housing rated for 20,000+ insertion cycles (vs. 6,000–10,000 for residential grade)
- Higher contact spring tension that maintains connection quality over years of daily plug-unplug cycles
The $20–$30 premium over a residential outlet is the lowest-cost safety upgrade in the entire EV charging installation. Buy the industrial grade.
🛒 Check Price on Amazon — Hubbell Industrial NEMA 14-50 Outlet →
🛒 Check Price on Amazon — Bryant Industrial NEMA 14-50 (Alt.) →
The Permit Question: Do You Need One?
In most US jurisdictions: yes, a permit is required for a new electrical circuit installation — whether that circuit powers an EV charger or anything else. NEC Article 625 specifically addresses EV charging equipment and requires compliance with all general wiring requirements.
What a permit means practically:
- Your electrician pulls the permit before starting work
- A local electrical inspector visits to verify the installation meets code
- The work is documented — important for homeowner’s insurance coverage and future home sales
- The permit fee: typically $50–$150 for a residential circuit permit
The unpermitted installation risk: An EV charger circuit installed without a permit is not covered by your homeowner’s insurance in the event of an electrical fire. Every year, improperly installed Level 2 chargers cause residential fires — and every one of those fires is investigated by the insurance company’s forensic team. An unpermitted circuit is grounds for claim denial. The $100 permit fee is genuinely the cheapest insurance available.
EV Charging and Your Garage: Safety Integration
Carbon Monoxide Considerations
Battery EVs produce no exhaust. But if your household has both an EV and a conventional vehicle, or if you use any combustion equipment in the garage — a CO detector remains mandatory. A garage without CO detection is a safety gap regardless of what you drive.
➡️ Attached Garage Health Risks: The CO, Benzene, and Fume Danger Most Homeowners Don’t Know →
Fire Safety Additions for EV Charging Garages
Lithium-ion battery fires are chemically distinct from ordinary combustible fires. They require different suppression approaches and significantly more intervention time. If you charge an EV in your garage — especially an overnight charge — fire detection is the critical safety layer.
At minimum: an interconnected smoke detector in the garage linked to bedroom detectors, and a rate-of-rise heat detector mounted on the ceiling (smoke detectors in garages false-alarm from vehicle exhaust and workshop dust — heat detectors do not).
➡️ Best Garage Fire Extinguishers 2026: Class Ratings, EV Battery Blankets, and Interconnected Alarms →
Smart Garage Door Integration
Many EV owners use scheduled overnight charging — the charger begins at 11 PM when electricity rates drop. A smart garage door controller adds the complementary layer: confirmation that the garage door is properly closed before the charging session begins, with remote monitoring and the ability to close it from your phone if you realize you left it open.
Total Cost Breakdown: What EV Home Charging Actually Costs in 2026
| Item | Low End | Mid Range | High End | Notes |
|---|---|---|---|---|
| EVSE Unit | $200 | $450 | $800 | Lectron / ChargePoint / Emporia |
| Electrician Labour | $150 | $400 | $800 | Simple run vs. complex routing |
| Wire + Materials | $80 | $150 | $300 | 6 AWG vs 4 AWG, conduit type |
| Permit Fee | $50 | $100 | $150 | Varies by jurisdiction |
| Panel Upgrade (if needed) | $0 | $1,500 | $4,000 | Only if current panel is 100A or below |
| Total (no panel upgrade) | $480 | $1,100 | $2,050 | Typical 200A panel, simple circuit run |
| Federal Tax Credit (30%) | −$144 | −$330 | −$615 | Equipment + installation × 30%, max $1,000 |
| Net After Tax Credit | $336 | $770 | $1,435 | File Form 8911 with your tax return |
At the mid-range scenario: a complete Level 2 home charging installation costs approximately $770 net after the federal tax credit. Against the 15-year ownership lifespan of typical home electrical infrastructure and the daily elimination of public charging fees ($0.30–$0.50/kWh at commercial stations vs. $0.12–$0.15/kWh at home during off-peak hours), this is one of the fastest-payback infrastructure investments an EV owner can make.
Future-Proofing: Installing for Two EVs Now
If there is any possibility of a second EV in your household within the next 5 years — and with EV adoption rates growing, there is for many households — the time to plan for dual charging infrastructure is during the first installation, not the second.
Two approaches:
Approach 1 — Install Two Circuits Now
While the electrician is already working, pulling a second 60A circuit and installing a second NEMA 14-50 outlet costs approximately $200–$400 in additional labour and materials — significantly less than a second service call. The second outlet sits capped and ready until needed. This is the lowest long-term cost option.
Approach 2 — Install One Circuit with Load-Sharing EVSE
Some EVSE systems (ChargePoint Home Flex, Tesla Wall Connector) support a power-sharing configuration: two chargers on one circuit that dynamically share the available amperage. When both vehicles charge simultaneously, each receives half the circuit capacity. When only one charges, it receives the full capacity. One 60A circuit supports two EVs in this configuration.🛒 Check Price on Amazon — Dual EV Charging Load-Sharing Station →
The Complete EV Charging Garage Accessories Table
| Item | Purpose | Priority | Amazon |
|---|---|---|---|
| NEMA 14-50 outlet (if plug-in install) | Dedicated 240V outlet for charger | 🔴 Essential | Shop → |
| Outlet circuit tester | Verify wiring polarity before first use | 🔴 Essential | Shop → |
| EV cable management hook | Store charging cable off the floor | 🟡 Recommended | Shop → |
| Garage WiFi extender | Ensures smart charger app connectivity | 🟡 Recommended | Shop → |
| EV fire suppression blanket | Li-ion battery fire containment | 🟡 Recommended | Shop → |
| Rate-of-rise heat detector | Garage fire detection (not smoke alarm) | 🟡 Recommended | Shop → |
| Smart plug (for existing L1 EVSE) | Schedule Level 1 charging during off-peak hours | 🟢 Optional | Shop → |
EV Cable Management: The Trip Hazard You Will Create Without a Plan
A Level 2 charging cable is 18–24 feet long, weighs 4–6 lbs, and needs to reach from a wall-mounted EVSE to your vehicle’s charge port — which may be on the driver’s side front fender, the passenger side rear quarter, or the nose of the vehicle depending on the model. Without a cable management solution, this cable lives on the garage floor. A cable on the garage floor gets driven over (which damages the jacket and the internal conductors), becomes a trip hazard, accumulates grease and debris, and tangles with every other item on your garage floor.
Three cable management approaches that work:
Option 1 — Wall-Mount J-Hook System
A series of J-hooks mounted on the wall between the EVSE and the vehicle’s parking position allows the cable to be draped neatly at waist height when not in use. The cable stays clean, accessible, and off the floor with minimal effort — simply lift and coil onto the hooks after each charging session.🛒 Check Price on Amazon — J-Hook Cable Management Set →
Option 2 — Retractable EV Cable Hoist
A ceiling-mounted retractable cable hoist pulls the charging cable up toward the ceiling when not in use and lowers it on demand. This is the cleanest solution — zero floor contact, zero wall contact, the cable hangs directly over the vehicle’s charge port. Pairs naturally with the ceiling storage and hoist systems covered elsewhere on this site.
➡️ For ceiling mounting options and joist load capacity for cable management systems, see our Overhead Garage Storage Racks guide — joist safety and ceiling anchor guide →🛒 Check Price on Amazon — Retractable EV Cable Ceiling Hoist →
Option 3 — EV Cable Holster (Wall-Mount)
A dedicated EV cable holster mounts to the wall adjacent to the EVSE and stores the coiled cable and connector in a single-motion hang. Pull to uncoil, hang to store. The simplest and lowest-cost option — appropriate for garages where the charge port and EVSE are close together.🛒 Check Price on Amazon — EV Cable Holster Wall Mount →
➡️ For existing site readers: Your garage’s retractable extension cord reel setup applies equally well to EV cable management. See our Best Retractable Extension Cord Reels guide → for ceiling-mount options that work with heavy EV cables.
Calculate Your Home EV Charging Time
Enter your vehicle’s battery size and your planned charger — we calculate exactly how long your specific car takes to charge, how many miles per hour you gain, and recommend the right charger for your situation.
⚡ EV Home Charging Calculator
Enter your vehicle and charger details for a personalised charge time estimate — and find out if you need a panel upgrade.
* Assumes 85% charging efficiency (typical onboard charger loss). Actual results vary by temperature, battery age, vehicle onboard charger limit, and utility voltage stability. Times shown are for planning guidance, not guaranteed performance.
Frequently Asked Questions
Q: Can I install a Level 2 charger myself without an electrician?
Technically possible in some jurisdictions if you are a licensed homeowner-electrician who can pull your own permit. In practice: no. EV charging circuits operate at 240V with 40–60A capacity — mistakes are not forgiving. The liability, safety risk, and permit non-compliance risk of a DIY 240V circuit installation are not worth the $200–$400 electrician cost savings. Hire a licensed electrician, pull a permit, get the inspection signed off.
Q: How much does it cost to charge an EV at home versus a public fast charger?
Home Level 2 charging at off-peak rates: $0.08–$0.15 per kWh. A 60 kWh battery charges from 20% to 100% for approximately $3.84–$7.20. Public Level 3 DC fast charging: $0.28–$0.50 per kWh for the same charge = $13.44–$24.00. Annual savings from home charging vs. public charging for a daily driver: $800–$1,500 per year depending on driving distance and local electricity rates.
Q: Does a Level 2 charger damage the battery compared to Level 1?
No. Level 2 AC charging (7–12 kW) does not accelerate battery degradation. The battery management system controls the actual charge rate accepted from any AC source. Level 3 DC fast charging at very high rates (150kW+) used daily does have some degrading effect over years — that is a different scenario. Level 2 home charging is the recommended daily charging method by every major EV manufacturer for exactly this reason.
Q: What happens if my internet goes out — will my smart charger still charge my car?
All quality smart chargers (ChargePoint, Emporia, Grizzl-E Smart) continue charging at their last configured settings during internet outages. The app-based features (monitoring, scheduling changes) become unavailable until connectivity returns, but the charging session itself is not interrupted. Pre-configure your charging schedule when WiFi is available and it persists through outages.
Q: Is a 240V outlet already in my garage for a dryer or workshop equipment — can I use it for EV charging?
It depends on the outlet type and the circuit’s amperage. A NEMA 14-50 outlet (the 4-prong rectangular outlet used for ranges and RVs) is directly compatible with most Level 2 EVSEs. A NEMA 10-30 or 14-30 (dryer outlet) requires an adapter — not recommended for daily EV charging; the connection is not designed for the repetitive hot-plug cycles of daily charging. If the circuit is 30A or less, your charging speed will be limited to 24A (5.8 kW). A dedicated 50A–60A circuit is the correct infrastructure for full-speed Level 2 charging.
Q: Will a Level 2 charger increase my electric bill significantly?
Yes, but the increase replaces what you previously spent on gasoline. A typical EV owner drives 12,000–15,000 miles per year. At 3–4 miles per kWh (typical EV efficiency) and $0.13/kWh average electricity cost, annual home charging costs $390–$650. The average American household previously spending $2,000–$3,000 per year on gasoline sees a net energy cost reduction of $1,400–$2,400 annually after switching to home charging.
The Bottom Line: Level 2 Is Not a Luxury — It Is Infrastructure
When you buy an EV, the Level 2 home charger is the piece of infrastructure that makes the vehicle genuinely usable as a daily driver rather than a range-anxiety generator. It is the equivalent of buying a dishwasher and not connecting it to the water line — the appliance is theoretically functional but practically frustrating without the correct infrastructure.
The ChargePoint Home Flex is the correct choice for most households — flexible amperage, excellent app, and the best utility rate scheduling available in the consumer market. The Grizzl-E Classic is the right choice if you want maximum hardware quality without paying for smart features. Both are supported by the federal tax credit that reduces the net cost by 30%.
Audit your panel before you buy. Pull a permit when you install. Schedule your charging for off-peak hours from day one. And enjoy the experience of waking up every morning to a full battery without a fuel station ever being part of your morning routine again.
For the complete workshop and garage electrical foundation that supports EV charging, smart tools, and every project you will do in the space:
Affiliate Disclosure: Pro Garage Gear earns from qualifying Amazon purchases at no extra cost to you. Tax credit information is accurate as of May 2026 but may change — consult a qualified tax professional for advice specific to your situation. Electrical code requirements vary by jurisdiction; always verify requirements with your local authority having jurisdiction (AHJ) before beginning any electrical installation.