
Best Garage Power Tool Organizers 2026: The 3-Zone System That Keeps Every Tool Charged, Visible, and Exactly Where You Left It
Affiliate Disclosure: Pro Garage Gear participates in the Amazon Services LLC Associates Program. We earn from qualifying purchases at no extra cost to you. No manufacturer has paid for placement in this guide. All rankings reflect independent research.
Power Tool Organizers – The “$2,400 Pile on the Floor” Problem: You have been building your cordless tool collection for years. There is a DeWalt drill somewhere. The circular saw is leaning against the workbench leg. Two batteries are on the charger — except the charger is buried under a drop cloth on the shelf. The impact driver is in a bucket with extension cords. The oscillating tool has not been seen since the deck project in October.
Inventory that collection honestly and the street value sitting in that pile is typically $800–$3,000 for a serious DIYer. A professional tradesperson’s collection is worth $5,000–$15,000. None of it is earning its value sitting in a pile on a concrete floor where moisture, temperature cycling, impacts, and battery discharge progressively degrade every piece.
The deeper cost is time. The average workshop session begins with 8–12 minutes of locating, untangling, and charging tools before a single cut is made. At two sessions per week across 50 weeks, that is 13–20 hours per year spent searching for tools you already own. An organized tool wall eliminates that entirely — the tool is visible, the battery is charged, and the session begins in 30 seconds.
This guide introduces the 3-Zone Power Tool Organization System — the framework professional shops and serious hobbyists actually use, which is fundamentally different from the “hang everything on a pegboard” advice that dominates most guides. We then rank the specific products that implement each zone, organized by battery platform, budget, and garage size.
Why Power Tools Need a Different Organization System Than Hand Tools
Hand tools — chisels, screwdrivers, wrenches, pliers — are passive. They sit in a holder, drawer, or on a magnetic strip. They require no power, no charging management, and no safety consideration when stored. You can pack them tightly, stack them in drawers, or hang them densely on pegboard without consequence.
Power tools — particularly cordless tools with lithium-ion battery packs — are active systems with four distinct requirements that hand tool storage completely ignores:
Requirement 1 — Charging Infrastructure
A cordless tool without a charged battery is a paperweight. The most common failure of power tool organization systems is treating the tool and the battery as one unit. They are not. A drill needs to be stored in a position where it is physically impossible to grab it with a dead battery. This means the charging infrastructure must be integrated into the storage system, not treated as a separate power strip on a shelf.
Requirement 2 — Battery Temperature Management
Lithium-ion batteries lose 15–30% of their capacity when stored at 95°F+ for extended periods. In an uninsulated garage in summer, a battery pack sitting in direct sunlight on a south-facing wall can reach 115–130°F surface temperature — continuously degrading cell chemistry. The storage system must position batteries away from heat sources, out of direct sunlight, and ideally on an interior wall with the lowest temperature differential.
Requirement 3 — Charging Safety Separation
This is the requirement most guides never mention. Lithium-ion batteries charging in close proximity to each other — the “pile of chargers on a shelf” configuration — create a specific fire risk scenario. If one battery experiences thermal runaway during charging (a failure mode that can occur in damaged, aged, or counterfeit batteries), the heat generated can trigger adjacent charging batteries. The NFPA documented over 140 residential fires in 2024 attributed to lithium battery charging incidents.
A proper power tool organization system maintains minimum 6-inch separation between charging batteries and does not charge batteries directly above or below combustible materials.
Requirement 4 — Access Frequency Matching
Power tools have dramatically different access frequencies. Your drill and circular saw are used multiple times per week — they need immediate, one-motion access. Your oscillating tool, rotary tool, and specialty jigs may be used once or twice per year. Storing both categories at the same wall height and access point means reaching past rarely-used tools to get the daily drivers — and gradually producing the pile that started this article.
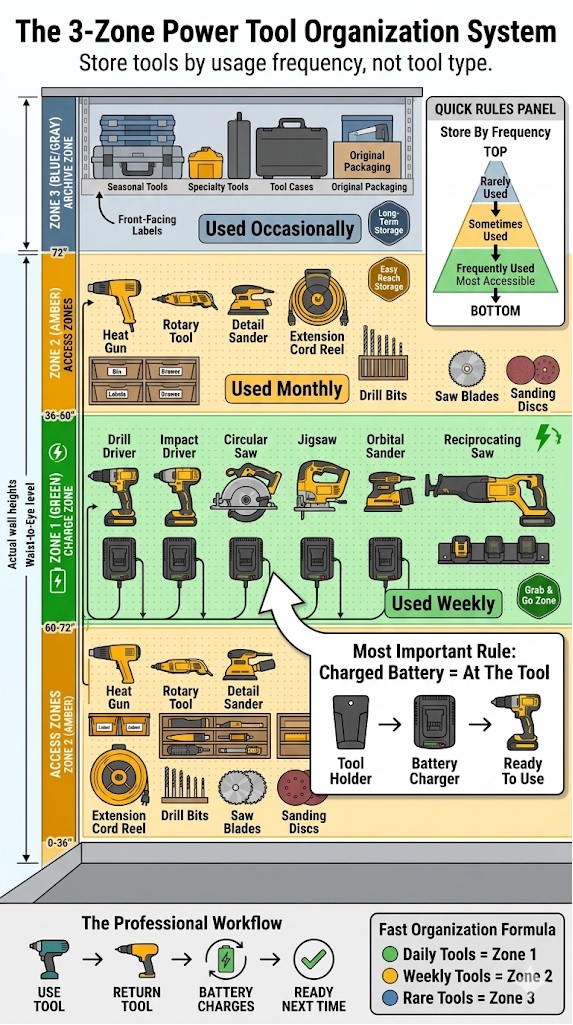
The 3-Zone Power Tool Organization System
Professional shops — automotive, fabrication, construction, and woodworking — universally organise their power tools in three spatial zones that match access frequency to physical position. The system works because it maps tool use reality rather than imposing an arbitrary order based on tool category or size.
Plan Your Zones Before You Buy a Single Holder
Enter your height, your battery platform, the number of tools you own, and your wall condition. The planner calculates your exact Zone 1 height range, audits your charger amperage load, recommends the correct wall backing approach, and generates a prioritised shopping list specific to your setup.
📐 Workshop Zone Planner
Enter your details for custom Zone 1 heights, a charger amperage audit, wall backing recommendation, and a prioritised shopping list built for your specific setup.
Archive
Access
Charge
Level
* Zone heights are guidelines based on typical ergonomic reach ranges. Adjust based on your specific tools and comfortable working stance. Charger amperage values are typical — always verify your specific charger nameplate. Pro Garage Gear earns from qualifying Amazon purchases.
Zone 1 — The Charge Zone (36–60 Inches from Floor: Waist to Eye Level)
Zone 1 is prime real estate. It is the band of wall space between waist height and eye level — the zone your hand reaches naturally without bending or stretching. Every tool in Zone 1 must earn its position by meeting two criteria: it is used at least weekly, and it always needs to be ready with a charged battery when you reach for it.
Typical Zone 1 contents: primary drill/driver, circular saw, impact driver, jigsaw, orbital sander, reciprocating saw. Six to eight tools maximum — the daily and weekly drivers. Their battery chargers are integrated into Zone 1 directly, positioned so that returning the tool to its holder automatically places the battery in charging position. There should be no step between “I’m done using this tool” and “the battery is now charging.”
The key design principle of Zone 1: You should never need to look for a charged battery. The Zone 1 wall system is designed so that a charged battery is always physically present at the tool’s storage position. This requires either integrated charging (charging built into the holder) or dedicated battery stations directly adjacent to each tool holder — not a shared charger on a separate shelf.
Zone 1 in a Shared Workshop: The Primary User Rule
Zone 1 is defined as 36–60 inches from the floor — a range that accommodates most adult heights within a single zone. But when a garage workshop is used by two or more people with meaningfully different heights (more than 6 inches of difference), zone calibration requires a deliberate decision rather than a default measurement.
The rule is not simply “calibrate to the shortest user,” as some guides suggest — which would penalise a taller daily user to accommodate an occasional shorter one. The correct principle is:
Zone 1 is calibrated to the primary user — the person who uses the workshop most frequently. Secondary users’ comfort is addressed by holder position, not zone height.
Here is why this matters practically: if the primary user is 6 feet tall and their partner is 5’2″ and uses the workshop occasionally, setting Zone 1 at 5’2″ eye level (approximately 55 inches) means the drill holder is above the primary user’s comfortable return-by-feel position every single time they use it. Over hundreds of tool exchanges per year, this creates the micro-frustration that progressively undermines the system — tools start being set down on the bench instead of returned to holders.
The correct approach for shared workshops:
- Set Zone 1 to the primary user’s comfortable reach height. For most adults, this is fingertip-to-shoulder range — approximately 36–50 inches for a 5’4″ person, 40–56 inches for a 5’10” person, 44–60 inches for a 6’2″ person.
- Position the most frequently shared tools at the lower end of Zone 1. The drill that both users grab regularly should be at 40–42 inches — comfortable for the shorter user without being awkward for the taller one.
- Reserve the upper Zone 1 positions (54–60 inches) for the primary user’s specialty tools. The reciprocating saw or rotary tool used only by the primary user can be at a height that is optimal for them alone.
- Apply the 30-Day Review to shared workshops specifically. Which tools are not being returned to their holders by which user? The answer reveals whose height calibration is wrong, not whose work habits are wrong.
| User Height | Comfortable Zone 1 Range | Optimal Single-Grab Height |
|---|---|---|
| 5’0″ – 5’4″ | 32–52 inches | 44–46 inches (mid-torso) |
| 5’4″ – 5’8″ | 36–55 inches | 46–50 inches |
| 5’8″ – 6’0″ | 40–58 inches | 50–54 inches |
| 6’0″ – 6’4″ | 44–62 inches | 54–58 inches |
| Shared (two users, mixed heights) | Use lower bound of taller user | 40–48 inches (accessible to both) |
Zone 2 — The Access Zone (Floor to 36 Inches and 60–72 Inches)
Zone 2 is the band above eye level and below waist height — still accessible but requiring conscious reach. Zone 2 holds the tools used weekly but not daily, plus all accessories and consumables. Accessories — drill bits, saw blades, router bits, sanding discs — belong in Zone 2 in clearly labelled drawers or bins directly adjacent to the tool that uses them. Not in a separate drawer across the bench. Adjacent means within arm’s reach of the tool without moving your feet.
Typical Zone 2 contents: rotary tool, detail sander, random orbit sander (if not a daily driver), heat gun, tile saw (if used occasionally), labelled accessory bins for each tool category, extension cord reel.
Zone 3 — The Archive Zone (Above 72 Inches)
Zone 3 is overhead storage and deep-shelf territory — accessible with effort, appropriate for tools used fewer than 12 times per year. Seasonal tools, specialty tools used on specific project types, and original manufacturer packaging belong in Zone 3. Invest in modular cases (DEWALT TSTAK, Milwaukee PACKOUT, DEWALT ToughSystem) for Zone 3 tools — portable, stackable, and protective during the months of inactivity between uses.
The most important rule of Zone 3: every item must be labelled on its front face. The quickest way to rebuild the search-for-tools problem is storing rarely-used items overhead in unlabelled cases. You forget what is there. You buy duplicates. You search for 15 minutes for something that is 6 feet above your head.
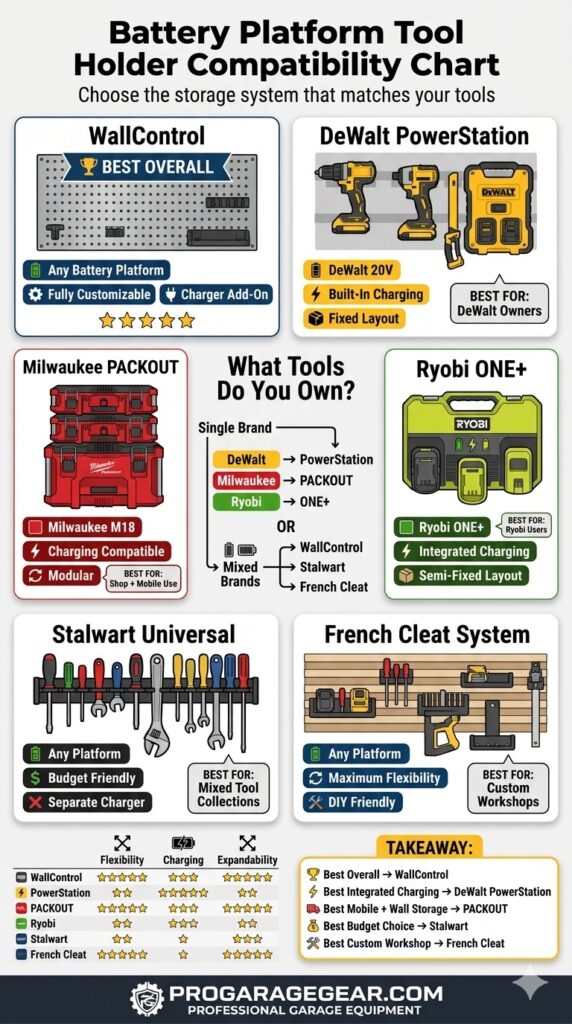
The Four Wall System Options: Which Architecture Suits Your Garage
Once the zone framework is established, the physical wall system that implements it falls into four architectures. Each has legitimate strengths — the correct choice depends on how often your tool inventory changes, whether you prioritise brand-specific holders or universal compatibility, and your budget.
Architecture 1 — French Cleat System
A French cleat is a strip of wood or aluminum cut at a 45-degree angle, mounted horizontally on the wall. Tool holders, bins, shelves, and accessories hang from the cleat by their own 45-degree hook — and can be repositioned anywhere along the cleat without tools or fasteners. The entire wall is reconfigurable in minutes.
Why French cleats are the professional shop standard: Your tool inventory changes. You add tools. You change platforms. You realise the drill holder belongs 12 inches to the left. With a French cleat system, every one of these changes takes 30 seconds. With pegboard: 20 minutes of hole-matching and hook-repositioning. With slatwall: similar effort.
The limitation: French cleat holder quality varies enormously. The wall itself — typically 3/4-inch plywood mounted to studs — requires either existing wall space or a building project to install. The initial setup is the highest-effort of the four architectures.
🛒 Check Price on Amazon — French Cleat Aluminum Wall System Kit →
🛒 Check Price on Amazon — French Cleat Power Tool Holder Set →
Architecture 2 — Brand-Specific Modular Systems
DeWalt, Milwaukee, Ryobi, and Makita all manufacture proprietary wall mounting systems designed around their specific battery platforms and tool dimensions. These systems provide the most precise fit — a DeWalt holder for a DeWalt drill holds it at the exact balance point, charges the battery via the charger station, and releases with one hand. No universal system matches this precision.
The limitation: These systems lock you to a single brand. If you own tools across multiple platforms — a Milwaukee drill and a DeWalt circular saw — brand-specific systems require either splitting the wall between two brand systems or sacrificing the holders for one platform.
Architecture 3 — Slatwall Panel System
Slatwall — the horizontal channel wall panels used in retail fixtures — accepts a wide range of universal accessories and reconfigures almost as easily as French cleats. The panels mount directly to studs and are covered in accessories from dozens of manufacturers. The visual appearance is cleaner than pegboard and more uniform than a French cleat system.
➡️ For the detailed comparison of slatwall versus pegboard including load ratings and long-term durability: Slatwall vs. Pegboard: Why Pegboard Is a Waste of Money for Serious Tool Storage →
Architecture 4 — Modular Case Stack (PACKOUT / ToughSystem)
For the garage that serves as a staging area rather than a fixed workshop — tradespeople who take tools to job sites, homeowners who move tools between locations — modular stacking case systems replace wall mounting entirely. Every tool lives in a case that stacks, travels, and returns to the same position in the garage. Milwaukee PACKOUT and DeWalt ToughSystem are the market leaders; both systems use compatible stacking interfaces across their full product ranges.
2026 Rankings: The Best Power Tool Organizers by Category
🥇 Best Overall System — WallControl 32-Inch Metal Pegboard Kit with Power Tool Holders
Why it earns the top position: WallControl builds their panels from 16-gauge steel — not the 26-gauge aluminum that most pegboard competitors use. The difference is immediately apparent when you hang a loaded drill holder: WallControl’s panels do not flex, deflect, or rattle under dynamic load. The 32-inch-wide kit includes brackets that mount directly to wall studs without requiring a backing board, and WallControl’s hook and holder range covers every common power tool format.
The Data
- Panel material: 16-gauge cold-rolled steel
- Panel dimensions: 32 inches × 16 inches per panel (kits combine multiple panels)
- Weight capacity: 50 lbs. per panel — handles any power tool without deflection
- Mounting: Direct to studs with included hardware — no backing board needed
- Compatibility: Universal — works with all WallControl accessories plus standard 1/4-inch pegboard hooks
- Finish: Powder-coat in red, white, grey, or galvanised
The honest limitation: WallControl’s proprietary hook system is more expensive than standard pegboard hooks — but does not fall out when you remove a tool, which is the fundamental failure of standard pegboard in a workshop context. The higher hook cost is justified by the elimination of the single most frustrating aspect of any pegboard system.
🛒 Check Price on Amazon — WallControl 16-Gauge Steel Pegboard Kit →
🥈 Best for DeWalt Platform — DeWalt DWST82722 PowerStation Wall System
Why it earns #2: The DeWalt PowerStation mounts eight DeWalt 20V MAX or FLEXVOLT tools at their optimal balance points, with integrated charger outlets so that returning a tool to its position charges its battery immediately. The system is designed specifically for the DeWalt battery ecosystem — the tool holders are shaped for DeWalt’s grip geometry, and the battery contact points align without any manual positioning.
The Data
- Tool capacity: 8 tools simultaneously
- Battery charging: 4 charging positions (2× dual-port chargers included)
- Mounting: Two standard studs, 16-inch on-centre — the most common residential stud spacing
- Compatibility: All DeWalt 20V MAX and FLEXVOLT tools with standard belt clip or hanger hook
- Power requirement: 120V outlet within cord reach of mounting location
The workflow change this enables: You finish a project. You return every tool to its holder. Every battery begins charging. You return the next morning to eight fully charged tools. The system enforces the “always charged” principle by making charging the default state — not something you have to remember to do separately.
The honest limitation: DeWalt-specific. Non-DeWalt tools have no home in this system.
🛒 Check Price on Amazon — DeWalt PowerStation Wall Tool Organizer →
🥉 Best for Milwaukee Platform — Milwaukee PACKOUT Tool Station
Why it earns #3: The Milwaukee PACKOUT system deserves its own category: it bridges Zone 1 (wall storage) and Zone 3 (portable case system) seamlessly. PACKOUT cases stack to the wall bracket, the tools are stored in cases with form-fit foam inserts, the cases detach from the wall for job site transport, and they return to exactly the same wall position. No other system in the residential market offers this portable-to-permanent transition.
The Data
- System: IP65-rated modular cases with interlocking stack system
- Wall bracket: PACKOUT Wall Mount Plate holds cases at fixed wall position
- Case options: Small, medium, large, deep, drawer unit, cooler, organizer tray
- Stack interface: All PACKOUT sizes connect to the same locking rail system
- Load rating: 250 lbs. stack capacity
Who this system is for: Any Milwaukee tool owner who uses their garage as a home base but takes tools to job sites, second properties, or project locations. The PACKOUT wall mount makes the garage a docking station — tools arrive, dock to the wall, charge, and redeploy when needed.🛒 Check Price on Amazon — Milwaukee PACKOUT Wall Mount Plate →
🛒 Check Price on Amazon — Milwaukee PACKOUT Modular Cases →
⭐ Best Universal Charging Station — Melko Wall-Mount Multi-Tool Charging Station
For multi-platform tool collections — mixed DeWalt, Milwaukee, and Ryobi, or any combination — a universal charging station that accommodates any charger via standard outlet positions is the correct solution. The Melko and comparable systems provide individual outlet positions for each charger, cable management to prevent the cord tangle that inevitably develops with multiple chargers on a single shelf, and a mounting system that keeps the entire charging zone consolidated in Zone 1.
The Data
- Outlets: 6–8 individual outlets with surge protection
- Mount: Direct wall mount or pegboard compatible
- Cable management: Integrated cable routing prevents cord tangle between chargers
- Compatibility: Any 120V charger from any manufacturer
- Surge protection: 900–1,200 joule surge rating
🛒 Check Price on Amazon — Wall-Mount Multi-Tool Charging Station →
⭐ Best Budget Universal Holder — Stalwart Vertical Power Tool Holder Set
For the owner building their organization system incrementally, the Stalwart vertical tool holder set provides the Zone 1 framework without a full wall system investment. Individual holders — each accommodating a specific tool type by grip diameter — mount to existing pegboard, slatwall, or directly to wall studs. A set of six covers every daily-driver tool category at a price that allows the system to be expanded as tool inventory grows.
🛒 Check Price on Amazon — Stalwart Vertical Power Tool Holder Set →
⭐ Best for Ryobi — Ryobi One+ Tool Wall Organizer
Ryobi’s ONE+ wall organizer uses their proprietary mounting interface — the same attachment point used on Ryobi job site accessories — to create a cohesive storage wall for the ONE+ battery ecosystem. Like the DeWalt PowerStation, it integrates charging directly into the wall mount, keeps all 18V batteries topped up at their storage positions, and accommodates the full range of ONE+ tools via uniform attachment points. The price point matches Ryobi’s platform positioning — the most accessible entry into branded tool storage.
🛒 Check Price on Amazon — Ryobi ONE+ Wall Tool Organizer →
Complete Power Tool Organizer Comparison Table
| System | Best For | Platform | Charging Integrated? | Reconfigurable? | Amazon |
|---|---|---|---|---|---|
| WallControl Steel Pegboard | Universal — best overall wall panel | Any | Add-on only | ✅ Full | Shop → |
| DeWalt PowerStation | DeWalt 20V/FLEXVOLT owners | DeWalt | ✅ Native | Limited | Shop → |
| Milwaukee PACKOUT | Mobile + wall storage hybrid | Milwaukee | ✅ Via cases | ✅ Full | Shop → |
| Ryobi ONE+ Organizer | Ryobi ONE+ platform owners | Ryobi | ✅ Native | Limited | Shop → |
| Stalwart Universal Holders | Budget start / mixed platforms | Any | ❌ Separate | ✅ Full | Shop → |
| French Cleat System | Max flexibility / custom layout | Any | Add-on | ✅ Maximum | Shop → |
The Charging Safety Setup: The Section Most Tool Storage Guides Skip
Lithium-ion battery fires in residential settings have increased sharply as cordless tool inventories have grown. The National Fire Protection Association’s data shows that the risk is highest during charging — not during use — because thermal runaway can begin hours into a charge cycle when the owner is no longer present in the space.
A well-designed Zone 1 charging setup addresses four specific risk factors that a “chargers on a shelf” configuration ignores:
Risk Factor 1 — Battery Spacing
Maintain a minimum 6-inch separation between actively charging batteries. A wall-mounted charging station with dedicated outlet positions per charger naturally enforces this spacing. A shelf with multiple chargers plugged into a single power strip does not.
Risk Factor 1.5 — Sustained Charging Load: The Circuit Overload Most Charging Stations Create
Here is the electrical reality that most tool wall guides miss entirely: a well-organised charging station with six chargers is also a potential circuit overload waiting to happen — and the risk is not from a brief startup surge but from the sustained simultaneous current draw of multiple fast chargers running continuously through the night.
The charger amperage audit — do this before plugging in your charging station:
Every battery charger has an input amperage specification printed on its nameplate label — the small sticker on the charger body or base that lists Input/Output voltage and current. Find the “Input:” line and note the amperage value. This is what the charger draws from your wall circuit.
| Common Charger | Input Amperage (120V) | Notes |
|---|---|---|
| DeWalt DCB115 (standard charger) | 4.0A | Most common DeWalt charger |
| DeWalt DCB118 (fast charger) | 8.0A | High-speed — draws twice as much |
| Milwaukee M18 48-59-1808 (8-port) | 7.0A total | 8 batteries on one charger |
| Milwaukee 48-59-1201 (standard) | 3.5A | Standard M18 charger |
| Ryobi PCG002B (standard 18V) | 2.0A | Low draw |
| EGO CHX5500 (rapid charger) | 9.0A | High draw — check circuit separately |
The calculation: Add up the input amperage of every charger you plan to run simultaneously on your charging station circuit. Then apply the NEC 80% continuous load rule — your total charger load must not exceed 80% of the circuit’s breaker rating.
Safe load ceiling by circuit:
15A circuit → 12A maximum charger load
20A circuit → 16A maximum charger load
20A dedicated circuit (nothing else sharing it) → 16A maximum
A real-world scenario that fails: Three DeWalt DCB115 chargers (4.0A each = 12A) + one DeWalt DCB118 fast charger (8.0A) = 20A combined. On a 20A circuit shared with a garage mini-fridge (6A): 26A total. The 20A breaker trips. The charging station turns off at midnight. You wake up to four uncharged tools.
A real-world scenario that passes: Four DeWalt DCB115 chargers (4.0A × 4 = 16A) on a dedicated 20A circuit with nothing else on that breaker. Total load: 16A = exactly 80% of the 20A circuit rating. This is the maximum you can safely run on a single dedicated 20A circuit.
The solution when your charger load exceeds your circuit capacity:
- Option 1 — Stagger your charging: Use a smart plug with a timer on each charger to stagger their start times by 15–20 minutes. The circuit never sees full simultaneous load from all chargers at once. Cost: $15–$25 per smart plug.
- Option 2 — Split across two circuits: Run half your chargers from the Zone 1 dedicated outlet and the other half from a second outlet on a different circuit. Requires mapping your circuits to confirm they are genuinely on separate breakers.
- Option 3 — Replace fast chargers with standard chargers for storage charging: Fast chargers draw 2–4× the amperage of standard chargers. If you are charging overnight, there is no benefit to fast charging — a standard charger completes a full charge cycle in 6–8 hours and draws a fraction of the amperage. Keep the fast charger for urgent job-site top-ups; use standard chargers for the overnight wall system.
🛒 Check Price on Amazon — Kasa Smart Plug with Timer + Energy Monitor →
➡️ For the complete garage circuit identification method and dedicated outlet installation guidance: The 8-Point Garage Electrical Audit: Circuit Identification and Amperage Mapping →
Risk Factor 2 — Proximity to Combustibles
Do not charge batteries directly above or below wood, cardboard, paper, or fabric. The Zone 1 charging position on a metal panel wall (WallControl steel pegboard) with a clear floor below the charging station is the safest residential configuration. Do not charge on a wooden shelf above the workbench. Do not charge inside enclosed wooden cabinets.
Risk Factor 3 — Charging Damaged Batteries
A battery with any of the following should never be charged and should be immediately recycled at a participating retailer: visible dents or cracks in the casing, swelling (the pack appears larger than it did when new), unusual heat during discharge (significantly warmer than the tool), or any history of water immersion. These are pre-failure indicators. A structurally compromised lithium-ion cell charging in your garage is a genuine fire risk.
Risk Factor 4 — Detection and Suppression
A rate-of-rise heat detector — not a standard smoke detector — is the correct detection device for a lithium-ion charging area. Smoke detectors respond to combustion products; a thermal runaway event in a sealed battery pack may not produce sufficient smoke to trigger a smoke detector before reaching critical temperatures. A rate-of-rise heat detector triggers on temperature change velocity rather than smoke presence.🛒 Check Price on Amazon — Rate-of-Rise Heat Detector (Garage Mount) →🛒 Check Price on Amazon — Lithium Battery Fire Suppression Blanket →
➡️ For complete garage fire safety setup including extinguisher class and placement: Best Garage Fire Extinguishers 2026: Class Ratings and Li-ion Battery Suppression →
The Labelling System That Makes Every Other Element Work
Organization without labelling is organization that degrades over time. Within six months of installing the cleanest tool wall in your neighbourhood, the reciprocating saw is back in a bucket and the impact driver is under the bench — because without persistent visual cues enforcing where each tool belongs, entropy wins.
A labelling system for a power tool wall serves a different function than labelling on storage bins. Tool holders are position labels — they tell you what is missing when you look at the wall, not just what is present. The correct protocol:
- Label the holder, not just the tool. A label on the tool tells you what it is when you have it in your hand. A label on the holder tells you what is missing when the tool is not there. Both are necessary; the holder label is more valuable.
- Label at the battery charger position. Every charging port should be labelled with the tool whose battery charges there. A charger position without a battery present immediately tells you that tool is out of the garage or in use.
- Label accessory bins by tool name, not accessory type. “Router Bits” belongs to the router holder. “Circular Saw Blades” belongs adjacent to the saw. The accessory bin is part of the tool’s Zone 1 footprint, not a separate category system.
The Adjacency Accessory System: What to Mount Next to Each Tool
The labelling section introduced the principle that accessories belong adjacent to the tool that uses them, not in category-organised drawers. Here is the specific adjacency map for the most common tool wall configurations — the exact accessories that mount directly next to each tool holder to complete each tool’s Zone 1 footprint:
| Tool (Zone 1) | Adjacent Accessory (Zone 1) | Holder Type | Amazon |
|---|---|---|---|
| Drill / Driver | Magnetic bit holder strip (30+ bits organised by type) | Wall-mount bit organizer | Shop → |
| Circular Saw | Wall-mount saw blade rack (stores 4–8 blades vertically) | Vertical blade organizer | Shop → |
| Router | Router bit carousel or wall-mount insert holder | Rotating bit holder | Shop → |
| Jigsaw | Jigsaw blade dispenser (blades stored tip-down in slots) | Blade dispenser strip | Shop → |
| Oscillating Multi-Tool | Multi-tool accessory kit in wall-mount pouch | Wall-mount tool pouch | Shop → |
| Impact Driver | Socket organizer rail (1/4″ drive sockets visible) | Socket rail holder | Shop → |
🛒 Check Price on Amazon — Magnetic Bit Holder Strip (Wall Mount) →
🛒 Check Price on Amazon — Wall-Mount Saw Blade Organizer Rack →
🛒 Check Price on Amazon — Router Bit Wall-Mount Carousel →
The “Pro Installation” precision kit for Step 2 (wall mapping):
🛒 Check Price on Amazon — Franklin ProSensor 710 Stud Finder →
🛒 Check Price on Amazon — Self-Leveling Laser Level (Wall Panel Alignment) →
🛒 Check Price on Amazon — DYMO LabelManager 280 Label Maker →
➡️ For a complete budget-first approach to garage organisation including label strategy: 12 Garage Organisation Upgrades Under $50: The Label Maker Is Always First →
Building Your Tool Wall: The Recommended Installation Sequence
Most tool wall projects fail to deliver their full potential because they start with the wall hardware and work backward — the wall is installed, then you try to fit your existing tools around it. The correct sequence works forward from your tools to the wall design.
Step 1 — Inventory and Categorise (30 Minutes)
Lay every power tool you own on the garage floor. Assign each tool to Zone 1, Zone 2, or Zone 3 based on honest use frequency. Count Zone 1 tools — this determines the minimum width of your charging station. Count Zone 2 tools — this sets the wall depth requirement. Take a photograph for reference.
Step 2 — Map the Wall (15 Minutes)
Identify the wall section available for tool storage. Locate studs (stud finder required). Measure the width and height. Sketch the three zones at their correct heights on the wall with a pencil. Mark stud positions. This is your installation blueprint — no measuring during installation, only during planning.
🛒 Check Price on Amazon — Franklin ProSensor 710 Stud Finder →
Step 2.5 — The Plywood Backing Decision (Critical for Unfinished Garages)
Before your wall system goes up, answer this question: what is behind the surface you are mounting to? The answer determines whether you need a plywood backing layer — the single most overlooked step in garage tool wall installations and the one that separates a system that performs well for 10 years from one that develops problems within 18 months.
The Three Garage Wall Conditions
Condition 1 — Finished drywall wall:
Standard residential drywall over insulated stud bays. Mount your WallControl panels or French cleat directly to studs through the drywall. No backing needed. This is the ideal mounting surface and requires no additional preparation beyond stud location.
Condition 2 — Unfinished stud wall with exposed insulation:
Bare studs with fiberglass batts or spray foam between them — common in detached garages, additions, and older structures where interior finishing was deferred. This condition requires a plywood backing layer before any wall system is mounted.
Why unfinished walls need backing:
- WallControl panels and French cleats mounted directly to studs create open gaps between the panels and the insulation behind them. Sharp accessories — router bits, chisels, drill bits — stored in holders near these gaps can contact exposed fiberglass insulation. Glass fibre particles released from disturbed insulation are a respiratory and skin hazard.
- Without backing, you can only mount hardware at stud positions (every 16 or 24 inches). This limits holder placement to stud intervals rather than where your specific tools actually need to be positioned.
- Bare studs and insulation behind your tool wall create an environment that collects sawdust in the wall cavity — a fire risk that accumulates invisibly behind the panel system over years of use.
Condition 3 — OSB or plywood sheathing:
Some garage walls — particularly detached garages with exterior sheathing visible from inside — have OSB or plywood as the interior face. These walls can accept direct mounting without additional backing, provided the sheathing is at least 1/2-inch thick and fasteners are still driven into studs for heavy loads.
The Plywood Backing Installation Method
For unfinished stud walls: install one continuous sheet of 3/4-inch ACX plywood (the “A” face outward — smooth, sanded, ready for paint or direct mounting) across the full planned width of your tool wall zone.
Why 3/4-inch ACX specifically:
- 3/4-inch thickness: Provides sufficient substrate for lag screws, through-bolts, and heavy tool holder fasteners without backing through to the wall cavity. Thinner plywood (1/2-inch) deflects under concentrated tool holder loads.
- ACX grade: The “A” face is sanded smooth and knot-free — it accepts paint, labels, and wall panel adhesive cleanly. The “C” face against the studs tolerates the rough contact surface. “X” indicates exterior-grade glue — appropriate for the temperature cycling and humidity variations of a garage environment.
- Sealed edges and faces: Apply one coat of interior latex paint or clear sealer to all exposed plywood edges and the front face before mounting any hardware. This seals the wood against moisture absorption from garage humidity cycles.
Installation sequence for plywood backing:
- Cut the plywood sheet to the exact width of your planned tool wall zone. A standard 4×8 sheet covers a 48-inch × 96-inch wall section — two sheets cover a full 8-foot wall run side by side.
- Position the sheet over the stud bay and mark stud positions on the front face.
- Drive 3-inch wood screws through the plywood and into each stud at 12-inch vertical intervals. Minimum three screws per stud for a load-bearing tool wall application.
- Apply paint or sealer before mounting wall panels.
- Mount WallControl, French cleats, or slatwall directly to the plywood face — fasteners can now be positioned anywhere on the panel, not only at stud locations.
The additional benefit most builders do not anticipate: The 3/4-inch plywood layer adds structural rigidity to the entire wall section. A WallControl panel mounted to plywood-over-studs does not flex, transmit vibration to the wall cavity, or develop rattle under dynamic tool use. The system feels and sounds substantially more solid than panel-to-stud mounting — the difference is immediately perceptible the first time you replace a tool in its holder.
🛒 Check Price on Amazon — 3/4″ ACX Sanded Plywood (4×8 Sheet) →
🛒 Check Price on Amazon — Exterior Latex Primer (Plywood Sealer) →
Step 3 — Install the Electrical Infrastructure First
Before any wall panel goes up — install the outlet that will power your charging station. A single 20A outlet at Zone 1 height (approximately 50 inches from the floor) positioned at the centre of your planned tool wall provides the power point for the charging station without any cord management challenge. Installing this outlet after the wall panels are up requires working around them.
➡️ For electrical requirements and GFCI considerations for workshop outlets: Garage Electrical Audit: Is Your Wiring Ready for Power Tools? →
Step 4 — Mount Wall Panels to Studs
Install your chosen wall system (WallControl, French cleat, or slatwall) directly to the studs you mapped in Step 2. Do not use drywall anchors for any part of the tool wall — tools generate dynamic load when removed and returned to holders. Every fastener must be into a stud.
Step 5 — Install Holders and Charge Station Before Any Tools
Install every holder and the charging station before placing any tool. Verify the charging station outlet cord reaches the wall outlet without extension cords. Verify every holder is at the correct Zone 1 height for your working stance — standing in front of the wall, your dominant hand at shoulder height for the most frequently grabbed tool.
Step 6 — Return Tools to Their Positions and Label
Return every Zone 1 tool to its holder. Connect every charger to the charging station. Begin charging all batteries simultaneously for the first “full reload.” Apply holder labels and charger position labels. Take a photograph — this is your reference for what a correctly loaded wall looks like when you return home and notice something is missing.
Step 7 — The 30-Day Review
After 30 days of use, evaluate which holders you reached for most and which tools drifted off the wall. Any tool that consistently does not return to its holder either needs to move to Zone 2 (it is not a daily driver) or its holder position needs to move to a more convenient location. The 30-day review is where the zone system gets calibrated to your actual behaviour, not your assumed behaviour.
The Workbench Connection: How Tool Storage and Workbench Setup Work Together
The tool wall and the workbench form a system. A well-designed tool wall positions Zone 1 tools within arm’s reach from the workbench standing position — so that reaching for any tool does not require moving your feet away from the work in progress. This is the Workshop Triangle concept: workbench face, tool wall, and material storage (lumber rack, bin shelf) forming a triangle that minimises movement between the three most-used points in the shop.
The practical implication: mount your tool wall on the wall directly behind or perpendicular to your workbench, not on the opposite wall. The opposite wall position — which feels like it keeps the bench clear — means walking 8–12 feet every time you pick up or return a tool. Over a four-hour project session with 40–60 tool exchanges, that is 320–720 feet of unnecessary walking.
➡️ For workbench selection and the bench-to-wall relationship in a workshop layout: Best Adjustable Garage Workbenches 2026: Shake Test Results and Workshop Layout →
Budget Tiers: Building the System in Phases
Phase 1 — $75 to $150 (This Weekend)
- WallControl starter panel (32″ × 16″): $45–$65
- 6-piece Stalwart universal tool holder set: $25–$40
- DYMO label maker: $25–$35
- Multi-outlet surge protector (wall mount, for chargers): $20–$35
What this delivers: Zone 1 framework for 4–6 tools, integrated charger position, basic labelling. The foundation that all future additions build on.
Phase 2 — $200 to $400 (Over 30 Days)
- Expand WallControl panels to cover 64″–96″ of wall width
- Add brand-specific holders for your primary platform
- Install a dedicated 20A outlet for the charging station (electrician)
- Add rate-of-rise heat detector above charging zone
What this delivers: A fully functional Zone 1 system with proper electrical infrastructure, all primary tools charged and organised, safety detection in place.
Phase 3 — $400 to $800 (Complete System)
- Full brand platform system (DeWalt PowerStation, Milwaukee PACKOUT, or Ryobi ONE+)
- Zone 2 slatwall or French cleat expansion for secondary tools
- Overhead Zone 3 case storage (DeWalt ToughSystem or PACKOUT)
- Pegboard accessories for all tool-specific add-ons
What this delivers: A professional-quality, fully zoned tool organisation system that protects the full value of your cordless tool investment and eliminates the search-and-charge cycle permanently.
Frequently Asked Questions
Can I mix different battery platform tools on the same wall?
Yes — and this is the most common real-world configuration, which is why WallControl steel pegboard with universal holders earns the top ranking. Brand-specific systems are more elegant when your entire collection is on one platform, but they create an unresolvable gap for tools outside that brand. A universal system with individual chargers for each platform on a shared charging station handles mixed collections without compromise. The only thing you lose is the platform-specific charge integration — you need to manually connect each charger rather than having it built into the holder mount.
How do I stop my tool holders from vibrating loose on the wall over time?
This is almost always a mounting issue rather than a product issue. Holders vibrate loose when they are mounted to drywall with anchors rather than directly into studs. Every power tool holder that carries dynamic load — meaning you grab and return the tool by hand with some force — must be fastened to studs. Additionally, WallControl’s locking hook design (the hooks lock into their panel position rather than sitting in open holes) eliminates the primary failure mode of standard pegboard, which is hooks pulling forward out of holes under dynamic load.
Should I charge batteries to 100% or keep them at 80% for storage?
For batteries in daily or weekly use: charge to 100% — the convenience of always-ready tools outweighs the marginal cell stress of full charge cycles. For batteries that will sit unused for more than 30 days (seasonal tools, rarely-used equipment): store at 40–60% charge — this is the storage-optimal state for lithium-ion chemistry that minimises self-discharge-related capacity loss over time. Most modern battery management systems include a storage mode accessible via the charger or the manufacturer’s app.
What is the best way to organise accessories (bits, blades, sandpaper) alongside the tools?
The principle is adjacency not category. Drill bits belong next to the drill — in a wall-mount holder directly adjacent to the drill’s Zone 1 position, not in a separate “drill bits” drawer across the bench. Router bits belong next to the router. Circular saw blades belong next to the saw. Organising by accessory category (all cutting accessories together, all fasteners together) requires you to look in two places every time you need a tool and its accessory. Organising by tool ownership means one hand gesture gets you both.
How much wall space does a complete tool organisation system require?
For a typical serious DIYer with 8–12 Zone 1 tools: plan for 72–96 inches (6–8 feet) of wall width at Zone 1 height, plus 48–60 inches of Zone 2 space below and adjacent. This is a single 8-foot wall section — the most common available wall run in a standard 2-car garage. If wall space is genuinely limited, the Milwaukee PACKOUT’s vertical case stacking format offers the best density — a 2-foot-wide × 6-foot-tall PACKOUT stack can hold as many tools as 6 feet of flat wall-mounted system, at the cost of case-lid access rather than direct-grab access.
Is pegboard or slatwall better for power tools?
Neither standard pegboard nor standard slatwall is specifically designed for the load requirements of power tools. The answer depends on the product quality: standard 1/8-inch pegboard with standard S-hooks is inadequate for power tool storage under regular use. WallControl’s 16-gauge steel pegboard is excellent. Standard slatwall with proper load-rated hooks is adequate. See our full comparison for specific load ratings and long-term durability data: ➡️ Slatwall vs. Pegboard: The Honest Comparison for Workshop Use →
The Bottom Line
The 3-Zone system is not a product — it is a principle. And the principle is this: your most frequently used tools should be the easiest to access and the hardest to leave uncharged. The wall system that implements that principle — WallControl steel pegboard for universal collections, DeWalt PowerStation for DeWalt owners, Milwaukee PACKOUT for mobile-plus-wall users — is a secondary decision. The zone framework is the decision that actually changes how your garage works.
Start with Zone 1. Install the five or six tools you use every week, with their charging infrastructure integrated. Label every position. Do that this weekend. Zone 2 and Zone 3 can follow over the next month as time and budget allow.
The $2,400 pile on the floor becomes a $2,400 system on the wall. Same tools. Different outcome every time you walk into the garage.
Affiliate Disclosure: Pro Garage Gear earns from qualifying Amazon purchases at no extra cost to you. Product specifications verified at time of publication. Always follow manufacturer safety guidelines for lithium-ion battery charging and sto