
The Untold Truth About Hexagon Garage Lights: 2026 Buyer’s Guide, Real Costs & Installation Facts
By Pro Garage Gear Team | August 2026
This post contains affiliate links. We may earn a commission if you purchase through these links
The “Instagram Trap”: You’ve seen the viral videos. A garage door opens, revealing a sleek, glowing honeycomb ceiling that looks like a scene from Tron. You want it. But before you drop $300 and drill 60 holes in your drywall, you need to know the difference between a “Lighting Upgrade” and a “Fire Hazard.”
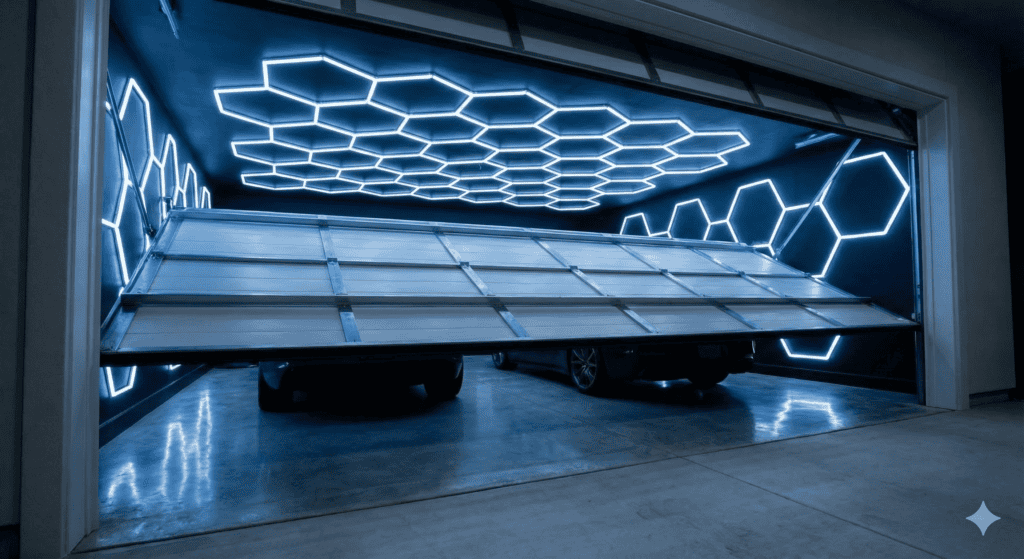
Most blog posts will tell you these lights are “cool” and send you to a generic Amazon link. We aren’t going to do that.
We are going to talk about CRI (Color Rendering Index), Radio Frequency Interference, and Voltage Drop—the three things that actually determine if your new lights will help you detail your car or just give you a headache.
What are the differences between the various hexagon garage lights?
If you are ready to build a showroom-level garage, this is the only guide you need.
🏆 The “Cheatsheet” Comparison Table
If you are in a rush, here is how the top contenders stack up. Pay attention to the CRI column—this is the most important spec for car enthusiasts.
| Feature | Hexagon Garage (Official) | Gonengo (Best Seller) | Litezone (Small Garage) | HYPERLITE Gen II (Daily Use) | Generic AliExpress/eBay |
|---|---|---|---|---|---|
| Best For | Pro Detailers & Showrooms | DIY Homeowners | Single-car garages | Daily-use shops | Risk Takers |
| CRI Rating | >90 | >80 | ~80 | ~80 | <70 |
| Panel Count | Full grid, custom | Full grid | 5-grid | 5-grid | Varies |
| Wattage | High (full grid) | Moderate | ~168W | ~168W | Unrated |
| Housing | Aluminum | PVC/Plastic | Plastic | Reinforced plastic | Thin plastic |
| Warranty | 5 Years | 2 Years | 1-2 Years | 2 Years | “Good Luck” |
| Price | $$$ | $$ | $$ | $$ | $ |
The Science: Why “CRI” is the Secret Sauce
Most people buy garage lights based on Brightness (Lumens). This is a rookie mistake.
You can have a light that is blindingly bright, but if it has a low CRI (Color Rendering Index), your car paint will look “dead.”
- CRI < 80: Reds look muddy. Blues look grey. You cannot accurately match paint or see the depth of a ceramic coating.
- CRI > 90: This is “High Definition” for your eyes. Red pops. Metallic flakes sparkle.
The Crusher Insight:
Most cheap “Hex Lights” on eBay use low-quality LED chips with a CRI of 70. They are bright, but they make your garage feel like a hospital operating room—sterile and cold.
If you are building a detailing bay, do not settle for anything less than CRI 80. The [Gonengo Kit] hits this sweet spot for the price, while the premium kits push CRI 90+.

The R9 Number the Comparison Table Doesn’t Show
CRI is an average across eight colour samples — and critically, it excludes saturated red, which is reported separately as R9. This matters specifically for automotive work: R9 is the number that determines whether your hexagon grid renders red paint, red wiring, and brake components accurately, or whether they all collapse into a muddy brown-orange under the light.
A fixture can advertise CRI 90+ and still have a poor R9 score, because R9 isn’t part of the CRI average calculation. If you’re specifically choosing a hexagon grid for detailing red or deep-colour vehicles, ask the manufacturer for the R9 spec directly — it’s rarely printed on the box, but it’s the number that actually predicts whether reds look accurate under the grid.
The Glare Problem Nobody Mentions in the Instagram Videos
Here is what the viral installation videos don’t show you: a hexagon grid illuminates a car from directly overhead, at close range, from dozens of individual points across the ceiling. That’s exactly the lighting geometry that produces a dense “spiderweb” reflection pattern across a glossy painted surface.
For showing off a finished car, this reflection pattern looks striking — it’s part of why the format photographs so well for social media. For actually working on the car, it’s a genuine functional problem: the reflection pattern sits on top of the paint surface and visually competes with the swirl marks, scratches, and defects you’re trying to spot. A single, well-placed perimeter light source (see the layout section below) often reveals paint defects more clearly than a dense overhead grid precisely because it doesn’t create competing reflections across the whole panel.
The honest guidance: if your primary use case is showroom presentation — parking the car to look at it, filming content, hosting — a hexagon grid is the right tool and the glare is a feature, not a bug. If your primary use case is actually detailing or mechanical work where you need to see the paint surface clearly, pair the hexagon grid with a secondary lower-angle task light, or consider whether a perimeter-mounted shop light layout serves the work better than the showroom look.
➡️ For the perimeter layout approach and general fixture selection: Best Garage Lighting Ideas 2026: The Perimeter Layout That Banishes Shadows →
🛠️ The Installation “Horror Story” (And How to Avoid It)
Competitors tell you it’s “Plug and Play.” They are lying.
Installing a 16×8 foot grid on a ceiling is a construction project. Here is the reality of what it takes to get that seamless look.
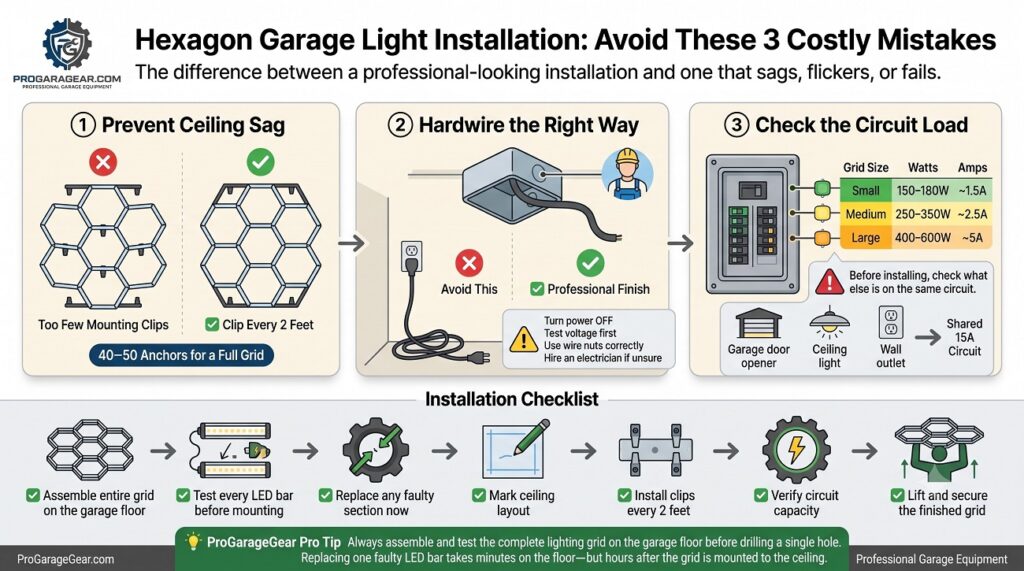
1. The “Sag” Factor
Cheap kits use plastic connectors. Over time, gravity pulls on the long LED tubes. If you only mount the corners, the middle of your hexagon grid will start to sag and bow within 6 months.
- The Fix: You cannot skimp on anchors. You need a mounting clip every 2 feet. Yes, that means drilling roughly 40-50 holes in your ceiling.
2. The “Hardwire” Myth
Most of these kits come with a standard 3-prong plug. But nobody wants an ugly black cord dangling from their ceiling to a wall outlet.
- The Fix: You need to cut the plug off and hardwire it into an existing ceiling junction box (where your old bulb was).
- Warning: If you aren’t comfortable with wire nuts and voltage testers, hire an electrician. A bad neutral connection here can cause the LEDs to strobe.
3. The Number Nobody Checks Before Hardwiring: Amperage
The hardwire instruction above tells you to wire the grid into your existing ceiling junction box. Before you do that, check what else is on that circuit and whether it can actually carry the load.
A full hexagon grid rated at 60,000+ lumens typically draws somewhere between 300 and 600 watts depending on panel count and manufacturer efficiency — a genuinely different load than the single 60-100 watt bulb the junction box previously carried. At 120V, 600 watts draws 5 amps. That sounds trivial against a standard 15-amp circuit — until you account for what else shares that circuit: garage door opener, any outlets on the same run, other lighting.
| Grid Size | Typical Wattage | Amp Draw @ 120V | Safe on a Shared 15A Circuit? |
|---|---|---|---|
| Small (5-panel starter) | 150–180W | ~1.3–1.5A | ✅ Yes, comfortably |
| Medium (10-14 panel) | 250–350W | ~2.1–2.9A | ✅ Yes, if circuit isn’t already loaded |
| Full grid (60,000+ lumens) | 400–600W | ~3.3–5A | ⚠️ Check existing load on that circuit first |
Before hardwiring: identify every other load on the circuit the junction box belongs to — this is usually the same circuit as your garage door opener and possibly other ceiling outlets. Add up the amp draw. If you’re uncertain, this is exactly the kind of check worth having an electrician confirm at the same time they verify your wire-nut connections — the “bad neutral connection causes strobing” warning above is real, and a licensed electrician catches both problems in the same visit.
➡️ For a full circuit-by-circuit garage electrical audit: Garage Electrical Audit 2026: The 8-Point Checklist →
4. The Layout Grid (Use the Floor First)
Do not start mounting on the ceiling. Assemble the entire grid on your garage floor first.
- Why: 1 in 100 LED tubes might be dead on arrival. If you mount it all and then flip the switch to find a dead bar in the center, you will cry. Test it on the floor.
⚠️ The Hidden Problem: Garage Door Interference
Here is something no one talks about.
Cheap LED drivers (the power box that runs the lights) emit RFI (Radio Frequency Interference). This frequency often sits between 300MHz and 400MHz.
- The Problem: Your garage door opener remote also operates at 315MHz or 390MHz.
- The Symptom: You install your cool new lights. You drive home. You click your remote. Nothing happens. The lights are “jamming” the signal.
The Solution:
- Buy Shielded: Higher quality kits (like the ones we recommend) use shielded drivers to prevent leaks.
- Ferrite Cores: If you are installing big lights, make sure you use Ferrite Cores.
Voltage Drop: The Third Thing We Promised to Cover
A full hexagon grid is built from dozens of individual panels daisy-chained together across a run that can stretch 15-20 feet or more from the power source. Every foot of that chain has a small amount of electrical resistance, and voltage drops slightly at each connection point as current travels further from the source.
The practical symptom: panels at the far end of a long chain run measurably dimmer than panels near the power connection — sometimes visibly so on a large grid. This isn’t a defect in any individual panel; it’s basic electrical behaviour that becomes more pronounced the longer the total run and the thinner the internal wiring.
How to minimize it:
- Power the grid from a connection point at or near its centre rather than one corner, so current travels a shorter maximum distance to reach any panel
- For very large grids (14+ panels), consider a second power injection point partway along the run rather than relying on a single connection to carry the full chain
- Higher-quality kits (the aluminum-bodied premium tier below) generally use heavier gauge internal wiring specifically to reduce voltage drop across long runs — this is part of what the price premium buys, beyond just the housing material
If you notice uneven brightness across a large installed grid, voltage drop — not a bad panel — is the most likely explanation before you start troubleshooting individual connectors.
⭐️ Detailed Reviews: The Good, The Bad, & The Ugly
1. The “Smart” Buy: Gonengo Hexagon Grid System
This is the kit that 90% of you should buy. It strikes the perfect balance between “Professional Look” and “DIY Price.”
- The Pros: The connectors are tight. The color temperature is a crisp 6500K (Daylight), which keeps you awake and focused.
- The Cons: It is bright. Too bright for a dinner party, but perfect for working. It is not dimmable out of the box.
- Verdict: If you want the Instagram look for under $200, this is the undisputed king.

2. The “Showroom” Splurge: Hexagon Garage Aluminum Series
If you own a Porsche, don’t put plastic lights above it.
- The Pros: The housing is aluminum, which dissipates heat better than plastic. Heat is the enemy of LEDs; cooler LEDs last 50,000+ hours. The CRI is 90+, meaning your paint will look liquid.
- The Cons: It costs 3x more than the Amazon kits.
- Verdict: Buy once, cry once.

3. The “Small Garage” Right-Size Pick — Litezone 5-Grid Kit
Not every garage needs — or has the ceiling space for — a full 14+ panel installation. The Litezone 5-grid kit is sized specifically for single-car garages and home shops where a full grid would be overkill relative to the space, running at a crisp 6500K daylight temperature that makes surface defects easy to spot.
The Data
- Panel count: 5-grid — sized for smaller footprints
- Colour temperature: 6500K
- Wattage: Approximately 168W — comfortably within the “safe on shared circuit” range in the amperage table above
Who this is for: single-car garages and home shops where a 14-panel grid would be disproportionate to the space — a right-sized alternative to buying a full kit and leaving half of it in the box.
🛒 Check Price on Amazon — Litezone 5-Grid Hexagon Kit →
4. The “Daily Use Shop” Pick — HYPERLITE Gen II 5-Grid
For a grid that runs daily rather than occasionally — a home business, a shop that sees regular customer traffic, or simply heavy personal use — build quality matters more than it does for an occasional-use showroom install. The HYPERLITE Gen II uses a tougher build than most budget kits at a comparable panel count, with connectors that hold alignment better under the thermal cycling of daily on/off use.
The Data
- Panel count: 5-grid
- Wattage / Lumens: 168W, approximately 16,800 lumens
- Colour temperature: 6500K
Who this is for: daily-use spaces — home gyms, small workshops, spaces that see regular foot traffic — where connector durability under repeated use matters more than in an occasional-use showroom.
🛒 Check Price on Amazon — HYPERLITE Gen II 5-Grid Hexagon Kit →
💡 Design Ideas: You Don’t Have to Do a Rectangle
One of the coolest features of these modular systems is the ability to break the mold.
- The “Runway”: Instead of a massive grid, run a single line of hexagons down the center of the car bay.
- The “Wall Wrap”: Run the lights up the wall and onto the ceiling. This creates a “light tunnel” effect that is incredible for side-panel detailing.
Final Verdict: Are They Worth It?
We were skeptical. We thought they were just a TikTok trend.
But after working under them, we can never go back to bulbs.
The elimination of shadows changes how you work. You stop losing 10mm sockets. You spot swirl marks you never knew existed. You feel more energized working in the bright, clean light.
If you are ready to transform your “Dungeon” into a “Studio,” the Hexagon Light is the single most impactful visual upgrade you can make.
Just remember: Buy extra drywall anchors. You’re going to need them.
Shop the Gonengo Kit on Amazon
Once you have the lights installed, use our checklist to keep the floor clean…
The perfect companion to your new lighting is a pro wash bay…
Frequently Asked Questions
How many amps does a full hexagon grid draw?
A full grid rated at 60,000+ lumens typically draws 3-5 amps at 120V, depending on panel count and manufacturer efficiency. Smaller 5-panel starter kits draw closer to 1.3-1.5 amps. Before hardwiring any size grid into an existing junction box, check what else shares that circuit — see the amperage table above.
Do hexagon lights interfere with my garage door remote?
Budget kits with unshielded LED drivers can, because the driver’s electrical noise falls in a frequency range close to common garage remote frequencies (315MHz or 390MHz). Higher-quality kits with shielded drivers avoid this. If you’ve already installed a budget kit and lost remote range, a $5 ferrite core snapped onto the power cord resolves most cases — see the Interference section above.
Q: Why is one side of my hexagon grid dimmer than the other?
This is almost always voltage drop, not a defective panel — see the Voltage Drop section above. It happens on long daisy-chained runs where panels furthest from the power connection receive slightly less voltage. Powering the grid from a central point rather than one end, or adding a second power injection point on very large grids, resolves it.
Can I install a hexagon grid myself, or do I need an electrician?
The physical mounting (clips, anchors, panel assembly) is entirely DIY-friendly. The electrical connection is where the line is: if you’re hardwiring into an existing junction box and comfortable with wire nuts and a voltage tester, it’s within reach for an experienced DIYer. If you’re not confident testing for a bad neutral connection or checking existing circuit load, hire an electrician for that step specifically — the mounting and the wiring are separable tasks, and there’s no shame in DIYing the first and hiring out the second.
Q: Is a hexagon grid actually good for working on a car, or just for showing it off?
Both, with a caveat — see the Glare Problem section above. The shadow elimination is genuinely useful for spotting dropped tools and general visibility. For fine paint work specifically, the dense overhead reflection pattern a full grid creates can compete with the swirl marks you’re trying to see, and a perimeter-style layout sometimes reveals defects more clearly. Many serious detailers run both: a hexagon grid for ambient/showroom light and a separate lower-angle task light for actual paint inspec