
How to Build a Garage Gym in 2026: Equipment, Flooring, Climate & Layout Guide
This post contains affiliate links. We may earn a commission if you purchase through these links.
The “January Parking Lot” Scenario: It’s 5:45 pm in January. You’re circling your commercial gym’s parking lot for the fourth time. Every treadmill is occupied. There’s a 20-minute wait for the squat rack. The person on the cable machine has been texting for 12 minutes between sets. You drive home having wasted 40 minutes and worked out for exactly zero of them.
Now imagine walking 30 feet from your kitchen into your own garage, starting your set immediately, controlling the temperature, playing your music at whatever volume you want, and never waiting for anything — ever again.
The average gym membership costs $58/month, or $696/year. A solid foundational garage gym can be built for $1,500–$3,000, paid off in 2–4 years, and used for decades. The math is obvious. The question is how to do it right — because a poorly planned garage gym becomes a room of expensive equipment you shuffle around to park your car.
This is the complete blueprint on how to build a garage gym.
🏋️ Garage Gym ROI & Payback Calculator
Enter your current gym costs and planned build budget to see exactly when your garage gym pays for itself — and how much it saves over 10 years.
* Assumes gym membership grows at your selected annual rate. Garage costs are build budget + annual maintenance. Does not account for equipment resale value or home value increase. Individual results vary.
Phase 1: Plan Your Space Before You Buy Anything
The Minimum Footprint Reality Check
Most people dramatically underestimate the space workout equipment requires — not just to sit in, but to use safely.
Standard garage sizes and what fits:
| Garage Size | Available Space (after car) | Realistic Gym Capacity |
|---|---|---|
| 1-car (10×20 ft.) | ~100 sq. ft. | Power rack + weights + small cardio |
| 2-car (20×20 ft.) | ~200 sq. ft. | Full home gym with dedicated cardio zone |
| 2.5-car (24×24 ft.) | ~350 sq. ft. | Professional-level setup, multiple stations |
Movement clearance rules:
- Power rack: Minimum 6 ft. in front and behind (for barbell loading/spotter walking)
- Treadmill: Minimum 3 ft. behind for safety dismount
- Deadlift/Olympic lifting area: 8×8 ft. minimum (barbell is 7 ft. long; add clearance on both sides)
- Pull-up / dip station: Minimum 7 ft. ceiling height for pull-ups with full overhead arm extension
The critical mistake: Measuring the floor space and buying equipment based on footprint, ignoring the movement radius. A 4×4 ft. squat rack footprint requires 8×10 ft. of usable floor space.
How to Plan Your Layout
- Draw your garage to scale on grid paper (each square = 1 ft.)
- Mark your parking zones, doors, and fixed features (water heater, door opener rail, electrical panel)
- Identify the “flex zone” — the area you can work with
- Place equipment on paper before buying anything
Pro tip: Tape the footprint of planned equipment on your floor with painter’s tape before purchasing. Live with the layout for a week. You’ll immediately discover conflicts you didn’t see on paper.
Before designing your layout, make sure your garage floor can handle the impact of Olympic lifting and dropped weights. Our Best Garage Flooring 2026 guide covers the options that hold up to gym use.
Phase 2: Flooring — The Foundation of Everything
This is the single most important decision in a garage gym build, and the one most beginners skip or underspend on.
Why Standard Garage Flooring Fails for Gyms
Bare concrete is dangerous — sweat makes it slippery, dropped weights cause spalling (concrete chipping), and hard surfaces transfer full impact to joints. Epoxy-coated floors look beautiful but crack and chip when weights are dropped repeatedly.
You need rubber flooring. Specifically:
3/4″ Thick Rubber Stall Mats (Horse Stall Mats): The best value in garage gym flooring. Available at farm supply stores (Tractor Supply, Rural King) for $40–$55 per 4×6 ft. mat. At 3/4″ thick, they protect concrete from weight drops, provide traction during heavy lifts, and last 20+ years. The downside: they’re heavy (100 lbs. per mat) and smell like rubber for several weeks.
Purpose-Built Gym Tile (3/8″ interlocking rubber): Better looking, easier to install, easier to replace individual tiles if damaged. More expensive than stall mats, but appropriate for areas where you won’t be dropping barbells (cardio zone, stretching area).
The Two-Zone Floor Strategy:
- Heavy lifting zone (under the rack, deadlift area): 3/4″ stall mats — these absorb heavy weight drops
- Cardio and mobility zone (treadmill, stretching): 3/8″ interlocking tiles — easier on joints, easier to clean
🔬 The Concrete Level Test: Is Your Slab Ready for a Power Rack?
A power rack sitting on unlevel concrete doesn’t just wobble — it creates dangerous asymmetric loading on the uprights, causes bar path deviation in heavy squats and bench presses, and stresses the rack’s base welds over time. Before you anchor your rack, perform this 3-minute test.
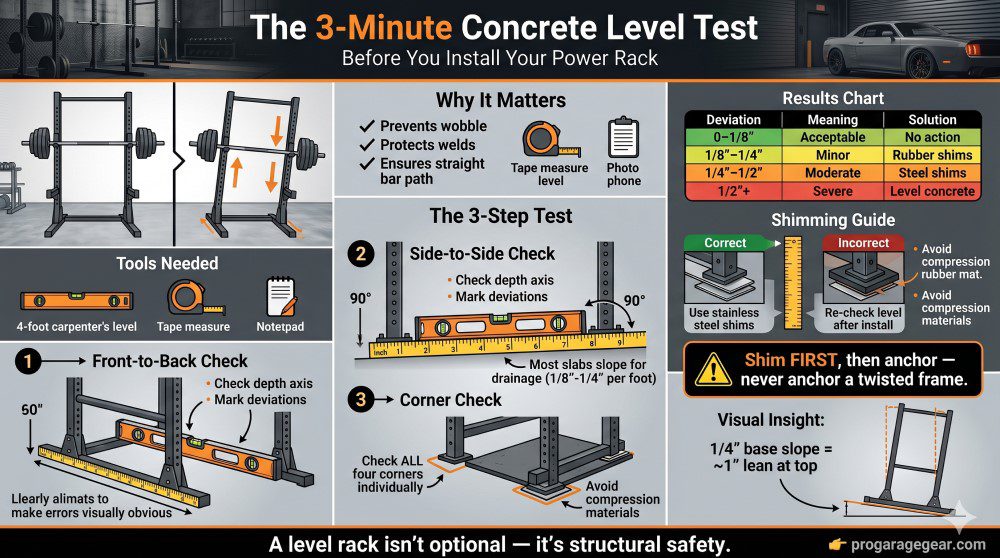
What you need:
- A 4-foot carpenter’s level
- A tape measure
- A notepad (or your phone’s notes app)
The Test Procedure:
Step 1 — Center Check: Place your 4-foot level on the concrete where the rack will sit, front-to-back (along the depth axis). Note the bubble position. A centered bubble means the slab is level on this axis. Mark any deviation with a piece of chalk.
Step 2 — Side-to-Side Check: Rotate the level 90° and place it across the width of the rack’s planned footprint. Note again. Most residential slabs have a slight side-to-side slope (intentional drainage slope of 1/8″ to 1/4″ per foot). This is the most common cause of rack wobble.
Step 3 — The Corner Check: Check all four corner positions of your planned rack footprint individually. A slab can be level in the center but have a corner that’s low by 1/4″+ — enough to make a loaded rack lean visibly.
Interpreting Your Results:
| Deviation Found | What It Means | Solution |
|---|---|---|
| 0–1/8″ across 4 ft. | Acceptable | Standard installation, no shimming needed |
| 1/8″–1/4″ across 4 ft. | Minor slope | Rubber shim plates at low corners |
| 1/4″–1/2″ across 4 ft. | Moderate slope | Stainless steel shim plates (not rubber — compresses) |
| Over 1/2″ across 4 ft. | Significant slope | Consider self-leveling concrete underlayment before flooring |
The DIY Shimming Guide:
If shimming is needed, here’s how to do it correctly and safely:
- Use stainless steel shim plates (sold as “equipment shims” at industrial supply stores) — not rubber shims, not cardboard. Rubber compresses under heavy load and shifts the rack back out of level. Stainless steel holds permanently.
- Place shims under the base feet, not under the stall mat. Shimming under the mat creates a compression point that can migrate.
- After shimming, re-check with the level across all three axes. Don’t trust your eye — the level is the judge.
- Re-check level after your first 2 weeks of heavy use. New concrete can settle slightly. A one-time post-load re-check is good practice.
When to Anchor vs. When to Shim: If your rack is rated for anchoring and your slab slope exceeds 1/4″, shim first then anchor. Anchoring a racked (twisted) rack frame into a sloped slab permanently deforms the frame under heavy loading. Get it level, then drill.
Why This Matters: A rack that’s 1/4″ out of level across 7 feet of upright creates a lean of nearly 1 inch at the top of the uprights. That doesn’t sound like much until you’re unracking 300 lbs. and wondering why the bar feels like it wants to slide to one side.
For a full comparison of gym-suitable garage flooring options, see our Best Garage Floor Mats and Tiles guide.
Phase 3: Equipment — The Priority Build Order
Tier 1 — The Foundation (Buy First)
1. Power Rack / Squat Cage This is the heart of a home gym. A quality power rack allows you to squat, bench press, and perform overhead press with safety bars — meaning you can lift heavy without a spotter.
What to look for:
- 3×3″ 11-gauge steel uprights (not 14-gauge)
- Safety arms/bars rated for your maximum expected load + 50%
- Multi-grip pull-up bar integrated overhead
- J-cups (bar holders) with bolt-on, not welded design — welded cups crack under heavy load

Recommended: Rogue R-3 Power Rack (best-in-class, lifetime warranty, expensive), REP PR-4000 (excellent value, same gauge steel as Rogue at lower price).
2. Barbell A quality barbell is a 30-year investment. Do not cheap out here.
What to look for:
- 45 lb. Olympic barbell, 28.5mm diameter for power lifting, 28mm for Olympic lifting
- Tensile strength of 185,000 PSI minimum
- Chrome or cerakote finish (not bare steel, which rusts rapidly in garage conditions)
- Dual knurl marks (IWF + IPF)
Recommended: Rogue Ohio Bar (the benchmark for residential garage gyms — one barbell, forever).
3. Weight Plates For budget builds: cast iron plates (cheaper, widely available). For serious lifters or limited space: calibrated rubber bumper plates (safer for dropping, protect floors better).
Buy enough plates to load 225–315 lbs. initially. Add as you progress.
Tier 2 — Expand Your Training Options (Buy in Months 2–6)
4. Adjustable Dumbbells A fixed dumbbell rack takes enormous floor space and significant budget. Adjustable dumbbells (Bowflex SelectTech or Ironmaster) provide up to 50–90 lbs. per hand in a footprint the size of a single pair of dumbbells.
5. Bench (Adjustable) An adjustable bench expands the flat bench press to include incline and decline pressing, dumbbell rows, step-ups, and split squats. Look for bench ratings of at least 1,000 lbs. combined weight capacity (your body weight + what you’re pressing).
6. Pull-Up Bar / Gymnastics Rings If your power rack has a pull-up bar — use it. If not, a wall-mounted pull-up bar ($40–$80) handles pull-ups, chin-ups, and hanging core work. Gymnastics rings ($30–$60) add ring dips, ring rows, and ring push-ups — replacing $2,000 worth of cable machine exercises.
Tier 3 — Conditioning and Recovery (Buy as Budget Allows)
7. Cardio Equipment One piece of cardio equipment, chosen based on injury history and preference:
- Assault AirBike: Best overall conditioning tool. Zero impact on joints. Takes 3×3 ft. of space. Brutal.
- Concept2 RowERG: Full-body cardio, extremely low impact. 8 ft. of floor space required. Folds vertically for storage.
- Treadmill: Most people know how to use one. Takes the most space. Look for a model with a minimum 3.0 HP continuous motor.
8. Kettlebells A 35 lb., 53 lb., and 70 lb. kettlebell handles 90% of kettlebell exercises for most people. Kettlebells are dense, take almost no floor space, and add conditioning and mobility work that barbells can’t replicate.
Phase 4: Climate Control — The Deal Breaker
A garage gym without climate control is a gym you’ll stop using by mid-January or mid-July, depending on your climate. This is non-negotiable.
Heating (Winter)
Electric wall heaters (240V): Best for enclosed, well-insulated garages. Clean, quiet, no combustion. Require a dedicated 240V circuit.
Propane radiant heaters: Faster warm-up for poorly insulated garages. Require ventilation — do not run with the garage door sealed in a small space.
Mini-split (heat pump): The best long-term solution. Provides both heat in winter and cooling in summer. Requires professional installation. $1,500–$3,500 installed, but lasts 20+ years.
For detailed heater comparisons and BTU sizing for your garage, see our Best Garage Heaters 2026 guide.
Cooling (Summer)
Lifting weights in a 100°F garage is not just uncomfortable — it’s dangerous. Core body temperature rises during heavy exercise; an excessively hot environment compounds this rapidly.
Minimum solution: A quality box fan or industrial wall-mount fan for air circulation. Better solution: A portable air conditioner ($400–$600) vented through a window kit or garage door gap. Best solution: A ductless mini-split (heat and cool from one unit).
Insulation
A poorly insulated garage loses heated and cooled air as fast as you produce it. Insulating the garage door is the highest-return improvement — most garage doors have zero insulation value.
An insulated door makes both heating and cooling dramatically more efficient. See our Best Garage Door Insulation Kits guide to find the right fit.
Phase 5: Lighting, Mirrors & Finishing Details
Lighting for a Garage Gym
You need to see what you’re doing — proper form, weights on bars, and general safety. Standard single-bulb garage lighting is insufficient.
Target: 50–75 foot-candles (FC) of illumination across the workout space. This requires approximately 5,000–8,000 lumens for a 2-car garage.
Best approach: LED shop lights on the ceiling directly over the rack and lifting zone, supplemented by wall-mounted task lighting over any mirrors.
For the complete lighting breakdown including CRI considerations (critical for seeing muscle definition in a gym setting), read our Best Garage Lighting 2026 guide.
Wall Mirrors
Mirrors aren’t vanity in a gym — they’re a safety tool. Watching your squat form, press alignment, and pull-up positioning in real time is how you prevent injuries. Full-length acrylic mirrors (not glass — glass is a hazard if a weight drops or impacts the wall) mounted to the wall behind your lifting platform are ideal.
Chalk Storage & Cleanup
Lifting chalk (magnesium carbonate) dramatically improves grip but creates significant dust. Install a small shelf or cabinet near the rack for chalk storage, and plan for weekly cleaning with a shop vac.
A good shop vac is essential for gym maintenance — chalk, rubber dust, and dirt accumulate fast. See our Best Shop Vacs of 2025 for recommendations.
Budget Breakdown: Realistic Costs by Build Level
| Level | Equipment | Flooring | Climate | Total |
|---|---|---|---|---|
| Starter (rack + bar + weights) | $600–$900 | $200 | Existing | $800–$1,100 |
| Mid-Level (+ dumbbells + bench + cardio) | $1,500–$2,500 | $400 | Heater: $300 | $2,200–$3,200 |
| Advanced (full station + premium rack) | $4,000–$8,000 | $600 | Mini-split: $2,500 | $7,000–$11,000 |
🛒 Complete Garage Gym Shopping Table: Every Buy from Phase 1 to Phase 5
| Phase | Item | Why You Need It | Priority | Amazon Link |
|---|---|---|---|---|
| Phase 1 — Flooring | 4×6 ft Rubber Stall Mats (3/4″ thick) — buy 4–6 for a full rack area | Protects concrete from weight drops; the only floor option under a power rack | 🔴 Essential | Search Amazon → |
| Phase 1 — Flooring | Interlocking Rubber Gym Floor Tiles (3/8″) | Cardio and stretching zones — easier to install and replace than mats | 🟡 Recommended | Search Amazon → |
| Phase 2 — Power Rack | REP Fitness PR-4000 Power Rack | Best value rack for home garages — 3×3″ 11-gauge steel, full safety arms | 🔴 Essential | Search Amazon → |
| Phase 2 — Power Rack | Rogue R-3 Power Rack | Premium option — lifetime warranty, best-in-class build quality | 🟢 Premium | Search Amazon → |
| Phase 2 — Barbell | Rogue Ohio Bar (45 lb. Olympic Barbell) | The benchmark home gym barbell — chrome finish, dual knurl marks, 185k PSI tensile | 🔴 Essential | Search Amazon → |
| Phase 2 — Barbell | CAP Barbell Olympic Bar (Budget Pick) | Solid entry-level option if Rogue is outside budget | 🟡 Budget Alt. | Search Amazon → |
| Phase 2 — Weight Plates | Rubber Bumper Plates Set (Starter: 2×10, 2×25, 2×45 lb.) | Safer for drops; protects floor and barbell sleeves | 🔴 Essential | Search Amazon → |
| Phase 2 — Weight Plates | Cast Iron Olympic Plates (Budget Set) | Lower cost; fine for non-Olympic lifting / no drops | 🟡 Budget Alt. | Search Amazon → |
| Phase 3 — Dumbbells | Bowflex SelectTech 552 Adjustable Dumbbells (pair) | 5–52.5 lbs per dumbbell in one unit — saves enormous floor space | 🔴 Essential | Search Amazon → |
| Phase 3 — Dumbbells | Ironmaster Quick-Lock Adjustable Dumbbells | More durable than Bowflex; better for heavy use; goes up to 75 lbs | 🟢 Premium | Search Amazon → |
| Phase 3 — Bench | Rep Fitness AB-3100 Adjustable Weight Bench | Flat / incline / decline; rated 1,000 lb. combined; 11 back positions | 🔴 Essential | Search Amazon → |
| Phase 3 — Bench | Flybird Adjustable Weight Bench (Budget Pick) | Affordable, foldable; good for lighter users and smaller garages | 🟡 Budget Alt. | Search Amazon → |
| Phase 3 — Pull-up Bar | Gymreapers Heavy Duty Wall-Mount Pull-Up Bar | Mounts to studs; handles kipping, weighted pull-ups, and rings | 🔴 Essential | Search Amazon → |
| Phase 3 — Rings | Nayoya Gymnastic Rings with Numbered Straps | Adds dips, ring rows, push-ups — replaces a $2,000 cable machine | 🟡 Recommended | Search Amazon → |
| Phase 3 — Kettlebells | Yes4All Cast Iron Kettlebell (35 lb.) | Core conditioning, swings, Turkish get-ups | 🟡 Recommended | Search Amazon → |
| Phase 3 — Kettlebells | Yes4All Cast Iron Kettlebell (53 lb.) | Intermediate conditioning — the most versatile single kettlebell weight | 🟡 Recommended | Search Amazon → |
| Phase 3 — Kettlebells | Yes4All Cast Iron Kettlebell (70 lb.) | Heavy swings, farmers carries, advanced movements | 🟢 Advanced | Search Amazon → |
| Phase 4 — Cardio | Assault AirBike Classic | Best conditioning tool per sq. ft. — zero impact, brutal output | 🟢 Premium | Search Amazon → |
| Phase 4 — Cardio | Concept2 RowERG Rowing Machine | Full-body low-impact cardio; folds vertically for storage | 🟢 Premium | Search Amazon → |
| Phase 4 — Cardio | NordicTrack T Series Treadmill | Entry-level treadmill; 2.6 CHP motor; foldable | 🟡 Recommended | Search Amazon → |
| Phase 4 — Heating | Dr. Infrared Heater 1500W Electric (240V) | Quiet, clean, no combustion — for attached garages up to 400 sq. ft. | 🔴 Essential (cold climates) | Search Amazon → |
| Phase 4 — Heating | Mr. Heater Big Buddy Propane Heater | Fast heat-up; ideal for detached garages; portable | 🟡 Recommended | Search Amazon → |
| Phase 4 — Cooling | Honeywell HL Series Portable Air Conditioner | Cools up to 550 sq. ft.; window-kit included; single-hose | 🟡 Recommended | Search Amazon → |
| Phase 4 — Fans | Hurricane Wall Mount Fan (16-inch) | Air circulation without AC; for moderate summer climates | 🟡 Budget Option | Search Amazon → |
| Phase 5 — Lighting | Barrina LED T5 Linkable Shop Lights (6-Pack) | Plug-and-daisy-chain; 2,200 lumens each; 5000K daylight | 🔴 Essential | Search Amazon → |
| Phase 5 — Lighting | Hykolity LED High Bay Shop Light (100W) | Single powerful overhead fixture; ideal for high ceilings | 🟡 Recommended | Search Amazon → |
| Phase 5 — Mirror | Fab Glass and Mirror Acrylic Wall Mirror (48×72 in.) | Full-length acrylic (not glass); safe next to a lifting platform | 🟡 Recommended | Search Amazon → |
| Phase 5 — Speaker | JBL Xtreme 3 Portable Bluetooth Speaker | Loud, durable, IPX67 waterproof — handles gym dust and sweat | 🟡 Recommended | Search Amazon → |
| Phase 5 — Anti-Fatigue Mat | Gorilla Grip Anti-Fatigue Comfort Mat (20×32 in.) | In front of the bench or squat rack for standing comfort | 🟡 Recommended | Search Amazon → |
| Phase 5 — Safety | Carbon Monoxide + Smoke Detector Combo | Non-negotiable if using propane heat or running a vehicle | 🔴 Essential | Search Amazon → |
| Phase 5 — Safety | First Aid Kit (200-piece) | Mounted on wall; covers cuts, strains, and minor injuries | 🔴 Essential | Search Amazon → |
| Phase 5 — Chalk | Gunsmith Fitness Block Chalk (2 lbs.) | Improves grip for deadlifts, pull-ups, heavy rows | 🟡 Recommended | Search Amazon → |
| Phase 5 — Humidity | Govee Digital Hygrometer (2-Pack) | Monitor garage RH% — know when rust risk is rising | 🟡 Recommended | Search Amazon → |
| Phase 5 — Humidity | hOmeLabs 50-Pint Dehumidifier | Protects equipment from humidity-driven rust | 🟡 Recommended | Search Amazon → |
Priority Key
| Icon | Meaning |
|---|---|
| 🔴 Essential | Buy this before anything else in its phase — core function depends on it |
| 🟡 Recommended | Strong addition for most gym setups — high value for the cost |
| 🟢 Premium | Best-in-class option — worth it if budget allows |
| 🟢 Advanced | For experienced users who have outgrown starter equipment |
Do I need a permit to build a garage gym?
Not for equipment placement. If you add a mini-split (requires electrical and potentially refrigerant line work), a dedicated 240V circuit, or structural changes — those require permits. Equipment itself is personal property and requires no permit.
Will heavy weights damage my concrete floor?
Repeatedly dropping heavy weights (especially Olympic lifting) directly on bare concrete will cause spalling. Use 3/4″ rubber stall mats under your lifting zone. With adequate rubber, even significant drops won’t damage the concrete beneath.
How do I prevent equipment from rusting in the garage?
Control humidity (see our dehumidifier guide), apply a thin coat of 3-in-1 oil to bare steel bars and equipment, and store bumper plates stacked (not standing — standing creates flat spots over time).
The Bottom Line
A garage gym is one of the highest-return investments a homeowner can make. At $58/month in gym fees, a $2,000 garage gym pays itself off in under 3 years. After that, every workout is free. And unlike a commercial gym, your garage gym is never crowded, never closed, never judging your playlist, and always 30 feet from your kitchen.
Start with Phase 1 (planning and flooring), add the power rack and barbell, and build from there. The equipment matters less than the habit — but the right environment makes the habit infinitely easier to keep.