
Best Garage Lighting Ideas 2026: Banish Shadows Without an Electrician
By Pro Garage Gear Team Last Updated: August 2026
Disclosure: This post contains affiliate links. As an Amazon Associate, we earn from qualifying purchases. We recommend lights that help you find that 10mm socket, not just brighten the room.
The “10mm Socket Test.”
Here is how you know if your garage lighting is failing you: Drop a small 10mm chrome socket on the floor.
If you have to pull out your phone’s flashlight to find it, or if you have to kick around the shadows to spot the glint of metal, your lighting is costing you time and sanity.
For decades, the standard for garages was the 4-foot fluorescent tube. You know the one—it hums when it’s cold, it flickers when it’s dying, and it casts a sickly yellow glow that makes your car paint look dull.
It is time for an upgrade. And the best part? You don’t need to hire an electrician to run new wires or rip open your drywall.
In this guide, we break down the best garage lighting ideas for 2025, focusing on high-CRI LED upgrades that plug right into your existing outlets.
The Science of Sight: Lumens vs. Kelvin vs. CRI
Most people buy lights based on “Watts.” This is a mistake. Watts only tell you how much electricity a bulb eats, not how much light it creates. To create a pro-level shop, you need to understand three numbers:
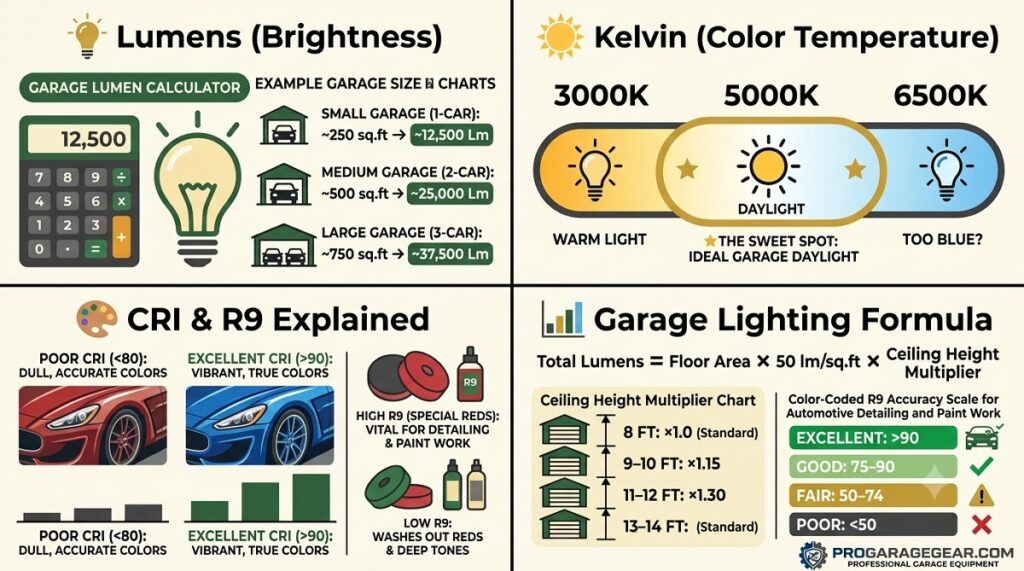
1. Lumens (Brightness)
Think of Lumens as “raw power.” A standard 60W living room bulb is about 800 Lumens.
- The Garage Rule: You want at least 4,000 to 6,000 Lumens per car bay for general parking. If you have a workbench, you want 8,000+ Lumens directly over it.
The Lumen Sizing Formula: Calculate Your Specific Garage Requirement
The 8,000–12,000 lumen recommendation in this guide is correct for a standard 2-car garage at 9-foot ceiling height. Your garage may require more or less depending on its specific dimensions and ceiling height. Here is the formula:
Total lumens required = Floor area (sq.ft.) × 50 lumens/sq.ft. × ceiling height multiplier
| Ceiling Height | Multiplier | Reason |
|---|---|---|
| 8 feet | 0.9× | Light reaches floor with less spread loss |
| 9–10 feet | 1.0× (baseline) | Standard residential specification |
| 11–12 feet | 1.15× | Inverse square law — 15% more lumens needed |
| 13–14 feet | 1.35× | Significant spread loss at this height |
Examples:
- Standard 1-car garage (12×20 ft, 9 ft ceiling): 240 × 50 × 1.0 = 12,000 lumens
- Standard 2-car garage (20×20 ft, 9 ft ceiling): 400 × 50 × 1.0 = 20,000 lumens
- Large 2-car with high ceiling (24×24 ft, 12 ft ceiling): 576 × 50 × 1.15 = 33,120 lumens
Then divide total lumens required by the delivered lumens per fixture to get the number of fixtures needed. Two Dansny 150W aluminium deformable lights at 6,000 delivered lumens each cover a single-car garage exactly. Four Barrina T5 strips at 2,200 lumens each cover 8,800 lumens — sufficient for a 1-car garage but not a 2-car.
2. Kelvin (Color Temperature)
This is the “color” of the light.
- 3000K (Warm White): Too yellow. Makes you sleepy. Avoid this.
- 6500K (Blue/Cool Daylight): Often too harsh/clinical. It can strain your eyes.
- 5000K (Pure Daylight): The Sweet Spot. This is the closest to natural sunlight. It helps you see contrast clearly without the “blue haziness.”
3. CRI (Color Rendering Index)
This is the secret weapon. CRI measures how accurate colors look.
- If you detail cars or paint wood projects, you need a High CRI (85+).
- Low CRI lights make bright red paint look muddy orange. High CRI makes it pop.
The R9 Red Value: The Hidden CRI Sub-Score That Matters for Paint Work
The CRI number in any product listing averages eight colour samples (R1–R8) that cover most of the visible spectrum. The ninth sample — R9, saturated red — is reported separately and is almost never included in product listings because it is typically poor in budget LEDs.
R9 is the specification that determines whether a lighting source can accurately render red hues — the colour channel most relevant to automotive paint matching, wiring colour identification (red vs orange), and wood finish evaluation. Under a light with R9 below 20: deep red paint looks brown, fire-engine red looks dark orange, and red automotive wiring is nearly indistinguishable from orange. Under a light with R9 above 50: all of these distinctions are clear.
| R9 Value | Red Accuracy | Suitable For |
|---|---|---|
| Below 20 | Poor — reds appear muddy | General parking and storage |
| 20–50 | Moderate — reds distinguishable but not accurate | General workshop work |
| 50–80 | Good — accurate for most tasks | Detailing and mechanical work |
| Above 80 | Excellent — paint-accurate rendering | Automotive paint matching, body work |
The CRI 85+ recommendation in this guide remains correct as the general standard. For automotive paint work or body repair specifically: specify R9 above 50 and confirm with the manufacturer. The 95+ CRI strips mentioned in the May 2026 update typically carry R9 values above 80 — the correct specification for colour-critical work.
DLC Certification: How to Cut Your Lighting Cost by 30–50% Through Utility Rebates
Many US utility companies offer rebates for replacing incandescent or fluorescent lighting with qualified LED products. The qualification standard is DLC (DesignLights Consortium) listing — an independent certification that verifies the fixture meets minimum efficacy, quality, and lifespan requirements. Fixtures on the DLC Qualified Products List (QPL) are eligible for utility rebates in most US states; fixtures without DLC listing are not eligible regardless of their performance.
The practical impact: A 6-pack of Barrina T5 LED strips typically costs $60–$80. A comparable DLC-listed LED shop light system with similar output may cost $120–$180. With a utility rebate of $15–$25 per fixture (a common rebate tier in major US utility programmes), a 6-fixture DLC-certified installation returns $90–$150 in rebates — covering the cost premium entirely and reducing the net cost below the non-DLC alternative.
How to check rebate availability: Go to the ENERGY STAR rebate finder at energystar.gov/rebate-finder or your specific utility’s website, enter your ZIP code and “LED shop light,” and confirm the rebate value and DLC listing requirement for your area. This takes 5 minutes and can save $50–$200 on a full garage lighting installation.
The Barrina and Dansny note: Neither the Barrina T5 strips nor the Dansny deformable lights recommended in this guide are DLC listed — they are consumer-grade products sold at price points that do not support the DLC certification process cost. For rebate eligibility, specify commercial-grade LED shop lights with DLC listing. For installations where rebates are not available or the rebate value does not justify the cost difference: Barrina and Dansny remain the correct value specifications.
🛒 Check Price on Amazon — DLC-Listed LED Shop Lights (Rebate Eligible) →
💡 May 2026 Update: The Summer Lighting Adjustment + New High-CRI Options
Retitled to 2026. Original publish December 2025.
The Summer Light Balance Problem:
In winter, your garage is dark even at midday. In spring and summer, natural light floods in through the open garage door — and suddenly your carefully installed overhead LEDs create an uneven effect: bright overhead, dark corners at the back where the door light doesn’t reach.
Summer calls for a different lighting strategy than winter:
- Open door working: The open door provides significant natural light from the front half of the garage. Focus your supplemental lighting on the back wall and corner work areas, not the center.
- Glare management: Summer direct sunlight entering a garage creates a brightness differential that makes dark corners feel darker by contrast. Install corner-fill lighting (a simple shop light in each back corner) to balance the contrast.
- Heat management: LED lights generate significantly less heat than fluorescent or HID fixtures — an important consideration in summer when you don’t want additional heat sources in the garage.
New for 2026: 95+ CRI Consumer LED Strips Are Now Affordable
In late 2025 and early 2026, several manufacturers released 95+ CRI LED strips at price points previously associated with 80–85 CRI products. A 90+ CRI rating was the threshold for color-accurate work in our original guide. The 95+ CRI options now available represent a meaningful step further — particularly important for automotive paint matching, woodworking finish evaluation, and electrical wire identification.
🛒 Check Price on Amazon — 95+ CRI Garage LED Shop Lights →For summer temperature management including LED heat output considerations → Summer temperature management
The Perimeter Layout: Why a Single Centre Fixture Fails at the Task That Matters Most
Buying the correct fixtures and calculating the correct total lumen output solves brightness. It does not solve shadow — and a single fixture mounted at the centre of the garage ceiling is the most common placement mistake in the entire category.
The problem shows up the moment you open the hood: your own body, standing at the front of the vehicle to work, blocks the light directly overhead. The engine bay goes dark exactly where you need to see. A single center-mounted fixture — no matter how many lumens it produces — cannot solve this, because the failure is positional, not a brightness deficit.
The fix is a perimeter layout. Instead of concentrating fixtures at the ceiling centre, distribute them in a rectangle around the zone where the vehicle parks — one run along each side wall or ceiling edge rather than a single row down the middle. Light then reaches the engine bay from the sides and front simultaneously, arriving from angles your own body can’t block no matter where you’re standing.
This is also why fixture count matters as much as total lumens: the Fixture Count Calculator above tells you how many units your garage needs in total, but a perimeter layout requires those units to be spread across multiple mounting runs rather than clustered in one line — plan your fixture purchase with this distribution in mind, not just the raw total.
One additional placement tip: if your garage has NewAge or similar cabinet systems installed, adding a dedicated under-cabinet light strip over the workbench surface solves a second, separate shadow problem — your own upper body blocking overhead light while working at the bench — that a perimeter ceiling layout alone doesn’t fully address.
The Top 5 Lighting Upgrades (No Electrician Required)
We have categorized these solutions by “Effort Level,” from a 30-second screw-in fix to a full workshop overhaul.
Level 1: The “30-Second” Upgrade (Deformable LEDs)
Winner: Dansny 60W Deformable LED Garage Light
If you rent your home or just want an instant fix for under $30, this is it. These look like a standard lightbulb base, but they have “satellite wings” of LED panels attached to them.
- How it works: You literally unscrew your old, dim lightbulb and screw this in.
- The Magic: Once installed, you can unfold the “wings” to aim light into the corners of the room.
- Power: A single unit puts out 6,000+ Lumens. That is 7x brighter than the bulb you just removed.
Pros:
- Zero tools required.
- Instantly brightens the center of the room.
- Very cheap.
Cons:
- It creates a single “point source” of light, which can cast harsh shadows if you are working under a car hood.

Level 2: The “Shadow Killer” (Linkable LED Strips)
Winner: Barrina T5 / T8 LED Shop Lights (Pack of 6)
Shadows happen when light comes from only one direction. To kill shadows, you need a “blanket” of light. The Barrina system is the gold standard for DIY workshops.
- The Daisy Chain: These lights come with connector cords. You plug the first light into a wall outlet, plug the second light into the first, and so on. You can run a row of 6 lights using only one power outlet.
- Installation: They are feather-light. You can mount them to the ceiling using simple clips or even heavy-duty double-sided tape.
- The Result: By spreading 6 lights across your ceiling, light hits your project from every angle. Shadows disappear.
The Circuit Load Limit: How Many Barrina Strips Per Outlet
The Barrina T5 LED Shop Light draws 22–28 watts per 4-foot strip. A 6-pack draws 132–168 watts total. The daisy-chain connection means all 6 strips run from one outlet on one circuit.
A standard 15-amp 120V circuit has a safe continuous load limit of 1,440 watts (80% of 1,800 watts). A 6-pack of Barrina at 168 watts uses less than 12% of this capacity — far below any circuit limitation. Connecting two full 6-packs (12 strips at 336 watts) on one circuit is safe. Connecting four 6-packs (24 strips at 672 watts) with other loads on the same circuit is where you need to check whether the circuit is shared with garage outlets carrying significant additional load.
The practical rule for Barrina installations: A single 15-amp garage circuit can safely power up to 20 Barrina T5 strips continuously, assuming no other significant loads are on the same circuit. For garages where the lighting circuit also serves outlets used by power tools or battery chargers: either dedicate a separate circuit to lighting, or verify that the combined load stays below 1,440 watts.
➡️ For circuit planning and dedicated outlet sizing: Garage Electrical Audit 2026: Circuit Load Planning →
Pros:
- Best visual performance for workshops.
- “Daisy Chain” design requires no wiring.
- 5000K Daylight color is perfect for working.
Cons:
- Installation takes about an hour (measuring and mounting).
For the full deformable LED technical guide including thermal testing → Full Deformable Led Technical Guide
The Daisy-Chain Wire Gauge Limit (A Different Risk Than Circuit Amperage)
The circuit load calculation above confirms your household circuit can handle the total wattage of a large Barrina installation. That is not the only limit that matters. Linkable LED strips connect to each other through small internal connectors, and the wire gauge inside those connectors — typically 18-gauge in the first fixture of the chain — is sized for the manufacturer’s stated chain limit, usually 6 units.
If you daisy-chain more strips than the manufacturer specifies — 10 or 12 units run as one continuous chain instead of the rated 6 — every downstream fixture’s current draws back through that same first connector. The household circuit breaker won’t trip, because the total load is still well within the circuit’s 15-amp rating. But the thin internal wire carrying that combined current inside the first fixture can overheat and melt independently of any breaker protection.
The rule: Check your specific fixture’s manual for its stated maximum chain length — commonly 6 units for Barrina-style strips — and never exceed it in a single continuous run. If your total fixture count from the Fixture Count Calculator above exceeds that limit, split the installation into two or more separate chains, each running to its own outlet or power strip, rather than one long chain.

Level 3: The “Instagram Flex” (Hexagon Grid)
Winner: Hexagon Garage Light Grid System
You have seen these on YouTube and in professional detailing studios. They are a honeycomb grid of LED tubes that hang from the ceiling.
- The Appeal: Beyond the cool futuristic look, the hexagon shape creates incredible reflections on car hoods (perfect for detailing photography).
- The Reality: They provide incredibly even light, but installation is a project. You have to snap dozens of connectors together and mount a large frame to the ceiling.
Pros:
- The ultimate “Pro” look.
- Incredible light distribution.
- High CRI ratings (usually).
Cons:
- Expensive ($150 – $400+).
- Tedious assembly.

Level 4: The “Under-the-Hood” Mobile Light
Winner: Astro Pneumatic 40SL Rechargeable Hood Light
Even the best ceiling lights can’t see inside your engine bay when the hood is popped. The hood itself casts a shadow.
- The Solution: This bar light extends and clamps onto the hood of your car (padded hooks prevent scratching). It blasts 1,000+ lumens directly onto the engine.
- Why this one? Astro Pneumatic is a mechanic favorite. It’s rechargeable and tough enough to be dropped in oil.
Pros:
- Essential for engine maintenance.
- Portable.
- Battery powered (no cord to trip over).
Cons:
- Single-purpose tool.

The “Pro Body Shop” Pick — PrimeLights Stingray 6-Lamp
For anyone who has outgrown Barrina strips and wants the fixture professional body shops actually hang, the Stingray 6-Lamp is a different category of product — a single industrial steel-housed fixture that replaces roughly 10 standard bulbs’ worth of output from one mounting point.
The Data
- Housing: Steel, not plastic — meaningfully better heat dissipation than plastic-housed strips, which is what lets the diodes maintain output over a 50,000+ hour rated lifespan instead of dimming early
- CRI: 90+ available — correct specification for detailing and paint-critical work, consistent with the R9/CRI guidance elsewhere in this guide
- Format: Single hardwired industrial fixture rather than a daisy-chained strip system
Who this is for: Mechanics and detailers who’ve already identified CRI as their priority (see the R9 Red Value section above) and want a single robust fixture over multiple linked consumer-grade strips.
🛒 Check Price on Amazon — PrimeLights Stingray 6-Lamp (Pro/Steel Housing) →
Pro Tip: The “Motion Sensor” Hack
Imagine walking into your garage with your hands full of grocery bags or a heavy toolbox. Fumbling for the light switch is annoying.
For less than $15, you can buy a Screw-In Motion Sensor Adapter.
- Screw the adapter into your ceiling socket.
- Screw your new Deformable LED light into the adapter.
- Result: Your garage lights blast on automatically the second the door opens. It feels like magic every time.

Frequently Asked Questions (FAQ)
Can I replace my old fluorescent tubes with LED tubes?
Yes, but it’s tricky. Old fixtures have a “Ballast” (a heavy black box inside) that regulates voltage. LED tubes don’t need this. You have two options:
Plug-and-Play Tubes: Work with the ballast (but if the ballast dies, the light dies).
Ballast Bypass (Type B): You cut the wires to remove the ballast. This is better long-term but requires basic wiring skills. Honest Advice: It is usually easier and cheaper to just rip down the old fixture and put up new Barrina strips.
Do LED shop lights work in cold weather?
Yes! This is a huge advantage over fluorescent. Old glass tubes flicker and take minutes to warm up in freezing temps. LEDs turn on instantly at 100% brightness, even at -20°F.
How many lumens do I need for a 2-car garage?
Aim for a total of 8,000 to 12,000 Lumens for the whole room.
What is the R9 value I should look for in garage lighting?
For general garage use — parking, storage, and general maintenance — R9 is not a critical specification. A CRI 80+ light is sufficient. For colour-sensitive work including automotive paint matching, body repair, electrical wiring identification, and wood finishing: specify R9 above 50, and confirm with the manufacturer or product specification sheet. Most product listings do not include R9 — you may need to search the manufacturer’s full specification document or contact them directly. The 95+ CRI LED strips mentioned in the May 2026 update section of this guide typically carry R9 above 80, making them the correct specification for colour-critical garage work without the cost of professional colour-matching lighting equipment.
What is DLC certification and do I need it for my garage lights?
DLC (DesignLights Consortium) certification verifies that an LED fixture meets minimum performance, quality, and longevity standards, and qualifies the fixture for utility company rebate programmes in most US states. You do not need it if rebates are unavailable in your area or if the rebate value does not justify the cost premium. You do need it if you want to qualify for utility rebates, which can reduce your net lighting cost by 30–50% on a full garage installation. The Barrina and Dansny products recommended in this guide are not DLC listed — they are consumer-grade products at price points that do not support the certification cost. For rebate-eligible installations, search for DLC-listed LED shop lights in the 4-foot, 2-lamp format using the ENERGY STAR rebate finder at energystar.gov.
- Two Dansny Deformable Lights (6,000 each) = 12,000 Lumens. (Perfect).
- One Pack of Barrina Lights (2,200 each x 6) = 13,200 Lumens. (Even better).
Final Verdict
- If you want the easiest, cheapest upgrade: Buy the Deformable Screw-In Light. It takes 30 seconds to install and changes the room instantly.
- If you work on projects/woodworking: Buy the Barrina LED 6-Pack. Install them in two rows on your ceiling to banish shadows forever.If you are a mechanic: Don’t forget the Under-Hood Light.
Stop squinting in the dark. Upgrade your lumens and see what you’ve been missing.
Now that you can actually see your walls, it’s time to organize them with Heavy Duty Shelving
LEDs work instantly in the cold, but you don’t have to. Check out our guide to Best Garage Heaters.