
Garage Electrical Audit: Is Your Wiring Ready for Power Tools? The 8-Point Checklist Professional Electricians Use
Affiliate Disclosure: Pro Garage Gear participates in the Amazon Services LLC Associates Program. We earn from qualifying purchases at no extra cost to you. No manufacturer has paid for placement in this guide.
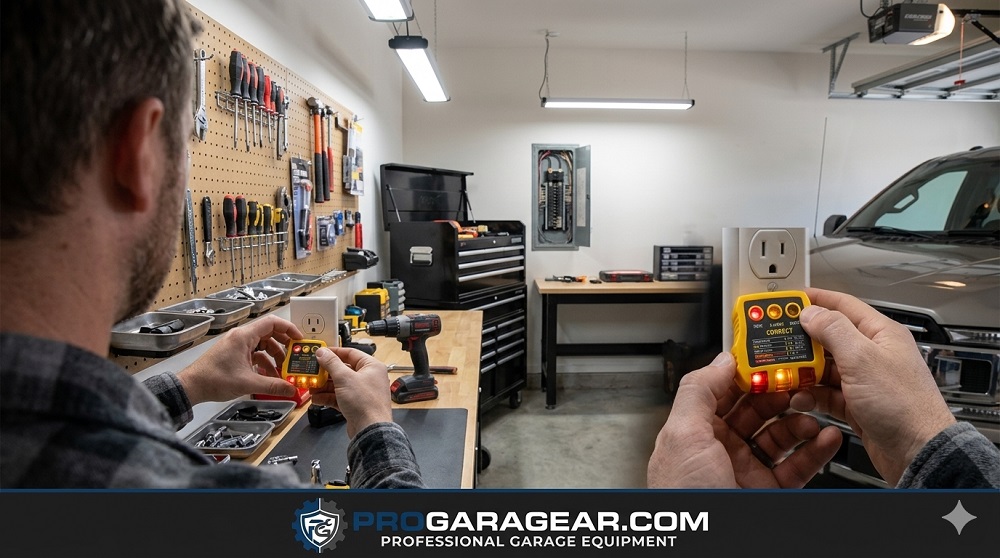
Garage electrical Audit – The “Day One Discovery” Problem: Your new table saw arrives. You uncrate it, roll it into position, plug it into the nearest garage outlet, and hit the power switch. The saw runs for 4 seconds — then the breaker trips. You reset the breaker. It trips again on startup. You try a different outlet. Same result. You call the manufacturer. They tell you the saw requires a 20-amp dedicated circuit. You call an electrician. He tells you the garage has four 15-amp outlets all sharing a single 15-amp circuit — and that adding a proper circuit will take a week to schedule and cost $250–$400.
The table saw sits in the corner, unused, for six days.
This exact scenario plays out in garages across North America every weekend. It is entirely avoidable with a 20-minute electrical audit performed before any tool purchase — not after delivery. The audit costs nothing beyond a $15 outlet tester. The information it provides determines not just what tools you can run today, but exactly what your garage needs to support the workshop you are actually building.
This guide gives you the complete 8-point audit — the same framework professional electricians use when evaluating a residential garage for workshop conversion — with the specific upgrade path and cost for every failure point.
Before you begin: This audit is diagnostic — it identifies problems. It does not instruct you to open your electrical panel, touch bare wires, or perform electrical work without a license. In most US jurisdictions, adding or modifying circuits requires a permit and a licensed electrician. The audit tells you what to ask for. The electrician delivers it.
Why Most Residential Garages Fail Workshop Electrical Audits
The residential electrical code under which most American homes were built — and the era in which most garages were wired — was designed for a garage that stored cars and occasionally powered a shop light. A single 20-amp circuit serving the entire garage was the standard minimum for decades, and in many homes built before 1999, that circuit is actually a 15-amp circuit shared with the laundry room, outdoor outlets, or a section of the home’s general lighting.
Modern power tools changed the demand landscape entirely. A contractor-grade table saw draws 15 amps continuously at full load. A two-stage air compressor draws 15–20 amps at startup. A MIG welder at 120V draws 20 amps at maximum output. A dust collector draws 7–12 amps. Running any two of these simultaneously on a single 15-amp circuit — the configuration most garages start with — trips the breaker within seconds.
The gap is not a flaw in your tools. It is a mismatch between residential construction standards from the 1970s–1990s and workshop tool requirements that have grown significantly as homeowner tool quality improved. The audit identifies the specific gaps in your garage and quantifies exactly what it costs to close them.
What You Need Before You Start the Audit
The complete audit requires four items — three of which you may already own:
- Outlet circuit tester: A three-light plug-in tester that identifies wiring faults (open ground, open neutral, hot/neutral reversal) in seconds. Cost: $8–$15. This is the most important single tool in the audit.
- Non-contact voltage tester: Confirms whether an outlet or circuit is live without touching bare conductors. Cost: $15–$25.
- A flashlight or headlamp: For reading panel labels and inspecting junction boxes.
- A pencil and paper (or phone notes): To map each outlet to its breaker and record findings.
The Diagnostic Duo: The $25 Kit That Prevents a $400 Electrician Surprise
Before you begin the audit, these two tools are the only equipment required. Spend $25 now to walk into your electrician consultation knowing exactly what needs to be done — rather than discovering it during an emergency service call when the minimum trip charge alone is $75–$150.
| Tool | What It Tells You | Cost | Amazon |
|---|---|---|---|
| 3-Light Outlet Circuit Tester | Wiring faults at every outlet — open ground, open neutral, hot/neutral reversal. Identifies code violations in 3 seconds per outlet without any electrical knowledge required. | $8–$15 | Shop → |
| Non-Contact Voltage Tester (NCV) | Confirms live voltage without touching bare wires. Essential before inspecting any junction box, outlet wiring, or switch. The safety prerequisite for the entire audit. | $15–$25 | Shop → |
🛒 Check Price on Amazon — 3-Light Outlet Tester ($12) →
🛒 Check Price on Amazon — Klein NCVT-1 Non-Contact Tester ($18) →
Optional addition for power-draw measurement: A clamp meter lets you measure the actual amperage draw of any running tool — confirming it matches the specification and verifying that a circuit is not approaching its capacity limit during simultaneous tool use. Not required for the basic audit but valuable for ongoing workshop management.
🛒 Check Price on Amazon — Klein CL120 Clamp Meter (Measure Tool Draw) →
The 8-Point Garage Electrical Audit
Check 1 — Identify Your Main Panel Service Rating
What you’re checking: The total capacity of your home’s electrical service — the number printed on the main breaker at the top of your panel.
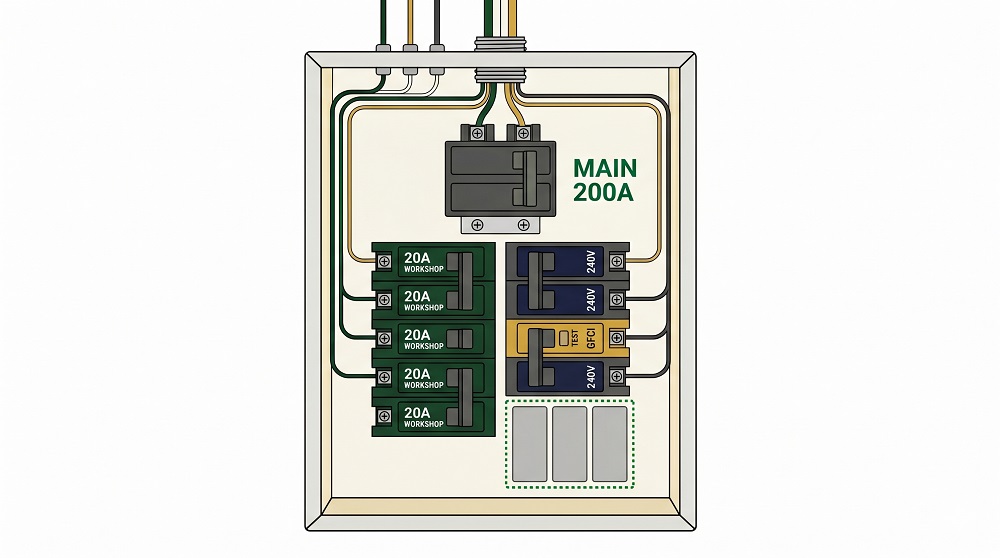
How to check it: Open your electrical panel door. The main breaker is the large double-pole breaker at the top, with two handles tied together. The amperage is printed on the handle: 60A, 100A, 150A, 200A, or 400A.
| Panel Rating | Workshop Viability | Recommended Action |
|---|---|---|
| 60A | ❌ Insufficient for any workshop tools | Panel upgrade required before any tool purchases |
| 100A | ⚠️ Marginal — limited headroom | Careful load management needed; EV charger incompatible |
| 150A | ✅ Adequate for most home workshops | Can support dedicated workshop circuits with care |
| 200A | ✅ Recommended standard | Full workshop capability including EV charging |
| 400A | ✅ Excellent | Supports multiple simultaneous 240V tools, dual EVs |
Pass criteria: 150A or higher. If your panel is 100A or below, schedule a panel upgrade consultation before purchasing any high-draw workshop tools. A 100A panel upgrade to 200A typically costs $1,500–$4,000 depending on your location and utility requirements.
➡️ For detailed EV charging panel requirements and headroom calculations: EV Home Charging in Your Garage: The Complete Panel Audit Guide →
Check 2 — Count Available Breaker Slots
What you’re checking: How many open positions exist in your panel for adding new dedicated circuits.
How to check it: Look at your panel breaker rows. Count spaces where no breaker is installed — these are your growth slots. Each standard circuit needs one slot (single-pole 120V) or two adjacent slots (double-pole 240V).
What the numbers mean:
- 0 empty slots: Panel is full. No new circuits can be added without a sub-panel installation or tandem breaker replacement. Cost to resolve: $200–$500 for a sub-panel.
- 1–3 empty slots: Limited — you can add 1–2 more circuits but a full workshop build will exhaust capacity quickly.
- 4+ empty slots: Good headroom for workshop expansion. Plan your priority circuits and fill from highest-draw tools first.
⚠️ Critical: The Panel Clearance Requirement Most Workshop Builders Violate
While you are at your electrical panel for Check 2, evaluate the working space in front of it. This is not optional advice — it is a code requirement with real safety and legal consequences.
NEC Section 110.26 requires:
- Minimum 30-inch width centred on the panel — measured across the panel face
- Minimum 36-inch depth in front of the panel — clear floor space extending outward from the panel face
- Minimum 78-inch height (6.5 feet) — the clear working space must be maintained from floor to ceiling
This working space must remain clear at all times — not just when the panel needs service, but permanently. Nothing can be stored, mounted, or built within this zone. The requirement exists so that an electrician (or firefighter, or you) can stand directly in front of the panel and work safely without obstruction.
The workshop-specific violation that fails inspections most often: A workbench installed across the garage’s back wall that extends in front of or directly below the electrical panel. This is one of the most common layout mistakes in garage workshop conversions — and one of the first things a building inspector or electrician flags. A workbench in the panel clearance zone is a code violation that must be corrected before a permit can be signed off.
The sub-panel placement rule: If your workshop build includes a sub-panel installed specifically in the garage, the same 110.26 clearance requirements apply to the sub-panel. Plan your garage layout with the panel clearance zone mapped before any workbench, storage, or tool placement is finalised.
The practical test: Stand directly in front of your electrical panel. Can you fully extend both arms sideways? Can you take one full step (36 inches) backward from the panel face without hitting anything? Can you stand upright without a ceiling obstruction? If any answer is no — your panel access does not meet NEC 110.26 requirements. Correct this before finalising any permanent workshop layout.
🛒 Check Price on Amazon — Electrical Panel Clearance Warning Labels →
Clamp Meter (Measure Tool Draw) →
Pass criteria: Minimum 2 empty double-pole slots (for dedicated 240V circuits) or 4 single-pole slots (for 120V workshop circuits). If you plan to add EV charging, reserve an additional 2-slot position now.
🛒 Check Price on Amazon — Tandem Breaker (Space-Saver Option) →
Check 3 — Test Every Garage Outlet with the 3-Light Tester
What you’re checking: Wiring faults at each outlet — the conditions that cause tool damage, shocks, and fire.
How to check it: Plug the 3-light outlet tester into every garage outlet. Read the light pattern against the legend printed on the tester face.
| Tester Light Pattern | What It Means | Risk Level | Action Required |
|---|---|---|---|
| Two amber lights lit | Correct wiring — outlet is properly wired | None | Pass — no action needed |
| All three lights off | Open ground — missing safety ground wire | Shock risk | Electrician must inspect and repair |
| Left and center lights | Open neutral — neutral wire disconnected | Equipment damage + shock | Electrician repair immediately |
| All three lights lit | Hot/ground reversal — dangerous miswiring | Severe shock + fire risk | Electrician repair immediately |
| Center and right lights | Hot/neutral reversal | Shock risk on contact | Electrician repair immediately |
What to do if any outlet fails: Tag it with tape and do not use it until repaired. Any tool plugged into an outlet with hot/ground reversal or open neutral is operating without electrical safety protection — the tool’s safety ground is either missing or energised incorrectly.
Pass criteria: Every garage outlet shows the “correct wiring” light pattern. Any other result is a failure requiring professional repair before workshop use.
Check 4 — Verify GFCI Protection on All Garage Outlets
What you’re checking: Ground Fault Circuit Interrupter protection, which is required by NEC Section 210.8(A)(2) on all 125V garage outlets in all US states that have adopted the 2020 or later NEC.
Why it matters: A GFCI detects current imbalance as small as 5 milliamps between the hot and neutral conductors — the threshold at which current through a human body becomes capable of causing ventricular fibrillation. When this imbalance is detected (indicating current is taking a path through a person or a fault), the GFCI trips in 1/40th of a second — faster than the human heart can fibrillate.
How to check it: Look for GFCI outlets (the rectangular outlets with TEST and RESET buttons in the center) or a GFCI breaker in your panel (identified by a TEST button on the breaker body). Press the TEST button on any GFCI outlet — the outlet should lose power immediately, confirmed by a plugged-in lamp going dark. Press RESET to restore power.
Coverage check: A single GFCI outlet protects all outlets wired downstream from it on the same circuit. If you press TEST on one GFCI outlet and all other garage outlets also go dark — they are all protected from that single device. If pressing TEST only affects the single outlet — the others are unprotected and need their own GFCI protection.
Pass criteria: Every garage outlet is either a GFCI outlet or is protected downstream from a GFCI outlet or GFCI breaker. Any unprotected outlet is a code violation and a safety gap in a workshop environment where tools, extension cords, and water contact are common.
🛒 Check Price on Amazon — Leviton 20A Self-Test GFCI Outlet →
🛒 Check Price on Amazon — Siemens 20A GFCI Circuit Breaker →
Check 5 — Identify Circuit Amperage for Every Garage Outlet
What you’re checking: Whether your garage outlets are on 15A or 20A circuits — and whether any are on dedicated circuits or shared with other areas of the home.
How to check it (the breaker identification method):
- Plug a lamp or radio into each garage outlet in sequence.
- Go to the electrical panel and flip breakers one at a time until the lamp/radio loses power.
- Note which breaker controls each outlet and read the amperage on the breaker handle (15 or 20).
- Record a map: Outlet 1 → Breaker 12 (15A), Outlet 2 → Breaker 12 (15A), Outlet 3 → Breaker 14 (20A).
The critical question: How many outlets share each breaker? If all four garage outlets are on one 15A breaker — you have a maximum of 12 amps of continuous load available for all workshop tools combined (NEC 80% rule for continuous loads). That supports a drill and nothing more.
Identifying the outlet type from the face: A 15A outlet has two vertical slots. A 20A outlet has one vertical and one T-shaped horizontal slot extending from the left vertical. The outlet amperage must match or be less than the circuit breaker amperage — a 20A outlet on a 15A circuit is a violation (the breaker does not protect the outlet at its rated capacity).
Pass criteria for workshop use:
- At least one dedicated 20A circuit serving only garage outlets (not shared with laundry, exterior outlets, or lighting)
- 20A outlets on 20A circuits — not 20A outlets on 15A circuits
- A second dedicated 20A circuit for a second simultaneous tool is the professional standard
Fail scenario — most common finding: All garage outlets share a single 15A breaker that also feeds the garage door opener and one or more exterior outlets. This is the electrical equivalent of a two-lane road trying to handle six lanes of traffic.
Check 6 — Assess Wire Gauge in Visible Runs
What you’re checking: Whether the wire serving your garage outlets is appropriately sized for the breaker protecting it.
How to check it: Look at any exposed wire runs in your garage — along the ceiling, at junction boxes, or where cables enter the panel. The gauge is printed on the plastic jacket every few feet: “12 AWG” or “14 AWG” are the most common.
| Wire Gauge Found | Maximum Safe Amperage | Correct Breaker Size | Assessment |
|---|---|---|---|
| 14 AWG | 15A | 15A maximum | ✅ Correct for 15A circuits — cannot be upgraded to 20A without rewiring |
| 12 AWG | 20A | 15A or 20A | ✅ Correct for both — the gold standard for workshop circuits |
| 10 AWG | 30A | Up to 30A | ✅ Heavy-gauge — appropriate for large compressors and sub-panel feeds |
| Aluminum wiring (silver-coloured) | See note below | Varies | ⚠️ Requires specific compatibility — see section below |
The Aluminum Wiring Alert
Homes built between 1965 and 1973 frequently used aluminum rather than copper wiring for branch circuits. Aluminum is electrically functional but expands and contracts at a different rate than copper under thermal cycling — which progressively loosens connections at outlets, switches, and devices. Loose aluminum connections are a documented cause of residential electrical fires.
If your garage wiring is silver-coloured (not copper-coloured), this is not an immediate emergency but it does require action: all devices (outlets, switches) must be rated “CO/ALR” (copper-aluminium rated) or the connections must be treated with anti-oxidant compound and pig-tailed with copper wire using AlumiConn connectors. Have a licensed electrician evaluate all aluminum branch circuit connections before adding workshop loads — increased current draw accelerates connection degradation.
Pass criteria: 12 AWG wire on circuits powering workshop outlets, protected by 20A breakers. 14 AWG on 15A lighting circuits is acceptable. Any mismatch between wire gauge and breaker size is a code violation requiring immediate correction.
Check 7 — Confirm 240V Circuit Availability
What you’re checking: Whether your garage has any 240V circuits installed for high-draw tools and equipment.
Why you will eventually need 240V: A table saw, welder, large air compressor, or EV charger operating at full capacity exceeds what a 120V circuit can deliver. 120V circuits are limited to approximately 2,400 watts of continuous load (20A × 120V × 80%). A 240V circuit at the same 20A delivers 4,800 watts — double the power on the same wire gauge. For 30A 240V circuits: 7,200 watts. Most serious workshop tools are 240V for exactly this reason.
How to check it: Look in your panel for double-pole breakers (two handles tied together occupying two slots). Note their amperage: common sizes are 30A (for large compressors), 40A (for some welders), 50A (for EV chargers and ranges), and 60A (for large welders and sub-panels). Trace the circuit to identify if any 240V outlet is already installed in the garage — typically a NEMA 14-30 (dryer outlet shape), NEMA 14-50 (4-prong rectangular), or NEMA 6-50 (2-prong + ground).
Pass criteria: At minimum one 240V outlet already installed in the garage if you own or plan to purchase any 240V tool. If none exists — add this to your electrician’s scope of work. The incremental cost of adding a 240V circuit while an electrician is already on-site for other work is typically $150–$300 less than a separate service call.
➡️ For welding machine electrical requirements: Best Welding Machines 2026: The Breaker Fatigue Audit You Must Do Before Installing →
Check 8 — Evaluate Extension Cord Usage Patterns
What you’re checking: Whether your current workshop setup relies on extension cords in ways that create fire, shock, and tool damage risk.
The extension cord problem in garages: Extension cords are designed for temporary use — plugging in a Christmas tree, running a vacuum to a far corner once. They are not designed for continuous high-current workshop loads. The problems:
- Undersized gauge: A 16-gauge extension cord rated for 13 amps creates voltage drop when running a 12-amp table saw 50 feet away. Voltage drop causes motors to run hotter, draw more current, and wear out faster. Most consumer extension cords are 16-gauge.
- Coiled cord resistance: An extension cord left coiled during use cannot dissipate the heat generated by current flow — the coil acts as an induction coil, concentrating heat at the center. Coiled extension cords under load have caused residential fires.
- Multi-outlet splitters: A single outlet to a 6-outlet power strip to three high-draw tools is a cascade failure waiting to happen. The single circuit breaker protecting the outlet sees aggregate load from all connected tools.
Check 9 — Verify Whole-Home Surge Protection
What you’re checking: Whether your electrical system includes a whole-home surge protective device (SPD) — the single piece of infrastructure that protects everything you plug into your garage from utility voltage spikes.
Why this matters specifically for a workshop garage: When most homeowners think of surge protection, they think of the power strip surge protector under the desk. That $25 device is a point-of-use protector — it handles the smaller internal surges generated by appliances switching on and off within the home. It does not handle the category of surge that actually destroys expensive electronics: utility line surges.
Utility line surges originate outside your home — from lightning strikes on the power grid within a mile, from utility switching operations when power is restored after an outage, and from large motors cycling on and off on the same transformer circuit (your neighbourhood’s HVAC systems, elevators, industrial equipment nearby). These external surges arrive through your utility service entrance and propagate through every circuit in your home simultaneously. A point-of-use surge protector installed after the service entrance sees the full spike before it can act.
The workshop-specific vulnerability: Modern garage equipment is disproportionately exposed compared to the rest of the home:
- EV charger electronics: Level 2 EVSE units contain power conversion electronics rated for standard voltage tolerances. A sustained overvoltage spike damages the charging module — repairs cost $200–$400, and the charger may not show symptoms for weeks after the event.
- Inverter-based welders: The Lincoln POWER MIG 210 MP and comparable inverter welders use high-frequency switching power supplies that are significantly more sensitive to voltage transients than the transformer-based welders they replaced. Many inverter weld machine failures attributed to “board failure” are actually undetected surge events.
- Smart battery chargers and maintainers: The NOCO GENIUS series and comparable units use microcontroller-based charging algorithms. A voltage spike that reaches the battery terminal port can corrupt the charge algorithm or damage the output stage.
- Cordless tool battery packs: Lithium-ion packs connected to wall chargers during an external surge event can have their battery management systems (BMS) damaged — affecting charge capacity and safety functions permanently.
How to Check It
Look in your main electrical panel for a device labelled “SPD,” “Surge Protector,” or “Transient Voltage Surge Suppressor.” It will typically be a small module — either DIN-rail mounted inside the panel or a device that occupies 1–2 breaker slots. Most residential panels installed before 2020 do not have one — the 2020 NEC made whole-home SPD installation required for new construction in most jurisdictions, but existing homes are not retroactively required to add them.
The Two Types of Whole-Home Surge Protection
| Type | How It Installs | Protection Level | Cost | What It Handles |
|---|---|---|---|---|
| Type 1 SPD | Before the main breaker — requires utility coordination | Highest — handles direct lightning strike surges | $300–$600 installed | External lightning and utility switching |
| Type 2 SPD | Inside the main panel, after the main breaker — plug-in or breaker slot | High — handles most utility and internal surges | $50–$150 + $100–$200 installation | Utility switching, nearby lightning, internal surges |
For most residential workshops: a Type 2 SPD is the correct and cost-effective solution. It installs in your existing panel in a single service call addition, requires no utility coordination, and protects against the surge events that are statistically most likely to damage your equipment.
Pass criteria: A Type 1 or Type 2 SPD is visibly installed in or immediately adjacent to your main panel. If none is present — add it to your electrician’s scope of work. At $50–$80 for the device and 30 minutes of installation time alongside other panel work, it is one of the lowest cost-to-protection-value additions available.
🛒 Check Price on Amazon — Siemens FS140 Whole-Home Surge Protector →
🛒 Check Price on Amazon — Square D HEPD80 Surge Protector →
The math on surge protection: A Type 2 SPD costs approximately $75 installed alongside other panel work. The tools it protects in a fully equipped workshop — an EV charger ($500–$1,100), an inverter welder ($600–$1,500), a smart battery system ($200–$400), and multiple cordless tool chargers ($300–$600) — represent $1,600–$3,600 in electronics. The SPD’s protection cost-to-value ratio is approximately 2–5%. No other single purchase in your workshop delivers that risk-adjusted return.
Check 9.5 — Verify Your Lighting Is on a Dedicated Circuit
What you’re checking: Whether your garage lighting is on a circuit separate from your power tool outlets — and why being plunged into darkness during a workshop session is a genuine safety hazard, not just an inconvenience.
The darkness danger: A table saw, miter saw, or router does not stop instantly when the power is cut. Most circular blade tools have 3–8 seconds of blade spin-down time after power loss. If a tool trips a shared circuit breaker and simultaneously kills your garage lighting, you are in a completely dark workshop with spinning blades. The correct response — step away from the tool and wait for full stop — requires you to know where you are and where the tool is. In complete darkness, disorientation is immediate.
This is not a theoretical concern. Shared lighting and outlet circuits in garages are the original NEC-minimum configuration. When a high-draw tool trips the breaker, every device on that circuit — lights included — goes dark simultaneously.
How to check it: Using the circuit mapping method from Check 5 — plug a lamp into your garage lighting fixture circuit (or note which overhead lights are on), then identify which breaker controls them. Compare that breaker to the breakers controlling your tool outlets. If your lights and your power tool outlets share a breaker: you have a shared circuit.
What a separate lighting circuit looks like: A dedicated 15A circuit serving only overhead lighting fixtures, with no tool outlets on the same breaker. Even if a power tool trips its dedicated 20A circuit, the lights remain on — allowing you to safely power down the tool, reset the breaker, and continue working.
The upgrade path: Adding a dedicated 15A lighting circuit is the least expensive circuit addition available — 15A wire, a 15A breaker, and a ceiling junction box. Cost when added alongside other panel work: $100–$200. When added as a standalone service call: $200–$350. It is always better to scope it alongside the other workshop circuits.
The high-lumen LED array consideration: If you have installed multiple linked LED shop lights (the Barrina T5 6-pack draws approximately 130W combined; a full garage array of 12 tubes draws approximately 260W), verify that the total LED lighting load does not exceed 80% of your lighting circuit’s capacity. A 15A lighting circuit supports a maximum of 1,440W of continuous lighting load (15A × 120V × 80%). This is rarely an issue with LED fixtures, but worth confirming if you have many fixtures on one circuit.
➡️ For LED shop light wattage and specifications to calculate your lighting load: Best Garage Lighting 2026: Shop Light Specifications and Circuit Planning →
Pass criteria: Garage overhead lighting is on a dedicated 15A circuit separate from all power tool outlets. Any shared configuration should be flagged to your electrician during the next service visit.
The pass criteria for extension cord use:
| Extension Cord Application | Minimum Gauge Required | Maximum Length |
|---|---|---|
| Table saw, miter saw, router (12–15A tools) | 12 AWG | 25 feet |
| Drill, sander, jigsaw (5–8A tools) | 14 AWG | 50 feet |
| Shop vac, blower, light loads | 16 AWG | 25 feet |
| Any tool exceeding 12A continuously | Not recommended — add a circuit instead | N/A |
🛒 Check Price on Amazon — 12-Gauge Workshop Extension Cord (25 ft.) →
🛒 Check Price on Amazon — Retractable Cord Reel (Ceiling Mount — 14 AWG) →
Your Audit Results: The Scoring System
Score your garage one point for each check that passed:
| Score | Workshop Readiness | What It Means |
|---|---|---|
| 8/8 | 🏆 Workshop Ready | Your garage is electrically equipped for a serious home workshop. Proceed with tool purchases. |
| 6–7/8 | ✅ Mostly Ready | Minor gaps that a single service call can close. Identify the 1–2 failures and address them before high-draw tool purchase. |
| 4–5/8 | ⚠️ Foundation Work Needed | Real limitations that affect what you can safely run. Prioritise Checks 3, 4, and 5 failures — they are the most impactful and often the least expensive to fix. |
| Below 4/8 | ❌ Upgrade Required | The garage needs meaningful electrical work before serious workshop use. Get three electrician quotes — scope the full workshop electrical upgrade in one project rather than incremental fixes. |
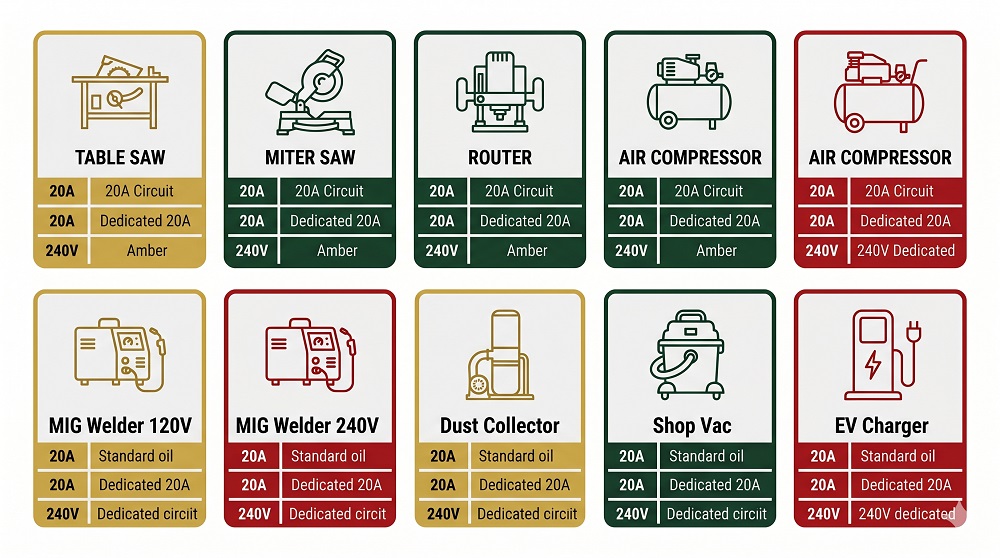
Tool-by-Tool Electrical Requirements: What Every Major Workshop Tool Needs
| Tool | Running Amps | Starting Surge | Circuit Required | Voltage | Can Share? |
|---|---|---|---|---|---|
| Table saw (contractor) | 12–15A | 18–22A | 20A dedicated | 120V or 240V | No — dedicated only |
| Miter saw (10″) | 10–13A | 15–20A | 20A | 120V | One at a time |
| Router (variable speed) | 8–11A | 12–16A | 20A | 120V | One at a time |
| Air compressor (1–2 HP) | 9–14A | 18–26A | 20A dedicated | 120V | No — dedicated only |
| Air compressor (3–5 HP) | 14–20A | 24–38A | 30A dedicated | 240V | No — dedicated only |
| MIG welder (120V mode) | 16–20A | 16–20A | 20A dedicated | 120V | No — dedicated only |
| MIG welder (240V mode) | 28–50A | 28–50A | 50–60A dedicated | 240V | No — dedicated only |
| Dust collector (1 HP) | 6–9A | 9–14A | 20A | 120V | Yes, with low-draw tools |
| Shop vac | 5–9A | 7–12A | 15A or 20A | 120V | Yes, with low-draw tools |
| Angle grinder (5″) | 9–12A | 14–18A | 20A | 120V | One at a time |
| Level 2 EV charger | 24–48A | 24–48A | 40–60A dedicated | 240V | No — dedicated only |
| Garage heater (electric) | 16–22A | 16–22A | 30A dedicated | 240V | No — dedicated only |
➡️ For air compressor CFM and electrical requirements in detail: Best Garage Air Compressors 2026: The CFM Truth and Circuit Sizing Guide →
Workshop Power Planner: Can Your Circuits Handle Your Tools Running Together?
Select every tool you plan to run in your workshop — even if not simultaneously — and we will calculate your total load, identify surge risks, tell you how many dedicated circuits you need, and flag which tools require 240V.
⚡ Workshop Power Planner
Select every tool in your workshop. We calculate your total load, surge demand, number of circuits needed, and whether any tool requires 240V wiring.
* Amperage values are typical for consumer-grade equipment. Verify your specific tools’ nameplate ratings. Circuit recommendations assume NEC 80% continuous load rule (dedicated circuit capacity × 80% = safe continuous load). Always have circuit work performed by a licensed electrician with a permit. Pro Garage Gear earns from qualifying Amazon purchases.
The Electrician Scope of Work: How to Brief Your Electrician
The most common and costly mistake homeowners make when hiring an electrician for a garage upgrade is under-scoping the job. You call about one issue — a tripped breaker — the electrician adds one circuit — and six months later when you buy the air compressor, you call again. Each service call has a minimum trip charge of $75–$150 on top of the work cost.
Brief your electrician on the complete workshop vision — every tool you plan to own in the next three to five years — and scope all electrical work in a single project. The marginal cost of pulling an additional circuit while the electrician is already working in your panel is a fraction of the cost of a second service call.
The Workshop-Ready Electrical Scope (What to Ask For)
Minimum scope for a basic home workshop:
- Two dedicated 20A circuits to the garage on 12 AWG wire (one for the left side of the garage, one for the right)
- GFCI protection on all garage outlets (either GFCI outlets or GFCI breakers)
- One NEMA 14-50 (50A, 240V) outlet for future use — welder, large compressor, or EV charger
- Correct wire gauge verification on all existing circuits
Complete scope for a serious home workshop:
- Three dedicated 20A circuits (one per major tool zone — bench area, compressor station, general)
- One 30A 240V circuit for a large air compressor or small welder
- One 50A 240V circuit for a serious welder or EV charger
- Ceiling-mount outlet locations planned (for retractable cord reels and overhead power drops)
- GFCI protection on all outlets
- Permit pulled and inspection scheduled
Expected cost range:
| Scope | Typical Cost Range | Notes |
|---|---|---|
| Single 20A circuit + GFCI outlets | $200–$450 | Most common first upgrade |
| Two 20A circuits + one 240V circuit | $450–$900 | The practical minimum for a real workshop |
| Full workshop electrical (3× 20A + 2× 240V) | $900–$2,000 | Do-it-once complete solution |
| Panel upgrade (100A → 200A) + workshop wiring | $2,500–$5,000 | Required if panel is 100A or below |
The Smart Monitoring Addition
Once your workshop circuits are installed, a smart plug with energy monitoring on each dedicated outlet gives you real-time visibility into what each tool actually draws versus what the circuit can deliver. This catches voltage drop, confirms your circuit is not overloaded when running multiple tools at different draw levels, and alerts you if any tool is drawing more than expected (a sign of motor wear or mechanical binding).
🛒 Check Price on Amazon — Kasa Smart Plug with Energy Monitoring →
🛒 Check Price on Amazon — Klein Tools Clamp Meter (Measure Actual Tool Draw) →
The Garage Electrical Safety Foundation
An electrically sound garage is not just about tool performance — it is the safety foundation under everything else you do in the space. Fire risk in garages is disproportionately high compared to other residential spaces because garages combine electrical loads with flammable materials (fuel, solvents, paints), combustion equipment (vehicles, heaters, generators), and typically lower fire detection coverage than living spaces.
The three safety additions that every workshop-equipped garage needs regardless of audit results:
➡️ Best Garage Fire Extinguishers 2026: Class ABC Ratings and Placement Guide →
➡️ Attached Garage Health Risks: CO, Benzene, and the Fume Danger Nobody Talks About →
For ceiling fan installation and the electrical requirements for proper garage climate control:
➡️ Best Garage Ceiling Fans 2026: The Wiring Guide for Correct Installation →
Frequently Asked Questions
Can I add a 20-amp outlet myself without an electrician?
In most US jurisdictions, adding a new circuit requires a permit pulled by a licensed electrician, or a homeowner permit (available in some states where the homeowner is performing work on their own primary residence). The permit requirement exists because the work must be inspected — an uninspected circuit has no documented compliance with the electrical code, which creates insurance and resale complications. Even if your state allows homeowner-pulled permits, a 20-amp circuit requires correct wire sizing, breaker sizing, and junction box installation. If you are not confident in your electrical knowledge, hire a licensed electrician — the stakes are a potential house fire, not a failed project.
My breaker trips when I start my table saw. Why?
Motor startup (inrush) current is typically 3–6× the running current for a fraction of a second. A table saw drawing 15 amps at full load draws 45–90 amps for the first 50–100 milliseconds of startup. A 15-amp breaker trips on this inrush. A 20-amp breaker may or may not trip depending on its trip curve — standard breakers (“type B”) trip at 3–5× rated current sustained for 0.1 seconds; delayed-trip breakers (“type D”) are more tolerant of motor startup surge. If your 20-amp breaker still trips on table saw startup: ask your electrician about installing a “slow-blow” or type D breaker on that circuit.
What is the difference between a GFCI outlet and a GFCI breaker — which is better for a garage?
A GFCI outlet protects itself and all outlets wired downstream from it on the same circuit. A GFCI circuit breaker protects every outlet on the entire circuit from the panel. Both provide equivalent protection — the choice is usually cost and convenience. GFCI outlets ($15–$25 each) are cheaper than GFCI breakers ($35–$65 each) when you have multiple circuits. But a GFCI breaker covers an entire circuit from a single device in the panel — simpler and more reliable for dedicated workshop circuits. For a new dedicated workshop circuit: GFCI breaker. For retrofitting GFCI protection to existing circuits with multiple outlets: one GFCI outlet at the first position in the circuit covers all outlets downstream.
How do I know if my outlet is on a 15A or 20A circuit if there are no labels on the breakers?
Two methods: (1) Look at the outlet face — a 15A outlet has two straight vertical slots; a 20A outlet has one straight vertical and one T-shaped slot. The outlet rating matches or is below the circuit breaker rating. (2) The circuit breaker identification method described in Check 5 of this audit — plug in a lamp, flip breakers until it goes dark, read the breaker amperage. If the breaker panel labels are illegible or missing, an electrician can trace and label every circuit in your panel (a “circuit mapping” service) for $150–$300 — money well spent before a serious workshop investment.
Can I run my air compressor and table saw at the same time?
Only if they are on separate dedicated circuits. A table saw at 15A plus an air compressor at 12A equals 27A of combined load. No single 20A circuit can support this — it exceeds the 20A breaker capacity and significantly exceeds the 16A safe continuous load limit (80% of 20A). With two separate dedicated 20A circuits: each tool runs independently without interaction. Many experienced shop owners run the air compressor on 240V specifically to separate it from the 120V tool circuit pool.
Is it safe to use a power strip for workshop tools?
A power strip is acceptable for low-draw accessories — phone chargers, LED task lights, laptop, radio. It is not appropriate for power tools. Power strips do not add circuit capacity — every outlet on a power strip shares the same single circuit feeding the strip. A 4-outlet power strip running a table saw, router, dust collector, and shop vac simultaneously is four tools sharing one circuit, one outlet, and one relatively thin cord that was never rated for that combined load. For workshop tools: dedicate one outlet per tool. Use the power strip for accessories only.
The 8-Point Audit Checklist (Print and Use)
| # | Check | Pass Criteria | Your Result |
|---|---|---|---|
| 1 | Main panel service rating | 150A or higher | ☐ Pass ☐ Fail |
| 2 | Available breaker slots | 4+ open slots or 2+ double-pole positions | ☐ Pass ☐ Fail |
| 3 | Outlet wiring test (3-light tester) | All outlets show correct wiring pattern | ☐ Pass ☐ Fail |
| 4 | GFCI protection on all outlets | Every outlet GFCI-protected | ☐ Pass ☐ Fail |
| 5 | Circuit amperage identification | At least one dedicated 20A circuit for garage | ☐ Pass ☐ Fail |
| 6 | Wire gauge verification | 12 AWG on 20A circuits; no mismatches | ☐ Pass ☐ Fail |
| 7 | 240V circuit availability | At least one 240V outlet present or planned | ☐ Pass ☐ Fail |
| 8 | Extension cord audit | 12 AWG cords for high-draw tools; no coiled use | ☐ Pass ☐ Fail |
The Bottom Line
Your garage’s electrical system is the invisible foundation of your entire workshop. Every tool you buy, every project you attempt, and every hour you spend in the space depends on circuits that were almost certainly designed for a car and a shop light — not a table saw, compressor, welder, and EV charger running in a real working garage.
The audit takes 20 minutes. The outlet tester costs $12. Most garages score between 4 and 6 out of 8 — meaning there are real gaps, but none that require a complete electrical overhaul. A single service call with a well-briefed electrician closes most of those gaps in an afternoon for $400–$900.
Do the audit before the tools arrive. Not after.
Affiliate Disclosure: Pro Garage Gear earns from qualifying Amazon purchases at no extra cost to you. Electrical code references reflect the 2020 NEC; local adoption and amendments vary. Always verify requirements with your local authority having jurisdiction (AHJ) before performing electrical work. Hire a licensed electrician for any circuit installation, modification, or panel work.