
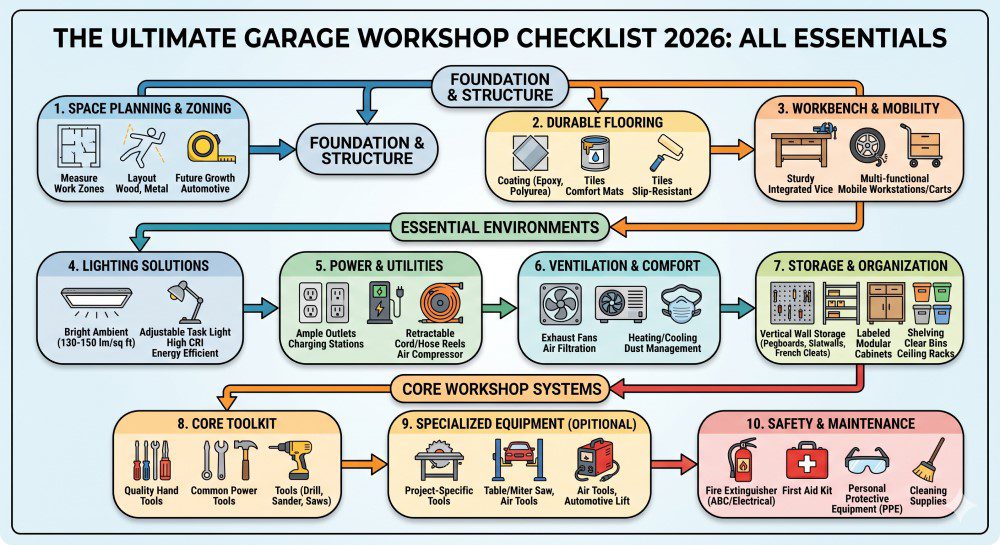
The Ultimate Garage Workshop Checklist 2026: 50 Essentials for the Serious DIYer (Organized by Priority)
This post contains affiliate links. We may earn a commission if you purchase through these links. We only recommend products we would use in our own garages
The “Half-Built Workshop” Problem: You’ve been working on your garage for two years. You have a great tool chest, a solid workbench, and decent lighting on the left side of the garage. But the right side is still a disaster of boxes you haven’t opened since the move. Your extension cord is coiled in the corner. There’s no dedicated outlet near your workbench. The floor is bare concrete that you keep meaning to coat. And every time you start a project, you spend 20 minutes looking for something before you can begin.
A workshop isn’t just tools. It’s a system — and a system requires planning, not accumulation. This checklist is the complete blueprint for turning your garage into a workshop that actually works: organized by priority, with specific recommendations and cross-references to every in-depth guide we’ve written.
Work through this list from top to bottom, and you’ll end with a space that professionals would be comfortable working in. This guide offers a valuable value of a complete garage workshop checklist.
🔥 Garage Heater BTU Calculator
Stop guessing. Enter your garage dimensions and insulation level — we’ll give you the precise BTU range you need and match you to the right heater type.
🏗️ The Workshop Triangle Rule: Plan Your Space Before You Build It
Before you buy a single item from this checklist, understand the principle that separates a functional workshop from an expensive storage room: The Workshop Triangle.
In kitchen design, the “Kitchen Work Triangle” connects the three most-used areas (sink, stove, refrigerator) to minimize steps. The same principle — minimizing unnecessary movement between your most-used zones — applies directly to garage workshop design. A poorly arranged workshop has you walking 20–30 feet per project. A well-arranged one has you turning 90–180 degrees.
The 3 Core Zones and How to Connect Them
Zone A — The Primary Work Surface (Workbench + Vise) Your most-used zone. You should be able to reach your most-frequently-used hand tools (drill, driver, measuring tape, pencil) without taking a step. Everything at or within arm’s reach of this bench is your “hot zone.” Keep only daily-use items here.
Zone B — The Power Tool Zone (Air Compressor, Grinder, Sander, Saw Stations) The zone you move to for specific operations. Should be within 3–5 steps of Zone A. The air compressor lives here — close enough to reach the hose easily from the bench. Circular saw and miter saw station, if applicable, also live here.
Zone C — The Storage Zone (Tool Chest, Shelving, Overhead Racks) The “retrieve and return” zone. You go here to get what you need, then return to Zone A or B to use it. This zone should line the walls behind you as you face the workbench — never requiring you to walk through your work area to reach storage.
The Optimal Layout by Garage Type
One-Car Garage (10×20 ft.):
[BACK WALL]
[ Zone C: Deep Shelving ][ Zone C: Tool Chest ]
[ Zone A: Workbench + Vise (full back wall, 8 ft.) ]
[ Zone B: Compressor ]   [ Open Floor — Work/Assembly ]
[GARAGE DOOR SIDE]
The workbench runs the full back wall. This is the most efficient layout for a one-car garage because it keeps the entire floor open for large project assembly.
Two-Car Garage (20×20 ft.):
[BACK WALL]
[ Zone C: Overhead Storage Above ]
[ Zone C: Shelving ][ Zone A: Workbench ][ Zone B: Power Tools ]
[ Open Center Floor — Assembly / Vehicle Work ]
[ Zone C: Tool Chest (wall side) ]
[GARAGE DOOR SIDE]
In a two-car garage, the L-shaped bench (back wall + one side wall) creates the most efficient Triangle. Zone B power tools occupy the corner at the intersection of the two bench runs.
Three-Car or Large Garage (700+ sq. ft.): Dedicated zones become possible: a dedicated finishing room area (painting, staining), a dedicated metal working area (grinder, welder), and a clean assembly zone separate from the dirty work area. Use ceiling-hung rubber curtains to visually and dust-separate zones.
The 5 Workflow Rules That Eliminate Frustration
Rule 1 — The Arm’s-Reach Rule: If you use it every single project — it lives within arm’s reach of the bench. Tape measure, pencils, drill/driver, safety glasses. Not in a drawer, not on a shelf 6 feet away.
Rule 2 — The Eye-Level Rule: Tools you use at least weekly go on the wall at eye level — visible and accessible without searching. Tools you use monthly go at waist level. Tools you use rarely go in drawers or overhead storage.
Rule 3 — The 3-Step Rule: Your power tool zone (Zone B) should require no more than 3 steps from your bench. If you have to walk around your car to reach your miter saw, the saw is in the wrong place.
Rule 4 — The “Dirty vs. Clean” Rule: Separate your dirty-work area (grinding, cutting, sanding, painting) from your assembly area. Sawdust on your fresh paintwork or metal filings in your bearing surface are consequences of mixing dirty and clean operations in the same zone. Even a 4-foot separation makes a meaningful difference.
Rule 5 — The Return Rule: Every tool has a home, and after every project, every tool returns to its home before the next project starts. This isn’t a cleanliness rule — it’s a productivity rule. A workshop where you always know where everything is allows you to start the next project immediately rather than spending 20 minutes hunting.
The Space Planning Tool: Before moving a single item of equipment, tape out your planned zone boundaries on the floor with colored painter’s tape (different colors for different zones). Live with the layout for one week of real projects. You will immediately discover conflicts you couldn’t see on paper — a drawer that opens into your stance, a power cord that crosses your work path, a shelf that blocks light from the window. Tape is free to move. Equipment is not.
PHASE 1: Infrastructure (Do This First — Everything Else Depends on It)
These are the irreversible decisions. Get these wrong and you’ll be pulling everything apart to fix them later. Get them right and they make every future upgrade easier.
☐ 1. Map Your Electrical Circuits
Your garage likely has one or two 15-amp or 20-amp circuits. Know which outlets are on which circuit before you start plugging in tools. Label your circuit breaker panel. Nothing kills a project faster — or trips a breaker more dangerously during operation — than an overloaded circuit you didn’t know was shared.
🔗 See our Garage Electrical Load Guide 2026 — covers breaker sizing, dedicated circuit installation, and GFCI requirements.
☐ 2. Add Dedicated Circuits (If Needed)
A table saw, air compressor, or welder pulling current from the same circuit as your garage door opener and lights is a recipe for nuisance tripping and motor damage. Most serious workshop tools require a dedicated 20-amp 120V circuit (or 240V for large compressors and welders). Have an electrician install what you need before you run conduit, install storage, or finish the walls.
☐ 3. Seal and Insulate Your Garage Door
Before you invest a dollar in climate control, close the largest gap in your garage. A properly sealed and insulated door can cut heating and cooling energy loss by 70% through the door alone.
🔗 See our Best Garage Door Seals & Weatherstripping guide and Best Garage Door Insulation Kits guide.
☐ 4. Install a Carbon Monoxide Detector
If you have an attached garage or ever run a vehicle, generator, or combustion heater in the garage — this is life-safety equipment, not optional. Install a dual-sensor CO + smoke detector near the interior access door. Test it quarterly.
🔗 See our Attached Garage Health Risks guide for the full threat profile.
☐ 5. Install a Fire Extinguisher
A Class ABC extinguisher (handles ordinary combustibles, flammable liquids, and electrical fires) mounted within arm’s reach of the exit door. 10 lbs. minimum. Check the pressure gauge quarterly.
☐ 6. Install GFCI Outlets
All garage outlets must be GFCI-protected per the National Electrical Code. If yours aren’t — replace them. This is a 20-minute task per outlet and prevents potentially fatal electrical shock when working with power tools near moisture.
PHASE 2: Climate & Air (Comfort = Productivity)
A garage you can’t work in comfortably is a garage you won’t work in. Climate is not a luxury addition — it’s a core workshop requirement.
☐ 7. Install Adequate Heating
Match your heater to your garage size (calculate BTUs needed: multiply garage square footage by ceiling height to get cubic footage, then multiply by 0.133 for a BTU estimate). Electric for attached garages (no combustion gases); propane for detached garages needing fast heat-up.
🔗 See our Best Garage Heaters 2026 guide.
☐ 8. Add Cooling or Ventilation (Summer)
One wall-mounted or ceiling fan at minimum. A portable AC or mini-split if your summer temperatures exceed 90°F regularly.
☐ 9. Control Humidity with a Dehumidifier
Every garage with tools that can rust needs this. Target 40–50% RH year-round.
🔗 See our Best Garage Dehumidifiers 2026.
☐ 10. Install an Air Filtration System
Sawdust, sanding particles, spray paint mist, and chemical fumes accumulate in a working garage. A ceiling-mount ambient air filtration unit (2-micron filter minimum) protects your lungs during every extended project.
🔗 See our Best Garage Air Filtration Systems.
☐ 11. Install Garage Door Weather Seals (All 4 Sides)
Bottom, threshold, sides, and top. This is Phase 1 prevention and Phase 2 efficiency combined.
PHASE 3: Lighting (You Can’t Build What You Can’t See)
Poor lighting causes mistakes, eyestrain, and missed safety hazards. A properly lit garage takes 2 hours and $150–$300 to achieve. There is no excuse for dim garage lighting.
☐ 12. Install High-CRI LED Shop Lights
High-lumen LED shop lights are the baseline. Target 5,000–8,000 lumens for a 2-car garage. More important than lumens: CRI (Color Rendering Index) above 90. High-CRI lighting lets you see true colors — critical for finishing, painting, and detail work.
🔗 See our Best Garage Lighting 2026 guide and Best Garage Lighting Ideas 2025.
☐ 13. Add Task Lighting at the Workbench
Overhead general lighting creates shadows directly over your hands at the bench. A dedicated under-cabinet or gooseneck LED task light eliminates this and dramatically improves fine work accuracy.
☐ 14. Add a Battery-Powered Work Light
For working under vehicles, inside cabinets, or anywhere your fixed lighting can’t reach. A quality magnetic-base LED work light (Milwaukee, DeWalt, or Streamlight) is worth every penny on the first use.
PHASE 4: Flooring (Protect What’s Under Your Feet)
☐ 15. Choose and Install Your Floor Solution
Options in priority order for most DIYers:
- Polyurea or polyaspartic floor coating — best long-term performance, professional installation
- DIY epoxy kit — good middle option if applied correctly on properly prepared concrete
- Interlocking rubber/PVC tiles — best for renters or those who want flexibility
- Rubber stall mats — best for gym/heavy lifting areas within the garage
🔗 See our Best Garage Flooring 2026 and Best Garage Floor Mats & Tiles.
☐ 16. Install an Anti-Fatigue Mat at Your Workbench
Standing on concrete for hours is genuinely harmful to your back, knees, and feet. An anti-fatigue rubber mat in your primary standing work zone is one of the highest-return ergonomic purchases in any workshop.
PHASE 5: Storage & Organization (A Place for Everything)
☐ 17. Install a Wall-Mount Tool Storage System
Slatwall or pegboard on your primary work wall puts tools visible and accessible. The key is mounting the right size system — don’t undersize it. A good wall tool system changes how you work daily.
🔗 See our Slatwall vs. Pegboard guide.
☐ 18. Buy a Quality Rolling Tool Chest
The right gauge steel, the right size for your tool inventory, ball-bearing slides throughout.
🔗 See our Best Garage Tool Chests 2026.
☐ 19. Install Shelving for Bins and Bulky Items
Heavy-duty steel shelving on the back or side wall handles bins, paints, hardware jars, and bulky items that don’t belong in a tool chest.
🔗 See our 15 Genius Garage Shelving Ideas.
☐ 20. Install Overhead Storage for Seasonal Items
Holiday bins, camping gear, and seasonal items belong overhead — not on the floor competing with your workspace.
🔗 See our Best Overhead Garage Storage Racks 2026.
☐ 21. Mount a Pegboard or Hook Panel for Long Items
Brooms, shovels, rakes, PVC pipe, and lumber benefit from vertical wall-mount storage on dedicated long-item hooks. These items are often left on the floor simply because there’s no designated storage spot.
🔗 See our Heavy Duty Garage Wall Mounts guide.
PHASE 6: Workbench & Primary Work Zone
☐ 22. Install a Quality Workbench
Solid enough to mount a vise. Adjustable height is ideal. Heavy-duty steel or hardwood top. Minimum 700 lb. rated.
🔗 See our Best Adjustable Garage Workbenches 2026.
☐ 23. Mount a Bench Vise
A cast iron bench vise (4″ jaw minimum) mounted to the corner of your workbench handles clamping, bending, holding, and assembly tasks that are nearly impossible without one.
☐ 24. Install a Retractable Extension Cord Reel Above the Bench
A ceiling-mount retractable cord reel provides power anywhere in the workspace without a cord on the floor.
🔗 See our Best Retractable Extension Cord Reels guide.
☐ 25. Mount a Power Strip with Surge Protection at the Bench
Dedicated outlets at bench level, with surge protection, for chargers, lamps, and bench-top tools.
PHASE 7: Core Tools
☐ 26. Cordless Drill + Impact Driver Combo
The foundation of every tool arsenal. Choose your platform and commit.
🔗 See our Best Cordless Tool Sets 2026.
☐ 27. Circular Saw (Cordless or Corded)
For lumber cutting. Cordless for portability; corded for sustained heavy cutting.
☐ 28. Reciprocating Saw
The most versatile demolition tool. Cuts wood, metal, plastic, and pipe with blade changes.
☐ 29. Jigsaw
Curved cuts, interior cutouts, fine detail work that a circular saw can’t do.
☐ 30. Oscillating Multi-Tool
The “scalpel” of the workshop. Grout removal, detail cutting, flush cuts, and sanding in corners.
☐ 31. Random Orbital Sander
For finishing wood before painting, staining, or coating. 5″ diameter pad, variable speed.
☐ 32. Air Compressor
Match to your most demanding tool (see CFM guide above). 15–20 gallon for most serious DIYers.
🔗 See our Best Garage Air Compressors 2026.
☐ 33. Shop Vac (Wet/Dry)
The most-used cleanup tool in any workshop. 5–10 gallon, with dust collection bags for fine particle work.
🔗 See our Best Shop Vacs of 2025.
☐ 34. Complete Hand Tool Set
Socket set (metric and SAE), combination wrench set, screwdriver set (including torx, Phillips, flathead), pliers set (standard, needle-nose, linesman, channel-lock), hammer, rubber mallet, pry bar set.
☐ 35. Measuring and Layout Tools
Tape measure (25 ft. minimum), combination square, framing square, 4 ft. level, chalk line, marking pencils and lumber crayons.
PHASE 8: Safety Equipment
☐ 36. Safety Glasses (Multiple Pairs)
One pair per person who works in the garage, stored where they’re used. Fogged or missing eye protection is as bad as none at all.
☐ 37. Hearing Protection
At 85 dB sustained exposure, hearing damage begins. Most power saws exceed 100 dB. Ear plugs (rated NRR 30) or ear muffs (rated NRR 25+) for any sustained power tool use.
☐ 38. Work Gloves (Multiple Types)
Cut-resistant gloves for sheet metal and glass; general mechanic gloves for tool use; chemical-resistant nitrile gloves for painting and cleaning.
☐ 39. Dust Masks and Respirators
N95 for general sawdust. Half-face respirator with P100 filters for sanding, spray painting, and chemical use. These are not interchangeable — know which you need for each task.
☐ 40. First Aid Kit
A dedicated, stocked first aid kit mounted in a visible, accessible location. Included: bandages, antiseptic, eye wash station, tweezers, tourniquet, and emergency contact card.
PHASE 9: Cleaning & Maintenance Tools
☐ 41. Pressure Washer
For vehicle cleaning, floor prep, and equipment maintenance.
🔗 See our Best Wall Mount Pressure Washer guide.
☐ 42. Garage-Specific Broom and Dustpan
A stiff-bristle garage broom (not a household broom) sweeps concrete effectively. Add a long-handled dustpan so you’re not bending to the floor.
☐ 43. Concrete Cleaner and Degreaser
For treating oil drips and spills before they set. A spray bottle of Purple Power or Krud Kutter at the workbench means you treat spills immediately rather than “later.”
🔗 See our How to Clean a Garage Floor guide.
☐ 44. Oil Drip Mat
Under any parked vehicle. Protects your floor investment from ongoing drips.
PHASE 10: The Smart Garage Upgrades
☐ 45. Smart Garage Door Controller
Retrofit your existing opener for phone control, close confirmation, and access logs.
🔗 See our Best Smart Garage Door Controllers guide.
☐ 46. Garage Parking Aid
A laser guide, bumper stop, or mirror system for parking precisely every time.
🔗 See our Best Garage Parking Aids guide.
☐ 47. Dehumidifier with Hygrometer
The complete humidity management system — a dehumidifier that maintains 40–50% RH automatically, monitored by a digital hygrometer that logs data over time.
☐ 48. Security Camera
A wide-angle 2K or 4K camera covering the garage door and interior access door. Motion alerts sent to your phone.
☐ 49. Bluetooth Speaker / Workshop Sound System
Often overlooked, consistently undervalued. A quality sound system in a garage workshop changes the experience of working there. You stay longer, work more carefully, and enjoy the process. Mount a Bluetooth speaker high on the wall out of the dust zone.
☐ 50. Labeled Organization System
The final and most underrated item on this list. Every bin, shelf, cabinet, and drawer in your garage should be labeled. A label maker ($20–$40) and one afternoon of labeling transforms a workspace from a “I think I put it over there somewhere” system into a “I know exactly where everything is” system.
The gap between a cluttered garage and a professional workshop isn’t money — it’s organization. Labels are the last step that makes everything else work.
Your Build Roadmap: Phase by Phase Timeline
| Phase | Priority | Estimated Cost | Time Investment |
|---|---|---|---|
| Infrastructure | Immediate | $100–$500 (+ electrician if needed) | 1 weekend |
| Climate & Air | Within 30 days | $200–$1,000 | 1–2 weekends |
| Lighting | Within 30 days | $100–$300 | 1 day |
| Flooring | Within 60 days | $200–$1,000 | 1–2 weekends |
| Storage | Within 90 days | $300–$1,500 | 2–3 weekends |
| Tools | Ongoing | $500–$3,000 | — |
| Safety | Immediate | $100–$200 | 1 day |
| Smart Upgrades | Ongoing | $200–$600 | — |
How much does it cost to build a complete garage workshop?
A functional workshop with quality tools, proper storage, and climate control runs $3,000–$8,000 built over 12–18 months. A basic functional setup (phase 1–4 on this list) can be achieved for $1,000–$2,500.
What should I build first in a new garage?
Electrical infrastructure and lighting — in that order. Everything else is limited by these two decisions. Poor electrical means you can’t run the tools you need. Poor lighting means every project is harder than it needs to be.
Should I insulate my garage before buying tools?
Yes, if climate is a concern in your region. Insulation and sealing are Phase 1 decisions that affect the performance of every tool, coating, adhesive, and storage system you install afterward.
Is a garage workshop a good investment for home resale?
A well-organized, finished garage workshop consistently adds perceived value to a home showing. Buyers in suburban markets frequently cite garage quality as a significant factor in purchase decisions. A clean, organized, well-lit workshop is a competitive advantage in most real estate markets.
The Bottom Line
A world-class garage workshop is built in phases, not in a single weekend. Work through this checklist systematically. Infrastructure first. Climate and lighting before tools. Storage before you accumulate more gear. Safety always.
The difference between a garage that frustrates you and one that inspires your best work comes down to intentional decisions made in the right order. Every item on this list exists for a reason — and together, they create a workspace that any serious DIYer would be proud of.
Start with one checkbox. Then the next. Your garage is waiting.
.